
Photographed and written by
John M. Young
I did a search earlier asking. “How much should I spend on a tobacco pipe?” The result surprised me:
“The average pipe smoker will spend $50 on their first pipe and $200 on their last. You can get a great starter pipe for under $50, and you’ll have it for life. I’m going to assume that you are new to the hobby of smoking pipes and would like to know about the cost involved.” (https://medium.com/@dh651541/how-much-does-a-tobacco-pipe-cost-637c32d32378)
Heck, I’ll set you up with a nice restored pipe for $50. Take a look at the previous restorations, most are still here and have not been smoked once restored. Feel free to email me scimansays1787@gmail.com. “What’s the point of that shameless self promotion?”, you ask. The answer is, today’s restoration of a Cavalier Bent Bulldog. This lovely pipe was certainly not made to be some great investment or someone’s “last pipe”. It was made to be smoked by a pipe smoker for a reasonable chunk of change. The vast majority of pipes made are from factories producing thousands of pipes per year. These old workhorse pipes shouldn’t be considered inferior junk as they were made to be used. Kind of like Craftsman tools. Sure they are not of the same quality as Snap-On but the average Joe probably doesn’t need nor has the money to buy professional grade quality tools. My Craftsman socket set that I received as a graduation gift from high school (1984, if you are wondering) was used to change the oil in the truck this morning. These tools will get the job at hand finished and will likely last for years with proper care.
The Cavalier came part of an estate lot back around the first of the year 2025. The lot was from Eschweiler, Germany and consisted of 13 pipes which I hoped had pipes that were a bit more uncommon here in the United States. The Cavalier had been languishing in the queue and had gotten cut in front of on several occasions. The stampings on the left shank are “CAVALIER” with an oddly placed close quote over GENUINE BRIAR. Below are some photographs of the pipe prior to any work done.


Hmm, I wonder if I paid the duty on that bit of tobacco remaining in the bowl? The Germans can be sticklers for rules, I hear. This pipe did not look like it required a great deal of work. A thorough cleaning, certainly and a good polishing of the stem.
Background
Searches for CAVALIER on both pipephi.eu and pipedia.org proved to be unsuccessful. This obviously is not a Dunhill product nor is a cavalier shaped pipe, which is what those sources respectively referred to. Typically pipes stamped with GENUINE BRIAR were from post World War II. The lack of a country of manufacture (COM) would also typically indicate a US made pipe. I realize these are both very subjective descriptions especially considering that the pipe was purchased from Germany. The only thing that struck me as odd was the aluminum tenon. I Have seen tenons like this before on French made pipes and in all cases they were fitted into cork lined mortises. Below is an example of a restoration I did of a similar looking mortise and tenon:

(https://scimansays1787.com/2024/11/26/a-country-panel-bent-rhodesian-restoration/)
The tenon of the Cavalier is a very nice fit into the briar not cork.
With nothing to go on All I can say without conjecture is that this is a pipe made from genuine briar. I am not even sure what the stem material is made of. In the restoration it did not produce the typical brown debris of sanded vulcanite. The sanding produced a very black dust. The stem material feels harder than vulcanite between the teeth but sands as if it is much softer than vulcanite. Weird, I know. The stem is also apparently drilled to accommodate a 3 mm filter. This too is more indicative of pipes made for the European market.
The Restoration
After the photo shoot the Cavalier made its way to the workbench and a laundered denim piece. I removed the used filter from the stem and wondered about the effectiveness of such a filter.

The ream team was collected and prepped for use.

Well, barely put to use. This Cavalier didn’t seem to have been smoked too much or the previous owner had kept the cake to a minimum perhaps by leaving tobacco in the bowl unsmoked?

The reamed bowl looked pretty good some sanding would still be required.

The shank cleaning went well. The tars and smoking residues were softened with 95% ethyl alcohol. These were then scraped using a dental scraper. Between scrapings I used cotton swabs and/or a nylon shank brush to scrub the airway.

The tobacco chamber was sanded with 320 sand paper wrapped around a wood dowel. The chamber was sanded to bare briar and showed no signs of any damage from heat or charring.

As clean as the tobacco chamber had looked the rim told a slightly different story. The lava deposits were quite thick indicating that the pipe had been smoked more than the chamber cake may have implied.

I softened the lava with saliva and began scraping with a sharp pocket knife.

The rim cleaned up nicely with the scraping.

I took the stummel to the sink for a scrub with undiluted Murphy Oil Soap and a nylon brush. The rustications of the carvings had trapped an impressive amount of dirt and grime.

After the nylon brush I repeated the scrubbing with more Murphy’s and a brass brush. The soap was rinsed with warm water and the stummel dried with a cotton hand towel.

Back at the workbench the stummel looked better in some ways and worse in others. It was clean but now I could clearly see the dreaded clear coat and the light spots that were areas where fill or putty had been applied to fills, pits or flaws in the briar.

Quite a few light spots indicating that these carvings were an elaborate flaw concealment.

To address the dreaded clear coat I decided to give the stummel a bath in acetone for about one half hour.

I started working on the stem while the stummel was in the acetone. I had difficulty passing a pipe cleaner through the slot. The slot was constricted with smoking residue, was my first thought.

I used bristle pipe cleaners dipped in 95% ethyl alcohol and a slot tool from Vermont Freehand.
Cleaning the stem went better from the tenon end and was done with bristle pipe cleaners dipped in alcohol. The stem material did not seem adversely affected by alcohol like a phenolic aldehyde (Bakelite).

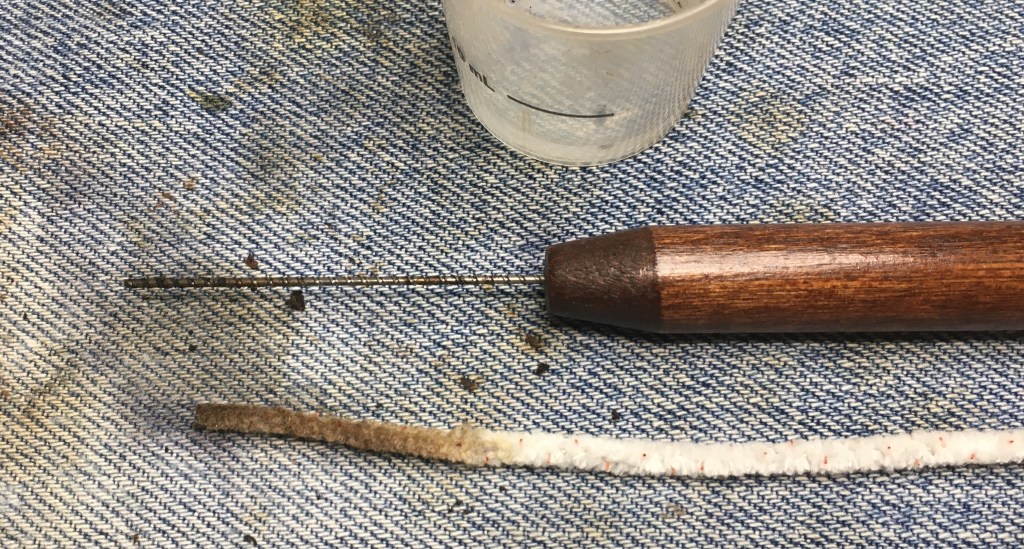
The slot was poorly cut at a slight angle and slightly off center. To fix this I decided to expand the slot with a Dremel rotary tool and the below bit.

The below photo shows a closeup of the slot before being expanded.

After the slot was expanded the slot was made longer and straightened. The interior would need to be shaped more into a Y with a small diamond file.

The Y was cut with a file, slot tool and smoothed with sandpaper.

The stummel was then removed from the acetone and wiped with a paper towel.

The clear coat was thicker or tougher than I thought. The finish now took on a “crinkle” look as the acetone evaporated.

Rather than just letting it soak for another half hour I started scrubbing the stummel with a nylon brush dipped in acetone. I put a nitrile glove on my hand for holding the stummel.

The acetone scrub worked to remove the clear coat. I probably should have done another half hour acetone soak but impatience got the better of me. In the photos below you can still see the remaining clearcoat in the deeper rustications. My other fear was that extended time in the acetone would dissolve the old fill material. I made the mistake of picking one fill from the front of the stummel. Below it was the topmost horizontal fill. After I picked the material out I realized that there would be very little chance that I could match the old rustication/carving pattern thus creating a bunch of new fill that stood out in unattractive fashion.

The old fills now stood out even more as light spots all over the stummel. I would have to ponder on how to repair these.

Another photo of the light spots.

I turned my attention to the stem for some “pondering” time and a nice repetitive sanding. I masked the shank with painters tape to keep the briar from being sanded. The stem material, as previously mentioned, did not behave like traditional vulcanite. It was not oxidized like vulcanite and the sanding produced a very black dust. Apparently my pondering got in the way of my documentation of the sanding with me failing to photograph the entire process. Apologies. The stem was sanded with a sequence of sanding sponges from 320-3500 grit. Between sponges the stem was rubbed with mineral oil and wiped with a paper towel. The stem material did take nicely to the mineral oil.

After the sanding sponges I buffed the stem rather than using a sequence of micro-mesh pads. The stem material buffed well and took on a lovely glossy black finish.

I wanted to get a better look at how the briar would look when finished so I could envision a remedy to the light spots so I decided to apply Before and After Restoration Balm. The balm was applied by finger and brushed into the carvings using a baby toothbrush.

20 minutes of pondering time later, the excess Restoration Balm was removed with a vigorous hand buffing with an inside out athletic sock.

The solution that I came up with would be a three step process. Step 1 would be restaining the light spots with a Furniture touch-up marker. Mahogany best matched the color.

Step 2 – after the re-staining, the old fills would have brown cyanoacrylate applied. This would soak into the old fill material and strengthen the old fill (so my pondering concluded).

Step 3 – Give the stummel a coat of Danish Oil thus encasing the newly restrained and hardened fills with another layer of protection and blending the residual clearcoat in the rustications with the new finish. The Danish oil was applied with a folded pipe cleaner.

Another pipe cleaner was inserted into the button and acted as a hanger allowing the oil to dry.

I left the pipe to dry overnight. The next day I applied Renaissance Micro-Crystalline Wax to the stummel with a toothbrush and hand buffed it with a soft cloth. This product was chosen over carnauba wax as it would not cake up the rustications and lead to future accumulation of general ickiness.

The stem was given several coats of carnauba wax with the buffer as was the flat stamped surface. The final step was to hand buff the pipe with a microfiber polishing cloth.
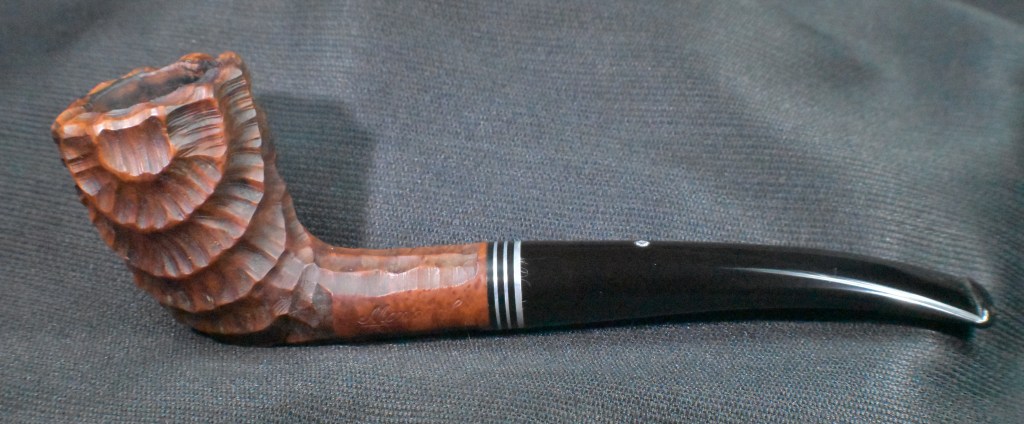
This attractive little bulldog turned out very nicely. Given there wasn’t a tremendous amount of work that it needed. The cleaning of the internals, the strengthening of the fills and the slight adjustments to the button certainly improved the pipe. The carvings have a great deal of character and provide for a nice feel in the hand. The stem polished up beautifully even though I do not really know what the material is. Overall this is just a very nice little pipe that will provide years of enjoyment to the next owner. The dimensions of the Cavalier Bent Bulldog are:
Length: 4.70 in./ 119.38 mm.
Weight: 1.04 oz./ 29.48 g.
Bowl Height: 1.44 in./ 36.58 mm.
Chamber Depth: 0.95 in./ 24.13 mm.
Chamber Diameter: 0.69 in./ 17.53 mm.
Outside Diameter: 1.46 in./ 37.08 mm.
I do hope that you have found something here useful to your own pipe care, maintenance or restorations. If you like this sort of thing, please click the like and subscribe buttons. Thank you for reading the ramblings of an old pipe lover.
Below are some photos of the finished Cavalier Bent Bulldog.


 (
(


 The pipes upon arrival were even more interesting than the photo indicated. This will be the second pipe of the lot that I’ve worked on. The first was the


 (
(


 I had filed until I got to 4.6 mm and thought that felt very nice for my bite. Next, I sanded to remove the evidence of my filing. I began with 320 sanding sponge.


