Skip to content
    • About

NebraskaPeteGeek

  • American Pipe Makers
  • British pipe Makers
  • Danish pipe Makers
  • French Pipe Makers
  • German Pipe Makers
  • Irish Pipe Makers
  • Italian Pipe Makers
  • Others or Unknown Pipe Makers
  • Restorations
  • A Custom-Bilt Circle Stamped Restoration

    January 2nd, 2025

    Photographed and written by

    John M. Young

    The story and mystique of Custom-Bilt or Custombilt pipes and their inventor, Tracy Mincer, are things of pipe legend.  I have to admit to having only restored one Custombilt pipe and it was a pipe actually made after the death of Tracy Mincer in 1964.  My only Custombilt was a Wally Frank ere pipe probably made in the 1970s (that restoration can be found here:  https://wordpress.com/post/scimansays1787.com/3262).  Although, I also did restore a Doodler.  Declaring that pipe an actual Tracy Mincer piece would be fraught with uncertainty (https://wordpress.com/post/scimansays1787.com/369)  This pipe was older and wore the following stamps  Custom-Bilt on the left shank, IMPORTED BRIAR on the bottom and a circle on the lower right shank.  Below are some photographs taken prior to working on the pipe.

    As you can see it was a rusticated pipe typical of Mincer Custom-Bilts.  The size was smaller, what I would call medium sized.  The most glaring issue was the chipped mouthpiece which would require some creative repairs.  The tobacco chamber had a significant cake build-up indicative of a well used pipe.  This was also evident in the lava flowing onto the rim.  There was also the expected dirt and grime ground into the rustications. This was going to be fun.

    Background

    The standard starting point for researching a pipe typically includes pipedia.org.  The query of Tracy Mincer, originator of Custom-Bilt, will take you to this brief entry:

    “Tracy Mincer started the original Custom-Bilt pipe company in 1934. In 1946, the name was changed to Custombilt after Mincer began an association with Eugene J. Rich, Inc. There were some big changes in advertising and distribution. The slogan “AS INDIVIDUAL AS A THUMBPRINT” began at this time as well.

    In the early 1950’s, Tracy Mincer developed severe financial problems that caused him to stop making the Custombilt, and he lost the name. n 1952, Mincer began a new pipe, The Doodler, that due to the holes in the bowl had to made primarily in a billiard type shape in three sizes. In the early 1950s, National Briar was turning the bowls for Mincer. Based upon the documentation, it appears that Mincer made the pipe until the mid 1960s, when National Briar Pipe Co., Inc. began making and selling the Doodler.

    Mincer died in 1964. Based upon the information provided, Mincer seemed to always have money, production, distribution and other problems. Mincer was probably a terrific craftsman but a very poor businessman and administrator. To me, Mincer sounds like your typical small business entrepreneur who always knew what was right and if you disagreed¼problems. Mincer always seemed to be on the brink of going out of business, not meeting payroll and so on.

    Claude Stuart purchased the Tracy Mincer Pipe Company and began making pipes using the Tracy Mincer stamp. Stuart finished nearly all the pipes produced, mostly carved and textured bowls and the occasional straight grain. Claude made the Tracy Mincer Pipe Company a moderate success. Stuart became ill and in 1990 The Tracey Mincer Pipe Company went out of business. Currently, Jim Tedesco owns the Tracy Mincer name.

    These interesting examples bellow are pipes made with the Tracy Mincer stamp. If you any additional information about these pipes, or can otherwise add to the history of this interesting pipe man, please add it here, or send it to sethile.pipes@gmail.com, and we can add it for you.” (Mincer – Pipedia).  

    There is a book written by William E. Unger, Jr.,Ph.D titled “As Individual As A Thumbprint”: The Custom-Bilt Pipe Story.  This book appears to be self published by Dr. Unger at The Graphic Touch, of Columbus, Ohio.  Printed in 2001 and bound with a black plastic spiral, the book states that the entire contents are “All rights reserved…without permission in writing from the author”.  Dr. Unger passed away January 1, 2013 (obituary:  https://www.legacy.com/us/obituaries/dispatch/name/william-unger-obituary?id=12197453) and the book is no longer in print.  This unfortunately means that I will not be including any quotes from the book.  We’ll see how I get around that, I guess.   I got lucky and purchased a copy from eBay for under $30 (with shipping) earlier this year, after watching several copies sell for what I considered astronomical prices.  The book is a remarkable piece of work and is the definitive history of the Custom-Bilt pipe.  The research that Dr. Unger put into getting the story correct is amazing.  Fortunately there were several past employees, friends and relatives associated with Tracy Miller and the company that were able to give interviews and explanations to the inner workings of the company.

    In regards to the stamps on the pipe in hand, I will speak to what I have found in Unger’s book, without quoting any of it.  The first thing that needs clarification is the Custom-Bilt vs. Custombilt name.  I’ll paraphrase William Unger here, the first stamps used by Tracy Mincer were “Custom-Bilt”.  These were used from 1938-1946 definitively and less definitively prior to 1938.  You could, perhaps, find reference to this in the book on page 91.  There, I think that should give me legitimacy and keep any lawyers at bay.  Next we examine the IMPORTED BRIAR stamp on the bottom of the pipe.  Unger states that he has inspected a large number of Custom-bilt pipes and that about ½ of them do not have this stamp.  He declares that he is at a loss to explain either their absence or presence  This lack of explanation might be seen towards the bottom of page 114.  The final stamp on this Custom-Bilt is the geometric circle stamped on the shank.  Certainly these stamps have some utilitarian meaning.  Nope.  Unger declares that he is not able to explain any system where shapes such as circles, triangles, stars, rectangles, half moons or even trapezoids have any systematic meaning.  This may or may not be seen on the top of page 114. 

    Pipephil.eu does allow quotations with proper referencing and shows nice examples of the above-mentioned geometric stamps.

    (Cos-Cz — Pipes : Logos & Markings)

    The Restoration

    The photos don’t show it very well but I didn’t feel too bad about the stains on the denim in comparison to the dirtiness of this pipe.

    The first step was to gather the remaining tools:  The PipNet, Smokingpipes Low Country Reamer, General triangular scraper and 320 sandpaper wrapped wood dowel. 

    The #2 and #3 blades of the PipNet did their work beautifully with little need for the other scrapers.  

    The tobacco chamber was sanded to bare briar and showed no signs of any damage.

    The shank was cleaned out by running the Kleen-Reem drill through the airway.  The drill had to be cleaned out several times as the tars from the airway filled the grooves.  95% ethyl alcohol was used with the nylon shank brush, bristle pipe cleaners and cotton swabs to clean out the yuck.

    The stummel was taken to the sink for a scrub with undiluted Murphy Oil Soap and a nylon scrub brush.  The soap was rinsed with warm water and the stummel dried with a cotton hand towel.  

    There remained some ground in dirt and grime in the rustications and the rim did not clean-up as well as I like so a second scrubbing with the Murphy’s was done.  This time with a brass brush.  That worked a bit more aggressively to remove the external yuck.

    Again, the stummel was rinsed with warm water and dried.

    Back at the workbench the stummel was wiped with a makeup pad dipped in 95% ethyl alcohol.  The wiping removed a bit more of the accumulated grime but the briar looked much better.

    The stem was quite dirty and required a good number of bristle pipe cleaners dipped in 95% ethyl alcohol to clean out the airway.

    The stummel was given a coating of Before and After Restoration Balm and allowed to sit for over an hour.

    After the break I returned to the stummel and wiped the remaining balm from it with an inside out athletic sock.

    Also during the break I came up with a plan for repairing the chipped section of the button.  I planned on using the Dremel tool and the bit I use for cutting a new slot in a mouthpiece.  The below photo shows the bit.

    The next photo is the bit in reference to a piece of 2 mm brass rod.

    The goal was to use the Dremel to cut a channel for the brass rod to fit into spanning the missing section.  Below you can see the brass rod cut to fit into these grooves.  The piece of green plastic is a piece of a lid that I cut to act as a dam, preventing glue from seeping into the airway. 

    I used cyanoacrylate (CA, super glue) to fix the brass rod into position.

    To make sure the brass rod did not emerge through the new button material I ground the brass down using the same Demel bit.  The photo below shows the tapered brass after grinding.

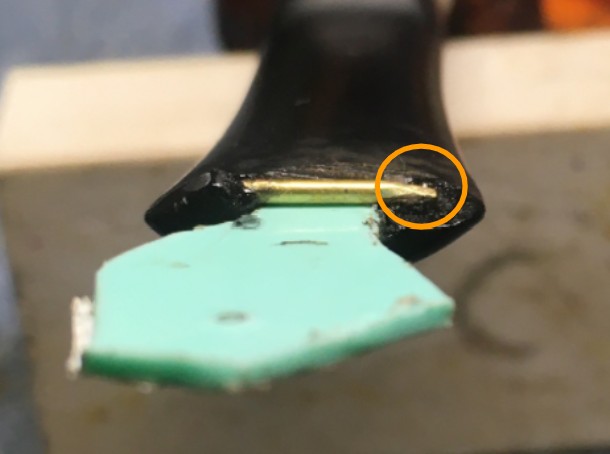
    With the brass rod in place and held at its opposite ends with CA, I planned on building up the missing material with black two part epoxy.  To prevent the epoxy from adhering to the dam, I coated it with petroleum jelly and reinserted it into the airway.

    The epoxy was mixed on a piece of plastic.  I accidentally got more of one part than I intended, thus the usable part of the mix in the half below the fly tying bodkin in the below photo.

    The epoxy was applied to the stem thickly enough as to rebuild the missing button.

    The shank of the pipe was wrapped in masking tape to protect it from any sanding of the stem.  Since the area to be replaced was the underside or bottom of the button, I let gravity pull the curing epoxy earthward.  This allowed the “drip” to thicken the button where I wanted more material.

    After 2 hours I removed the dam.  The button looked rough but the epoxy had provided enough material to be reshaped into a new button.

    After curing for about 2 hours the epoxy had assumed its shape and was no longer flowing.  It did remain soft though.  Soft enough for me to cut a nice straight edge with an Exacto knife.

    The epoxy was allowed to cure for an additional 4 hours.  After this time it was hard enough to allow me to file and sand the button to an appropriate shape.

    The below photo shows the slight color difference of the black epoxy prior to it being finish sanded, micro-meshed and polished.

    The stem was sanded with a series of sanding sponges from 400-3500 grit.  Between each sponge I rubbed the stem with mineral oil and wiped it with a paper towel.

    The stem was then worked with micro-mesh pads 4000-12000.  Between each pad the stem was rubbed with Obsidian Oil and wiped with a dry paper towel.

    With a surface as rusticated as this I opted to apply Renaissance Micro-Crystalline Wax instead of carnauba.  The wax was applied with a baby toothbrush and allowed to dry for a few minutes.  I then took it to the buffer and buffed it with a clean flannel wheel.  

    The stem received several coats of carnauba wax from the buffer.  The entire pipe was then hand buffed with a microfiber polishing cloth.

    Overall, this circle stamped Custom-Bilt turned out beautifully.  I have a new appreciation for Tracy Mincer’s work.  The pipe is smaller than I expected a Custom-Bilt to be but it has thatTracy Mincer look with its deep rustications and hefty wall thickness.  It is lightweight and feels great in hand.  I am happy with the stem rebuilding but not with the quality of the vulcanite.  There seem to be tiny inclusions in the rubber.  These are readily available under very bright light yet not noticeable with normal room light.  I think they are due to the recycling of tires for rubber during the war years of World War Two.  I can certainly understand why the pipes have attracted a following, even 80 years after they were made and 60 years after Tracy Mincer’s passing.

    The dimensions of the Custom-Bilt are:     

    • Length:  4.89 in./ 124.21 mm.
    • Weight:  1.28 oz./ 36.29 g.
    • Bowl Height:  1.70 in./  43.18 mm.
    • Chamber Depth:  1.36  in./ 34.54 mm.
    • Chamber Diameter:  0.79 in./ 20.07 mm.
    • Outside Diameter:  1.49 in./ 37.85 mm.

    I do hope that you have found something here useful to your own pipe care, maintenance or restorations.  If you like this sort of thing, please click the like and subscribe buttons.  Thank you for reading the ramblings of an old pipe lover.

    Loading…

    Below are some photos of the completed Custom-Bilt Circle Stamped pipe.

  • An Orlik Captain B9 Restoration

    December 31st, 2024

    Photographed and written by

    John M. Young

    Orlik pipes have never really been an acquisition nor restoration target of mine.  I’m not sure if that is due to the intimidating wig wearing judge on their advertisements or the fact that they don’t show up in estate lots as commonly.  I’m going to go with the intimidating judge and my disregard for authority figures.  Yeah right, you know it’s because they were a higher quality pipe that didn’t show up in the cheapo estate lots.  This wonderfully shaped bent, what I’d call an apple, is robust yet graceful.  It wasn’t the target of the lot but it did grab my attention and move forward in the queue solely based on its good looks.  The pipe is stamped ORLIK CAPITAN ofer MADE IN ENGLAND on the left with the only stamp on the right being a B9.  I assumed this to be a shape number.  Below are some photos of the Orlik Captain before work started.

    The most obvious issue was the amount of oxidation on the stem.  The rest of the pipe looked to be in great shape.

    Background

    Being generally unfamiliar with Orlik pipes is a curable affliction.  I have only restored a couple of Orliks and this one shares little in common with the others.  I turned first to pipedia.org.  The entry had a very brief history of the brand which I include here,

    “In 1899, a pipe manufacturer was founded in London, Bond Street, by Louis Orlik. L. Orlik Ltd. started to produce high quality pipes for a relatively low price but high service and soon became quite popular. By 1907 they used the name L & A Orlik, which apparently added Louis’s brother, Alfred to the company name. In the first quarter of 1900 they also established in Birmingham. This can be verified by silver hallmarks. In 1980 the company was acquired by Cadogan. Like many of London’s other pipe manufacturers they moved to a new built factory in Southend-on-Sea. As all current brands in the Cadogan group, Orlik was being produced in those factories.

    Orlik used the slogan “Smoked by all shrewd judges” “(who are also loved by his hard judge)” with a portrait of a judge wearing a wig. The picture is still used in Denmark for manufacturing of Orlik cigarettes.”   (Orlik – Pipedia)

    Here, I also found a link to an old catalog, date undetermined, with a shape 9 matching the stamp on the pipe in hand.

    (Orlik – Pipedia)

    (Orlik – Pipedia).  Next I wanted to know what the B of the B9 Large Chubby Bent could stand for.  There was a section which states the following:

    Models & Grades: Pre-Cadogan era

    • Virgin (Series Letter:Without letters)
    • Old Bond Street (Series Letter:A)
    • Old Bond Street Sandblast (Series Letter:AX)
    • Supreme (Series Letter:T)
    • Supreme Sandblast (Series Letter:TX)
    • Meerschaum Lined(Series Letter:M)
    • Corona (Series Letter:C)
    • Old Root (Series Letter:R)
    • De Luxe (Series Letter:L)
    • De Luxe Sandblast (Series Letter:LX)
    • Double Bore (Series Letter:W)
    • Prince Regent (Series Letter:P)
    • Major Black (Series Letter:MB)
    • Captain Black (Series Letter:B)
    • Captain Black Sandblast (Series Letter:BX)
    • Clubman (Series Letter:6793)
    • Clubman Sandblast (Series Letter:6793X)
    • Black Prince (Series Letter:6791)
    • Black Sandblast (Series Letter:6791X)
    • 3/4 oz De-Luxe (Series Letter:1990)
    • 3/4 oz (Series Letter:1986)
    • 3/4 oz Sandblast (Series Letter:1986X)

    (Orlik – Pipedia the bold and blue was added by me).  The only problem with this discovery was that it refers to Captain Black and the pipe is only stamped with CAPTAIN.  I did give some insight to the B.  It also indicated a pipe that was made prior to the 1980 purchase by Cadogan.

    I went to pipephil.eu seeking clarification of the CAPTAIN vs. Captain Black.  Iere I was rewarded with greater confusion.  The fonts from the below screenshot all look like the Orlik in hand.  The stem of this pipe does not have the iconic brass circle though.  Perhaps it is indeed a replacement stem.

    (Op-Oz — Pipes: Logos & Markings)

    The Captain Black stampings look vastly different than the block sans serif font stamped on this pipe.  

    (Can-Car — Pipes : Logos & Markings).  The script like stamps from the photos are more a match for the Captain Black font used by the tobacco maker.

    (https://www.smokingpipes.com/pipe-tobacco/CaptainBlack/original-1.5oz/product_id/105169)

    I returned to the pipedia.org entry to look for clarification.  Michael Lankton authored an entry titled DATING ORLIK PIPES (Talk:Orlik – Pipedia).  In this piece he discusses the pre-Cardogan, desirable, and the Cadogan “These are not the pipes you’re looking for, move along.” (Talk:Orlik – Pipedia).  He states that the pre-Cadogan pipes are stamped as follows, 

    “The Orlik series proper will be stamped in all caps in a sans serif font on the port side of the shank one of two ways

    ORLIK SERIES_NAME

    MADE IN ENGLAND

    or

    ORLIK SERIES_NAME

    LONDON MADE”  (Talk:Orlik – Pipedia)

    He goes on to state:

    “The following series are probably of little interest to Orlik collectors but I am including them for the sake of completion. In any event, if you picked up one of these pipes it would probably share the superior smoking qualities of their better lines, with obvious trade offs in the interest of producing a lower priced pipe.

    We pick up where we left off above, again in descending order of quality with the series code in parentheses:

    • Prince Regent(P)
    • Major Black(MB)
    • Captain Black(B)(BX)
    • Clubman(6793)(6793X)
    • Black Prince(6791)(6791X)
    • 3/4 oz De-Luxe(1990)

    3/4 oz(1986)(1986X)” (Talk:Orlik – Pipedia).

    So, what do I make of all this?  Well, I think this is an Orlik pipe made in England.  Thank you Captain Obvious.  Seriously, the stamps are indicative of a pre-Cadogan pipe but there is no mention of a CAPTAIN line without the “Black”.  The pipe does have the “B” from the Captain Black line.  Together this leaves me confused.  The good news is that I can carry out a restoration while in a state of confusion.  Perhaps a reader can add an explanation in the comments.

    The restoration

    The Captain settled onto the workbench with a clean denim piece.

    I began with reaming or, I should say with gathering the reaming tools.  The PipNet, Smoking pipes Low Country rReamer, General triangular scraper (with the tip ground round) and a wood dowel wrapped with 320 sandpaper.

    The tobacco chamber had a light layer of cake and a little lava flowing onto the rim.

    The PipNet made short work of the cake. With the other scrapers playing clean-up.

    The interior of the chamber showed no signs of damage after being sanded.  The rim on the other hand needed some light scraping.

    Another photo of the chamber with more light.

    The rim scraping was done with a sharp pocket knife and a bit of saliva.

    The stummel was taken to the sink for a scrub with undiluted Murphy Oil Soap and a nylon scrub brush.

    The soap was rinsed with warm water and the stummel dried with a cotton hand towel.  Back at the workbench the stummel showed no signs of clear coat.

    A quick wipe with 95% ethyl alcohol removed no stain indicating that this was a virgin finished pipe.  The stain on the make-up pad was mainly from smoking residue around the mortise.

    The stem was rubbed with 0000 steel wool to remove the outer hardened oxidation.  A pipe cleaner was inserted into the stem to act as a hanger for the stem’s bath in Before and After Extra Strength Deoxidizer.

    The stem went into the deoxidizer where it remained overnight.

    The stummel had a few small dents.  These were too deep to be removed by sanding without altering the shape of the pipe.  I tried raising the dents with a hot iron and wet cloth.

    The below 2 photos are pathetic attempts to show what I was seeing.  There was an area that looked like it was from a drop onto concrete and two scratches.

    Using your imagination and pretending that my photography is adequate is appreciated.  The steaming did help raise the dents.

    The next day the stem was removed from the deoxidizer and allowed to drip excess solution back into the jar for a few minutes.

    I used a coarse shop rag to absorb the remaining solution and rub away some of the loosened oxidation.

    Below you can see the oxidized rubber that was removed.

    Back at the workbench the pipe was starting to look better but brown was very evident.

    I used several make-up pads drizzled with Soft Scrub cleanser to remove more of the oxidized vulcanite.  The shank was taped with masking tape for protection while the stummel gave me a handle for easier holding.

    I then covered the stamps with painters tape for thor protection during sanding.  The pipe was sanded with a series of sanding sponges.  Between each sponge I wiped the stummel with an alcohol wetted make-up pad to remove sanding debris.  The stem was rubbed with mineral oil and wiped with a dry paper towel.

    Micro-meshing followed the sanding.  The 4000-12000 micro-mesh pads were used with stummel and stem wiping as above except the stem received Obsidian Oil in place of mineral oil between each pad.

    The pipe was then given a coating of Before and After Restoration Balm.  This was allowed to sit for 20 minutes.

    20 minutes later the balm was wiped from the pipe using an inside out athletic sock.

    BAH!  The stem still was showing brown under bright light.  That oxidation had penetrated deeply into the vulcanite.

    The solution?  More time in deox was all I could think.  I won’t bore you with the details of this second application of the previous protocols of deox, coarse rag wiping, Soft Scrubbing, micro-meshing and a trip to the buffer.  I will show you the resulting stem top and bottom photos:

    The pipe was taken to the buffer where it received several coats of carnauba wax.  The final step was a hand buffing with a microfiber polishing cloth.

    The Orlik Captain B9 is a true beauty.  I decline to call it by the official Orlik name, “Large Chubby Bent”  as I think that just sounds mean.  I was finally happy with how the rim repair went.  The oxalic acid treatment allowed me to remove nearly all signs of the charring without severely changing the shape of this wonderful old pipe.  The briar grain of a Peterson De Luxe is on full display with this pipe.  Beautiful bird’s eyes on both sides and lovely cross grain on the front and back.  Though the cross grain is not quite centered it remains attractive.  The stem was not severely oxidized leading me to believe this pipe was stored in a drawer and out of the light for a long time.  The vulcanite polished up very well and the gloss black accentuates the briar grain.   The dimensions of the Orlik Captain B9 are:     

    • Length:  5.35 in./ 135.89 mm.
    • Weight:  1.76 oz./ 49.90 g.
    • Bowl Height:  1.72 in./  43.69 mm.
    • Chamber Depth:  1.34  in./ 34.04 mm.
    • Chamber Diameter:  0.70 in./ 17.78 mm.
    • Outside Diameter:  1.68 in./ 42.67 mm.

    I do hope that you have found something here useful to your own pipe care, maintenance or restorations.  If you like this sort of thing, please click the like and subscribe buttons.  Thank you for reading the ramblings of an old pipe lover.

    Loading…

    Below are some photos of the completed Orlik Captain B9.

  • A Peterson Shamrock 5 Billiard Restoration

    December 26th, 2024

    Photographed and written by

    John M. Young

    I realize it is Christmas season and Saint Patrick’s Day is a few months away but this Peterson Shamrock was demanding some attention.  As you may have surmised, I am a Peterson Pipe lover, also known as a Pete Geek and thus rarely turn away a poor Irish briar in need of attention.  This pipe came to me as part of an estate lot from Canada last September.  I failed to record or remember precisely from where.  The stamps are clear and well defined reading, SHAMROCK on the left shank and “A PETERSON (over) PROCUCT” over MADE IN IRELAND  next to a 5 on the right shank.  The nickel band has the faux hallmarks of a shamrock, an Irish wolfhound and a round tower.  Below are some photographs of the pipe taken prior to any work done. 

    The plan for the restoration of the Shamrock looked to be straightforward and included the usual cleaning, refinishing and stem oxidation removal.  There were a couple of fills of both the briar and the stem but that too would be typical for a used pipe of this age.

    Background

    I have said it before will likely say it again, I am a slacker, and as such, I will use my own quote to provide the dear reader with additional information regarding Peterson pipes:

    “I have written about the restorations of several Peterson pipes over the past 13 months.  I will include here good sources of Peterson history for those who would like additional information:  

    For a great history Mark Irwin and Gary Marlburg’s book is a must read for a Pete Geek.

    (Available at https://www.smokingpipes.com/accessories/books/moreinfo.cfm?product_id=471478)  Given the price is a bit high but worth every penny for a Peterson aficionado.

    The next site is pipedia.org’s History of Peterson by Jim Lilley (Peterson – Pipedia)

    Lastly the pipephil.eu site for all things logo:  Peterson: historical pipes — Pipes: Logos & Markings (pipephil.eu)  They also have a few other links to things like the Peterson timeline and P-lip information.“

    The definitive source of “all things Peterson” is The Peterson Pipe written by Mark Irwin and Gary Malmberg.  According to Irwin and Malmberg, 

    “Shamrock (c.1941-2009)  Originally stamped SHAMROCK with no brand name, an inexpensive line first described in George Yale (New York) mail order booklet in 1941, imported by Roger Imports.  The line was actively promoted beginning in ‘45, aggressively promoted in US by Rogers from early ‘50s when they registered the Shamrock logo with US Patent Office, claiming propriety since ‘38.  Over the years offered with P-lip or fishtail mouthpiece, with or without nickel band, with or without shamrock logo on band, with or without S stamped in white or later in gold on mouthpiece.  Appearing in 2008 as unstained smooth and rustic, fishtail mouthpiece with gold impressed P on stem.  COMS of MADE IN over IRELAND (c. 1945-c.1965), MADE IN IRELAND forming a circle (c.1945-c. 1965), “A PETERSON”S PRODUCT” over MADE IN IRELAND (c. 1945-c. 1965), MADE IN THE over REPUBLIC OVER OF IRELAND (c. 1948-98) or “A PETERSON”S PRODUCT over MADE IN THE REPUBLIC OF IRELAND (c. 1948-98).  Model is always difficult or impossible to date.  (Irwin, Mark and Malmberg, Gary (2018). The Peterson Pipe The Story of Kapp & Peterson, First edition, second printing 2021. Briar Books Press, Canada. p. 312).

    The dates of 1945-1965 can be slightly narrowed with the faux hallmarked nickel band.  Again I turn to The Peterson Pipe book,  “The stamp was used until about 1963, when hand soldered nickel bands and ferrules were replaced by pressed ferrules and premade bands.”  (Irwin, Mark and Malmberg, Gary (2018). The Peterson Pipe The Story of Kapp & Peterson, First edition, second printing 2021. Briar Books Press, Canada. p. 302).  In keeping with the author’s terms, this may or may not reduce the production years by 2 to 1945-1963.

    The Restoration

    The Shamrock restoration began with a clean denim place setting.  The stem being the part in most need of attention was the starting point.

    I rubbed the stem with 0000 steel wool to remove the outermost oxidation.

    Then cleaned the airway.  It was surprisingly clean.

    Next, I inserted a pipe cleaner into the stem to act as a hanger for its time in the Before and After Extra Strength Deoxidizer or deox as I like to call it.

    Suspending the stem in the deox enables the solution better access to every bit of the surface.

    I had all day plans so the stem sat in the solution for about 8 hours until I returned to working on it.  The stem was removed from deox and allowed to drip excess solution back into the jar.

    I like wiping stems with a rough cotton rag after the deox bath.  

    The coarse material absorbs the remaining solution and helps to remove some of the oxidized vulcanite as well.

    Back at the workbench the stem was given a liberal coating of mineral oil and allowed to sit for 15 minutes.

    I wrapped the shank with painters tape in preparation for the sanding that was in the stem’s future. The stem was scrubbed with Soft Scrub cleanser applied to make-up pads.  

    I then turned my attention to reaming the tobacco chamber.

    The #1 blades of the PiNet did most of the work with the reaming.

    The General and the Smokingpipes Low Country reamer were used for some final scraping.

    The chamber was sanded with 320 sandpaper wrapped around a wood dowel.  The briar of the chamber looked good and showed no signs of heat damage.

    The cleaning out of the airway of the shank was next.  This was done with several cotton swabs and bristle pipe cleaners dipped in 95% ethyl alcohol.  There was also some drilling with the Kleen-Reem shank drill, scraping with a dental scraper and scrubbing with a nylon shank brush.

    The lava on the rim was softened with saliva and scraped with a sharp pocket knife.

    The rim showed a bit of a charring around the inside rim edges.

    The stummel was taken to the sink for a scrubbing with undiluted Murphy Oil Soap and a nylon scrub brush.  The soap was rinsed with warm water and the stummel dried with a cotton hand towel.

    The scrubbed stummel looked much better without its accumulated dirt.  The alcohol on a make-up pad wiping produced very little color indicating that this stummel was not stained.

    Curious to see how well the band would polish-up, I wrapped the shank with masking tape and took the stummel to the buffer.  There I buffed the band with rogue compound.  The results can be seen below.

    The masking tape on the shank was removed and new tape was applied to the band.  I also taped over the stamps to protect them from sanding.

    There were two fills which needed to be done prior to sanding.  The first was on top of the shank.

    The second was on the bottom adjacent to the band.

    I used brown cyanoacrylate (CA, super glue) and briar dust for the fills.  I first applied a small drop of CA to the pit then pressed briar dust into the CA wetted pit.  The fills were then filed smooth.

    A second application of CA was done on each fill and left to dry on its own accord.

    Once dried these were also filed smooth.

    There was one dent in the stem that received filling very similar to the above briar fills except this was done with black CA.  The photo below attempts to show the dent but the focus is poor.

    The stem was sanded with a series of sanding sponges from 400-3500 grit.  Between each sponge I rubbed the stem with mineral oil and wiped it with a paper towel.

    The stem was then worked with a series of micro-mesh pads from 4000-12000.  Between each pad I rubbed the stem with Obsidian Oil and wiped it with a paper towel.

    The briar was coated in Before and After Restoration Balm and allowed to sit for 20 minutes.

    The Restoration Balm was wiped from the pipe with an inside out athletic sock. 

    The pipe was then taken to the buffer for a few coats of carnauba wax.

    The final step was a hand buffing with a microfiber polishing cloth to raise the shine.

    Overall this Peterson Peterson Shamrock 5 Billiard turned out very nicely.  The natural briar grain is both straight on the sides and flamed in the front.  The band polished up better than I thought possible.  The vulcanite lost the oxidation and revealed a lovely high gloss black that accentuates the glow of the briar and the shine of the nickel band.  The dimensions of the Peterson Peterson Shamrock 5 Billiard are:     

    • Length:  5.89 in./ 149.61 mm.
    • Weight:  1.31 oz./ 37.14 g.
    • Bowl Height:  1.81 in./  45.97 mm.
    • Chamber Depth:  1.52  in./ 38.61 mm.
    • Chamber Diameter:  0.69 in./ 17.53 mm.
    • Outside Diameter:  1.35 in./ 34.29 mm.

    I do hope that you have found something here useful to your own pipe care, maintenance or restorations.  If you like this sort of thing, please click the like and subscribe buttons.  Thank you for reading the ramblings of an old pipe lover.

    Loading…

    Below are some photos of the completed Peterson Shamrock 5 Billiard.

  • A Trypis Freehand Restoration

    December 24th, 2024

    Photographed and written by 

    John M. Young

    My first reaction to this pipe was a near uncontrollable desire to name it Stumpy.  It looked like a gnarled old tree stump.  As I held it I came to appreciate the way the grooves fit my hand and saw/felt the practicality of the carvings.  This pipe was a great tactile experience.  Examining it more closely I saw how the maker had created the grooves.  It reminded me of a Tracy Mincer Doodler in that each of the four sides were likely drilled from top to bottom with two holes.  These holes were then exposed by further briar removal to create 8 grooves.  The overall shape is a highly carved four square panel that I could not classify as anything other than a freehand.  I had to know more about this pipe’s maker.  I looked at the stampings and read the following:  MADE over IN CANADA then Trypis (in a flowing script) over 4.  Below are some photographs of the pipe prior to any work done.

    There was dirt and grime in the carvings which would clean out easily.  The rim had some lava deposits suggesting that the pipe had been smoked quite a bit yet the tobacco chamber was not heavily caked.  This indicated a previous owner who used but cared for this pipe.  The stem was very oxidized indicating the pipe had been stored or displayed in the light.  I could certainly understand displaying such a unique pipe.  In general this looked to be a fun restoration.  

    Background

    I was really looking forward to researching this pipe.  I was unfamiliar with the brand.  I asked Steve Laug about them in a message on Facebook and he said that he had worked on several.  I immediately went to his site, https://rebornpipes.com/ and searched “Trypis”.  I was rewarded with three blogs to read.  While reading, I found that one of the posts was by Charles Lemon and dealt with a shank repair on a short Trypis Dublin (https://dadspipes.com/2019/05/31/quick-shank-repair-for-a-trypis-canted-dublin/).  The stamping on all three pipes were very similar to “Stumpy”.

    A quick search on pipephil.eu came up with the below screenshot.

    (Tp-Tr — Pipes: Logos & Markings). Further reaffirming the stamps on my pipes.

    Next I searched on pipedia.org.  Here I found a short article of the carver, Philip Trypis.

    “Phillip Trypis has been a pipe maker in Canada for well over 40 years. Originally from Greece, his experience ranges from cutting burls in a briar mill to making literally thousands of pipes out of his home in the hamlet of Oakwood, Ontario. Brigham pipes benefitted from Phillip’s skills where he worked for a number of years. There he directed the pipe production of the company when it was producing over 50,000 a year. Even though he left to start his own pipe shop, he still imported briar and turned tens of thousands of bowls for Brigham not to mention produce a large number of his own branded pipes.

    Many of the styles are traditional in form although Phillip has a number of freehand styles that are both familiar and off the beaten path. The vast majority of the higher priced pipes are very large pieces to be sure. Except where the pipe was of unusual shape or size, the frame sizes are 7.15″ x 3″ so you can get an idea of the scale.” (Trypis – Pipedia).  The three examples I had read about from the restorations of Laug and Lemon were of more traditional shapes.  I would classify Stumpy as one of Trypis’ “freehand styles…off the beaten path.” (Trypis – Pipedia). 

    My curiosity was still not quenched.  I was intrigued by this maker and needed more information.  A general search for “Phillip Trypis pipes” on Google led me to a forum post by a member going by the name “User 3604”.  I was unable to contact them directly and hope that including his wonderful recollection below will not offend.

    A recollection of the maker, Phillip Trypis:  

    “When I got into pipe smoking and bought my first pipe, (at least my first as an adult that I didn’t try to hide from my parents), I got it from Phillip Trypis whose name is known to most here I expect as a former carver for Brigham pipes back in their heyday. At this time Phillip’s health was in decline, he was in the early stages of dementia and his situation and our three meetings caused me to write about my second visit. Here is is. I hope you enjoy reading it as much as I enjoy remembering it.

    Meeting Phillip Trypis for the First Time – Again

    August 2007​

    I arrived in the little hamlet of Oakwood, just,north of Lindsay, Ontario a little after 12:00 noon. The drive was relaxing and it brought back memories of my days in college there in the late 70’s. My canine buddy Casey was along for the ride. I was making the 2 plus hour trip from Fergus to Oakwood to see Phillip Trypis; in his heyday a former master carver for Brigham pipes whom, in retirement started his own line. I was there to pick up a pipe I’d bought for my friend Don about 10 months ago as a going away gift when he moved to western Canada. Unfortunately, he’d broken the stem off while knocking it on something to get the dottle out after a smoke. I was also buying a few more for Don and hopefully another for myself.

    I pulled up in front of the Trypis’s home and saw Phillip and his wife sitting in their screened in front porch. A sign on the front lawn advertised “Auction Sale Saturday”. I was somewhat relieved to see them. I had spoken to Phillip this morning on the phone, (about 3 hours ago now) and he had said to come between 12:00 and 2:00 pm but knowing his short term memory had all but disappeared since he fell and struck his head the previous winter, I  wondered if he’d forget and go out. I walked up the steps and realizing that he would probably not remember my face from 11 months ago, I reintroduced myself.

    “Hi Mr Trypis, I’m Marlowe Sharp.” The intro was returned with a blank stare. Did he not hear me?  “HI MR TRYPIS, I’M MARLOWE SHARP” I said a fair bit louder. Blank look again. I SPOKE WITH YOU THIS MORNING AND TOLD YOU I WAS GOING TO COME AND PICK UP DON’s  PIPE?” I saw in his eyes recognition of that name but he still wasn’t putting it all together. Mercifully Mrs Trypis stepped in. “Oh hello.” she said, “You’re Don’s friend.” Then turning to her husband,  “Phillip, this is Don Janzen’s friend…Don from Alberta.”  I saw the light go on!

    “How are you Mr Trypis?” I said much more confidently.

    “ I’m peesed off!”  he replied glumly in his thick Greek accent. Not a good start.

    “Why are you pissed off?”

    “This move…I don’t want to move. It’s too much.”

    I suddenly felt sad for him. He was being forced, almost to leave a place he loved – a place where he could go to the basement and peeter around his shop and do what ever he liked. The stairs were too much now and Mrs. Trypis had recently been diagnosed with macular degeneration and had her driver’s license taken away. It was time to move into town where she could get around and where Phillip didn’t have to manage stairs. He was losing his independence a brain cell at a time along with all his “stuff” that kept him in a familiar world – sold off to strangers willing to pay the highest bid.

    “Can we go into your shop Mr Trypis? I want to buy some pipes.”

    At that his face brightened. Familiar territory! Yes let’s go there! At the same time, Mrs Trypis who had disappeared arrived back with Don’s pipe. It had been repaired, (apparently) and was in the box with Don’s original letter wrapped up in a bubble wrap envelope, all ready to go in the mail as he had promised last Sunday…and every other Sunday since October last year.  I ran and put it in my van immediately. I didn’t want to take the chance of getting wrapped up in the new pipes and arrive home having left it on the Trypis kitchen table.

    We went down to the shop and I pulled the pamphlet of Trypis Pipes from my pocket and told Phillip which ones Don wanted. First the 1/4  bent billiard. I put one aside. Then the 1/4 bent apple. I spent a while over that one because there were a couple of beauties. While I sorted through and put aside some favorites, I asked Phillip what the difference was between a $70.00 pipe and $150.00 pipe. With that question, all the remaining fogginess fell away. He was in his element now, firing on all cylinders as he explained to me about the grain of the wood and spoke about briar, design and workmanship. He pulled out a gorgeous $150.00 bent apple. The grain was lovely and on the stem he had added a piece of yellow lucite. He shoved it in my hand and said, “Here this one is good. Your friend will like this. ”I started to quickly add up the amounts in my head…this could get dangerous. I think Don had said he wanted $300.00 worth of pipes. I was at that price now and hadn’t yet got the Scandinavian pear that I had been eyeing for myself. I was also starting to have difficulty wondering if I might keep that bent apple for me…it was nice!

    The next box broke my resolve to only get one pipe for myself. Out of the bottom of a box of $150.00 pipes I pulled a beautifully carved Bent Sitter. It had a tobacco leaf carved into each side. “Uhh…do you have two of these?” I said hopefully. “I don’t think so.” said Phillip.” I think one only was made. Maybe another but it could be anywhere in here.”, he said as he swept his hand toward 30 boxes containing about a thousand pipes. In my head I apologized to Don; maybe I won’t tell him about this one. One day years down the road he’ll oogle it on my mantle. “Oh ya, I picked that up from Trypis some time ago.” I’ll say casually.

    Finally we got to the Scandinavian pear box. I selected one and looked it over but Phillip took it from me. Actually, he had done this with all the pipes I selected. He would pull the mouth piece out and reseat it several times before giving it back. I was wondering if he did this to make sure it would come out easily so Don wouldn’t break another one. Phillip didn’t give this one back though. He looked at it, thought a bit and said, “I need a pencil.”

    “Why?”

    “I show you. Come!”

    The next 10 minutes was spent looking for a pencil. What was he doing? We went back into his workshop to continue the search. As we entered the small back room I looked around at one of the messiest shops I had ever seen. Tools were everywhere, not to mention hundreds of partially finished pipe bowls of every shape and size. Everything was covered in wood shaving and dust. I picked up an unfinished bowl and immediately recognized the design as Brigham’s 100 anniversary pipe, a large Bent Square Panel with a maple leaf design carved on either side. They came out about 2 years ago. I looked at Phillip. He smiled and said, “My design. I don’t know if it sold well”.”

    For the next 10 minutes we again looked for the elusive pencil finally finding a package of new, un-sharpened carpenter’s pencils hanging on the wall. Next Phillip removed the buffing wheel from his lathe and replaced it with a sanding wheel. I was stumped. Was he going to personalize this pipe some how? Transform it to a one of a kind pipe just for me? Another 10 minutes went by as we traced an octopus of extension cords though the shop to figure out why the lathe had no power. Finally everything was in order, the power was on and the lathe screamed to life.

    “WHAT ARE YOU GOING TO DO MR TRYPIS?” I yelled over the noisy machine. This pipe was a really nice piece and I was wondering whether the old master carver still had the skills in him to do what ever he was about to do. He looked at me and smiled again, “You watch”. He was loving this!

    Phillip seated himself on his stool, took apart the pipe and looked at it. Then he looked at his lathe and seemed to think about something. I was getting excited. I was about to witness the master at work. He picked up his brand new carpenter’s pencil, steadied himself and….. sharpened it. He turned off the lathe, rubbed some graphite on the tenon of the stem, tried it a couple of times in the shank of the pipe and handed me the pipe saying, “There, it doesn’t stick any more.”   That was it!! 30 minutes to sharpen a pencil. I couldn’t help but laugh. Old Phillip thought I was just as proud of his effort as he was…and I was.

    After struggling back up the stairs and giving me a whopping 50% discount on the pipes I sat at his table looking at over $500.00 worth of pipes that he had just sold to me for $255.00. He was exhausted. The fall he had a year ago had taken it’s toll and although he was looking and talking better than when I saw him 11 months ago. He had little strength and I think with the pending move from his home, little spirit.

    We talked about my family and work as a police officer and then I took a few photos of Phillip holding my sitter. I shook his hand and wished him luck, which I regretted saying because I don’t believe in luck.

    “I’ll need it.” he said. “Thank you, It was very nice seeing you too.”

    I left with a tinge of sadness but was hopeful that I could visit Phillip once he gets to his new digs, buy another pipe or three, and meet Mr Trypis again…for the first time.

    January 2018

    P.S: I later realized that Don’s pipe had not been repaired well and that Phillip had been beyond doing any quality work for a number of years. He hadn’t been making pipes for probably 5 years and all the ones I had seen or bought were from before that time.

    I did see Phillip once again around 2011 after he had moved in to his son’s home in Scarborough near Toronto. I took a friend there and between us we purchased about 7 or 8 pipes, again all at a highly discounted price. He didn’t remember who I was that time either.

    I spoke with Phillip’s son in 2015 I think, and by that time Phillip was in a long term care facility with full blown dementia. I think that all his remaining pipes have been bought up by a couple of vendors. I still see them around occasionally. Get one if you can. They are lovely pipes.”

    https://www.brothersofbriar.com/threads/phillip-trypis-a-recollection.38337/

    That recollection satisfied my quest for information about mr. Trypis.  I think the photo added the last piece.  I am grateful that User 3604 shared this remembrance with all of us.

    The Restoration

    I began by giving Stumpy a clean denim piece to sit upon during this restoration.

    I knew that this stem would require some extra time in the Before and After Extra Strength Deoxidizer so, I started with it.  The stem was cleaned out with a couple of bristle pipe cleaners dipped in 95% ethyl alcohol.  Earlier I had remarked that the previous owner appeared to have cared for this pipe.  This was again made evident with the relatively clean airway of the stem.

    The reaming tools were gathered.

    The PipNet made quick work of the reaming only requiring light scraping with the other tools.  The interior of the tobacco chamber was sanded with the wood dowel wrapped in 320 sandpaper.  This sanding was taken to bare briar and revealed no damage to the interior of the bowl. 

    The lava on the rim was moistened with saliva and scraped with a sharp pocket knife.

    The airway of the shank was moistened with alcohol wetted cotton swabs and scraped with a dental scraper then scrubbed with several cotton swabs dipped in 95% ethyl alcohol. 

    The stummel was taken to the sink where it was scrubbed with undiluted Murphy Oil Soap and a nylon scrub brush.  The soap was rinsed with warm water and the stummel dried with a cotton hand towel.

    The minimal tooth chatter was sanded with 320 and 400 grit sanding sponges.

    The stem received a pipe cleaner inserted into the tenon to act as a hanger for its bath in Before and After Extra Strength Deoxidizer or, as I like to call it, deox.

    The deox bath lasted overnight and  the next day the stem was removed from the deox and allowed to drip excess solution back into the jar.

    I rubbed the remaining excess solution from the stem with a coarse shop rag.

    This rag absorbs the deox and abrades the softened oxidized rubber leaving wonderful patterns on the rag, creating a lovely Rorschach lick pattern on the rag.

    Back at the workbench I wrapped the shank with painters tape and used Soft Scrub cleanser on make-up pads to further scrub the oxidized vulcanite from the stem.  This stem was severely oxidized. 

    Next the stem was sanded with a series of sanding sponges from 320-3500 grit.  Between each sponge I rubbed the stem with mineral oil and wiped it with a paper towel.

    There was still lingering oxidation on/in the vulcanite.  I had to use the bright lights of the photo station so show it below.

    Bah.

    I took the stem to the buffer and used the rogue compound on a flannel wheel.  Several applications of rogue to the wheel and wheel to the stem later, I could barely make out any oxidized vulcanite.  I continued on to the micro-mesh pads.  Here I used pads 4000-12000.  Between each pad I applied Obsidian Oil rubbed on and wiped off with a paper towel.

    I polished the stem with both Before and After Fine and Extra Fine Polish.  Each polish was hand buffed using a soft cotton cloth.

    The stummel was given a coating of Before and After Restoration Balm applied with a baby toothbrush.  I failed to photograph this step and the final waxing of the stummel.  The Restoration Balm was allowed to work its magic for 20 minutes before being wiped from the stummel.  The stummel was then waxed with Renaissance Micro-crystalline Wax, again applied with a baby toothbrush. 

    The wax was buffed with a clean flannel wheel on the buffer.  The stem received several coats of carnauba wax also applied with the buffer.  This final step was hand buffing with a microfiber polishing cloth.

    Trypis Freehand is a delightfully carved original one-of-a-kind work.  As mentioned earlier the pipe feels amazing in hand.  The carvings add character with the smooth rim and side contrasting beautifully.  The stem polished up fairly well.  In normal room light it looks great, under very bright light residual oxidation can be seen in places.  I think that the thickness and the extreme texturing of the briar will make a very cool smoking pipe for the next steward of this wonderful beauty.  The dimensions of the Trypis Freehand are:     

    • Length:  5.83 in./ 148.08 mm.
    • Weight:  1.94 oz./ 54.99 g.
    • Bowl Height:  1.98 in./  50.29 mm.
    • Chamber Depth:  1.59  in./ 40.39 mm.
    • Chamber Diameter:  0.74 in./ 18.80 mm.
    • Outside Diameter:  1.58 in./ 40.13 mm.

    I do hope that you have found something here useful to your own pipe care, maintenance or restorations.  If you like this sort of thing, please click the like and subscribe buttons.  Thank you for reading the ramblings of an old pipe lover.

    Loading…

    Below are some photos of the completed Trypis Freehand.

  • A Peterson 417 Straight Dublin For Shannon Airport Restoration

    December 19th, 2024

    Photographed and written by

    John M. Young

    I probably do not need to tell you that with a nickname like Nebraska Pete Geek, I have a love for Peterson pipes.  I also have a love affair with the Dublin shape in pipes.  I know, I’ve said in the past that apples are my favorite but in checking my top 3 list of favorite shapes, I noticed that there are 5 on the list.  Hmm, math was never my thing.  Anyway, this dainty darling caught my eye from the auction block as it had a definite Dublin shape but a shaper number (417) that I was unfamiliar with.  Winning the auction was surprisingly easy as I was the only person to bid.  A few days later the demure Dublin Damselle arrived here in the wilds of southeast Nebraska.  The stamps on the shank are crisp and clear except for the “1” in “417” and read as follows:  PETERSON’S over DE LUXE over FOR SHANNON AIRPORT on the left shank.  MADE IN THE over REPUBLIC  over  OF IRELAND and 417 on the right shank.  The stem had a stamped Peterson’s script P with the paint completely worn away.  Below are some photographs taken of the pipe prior to any work done.

    Looking at that rim made me want to cry.  The charing was going to be a tough one to remedy.  Then there is that oh so cute bone tenon extension (chimney in Pete Geek speak).  It too would need some restorative love.  The stem was not in bad shape, old and pitted but not heavily oxidized.  The briar looked wonderful with not a fill to be seen.  This looked to be an interesting restoration.

    Background

    I have written about the restorations of several Peterson pipes over the past 13 months.  I will include here good sources of Peterson history for those who would like additional information:  

    For a great history Mark Irwin and Gary Marlburg’s book is a must read for a Pete Geek.

    (Available at https://www.smokingpipes.com/accessories/books/moreinfo.cfm?product_id=471478)  Given the price is a bit high but worth every penny for a Peterson aficionado.

    The next site is pipedia.org’s History of Peterson by Jim Lilley (Peterson – Pipedia)

    Lastly the pipephil.eu site for all things logo:  Peterson: historical pipes — Pipes: Logos & Markings (pipephil.eu)  They also have a few other links to things like the Peterson timeline and P-lip information.  

    This portion of the blog is only regarding the history of Peterson Dublins and this Peterson 417 in particular.  I began with the research of Dublin shapes by Peterson with a wonderful history in Mark Irwin’s Peterson Pipe Notes #172 titled, “A Catalog of Peterson’s Dublin Shapes, 1896–2020”.  I’ll not go into the details that Mark does due to a general lack of both knowledge and writing ability.  Combined with the fact that I am a Generation -X slacker, I’ll just give you the link and Mark all the credit for this great history lesson.  (https://petersonpipenotes.org/tag/peterson-dublin-shapes/).

    I will pick up the story of the 417 shape from within Mark’s teatease,

    “Irish Free State-Era Straight Dublins (1922-1937)

    A 120F for “Flat” with an oval shank

    The IFS-Era added two new straight dublins to the 120, 121, and 122: the 120F (“Flat” or oval shank) and slender 417. The System straights seem to have disappeared by this time. The 120 “Flat” is a natural thought in Peterson’s design language, which always comes back to comfort and practicality, and I can imagine someone in bowl-turning or even a customer thinking how great it would be to set his straight dublin down in order to emphasize a point over a pint or a cuppa.

    The first illustration of the 120F seems to be in the1937 “A Chat with the Smoker” pipe-box brochure issued not long after Peterson opened its London factory on White Lion Street. (It may well have been in production before then.) Examples of the shape appear as late as the 1965 catalog and may have been made for several years beyond that.

    A 417 Donegal Rocky Sterling Band

    The 417, a small-bowled Dublin with a long shank, first appeared in the 1937 catalog, but with two shape numbers: 417 for the Kapet and DeLuxe and 2022 for the “K” and 1st quality. The 2022 number would be dropped by 1945. Like the 120F, the last sighting of the 417 was in the 1965 catalog. The bowl seems bit more forward in its cant than the 120F.”  (https://petersonpipenotes.org/tag/peterson-dublin-shapes/)

    In the introduction of this blog I referred to this 417 as both a “dainty darling” and a “demure Dublin damselle”.  Why?, you ask.  To illustrate the size difference of the 417 and the more standard 120, I compiled the below with data From Mark Irwin’s PPN 172.  The differences, though slight, are definite.  Our darling dainty demure Dublin damselle is indeed a bit longer while a slighter in overall build than her more robust siblings.

    Shape 417 Straight Dublin.Shape 120 Patent Lip Straight Dublin.
    Years of production: 1937 – 1965Years of production: 1906 – present.
    Average Measurements:Average Measurements:
    Length: 6.21 in./157.73 mm.Length: 6.16 in./156.46 mm.
    Weight: 1.00 oz./28.35 g.Weight: 1.40 oz./39.69 g.
    Bowl Height: 1.74 in./44.20 mm.Bowl Height: 1.94 in./49.28 mm.
    Chamber Depth: 1.57 in./39.88 mm.Chamber Depth: 1.63 in./41.40 mm.
    Chamber Diameter: 0.67 in./17.02 mm.Chamber Diameter: 0.83 in./21.08 mm.
    Outside Diameter: 1.24 in./31.50 mm.Outside Diameter: 1.38 in./35.05 mm.
    P-Lip: YesP-Lip: Yes

    (https://petersonpipenotes.org/tag/peterson-dublin-shapes/)

    The date two of production for this pipe is allowed by two particular pieces of information; the FOR SHANNON AIRPORT stamp and the bone chimney.  According to Irwin in the Peterson Pipe, 

    ““FOR SHANNON AIRPORT”  (c.1947-c. 1983) Stamp on shank of pipes in several grades, indicates pipe was designated to be sold by duty free shops at Shannon Airport.” (Irwin, Mark and Malmberg, Gary (2018). The Peterson Pipe The Story of Kapp & Peterson, First edition, second printing 2021. Briar Books Press, Canada. p. 299)

    This gives a fairly definitive time period for the production of this pipe.  These dates can be further narrowed by the existence of the bone chimney or tenon extension.  Again referring to The Peterson Pipe, “Vintage De Luxe or Premier Systems, those produced before about 1960, featured a bone extension, which will be white on an unsmoked pipe and gunmetal or dark brown on a smoked one.  Nearly all of these seen on the estate market will have fused to their vulcanite stems, and many will have splits or cracks in them.” (p. 259).  This fine tuning of production dates places this pipe as a product of the Dublin factory between 1947-1960.

    The Restoration

    First off, let me thank Canada for the gift of cold air.  Yesterday’s cold front dropped the temperature 30 degrees Fahrenheit and yes, it came with 24 mile per hour winds (gusts over 40mph).  This did drive me into the basement for cover and allowed me to work on this lovely old pipe, thus the thank you.  I began with a clean denim piece to protect the work surface.

    The reaming tools came out to play.  These included the PipNet, SmokingpipesLow Country reamer, General triangular scraper (with the tip ground round) and a wood dowel wrapped in 220 sandpaper.

    Reaming round one went to the PipNet with the #1 blades.

    Round two, PipNet with #2 blades.

    The tobacco chamber was drilled with a more conical drill, as appropriate for a Dublin.  The reaming was finished with the Klee-Reem tool, for round three.  The other scrapers wrapped up the scraping with the sandpaper finishing up.  

    I used the airway drill from the Kleen-Reem to clear the airway.

    The bowl was wiped with a paper towel and scrubbed with a few cotton swabs dipped in 95% ethyl alcohol, shown below.  No evidence of heat damage was observed within the bowl. 

    The shank cleaning went quickly after the Klee-Reem and only required a few folded bristle pipe cleaners and cotton swabs dipped in the ethyl alcohol.

    The rim received a coating of Vaseline petroleum jelly and was scraped with a sharp pocket knife to remove both lava and charred briar.

    After scraping the rim looked better but not nearly acceptable.

    Topping the rim was required.  I did this with 320 sandpaper laid flat on the countertop.  The 320 paper was followed by a sheet of 400.

    The topped rim can be seen in the photo below.  It was getting more acceptable.

    To sand and give the inner rim a bevel I used a 2 inch polyvinyl chloride (PVC) pipe cap wrapped with 320 sandpaper.  The photo below shows two of these caps, one with sandpaper the other without.

    The inner rin was sanded with the sandpaper wrapped cap, if you were wondering.  Below is the resultant bevel.

    There remained some charring on the outside rim edge.  I did not want to remove too much material during the topping and risk changing the overall shape of the pipe.  I returned to the sharp pocket knife and tried to scrape the edge and the side of the stummel to avoid a curved rim.

    By scraping along the side, I was able to retain the sharp edge of the rim while still removing some of the char.

    Next the stummel was taken to the sink for a scrub.  This was done with undiluted Murphy Oil soap and a nylon scrub brush.  The soap was rinsed with warm water and the stummel dried with a cotton hand towel.

    Back at the workbench the stummel was wiped with a make-up pad dipped in 95% ethyl alcohol.  Very little color came off the pipe and there did not appear to be any finish remaining on the briar.

    The stamps on the shank and the logo were taped with painters tape to protect them from sanding.  The pipe was then sanded with a series of sanding sponges from 320-3500 grit.  Between each sponge the stummel was wiped with a make-up pad wetted with ethyl alcohol.  The stem was rubbed with mineral oil, applied by fingertip and wiped with a paper towel.

    The pipe was then worked with micro-mesh pads 4000-12000.  The stummel and stem wiping was done as with the sanding sponges except that Obsidian Oil was used in place of mineral oil.

    I cleaned the stem logo with a cotton swab dipped in 95% ethyl alcohol to clear out debris and oil from the logo.  I then painted the logo with a water based white acrylic paint.  This paint is intended for miniatures used in gaming.  The paint dries quickly and I scraped the excess from the logo using a plastic card.  The logo surface was then lightly worked with the 8000 and 12000 micro-mesh pads.

    The stummel received a coating of Before and After Restoration Balm and was allowed to sit for 20 minutes.

    After the 20 minute timer beeped, I wiped the balm away with an inside out athletic sock.  ANd finally got a look at the glory of the briar.

    Next, I turned my attention to the bone tenon extension or as the Peterson factory folks call it, the chimney.  This 65+ year old piece of bone had the tip and a bit of the side chipped.  It also had a slight bulge at the tip back about 4 mm.  The photos don’t show either of these pre-existing conditions very well.  I decided to file it flat to remove the chipped area.  

    I used a small flat file to round the entire chimney.  I then filed the tip down a bit removing about 1 mm of material.  Instead of removing the entire chipped part and shortening the chimney, I opted to build up the tip using brown Cyanoacrylate (CA, super glue).  The glue seemed to penetrate into the pores of the bone.  I thought this would be good for strengthening the entire piece.  The CA was spritzed with a drying accelerator. Then filed.  The draft hole was opened up with a diamond needle file and the edges of the tip were slightly rounded with the flat file.   The below two photos show the finished shape of the chimney.

    I was still not happy with the dark spots on the rim of the stummel.  I thought that maybe a treatment of the spots with a saturated oxalic acid solution would effectively bleach the dark spots.  I have a jar of saturated oxalic acid which I had mixed several months ago.  

    The solution was applied with a cotton swab to the darkened areas.  It dried quickly so I continued to apply additional solution.

    More solution was added as the already applied liquid dried.  I did this several times over a span of 15 minutes.  I then allowed the oxalic acid to sit for 30 minutes. 

    After 30 minutes I took the stummel to the sink and rinsed the briar with liberal amounts of water.  I dabbed a bit of Dawn dish soap on my finger and worked that around the acid wetted areas also.  My thought here was that the basic nature of soap would neutralize any remaining acid.  The soap was also thoroughly rinsed.  The photo below shows the dried rim.  Much improved over the initial appearance.

    The pipe was taken to the buffer where it received several coats of carnauba wax.  The final step was a hand buffing with a microfiber polishing cloth.

    The Peterson De Luxe 417 Straight Dublin For Shannon Airport looks amazingly better than it did originally.  I was finally happy with how the rim repair went.  The oxalic acid treatment allowed me to remove nearly all signs of the charring without severely changing the shape of this wonderful old pipe.  The briar grain of a Peterson De Luxe is on full display with this pipe.  Beautiful bird’s eyes on both sides and lovely cross grain on the front and back.  Though the cross grain is not quite centered it remains attractive.  The stem was not severely oxidized leading me to believe this pipe was stored in a drawer and out of the light for a long time.  The vulcanite polished up very well and the gloss black accentuates the briar grain.   The dimensions of the Peterson De Luxe 417 Straight Dublin For Shannon Airport are:     

    • Length:  6.45 in./ 163.83 mm.
    • Weight:  1.11 oz./ 31.47 g.
    • Bowl Height:  1.81 in./  45.97 mm.
    • Chamber Depth:  1.54  in./ 39.12 mm.
    • Chamber Diameter:  0.72 in./ 18.29 mm.
    • Outside Diameter:  1.28 in./ 32.51 mm.

    I do hope that you have found something here useful to your own pipe care, maintenance or restorations.  If you like this sort of thing, please click the like and subscribe buttons.  Thank you for reading the ramblings of an old pipe lover.

    Loading…

    Below are some photos of the completed Peterson De Luxe 417 Straight Dublin For Shannon Airport.

  • An English Made Kaywoodie Relief Grain Quarter Bent Prince of Wales 96

    December 17th, 2024

    Photographed and written by

    John M. Young

    Just when you thought that I had turned my back on American made pipes for those fancy European floozies, I jump back into a classic American brand.  Hey, wait a minute.  What’s this, a Kaywoodie made in England?  What sorcery is this?  More on that in the “Background” section below.  This pipe came to me as the pipe from an estate lot that I really wanted.  Not that the rest of the lot were all losers just, this was the target specimen.  The lot included 5 other pipes and included a nifty rack all coming from Dunnellon, Florida.  The Kaywoodie has the following stamps on the bottom of the shank:  

    96  KAYWOODIE RELIEF GRAIN over MADE IN ENGLAND.  Below are some photographs taken of the pipe upon its arrival.

    The good:  Great shape, wonderful sandblast, clear well defined stampings and a well aligned stem are some of the better qualities of this pipe.

    The bad: A moderately caked bowl, oxidized slightly chewed stem and lava encrusted rim will need attention.

    The ugly:  The altered stinger is a disappointment, accumulation of years of dirt and grime (ugly but easy to fix) and the light tooth chatter will need to be addressed.

    Background

    The history of Kaywoodie spans from 1915 to the present with its parent company Kaufman Bros. & Bondy going back even further, to 1851.  I will not even attempt to do justice to the venerable brand with a brief history.  I will, however, give a few links to great resources for those who are interested.

    Kaywoodie History:  https://greywoodie.com/pages/kaywoodie-history, https://pipedia.org/wiki/Kaufmann_Bros._%26_Bondy, http://pipephil.eu/logos/en/logo-kaywoodie-1.html

    This section is concerned with English Kaywoodies.  The elusive and less well documented species of the Kaywoodie family tree.  Robert W. Stokes wrote a Collector’s Guide to Kaywoodie Pipes that appears on pipedia.org.  In this guide he states: 

     “English Kaywoodies. All of the catalogs reviewed in this research contained the following copyright notification: Printed in U.S.A., Kaufmann Bros. & Bondy, Inc., New York and London. Kaywoodie Pipe cases and smoker’s accessories were also marked with “New York and London”. The catalogs, however, do not present any information concerning Kaywoodie’s London operations, or how the English Kaywoodies might have differed from those manufactured and marketed in the U.S. Lowndes notes that he has several English Kaywoodies acquired in Vaduz and Zurich. English Kaywoodies are now made by Oppenheimer pipes. Lowndes notes that English Kaywoodies with the “screw-in bit” come in Ruby Grain, Custom Grain, Standard, and Relief Grain grades. The traditional push-bit models come in Continental Plain and Relief, London Made, Minaret, Airway Polished No. 707, and Lightweight grades. Prices in 1985 ranged from 9.50 (pounds) to 26.00 (pounds). Lowndes notes that the Super Star was a special edition English Kaywoodie made of finest briar with a handmade silver band. Lowndes has two: one from Zurich with a large white-outlined logo, and beautifully cased; and one in walnut finish with the black-­in-white logo. A recent catalog shows the Super Star without a band and the ordinary small white logo. A 1985 letter from Oppenheimer states that the black-in-white logo has been discontinued and only the regular white logo is now used.” (https://pipedia.org/wiki/Collector%27s_Guide_to_Kaywoodie_Pipes#NOTES_ON_%22OTHER%E2%80%9D_KAYWOODIE_PIPES).  This information places the Kaywoodie in hand as a pipe produced prior to 1985.

    To narrow the production dates I next researched the shape number, 96.  This shape number appears in the 1936 and 1947 Kaywoodie lines as the “Prince of Wales”.  In 1955 it is listed as:  “96 — Quarter Bent Apple (Prince of Wales)” (https://pipedia.org/wiki/Collector%27s_Guide_to_Kaywoodie_Pipes#NOTES_ON_%22OTHER%E2%80%9D_KAYWOODIE_PIPES).  In the 1968-69 literature it returns to being called the “Prince of Wales”  without the Quarter Bent Apple descriptor.

    The below two screen clips were from pipedia.org’s Kaywoodie Shape Number page: 

    (https://pipedia.org/wiki/Kaywoodie_Shape_Numbers).  Well, not conclusive but the above information reduces the date of production from prior to 1985 to a range from 1931-1972.

    Returning to the Kaywoodie Guide the following quote regarding the logo is slightly helpful for narrowing the production date:  “Some of the pre-1936 Kaywoodies were stamped (on the shank) with a cloverleaf around KBB. Sometime between 1936 and 1947, the better pipes were marked with a black cloverleaf inside a white dot. However, because many of the pipes in the 1968-69 catalog still show this type of logo, the black-in-white logo merely indicates a “post 1936” vintage. Current (Italian-made) Kaywoodies have the “white outline” logo.” (https://pipedia.org/wiki/Collector%27s_Guide_to_Kaywoodie_Pipes#HINTS_ON_COLLECTING,_DATING_AND_PRICING_KAYWOODIES).  Using that bit of information the production is reduced to 1936-1969.

    Hoping to find even more precise dates, I turned to pipephil.eu.  Here I found several links to Kaywoodie information but nothing to improve the previous dates.

    (Kaywoodie not made in the US — Pipes : Logos & Markings)

    In conclusion, I think it is safe to say that the disruptions caused by World War Two (WWII) would probably eliminate those years from the range.  This leads me to guesstimate the production of this pipe to post-WWII-1969 London.

    The Restoration

    The restoration began with a clean denim piece on the workbench.

    The reaming tools were gathered and included the PipNet reamer, General triangular scraper (with the tip ground round), Smokingpipes Low Country reamer and a wood dowel wrapped in 220 sandpaper.

    The #1 and #2 blades of the PipNet were used for the majority of the reaming with clean-up duties to the other tools followed by sanding.

    The sanding of the tobacco chamber revealed the original chuck marks within the chamber.  The sanding also showed that the chamber showed no signs of any heat damage.

    Next the stummel was taken to the sink for a scrub with undiluted Murphy Oil Soap and a nylon scrub brush.  The soap was rinsed with warm water and dried with a cotton hand towel.

    Back at the workbench the stem tooth chatter was filed with a fine flat file.

    The stem, below the button,  was then sanded with a 400 grit sanding sponge to eliminate the file marks.

    The screw-in tenon was cleaned with 95% ethyl alcohol and a brass .22 caliber bore brush.

    The stem was reunited with the stummel and the shank wrapped in masking tape for protection.  I then used Soft Scrub cleanser on a make-up pad to remove the oxidized vulcanite that remained after the sanding.

    A second pad with the cleanser made the stem look pretty well free of oxidation.  Further sanding and micro-meshing would get rid of the rest.

    There remained a couple of small dents near the button.  I decided that I did not like the look of these so I filled them with thin cyanoacrylate (CA, super glue).

    Below is the application of the CA.

    To speed the drying/curing of the CA, a drying accelerator was spritzed onto the wet CA.  The fill was then filed agin and smoothed with the 400 sanding sponge.

    The stem was then sanded with a series of sanding sponges from grits 400-3500.  Between each sponge the stem was rubbed with mineral oil and wiped with a paper towel.

    I removed the tape and decided to fix a few of the light spots where the stain had been worn through.

    Using a walnut stain touch-up marker I stained the slight spots.

    Ah, much better.

    I was anticipating how the stummel would look with the Before and After Restoration Balm.  My patience lost to my curiosity.  I applied a coat of the balm to the stummel and let it sit for 20 minutes.

    The balm was wiped with an inside out athletic sock revealing a lovely refreshed briar stummel. 

    I don’t know what the magic of the Restoration Balm is but it works very well.

    Okay, enough procrastinating, back to work.  I micro-meshed the stem with the 4000-12000 pads.  Between each pad I rubbed the stem with Obsidian Oil and wiped the stem with a paper towel.

    The stummel was then waxed with Renaissance Micro-crystalline Wax applied with a baby toothbrush.

    The wax was hand buffed with a soft cotton cloth then taken to the buffer.  I used a clean flannel wheel to lightly buff the Renaissance wax.  

    The stem received several coats of carnauba wax applied with the buffer.

    I tested the draw of the pipe and tasted very slight “old tobacco”.  I thought, “why didn’t I check for that before I waxed it?” An overnight cotton-alcohol treatment was ordered for the patient.  I stuffed cotton into the bowl and the shank of the stummel.  The stummel was placed on a pipe stand so both the rim and the end of the shank were at equal height.  I then used a disposable pipette to saturate the cotton with 99% isopropyl alcohol.  “Why not 95% ethyl alcohol?”, you ask.  Well, my bench bottle of ethyl ran out and I was too lazy to grab another one and there was an isopropyl bottle at hand.  The alcohol was allowed to evaporate overnight.  The next day, the cotton appeared as below.

    I removed the cotton and swabbed out the bowl and shank with cotton swabs dipped in 95% ethyl alcohol (yeah, I grabbed another bottle).

    This treatment eliminated the smell and taste of old tobacco completely.  As a final step the pipe was hand buffed with a microfiber polishing cloth.

    This English Made Kaywoodie Relief Grain Prince of Wales just looks like a classy pipe, like it is ready for a night out at the opera.  Okay, I admit I’ve not been to an opera since 8th grade German Club’s experience of Die Fledermaus.  The pipe just looks good and it feels very nice in hand as well.  The sandblast looks black at first then upon closer examination the dark burgundy reveals itself.  The high gloss stem accents the more rustic briar very elegantly.  Yeah, I think it is a darn good looking pipe.  The clipped off stinger is a disappointment and may be a deal breaker to a Kaywoodie collector but this too is part of the history of the pipe. The dimensions of the English Made Kaywoodie Relief Grain Prince of Wales 96 are:     

    • Length:  5.82 in./ 147.83 mm.
    • Weight:  1.17 oz./ 33.17 g.
    • Bowl Height:  1.41 in./  35.81 mm.
    • Chamber Depth:  1.17  in./ 29.72 mm.
    • Chamber Diameter:  0.71 in./ 17.78 mm.
    • Outside Diameter:  1.52 in./ 38.61 mm.

    I do hope that you have found something here useful to your own pipe care, maintenance or restorations.  If you like this sort of thing, please click the like and subscribe buttons.  Thank you for reading the ramblings of an old pipe lover.

    Loading…

    Below are some photos of the completed English Made Kaywoodie Relief Grain Prince of Wales 96.

  • A Man Sculpted Black Meerschaum Dublin Restoration

    December 12th, 2024

    Photographed and written by

    John M. Young

    It’s a Dublin…  It’s Poker…  It’s Super Pipe!  Yeah, it sounds way cooler in the original form – It’s a Bird… It’s a Plane… It’s Superman.  I have to admit I wasn’t quite sure what to call this Man pipe when it arrived.  I asked my German pipe expert, Sascha Mertens, via Facebook messenger what he’d call it.  His reply was classic Sascha, “Dublin, accidentally! Planned as a poker!  Nice pipe.”  He included an artistically modified photo that I sent him and even signed it:  I am not sure I want to call it an “Accidental Dublin which was supposed to be a Poker Man pipe”.  That seems even wordy, for me.  I guess, I will just call it a Man Sculpted Black Meerschaum Dublin Pipe and hope the shape critics will read this intro before criticising the name.  

    The pipe itself was part of an estate lot purchased in September from Calgary Alberta, Canada.  It included 11 other pipes I recognized this one from the photo below:

    The male symbol could even be clearly made out.  It is always fun to pick up a lot from somewhere other than the States as locally available pipes in one location are rare and exotic in another location.  This lot had a couple of pipes with Canadian country of manufacture (COM) stamps.  Stick around and I’m sure they will make appearances in upcoming blogs.  The pipe has the male symbol and ISLE OF MAN stamped on the stem.  The meerschaum remains free of any marks indicating its origin.  Below are some photographs of the pipe prior to any work done.

    This looked to be an easy relaxing restoration.  The meerschaum was in great shape. Yeah, the stem was oxidized and looked as if someone thought they might improve the appearance by trying to give it a nice suntan by storing it in direct sunlight.  Besides, I had wanted to work on a Man meerschaum for some time.

    Background

    From previous research on several European meerschaum pipes I recalled that this line was a product of Laxey Pipes.  I refreshed my memory with a revisit on pipedia.org.  Below, I have included that entry.

    “Laxey Pipes Ltd. resided in a historical 19th century four-storey Man stone building at The Quay, Old Laxey, Isle of Man, which thankfully has been preserved.

    The company specialised in the production of meerschaum pipes using the Meerschaum mined by the Tanganyika Meerschaum Corporation in the Amboseli basin in Tanganyika (since 1964 part of the United Republic of Tanzania).

    Please note: you may often find names like “Manx Pipes Ltd.”, “Man Pipe Co.” and others more, but there is no indication of another Isle of Man pipe producer other than Laxey Pipe Ltd. at any time!

    Laxey Pipes Ltd. marketed own brands like “Manxpipe”, “Manxman”, “Manxland” e.c. Names like “John Bull”, “White Knight” (unwaxed), “Domino” (black, or lined) indicated some shapes / colours of Laxey’s own series. The stems either showed the astronomical sign for “male” or “man” (circle + arrow), or the crest of the Isle of Man, the 3-legged X in a circle. Manxpipes and Laxey’s other brands were available through pipe retailers in general, but also were sold (mainly) to tourists through their own shop in Laxey.” (Laxey Pipes Ltd. – Pipedia)

    (File:Manx.jpg – Pipedia).  I love the stone work of this old building and can’t help thinking, “watch that first step, it’s a doozy”, regarding the step from the pier to the boat at low tide.

    My next search was of pipephil.eu.  Here I was able to find logos from other Man pipes, reaffirming the family heritage.

    I find it interesting that African meerschaum was used.  In a couple of previous blogs, I discussed the history of meerschaum or sepiolite mining in the Amboseli region of Tanzania (links: https://wordpress.com/post/scimansays1787.com/7350 and https://wordpress.com/post/scimansays1787.com/7485).  Meerschaum from this region is not considered to be as high quality as the meerschaum of Turkey and is usually left rusticated and frequently stained or “painted”.  I put painted in quotes as I am unsure of how or with what Laxey coated the stummels of their pipes.

    Further research came across a forum post in pipesmokersdens.com by a member named Siv.  They state the following in their post:

    “Laxey Pipes Limited was established in the mid-1960s on the Isle of Man to manufacture various decorative smoking pipes, based in a historically important 19th century four-storey building on the quay in the east coastal village of Laxey. The building was erected in 1866 by Richard Rowe (c.1823-1886), Captain of the Laxey Mines, as an additional grain store for the Laxey Glen Flour Mill. The building was also used as a storage facility for other material, such as coal and corn, and it was utilised as a base for community meetings and events. The property had several owners before the Isle of Man Government acquired it in the 1960s and leased it to the pipe factory. Other company names such as Manx Pipes Ltd and Man Pipe Co. have been noted but no other pipe producer was active during this time, thus all names must have fallen under the Laxey Pipes Ltd umbrella.

    The company specialised in the manufacturing of meerschaum pipes using the mineral meerschaum (sepiolite) mined by the Tanganyika Meerschaum Corporation, situated in the Amboseli basin, Tanganyika (now the United Republic of Tanzania). Meerschaum is a soft white clay mineral, mainly found in Turkey with large deposits also found in Tanganyika, Africa. Meerschaum is a popular material for pipes because its properties allow it to be carved into finely detailed and decorative shapes. It is also porous by nature and can draw moisture and tobacco tar into the stone. Another organic material used by Laxey Pipes Ltd for its smoking pipes was briar wood. Briar is a type of wood that is native to Africa and is abundant the Ethiopian Highlands, the Ruwenzori Mountains and the Cameroon Mountains. It is a particularly good material to use for pipes because it has a natural resistance to fire and it has an ability to absorb any moisture.

    Laxey Pipes Ltd produced and marketed their own pipe brands such as ‘Manxpipe’, ‘Manxman’ and ‘Manxland’. Other pipe names indicated various shapes and colours of the Laxey pipe series, for example ‘White Knight’ (unwaxed) and ‘Domino’ (black or lined). The Laxey brands were sold through general pipe retailers but they were also sold through the company’s shop on its Isle of Man premises. Laxey Pipes Ltd also produced meer bowls (the compartment where the tobacco goes in the pipe) for pipe brands such as Peterson, Barling and Nørding from the 1960s until 2001.

    As the company entered the 1990s and early 2000s the supply of meer from East Africa was becoming increasingly difficult; Kenya and Tanzania had been extensively mined and places like Somalia was inaccessible due to civil war. The last Laxey meers were traded in May 2001 but the company continued making briar pipes. Changing attitudes to smoking led to a general decline in popularity of pipe smoking. The company closed its doors indefinitely in June 2002.” (https://pipesmokersdens.com/threads/man-pipes-laxey-pipes-ltd-isle-of-man.17931/)

    Siv also provides photos of of their Man pipe along with photos of the brochure accompanying the pipe.

    (photos:  https://pipesmokersdens.com/threads/man-pipes-laxey-pipes-ltd-isle-of-man.17931/)

    According to Mark Irwin, “By ‘78 Peterson had bought the Isle of Man company and moved its operations to their Dublin factory.” (Irwin, Mark (2018).  The Peterson Pipe (1st ed. 2nd printing). Briar Books Press. p.308).  Using the above information, I estimate this pipe to have been made on the Isle of Man between the 1960s-1978.  Siv’s pamphlet provided great information about the shape – 62/2, unfortunately no descriptor though.  I guess I’m stuck with Sascha’s “Accidental Dublin”.

    The Restoration

    The restoration began with a clean denim piece for both the protection of the pipe and the workbench top.

    THe reaming tools included only the General triangular scraper, the Smokingpipes Low Country reamer and the 220 sandpaper wrapped dowel.  The PipNet and Kleen-Reem were not employed for fear their torque would be detrimental to the meerschaum.

    The reaming was uneventful due to the light cake build-up within the tobacco chamber.

    After a light sanding I scrubbed the chamber with a few cotton swabs dipped in 95% ethyl alcohol.

    Before cleaning the shank, I looked close at the mortise.  There appeared to be an insert of some plastic.  

    I remembered the pamphlet Siv, the pipesmokersdens.com forum contributor, provided.These little things never cease to amaze me.I had no idea that pipe makers in the 1960s-1970 were in the habit of using Delrin or Delrin-like mounts for meerschaum pipes.

    THe airway of the shank was cleaned out using alcohol dipped bristle pipe cleaners.  I think the vast majority of the black that was staining the pipe cleaners was excess black dye or stain used in the production of the pipe and not accumulated filth from smoking.

    The stem was cleaned next.  It was only slightly dirty and only required a couple of alcohol dipped pipe cleaners.   This further reaffirmed my conclusion to the black from the shank cleaning was dye.

    The stem was lightly buffed with 0000 steel wool to remove the surface oxidation in preparation for a dip in the Before and After Extra Strength Deoxidizer (lovingly referred to as deox).  A pipe cleaner was inserted into the tenon to act as a hanger while in the solution.

    I left the stem in deox overnight as it was heavily oxidized.  The next day I removed the stem and allowed it to drip excess deoxidizer back into the jar.

    After the drip dry I placed the stem on a coarse shop rag.  I like these rags because the rough texture and open weave absorb the remaining solution and lightly abrade the softened oxidized rubber from the stem.

    After hand buffing with the shop rag, you can see the amount of oxidized rubber which was removed.

    Even though the stem was looking nicely black I had the feeling that there was additional scrubbing in my future.  I used Soft Scrub on make-up pads to  further scrub and remove the oxidation.

    A lot of make-up pads.

    Eventually the color left on the pads was lightened.  I checked the condition of the logo.  Frequently in cases of severe oxidation logos can suffer or be nearly eliminated.  Yay, the loge was still there!

    The stem was oiled with mineral oil and allied to soak in the oil for a few minutes.  I am not sure if this is necessary or not but it does provide a nice little break for one to go upstairs and get some lunch.

    I covered the logo and the COM stamps with small pieces of Scotch tape to protect them from the sanding.  The stem was then sanded with a series of sanding sponges from 400-3500 grit.  Between each sponge the stem was rubbed with additional mineral oil and wiped with a paper towel.

    At this point I wanted to repaint the stem logo.  I prepped the area by cleaning it with a cotton swab dipped in alcohol.  I used a water based acrylic modeling paint for the paint.

    The paint was applied with a fly tying bodkin to the stamp.  THis paint dries quickly.

    THe surface was scraped with a rigid plastic card to remove the excess paint without cleaning out the grooves.  I could not get the paint to stay in the top left of the male symbol even after a couple more attempts.

    The stem was then worked with micro-mesh pads 4000-12000.  Between each of these pads the stem was rubbed with Obsidian Oil and wiped with a paper towel.

    THe stem was then polished with Before and After Fine followed by the Extra Fine polish.  Both were hand buffed with a soft cotton cloth.

    THe pipe was then taken to the buffer for a few coats of carnauba wax.  The final step was a hand buffing with a microfiber polishing cloth to raise the shine further.

    Overall I find this Man Sculpted Black Meerschaum Dublin to be a lovely pipe.  I continue to adore the shape. I do find that the shape is almost hard to view though.  The high gloss finish and the sculpted edges make it hard for me to accurately determine them.  Once in hand things become far more clear.  Though the handling of the pipe is intriguing in itself, the pipe is unnaturally light weight.  Almost alarmingly so.  This too could be illusionary due to the stark black color making me think that it should feel more substantial.  The removal of the oxidation revealed a very nice flat saddle stem which matches the gloss black of the pipe very well.  The dimensions of the Man Sculpted Black Meerschaum Dublin are:     

    • Length:  5.68 in./ 144.27 mm.
    • Weight:  1.20 oz./ 34.02 g.
    • Bowl Height:  1.91 in./  48.51 mm.
    • Chamber Depth:  1.47  in./ 37.34 mm.
    • Chamber Diameter:  0.75 in./ 19.05 mm.
    • Outside Diameter:  1.36 in./ 34.54 mm.

    I do hope that you have found something here useful to your own pipe care, maintenance or restorations.  If you like this sort of thing, please click the like and subscribe buttons.  Thank you for reading the ramblings of an old pipe lover.

    Loading…

    Below are some photos of the finished Man Sculpted Black Meerschaum Dublin.

  • A Golden Square Apple Restoration

    December 10th, 2024

    Photographed and written by

    John M. Young

    I really like the apple shape.  It is one of those things that I can’t explain, kind of like the inexplicable pull to pat a dog on the head even though they haven’t done anything pat worthy.  Now this pipe, through no fault of its own, has remained unrestored for quite a while due to a previous owner smoking marijuauna or some cannabis with it.  I dread working on pipes used for pot.  The resins and tars from cannabis are a pain to remove from a pipe.  Those pot-heads who say. “But, smoking weed is “natural” and way healthier than tobacco” have apparently never compared the smoking residues of the two.  Not only does the cannabis smell terrible, when exposed to ethanol it kind of dissolves then as the alcohol evaporates the remaining resins become more like a soft plastic and resist further applications of ethanol.  Okay, I am sounding whiny, so I will leave it at this: 

    Cannabis users, please just eat your cannabis – edibles do not seem to leave any residue in a pipe. I think even Jeff Spicoli would agree with that statement.

    (https://gointothestory.blcklst.com/great-character-jeff-spicoli-fast-times-at-ridgemont-high-3375d9e42a28)  

    Background

    I began researching this pipe by visiting the pipephil.eu site.  Here I found the following:

    (Go-Gq — Pipes: Logos & Markings).   John Redman, eh.  As a kid I grew up on Redman avenue.  I am going to assume that the street was named in honor of the pipemaker though in reality I know this not to be true.  Stupid reality.  This John Redman produced several very nice looking pipes in his London factory.

    (Jo-Jok — Pipes : Logos & Markings).

    Now I wanted to know more about this factory and the history of my childhood street namesake.  I turned to pipedia.org.  There the entry was what I call lacking.  Though there was a nice photograph of the factory.

    “John Redman Ltd. and British Empire Pipe Co.

    Other lines include Aristocrat, Buckingham, Buckingham Palace, Canberra, Captain Fortune, Dr John, Golden Square, Redonian, Richmond (not Sasieni), Twin Bore

    Former factory located at 3-11 Westland Place, Hackney, London N1 7LP” (John Redman Ltd./British Empire Pipe Co. – Pipedia)

    (File:John Redman Ltd.jpg – Pipedia)

    My thirst for knowledge remained unfulfilled.  I tried searching the internet without a guide and found a wonderful article by an anonymous author on the vkpipes.com site.

    “This famous picture above is perhaps the only broad known illustration to materials about John Redman LTD & British Empire Pipe Co. And the majority of sources doesn’t move usually far beyond a couple of sentenses: this company did really exist, it was located at this address and there is their former building. However…

    However, this Edwardian building on Westland Place was only an annex and no actual manufacturing was located there. The principle place of business and offices were located in Whitecross Street 123/5/7, within 15 minutes of slow walking from Westland Place. Therefore, one of their series was named Whitecross – you may find it in the catalogue below. The building on Whitecross St. still stands there and you may see it on the picture below. The crossing street is the Fortune St., so we have got an explanation of another Redman’s brand name – Captain Fortune.

    Indeed, many Redman’s brands bear such toponomical signs: the “Golden Square” series comes from the Golden Square located between the Lower John and Upper John streets, “Dr. John” is the most probably related to the abovementioned John streets. There are also Canberra road and Canberra House in London (which might inspire stamping of the famous Canberra pipes) as well as Canterbury House (Canterbury series). Burlington pipes named after the Burlington Arcade (see also H. Simmons). The majority of them are located quite close to the John Redman’s main office. No wide explanations are needed for the series Westminster and Kensington. And of course, some British imperial charm was added with names Aristocrat, Redman’s Royal, King’s Ransom.

    John Redman (as it happened later to Eric Nording) was both a carver and an owner of a business of the same name. The first pipes were born in 1934, but personal efforts appeared soon to be insufficient, what inevitably led to emerging of the name John Redman LTD. Unfortunately, we don’t have artifacts, which could be unambiguously carried to the “pre-war” period. In the WWII years the company could hardly got to the list of lucky manufacturers, who received scarce briar from the state.

    But by the end of 1950s John Redman’s firm offered a well balanced portfolio – from popular and practical “Captain Fortune”, “Dr John”, “Golden Square” to top graded Redman’s Royal made of best briar and almost without any stains (comparable to GBD Virgin, but the “Royals” were usually much larger and carved in their own unique style). And of course, we shouldn’t forget about qualitative and still affordable Redonians, Aristocrats and Canberras – a very strong middle (and upper middle) segment. More details, list of offered brands as well as presentation and gift sets can be seen in the catalogue.

    It is known that in late sixties and later a part of the production was ordered from subcontractors, for example Blakemar Briars, and since 1992 trademarks of John Redman were taken over by Gerald Grudgings of Loughborough; this company wasn’t a top manufacturer, but many sources attribute the invention of the lovat shape to it.

    As the conclusion we are proud to express our sincere and warmest thanks to Robert Deering, who worked for John Redman in 1960s and gave us a number of very important directions.

    ​Below you may enjoy the catalogue of the John Redman Ltd products approximately from the 1960s. A very rare finding!” (JOHN REDMAN Catalogue – Very Keen on Pipes)

    (JOHN REDMAN Catalogue – Very Keen on Pipes)

    The Restoration

    I did start with a clean denim piece but only photographed the stem.  I’m not sure why.  I guess I wanted to get rid of that nasty marijuana smell so bad that I wasn’t thinking straight.  I used a channel lock with the jaws wrapped in masking tape to remove the stinger from the stem.

    The stinger was placed into a medicine cup where it was submerged in 95% ethyl alcohol.

    The stem cleaning went better than I thought it would, only requiring a couple of bristle pipe cleaners dipped in 95% ethyl alcohol.

    Next came the ream team and the reaming of the tobacco chamber.

    This too went quickly with the PipNet doing most of the work.

    The Tobacco chamber was sanded with 220 sandpaper wrapped around a wood dowel.  After the sanding I scrubbed the bowl with alcohol dipped cotton swabs, hoping to get rid of the smell.  The interior showed no signs of heat damage.

    The rim was not in too bad shape requiring only a little bit of scraping with a sharp pocket knife.

    The resulting surface looked better but there were two areas of charring, fore and aft as well as the deep rim dents.

    I decided to lightly top the rim to better analyze the best way to proceed with restoring the rim.  I used 320 sand paper laid flat on a countertop and circular sanding. 

    The rim was sanded wit 400 grit paper in the same fashion as with the 320.

    The front rim looked pretty good but the rear would require some filling with cyanoacrylate (CA< super glue) and briar dust.

    Next, the stummel was taken to the sink where it received a scrubbing with undiluted Murphy Oil Soap and a nylon scrub brush.  The soap was rinsed with warm water and the stummel dried with a cotton hand towel.

    There was the shine of a clear coat present after the scrubbing.  Alcohol had no effect on it soI tried acetone on a make-up pad.  This worked but was very slow acting.

    I recently refilled my acetone jar by topping it off with fresh acetone.  I submerged the stummel in the acetone and set the timer for 30 minutes.

    30 minutes later I removed the stummel and decided to scrub the airway of the shank while the tars and smoking residue were still softened by the acetone.  The shank was filthy and reeked of non-tobacco.  Scraping with a dental scraper and numerous cotton swabs and bristle pipe cleaners seemed to do little but anger the residues.

    I continued the assault.

    That unpleasant task finished, I turned to addressing the rim damage.  I beveled the inner rim with 320 sandpaper and a wood sphere.  The outer rim, I tried to bevel it with a flat file.

    Though better, those dents had to go.  I picked out the old fills with a fly tying bodkin figuring that I may as well do all the filling at the same time.

    Since there would be a significant amount of sanding with the new fills, I finished removing all traces of the clear coat with acetone dripped make-up pads.

    I placed a small drop of brown CA onto/into each of the pits.  While it was still wet, I pressed a small scoop of briar dust into the pit.  The briar dust causes the CA to set-up and cure nearly immediately.  I used a brass brush to clear the loose dust from the area.  The photo below shows what the new fills look like at this stage.

    These new fills were filed with a small flat file to remove the excess new fill.  The light color of the fill indicates that it needs an additional application of CA and perhaps briar dust.  A completed fill appears dark.

    An additional application of CA and more briar dust was done.

    This created another round of light briar new fills to be filed.

    Eventually the new fills were smoothed with a 400 grit sanding sponge.

    At this point, I was thinking to myself, “Hey self, the name of the pipe is Golden Square.  Let’s try to lighten the briar to a more golden color.”  Self replied, “Brilliant, I’ll get the oxalic acid.”  Oxalic acid can be used as a treatment to bleach darkened or stained wood.  I had mixed this saturated solution several months ago and had used it successfully a few times.  

    I applied the solution with a cotton swab.  The effects occurred quickly.  Below is the stummel still wet with the solution.

    The solution was rinsed thoroughly then scrubbed with dish soap.  The basic nature of the soap helped neutralize any remaining acid.  The stummel was towel dried and allowed to air dry for several minutes.  The below photos show the lightened color of the briar.

    I got the stem prepped for a dip into the deox tank, that is my term for the Skippy peanut butter jar filled with Before and After Extra Strength Deoxidizer.  The stem would be spending overnight in the solution.

    While the stem was soaking I apparently thought it best to completely not photograph the sanding of the stummel with sanding sponges 400-3500 and also not to photograph the micro-meshing of the stummel with micro-mesh pads 4000-12000.  I also failed to photograph me wiping the stummel with an alcohol moistened make-up pad between each sponge and pad to remove sanding debris.  For the life of me, I cannot understand why I chose not to do any of the above.  Darn old people…

    I did however photograph the application of Before and After Restoration Balm after all the sanding and micro-meshing was completed.

    After the balm had worked it’s magic for 30 minutes the remaining elixir was wiped from the stummel using an inside out athletic sock revealing the glorious briar of this Golden Square.

    The next day, I removed the stem from deox and allowed the excess solution to drip back into the jar.

    The stem was hand rubbed with a coarse shop rag to remove the excess solution and some of the loosened oxidized vulcanite.

    Below you can see the oxidized rubber that was removed.

    I cut a small piece of Scotch tape to cover the stem logo protecting it from the sanding barrage that was coming next.

    I wanted the stem in place with the stummel for the sanding to avoid rounding the joint where the two pieces meet.  I remembered that the stinger had been soaking in alcohol since the previous day.  The medicine cup was retrieved 

    and the stinger cleaned.

    The stem was reassembled and reinserted into the shank.  Next, I wrapped the shank with painters tape to protect it from the stem sanding.  The sanding progressed from sanding sponge 400-3500.  Between sponges I rubbed the stem with mineral oil and wiped it with a paper towel.  Oh, and photographed it.

    The stem was worked with micro-mesh pads 4000-12000.  Between each pad I rubbed the stem with a light coat of Obsidian Oil and wiped it with a paper towel.  Oh, and photographed it.

    The stem was looking very good but it needed to have the gold reapplied to earn it’s title Golden Square.  I cleaned the logo area with an alcohol dipped cotton swaband fetched the Gold Leaf Rub’nBuff.

    The gold was applied to the logo with a fly tying bodkin, pressing it into the stamped logo.

    The Rub’nBuff was then rubbed and buffed to remove the gold from the high points of the logo.

    I then used Before and After Fine Polish followed by the Extra Fine Polish.  Both compounds were hand buffed with a soft cotton cloth.

    The pipe, now cleaned, still had the lingering aroma of non-tobacco – yeah pot smoke.  I decided to give it an alcohol and cotton ball overnight treatment.  I stuffed cotton into the bowl and shank of the stummel then added 95% ethyl alcohol with a disposable pipette until the cotton was saturated.  This sat overnight.  In the morning, I found the following:

    The cotton was removed and the bowl and shank were again scrubbed with alcohol dipped cotton swabs.  The Ghost of Mary Jane was gone.

    The pipe was reassembled and taken to the buffer where it received several coats of carnauba wax.

    The final step was to hand buff the pipe with a microfiber polishing cloth.

    Overall this Golden Square Apple turned out very nicely.  I love the traditional well proportioned shape.  The pipe retained some of the contrast stain, enough that I did not think additional dying was needed.  The oxalic acid treatment did a nice job at lightening the briar without diminishing the original stain too much.  I could have continued with additional bleaching but I liked where I stopped.  The vulcanite of the stem polished up nicely and accents the briar well.  The dimensions of the Golden Square Apple are:     

    • Length:  5.58 in./ 141.73 mm.
    • Weight:  1.51 oz./ 42.81 g.
    • Bowl Height:  1.68 in./  42.67 mm.
    • Chamber Depth:  1.43  in./ 36.32 mm.
    • Chamber Diameter:  0.72 in./ 18.29 mm.
    • Outside Diameter:  1.53 in./ 38.86 mm.

    I do hope that you have found something here useful to your own pipe care, maintenance or restorations.  If you like this sort of thing, please click the like and subscribe buttons.  Thank you for reading the ramblings of an old pipe lover.

    Loading…

    Below are some photos of the finished Golden Square Apple.

  • A Cesare Barontini Sultana Kuttel Selection B6 Restoration

    December 5th, 2024

    Photographed and written by

    John M. Young

    The thing that drew me to this pipe for purchase and restoration was the thick briar wall of the Dublin shape.  Recently I have become smitten by thick walled pipes.  I know that I live by the phrase, “change is evil and must be destroyed” but this is different.  I mean, thick walls are just cool, right?  Both literally and figuratively.  Well, I saw this multinational beauty, an Italian from Dublin, and had to have it.  The auction was won and the pipe made the journey from Cedar Park, Texas all the way to the Northern Time Zone of southeast Nebraska.  The stamps on this pipe read:  Barontini, in a stylized script over SULTANA on the shank to and KUTTEL over SELECTION with a slightly offset B6 on the shank’s bottom.  Below are some photos of the pipe as it appeared before any work was done.  

    The pipe looked to be in good condition with no obvious damage or evidence of mistreatment.  There was of course the expected cake within the bowl, some tooth chatter near the button and oxidation of the stem.  Other issues that appeared upon closer examination were the numerous fills and the dreaded clear coat.

    Background

    In researching the Barontini name, I first visited pipephil.eu for an affirmation of what I expected to be of Italian origin.  There was what I had expected, an Italian flag.

    (Baro-Bd — Pipes : Logos & Markings).  There was no exact match to the stampings but this was obviously the same maker.  The stylized signature script was an exact match and the fourth photo from the top had a shape number of B8 and was a very close match to this pipe and the B6 that it wears.  The fifth photo from the top middle column, alludes to a briar band and an apparent black acrylic band at the stem shank joint.  This also matched the pipe in hand.  The stem of my pipe was lacking any of the cool logos of the included Barontinis which saddened me.  None of the associated links lead to further information or similarities except for the “L’artigiana” link.  Here there was a photo of a pipe which had a similar briar band on the stem.

    (L-Lab — Pipes : Logos & Markings)

    Next, I turned to pipedia.org for a bit more history on the Barontini company.  Not much information was there to be had.  I include it here in its entirety:

    “In 1890 Turildo Barontini opened a factory for the production of briar. In 1925 his son Bruno began to produce the first pipes. Cesare Barontini, son of Bruno, started direction of the factory in 1955, and still runs it together with his daughters Barbara and Silvia.

    Sub-brands & Seconds

    • Aldo Velani
    • Cesare
    • L’artigiana
    • Stuart
    • Cortina”

    (Barontini, Cesare – Pipedia).  The “Sub-brand” Aldo Velani, did prove quite interesting:

    “”Cesare” is a second brand produced by Cesare Barontini of Livorno / Italy. Cesare Barontini headed the company from 1955 on.

    Another Barontini 2nd is named “Aldo Velani“. The name is fiction. Cesare Barontini Pipes are still relatively unknown and under appreciated here in the United States. They do however offer a value rarely matched by some of their more recognized Italian counterparts. Barontini makes very fine pipes, particularly his premium lines. They offer a fine smoking experience at quite a bargain. There are a few brands of Italian pipes on the U.S. market that are hardly known in Italy, as they are made in factories dedicated to the export trade. Aldo Velani is a line imported from Italy by Lane Limited, Dunhill’s distributor. Made mostly in Livorno by Cesare Barontini, one of the best known private-label manufacturers, Aldo Velani pipes are classic shapes with an Italian ‘twist,’ according to Frank Blews, a spokesman for Lane. “Billiards with more ‘ball,’ bulldogs with more ‘jaw,”‘ is the way he characterizes the line. A medium to large pipe specifically developed for American tastes, the finishes use the names of Italian wines – Soave, Novello, Barolo, Refosco – to suggest their colors, and there is a lot of ornamental work.” (Cesare – Pipedia).  The phrase “Aldo Velani pipes are classic shapes with an Italian ‘twist,’” strikes me as an apt description of this pipe.  I referred to it earlier as a “multinational beauty, an Italian from Dublin”.  This sounds like exactly what Barontini is making with their Aldo Velani line – a traditional shape with a signature, Italian, twist.

    I could not find any information as to Barontini employing P-lip (Peterson style) buttons on their pipes nor were any shape charts discovered.  Perhaps some things are better off left as mysteries.  This mysterious Dublin from Italy seems to be an excellent illustration of that idea.  

    The Restoration

    I broke from tradition with this one and opted to not use a stained denim piece over the stained green flannel which underlies the denim.  I thought you might like a change.  Or, I was too darn lazy to get up and get a piece of denim from 6 feet (2 m) away.  

    The new-to-me PipNet got to go to work with this one along with the rest of the ream team.

    PipNet #3 blades started the process of reaming.

    The #4 blades continued and were followed up by the Smokingpipes Low Country reamer and the General triangular scraper.  All of them were followed by the 220 sandpaper wrapped around the wood dowel.  

    The sanded tobacco chamber was taken to bare briar and appeared free of any heat damage.  A condition the interior rim was not so lucky to avoid as there was some charing around the edge.

    Another view of the interior of the tobacco chamber and the unsightly fill of the rim.  Oh, you know that has to go.

    And go it did.  The old putty was picked out using a fly tying bodkin and a dental scraper.   The old putty was surprisingly hard.

    So hard, in fact, that I could not get all of it out.  I’ll get more of it in a few minutes.

    I used saliva and light scraping with a sharp pocket knife to scrape away some of the charred briar around the rim.  That helped but the dark ring persisted.

    Moving on to cleaning out the airway of the shank was the next task.  I used a dental scraper to remove some of the tar and smoking residue then scrubbed the airway with cotton swabs and bristle pipe cleaners dipped in 95% ethyl alcohol.

    My acetone in the acetone jar was getting pretty depleted due to use and evaporation.  I unfortunately did not have more on hand.  I tried to use a make-up pad dipped in the acetone to remove the finish on the stummel.  

    The finish was old, hard and thick.  A trifecta of resistance to removal.  I lightly sanded the stummel avoiding the stampings and placed the stummel into the jar to soak. 

    I had to repeat this twice, once for each end of the stummel since I could not completely submerge it into the remaining acetone.

    After two soakings in the acetone the finish began to relent and was mostly removed with some rubbing with a make-up pad dipped in acetone.  The stampings remained finish covered due to my unwillingness to sand.  I needed fresh acetone but didn’t want to drive into town for a $1.25 bottle of the finish removing elixir.  Fortunately A buddy and his son were coming down to go fishing and I asked them to pick up a bottle for me.

    The shiny spots all indicated places with finish remaining.

    The below photo is of the stamp on the bottom of the shank.

    My delivery arrived and a quick fishing trip gave the remaining finish a short reprieve.  Later that evening armed with a fresh bottle of acetone the finish was removed.  Another benefit of the acetone was that it softened up the fills allowing me to pick the material out far more easily.

    And there were quite a few fills to remove.

    To refill the pits I used brown cyanoacrylate (CA, super glue) by itself or with briar dust.  I wanted to see if I could use layers of CA only on the rim hoping to achieve slightly transparent fills.  While on the stummel I applied the CA to the pit and pressed briar dust into the wet CA.  In both cases the CA was allowed to cure or dry then it was filed using a small flat file and smoothed with a 400 grit sanding sponge.  If needed additional applications were done.  The photo below shows application #1 to the rim.

    The rim was propped to allow the CA to level and cure on its own.

    While the CA was curing I turned my attention to the stem.  I neglected to photograph the cleaning of the stem’s airway.  This was done with several bristle pipe cleaners dipped in 95% ethyl alcohol.  Those tooth marks had to go.  I used the small flat file to filed away material and blend the surface.  This stem was rather thick feeling between my teeth and I did not feel the need to fill the dents with black CA.  After the filing the stem was sanded with a 320 sanding sponge followed by a 400 sponge.

    The CA on the rim contracted as it cured and required a 2nd application to the deepest pit.  The two smaller fills can be seen in the photo below at 2:00 and 9:00 positions.

    The big rim pit needed a third application.

    Below you can see the other fills receiving their final sanding.

    Once the fills were done, I taped the stamps and began sanding the entire pipe with a series of sanding sponges from 400-3500.  Between each sponge I wiped the stummel with a make-up pad moistened with alcohol to remove sanding debris.  The stem was rubbed with mineral oil and wiped with a paper towel.

    After the final sanding wipe I removed the painters tape and wiped the shank with alcohol to remove any remaining adhesive from the tape.  The pipe was then worked with  a series of micro-mesh pads in grits 3600-12000.  Between each pad I wiped the stummel with a make-up pad moistened with alcohol to remove debris.  The stem was rubbed with Obsidian Oil and wiped with a paper towel.

    The pipe was then given a coating of Before and After Restoration Balm and allowed to sit for 30 minutes.

    The Restoration Balm was removed with an inside out athletic sock.  Sorry, I neglected to photo-document this step.  The stem was then hand polished using Before and After Fine Polish followed by the Extra Fine Polish.  Both compounds were applied by my fingertip and rubbed with a soft cotton cloth.

    Overall this Barnotini Sultana Kuttel Selection B6 turned out very nicely.  I love the shape and the thick walls.  The pipe retained some of the contrast stain, enough that I did not think additional dying was needed.  It did lose some of the deeper reddish hues which it had originally.  I think the red and the thick clear coat were only used to hide the numerous fills and their absence added to the attractiveness of the briar.  Okay, that is pure conjecture but I still think it looks better with a more natural briar than all the red.  The vulcanite of the stem polished up nicely.  If you are wondering why I did not use any deoxidation products on the stem it is because the filing and sanding were adequate to remove the oxidation without them.  The dimensions of the Barnotini Sultana Kuttel Selection B6 are:     

    • Length:  6.04 in./ 153.42 mm.
    • Weight:  1.81 oz./ 51.31 g.
    • Bowl Height:  2.07 in./  52.58 mm.
    • Chamber Depth:  1.83  in./ 46.48 mm.
    • Chamber Diameter:  0.88 in./ 22.35 mm.
    • Outside Diameter:  1.72 in./ 43.69 mm.

    I do hope that you have found something here useful to your own pipe care, maintenance or restorations.  If you like this sort of thing, please click the like and subscribe buttons.  Thank you for reading the ramblings of an old pipe lover.

    Loading…

    Below are some photos of the finished Barnotini Sultana Kuttel Selection B6.

  • A Peterson Dunmore System 79 Rustic Restoration

    December 3rd, 2024

    Photographed and written by 

    John M. Young

    This blog was originally posted on 12/01/2024 on Mark Irwin’s Peterson Pipe Notes 432.  It is reposted here as part of my ongoing saga.  It appears here with permission of the author, me. Also, this pipe is not available for sale.

    There are a few searches that I run on eBay frequently and Peterson Dunmore pipes are one of them.  When I first saw this rusticated rascal I thought about my budget and decided to give it a go.  The recent prices for estate pipes have been volatile to say the least.  I’ve watched auctions increase in price significantly over the past several years, sometimes going for far more than what I think something is worth and other times nowhere near the item’s value, in my mind.  This one would have been a hard pass 3 years ago but with inflation it fell within acceptable limits.  Besides, it was gorgeous.  The auction was won and after a Midwest adventure from Deerfield, Illinois to the wilds of southeast Nebraska it was home.  The pipe came with what I thought was the original box and ephemera.  At least that what they looked like in the eBay listing:

    The box looked correct in style for the early 1970s.  Upon examination I saw the following:

    Well, this sure as heck is not a 313 and it certainly is not smooth.  I messaged the seller explaining my disappointment.  They sounded sincere in their explanation that the pipe arrived to them in this box and that they did not intend to mislead.  I call this a learning moment for myself  and was reminded to avoid getting caught up in emotion.  I nevertheless provided very objective and honest feedback on eBay regarding the seller’s inaccurate item description. Live and learn, I guess.

    Below are some photos of the pipe prior to doing any work on it.  I also photographed the pamphlet and pipe sock and include those below as well.

    Background

    On June 25, 2024 I posted a blog about the restoration of a Peterson Dunmore 606.  Being a proud Generation X member, also known as a total slacker, I will include the background from that post in its near entirety (Original post:  Peterson Dunmore 606 Pot).

    “As much as I love the history of the Kapp and Peterson company and Peterson pipes, I will not get into that other than give you resources to read the history for yourself.  I will delve into the Dunmore, or Dunmoor line of pipes at greater depth.

    For a great history Mark Irwin and Gary Marlburg’s book is a must read for a Pete Geek.

    (Available at https://www.smokingpipes.com/accessories/books/moreinfo.cfm?product_id=471478)  Given the price is a bit high but worth every penny for a Peterson aficionado.

    The next site is pipedia.org’s History of Peterson by Jim Lilley (Peterson – Pipedia)

    Lastly the pipephil.eu site for all things logo:  Peterson: historical pipes — Pipes: Logos & Markings (pipephil.eu)  They also have a few other links to things like the Peterson timeline and P-lip information.

    Now to the stuff regarding this pipe:  A Peterson Dunmore.  I refer to Mark Irwin again here and his blog, Peterson Pipe Notes.  I can wholeheartedly recommend the free at

    https://petersonpipenotes.org/  Yes, you will get emails but only for things like the weekly blog post and occasional Peterson pipe drops (like the Peterson Pipe Notes Pipe of the Year) or offers for cool Pete Geek merchandise.  Anyway Mark has an article on the Dunmore line that is great. https://petersonpipenotes.org/226-documenting-the-dunmore-system-and-classic-lines/

    I will include the text here in its entirety but recommend the link for the photos. This is used with permission of the author (thank you Mark).

    “226. Documenting the Dunmore System and Classic Lines

    Milos “Mike” Bera at PipesPens&More.com on eBay recently wrote me to say that he’d run across two examples of a Peterson Dunmore Classic line he’d never seen before—a higher-grade line with a briar-in-brass sandwich band. As I thought they were not only gorgeous but undocumented, the time seemed right to take a look back at the history of the Dunmore System and Classic lines.

    I’ve been a fan of the Dunmore lines since I first saw them through the case back in the late 1980s and had to have one, a fat-bottom 72 (the 302 equivalent). Like everyone else, I thought there was some kind of mistake—“Where’s the nickel mount?” I remember asking. But the Dunmore System set out to be something a little different, yet within the classic Kapp & Peterson house style.

    The line originated in collaboration with Iwan Reis in 1971. How it came about is anyone’s guess at this point. Chuck Levi, the man who more than any other was responsible for bringing the great Danish artisan pipes to the US, was working with the creative minds at K&P to bring something new to the IRC catalog, and this was one of about a dozen K&P lines that debuted as exclusives in the Iwan Reis catalogs of that era.

    The concept was to modernize the System pipe by removing what was perceived as the old-fashioned nickel mount. And old-fashioned it was—if you look at pipe catalogs from the 1940s on through most of the rest of the 20th century, nickel ferrules and even bands were almost non-existent. K&P was virtually the only hold out, using sterling bands on the Sterling Silver Classic line and on the Premier & De Luxe Systems. A bead was then carved around the stummel at the mortise end. As you can see from the IRC detail, sometimes the contrast stain made the beads stand out, and sometimes not.

    But there were two more ingredients to the original Dunmore aesthetic which can be seen the photo below. Paddy Larrigan, K&P’s master-craftsman, was always striving to push the envelope in pipe engineering, and one of the things he dearly loved was a pipe that would sit, so he shaved off the bottom of the shank to allow the Dunmore System to sit on its shank and button, which gives it its uniqueness in the catalog. The downside of this is that I am not convinced that all the Dunmore reservoirs, being slightly smaller than the traditional System, are quite as effective.

    The third distinguishing mark of the original Dunmore lines is the stem. Both the System and Classic versions utilized the wide-shoulder “Comfort Lip,” with a painted  gold P on the stem. This doubtless helps the System sit as well as giving it a more muscular visual balance, strength being a long-standing concept in the design language of the company. While it gives the illusion of being an army “push” mount, of course it isn’t, but is a traditional tenon-mortise or “navy mount” as the old hands at K&P used to call it.

    The 1971 IRC catalog description reads, “dunmoor briar IRC ’71 modern system without sterling band, natural $12.00.” This intentional misspelling of “Dunmore” would persist through subsequent IRC catalogs, the copy-writer evidently under the spell of e.e. cummings and favoring an English flavor to his pipes. The name, like almost all K&P line names, is taken from the Irish landscape, in this case the town in County Galway famous for Dunmore Castle.

    The 1975 Orange Catalog shows the initial Dunmore System release was in only seven shapes:

    This was later expanded to include both the original bent dublin shape 5 (75) and XL5 (XL75) and the replacement calabash shape 5 and XL5. The remaining “new” System shapes were also added to the Dunmore lineup, the 01 becoming the Dunmore 73, the 02 the 70 and the 03 the 76. The fact that the 304 and 306 “setters” introduced in 1984 never entered the Dunmore System lineup adds the probability that the line had been discontinued by then.

    The smooth Dunmore System features a light brown natural finish, sometimes occurring with broad flames, as can be seen in these photos of an unsmoked 77 System:

    The rusticated version of the Dunmore System seems to have been finished in at least two techniques or versions. Neither is as deep as the Pebble Rustic finish  but they still feel very therapeutic under thumb and finger.

    Even when we were beginning our research on the Peterson book (due out in reprint later this year), most Pete fans had no idea there was also a Dunmore Classics line featuring the same beading at the mortise and wide Comfort Lip mouthpiece. Documentary proof was found in the rare 1978-79 Peterson-Glass catalog:

    The Dunmore System and Classic Lines from the 1978-79 Peterson-Glass Catalog

    I don’t know whether the Dunmore Classics was a short-lived line or whether it was primarily available in Europe, but it almost never appears on the estate market here in the US. As you can see from the catalog and the 406 pictured above, the same aesthetic was followed for the Classic line—light brown, nearly natural, higher-quality smooth bowl (or dark rustic) and faux army mount with gold-painted P, wide saddle and P-Lip stem. Only the Dunmore System, as far as I have been able to document, had the flattened stummel allowing it to set.

    I have always hoped to run across an unsmoked rustic Dunmore System with the dark contrast stains seen in the Peterson-Glass catalog. I wonder if this finish actually went into production, because the ones I’ve seen all look more-or-less like the XL75 shown above.

    The original Dunmore lines seemed to have been dropped at about the time the company went through its worst redundancy in 1984, as there are no more traces of it in the company’s ephemera from 1983 on. I remember the proprietor of my B&M, Cavalier Pipe & Tobacco in Barracks Road Shopping Center in Charlottesville, telling me when I bought my shape 73 Dunmore that the line was out of production, so I’d better get it if I wanted it (don’t you miss high-pressure salesmen?)—and that would have been 1986 or ’87.

    The second iteration of the Dunmore Classics line is that recently discovered by Mike at PipesPens&More on eBay. I would tentatively date it to c. 1995, well after K&P had gotten on its feet again and was doing some new and fascinating things. It seems to belong with three other briar adornment lines from the same period: Paddy Larrigan’s Briar in a Circle Systems and the Galway and Kapp-Royal higher-grade lines with their wonderful inset briar rings.

    Mike’s Dunmore Classics line is certainly on a par, from the two examples he’s found, with the Galway and Kapp Royal briars and maybe better, although probably not as fine as the Briar in a Circle Systems. Take a closer look at this 80S, which Mike sold within 24 hours of posting it on eBay:

    The last Dunmore Classics line made a brief appearance in the Dublin era’s second decade, somewhere in the 2000s, probably around 2005 or so. Jim Lilley’s old blog site made a reference to them, and I remember seeing them for sale at internet shops.

    I know it appeared well before I got interested in writing the Peterson book, because I don’t have any internet images of it in my files. These photos of the B5 and B11 give a good idea of what the line was like, although it appears to have begun in a higher range and then slipped to a lower.

    Updated Identification Guide

    Dunmore  (1971–c. 1984; c. 1995; 2006–2010)   Appeared in 1971 as Iwan Reis & Co. exclusive line “Dunmoor,” Premier-grade unmounted System in smooth natural or rustic dark chocolate contrast in all shapes, with beading at the shank, faux wide-saddle P-Lip with gold paint P.  Documented in Associated Imports catalog from 1973. Classic Range line from 1978 with same faux army mount and finishes. Second scarce Classic Range line, c. 1990, higher-grade smooth bowl with brass sandwich and briar band, P-Lip. A third Classic Range line, 2006–2010, mid-grade, featured standard and some B shapes, with beading around bowl instead of shank-face, for European market.

    Many thanks to Mike Bera
    Photos of the Dunmore 80s and 68 courtesy Mike’s Pipes Pens & More
    Photos of the B5 and 406 Dunmore courtesy Smokingpipes.com” (https://petersonpipenotes.org/226-documenting-the-dunmore-system-and-classic-lines/)”

    (https://wordpress.com/post/scimansays1787.com/6410 referencing myself feels weird)

    From the above documentation I think that I can safely assume that this Dunsmore 79 is of the original 1971-1978 time period.

    Interesting side note here:  In the above Mark Irwin says, “I have always hoped to run across an unsmoked rustic Dunmore System with the dark contrast stains seen in the Peterson-Glass catalog. I wonder if this finish actually went into production, because the ones I’ve seen all look more-or-less like the XL75 shown above.“  I emailed Mark and asked him if the Dunmore 79 in hand was what he was looking for.  I included some of the before and after photos from this restoration.  He replied, “Yup, that’s it!!😆” (Mark Irwin, personal email).

    The Restoration

    As boringly typical of my restorations, I began with a clean denim piece to protect the work surface.  Yeah, I know, the term “clean” doesn’t really describe the stained denim.

    The new to me PipNet came out and I had high hopes that it would be useful.  The standard ream team consisting of the Smoking pipes Low Country reamer, General triangular scraper and 220 sandpaper wrapped wood dowel were along for clean-up duties.  Low and behold the Dunmore 79 had precisely the wrong size bowl for either the #1 or #2 PipNet blades.  

    With the #1 blades too small and the #2 blades too large, plan B was put in motion.  The adjustable Kleen-Reem tool was called in to remove the minimal cake in the tobacco chamber.  The other two reamers were used then the chamber was sanded with the 220 on a stick.  Once down to the bare briar I could see that there was no damage to the briar and that this pipe looked like it had only been smoked a hand-full of times.

    Next was the cleaning of the shank.  Typically with Peterson System pipes this can be a chore.  Owners frequently fail to clean out the reservoir after a smoke which creates rather difficult tar deposits.  This pipe’s tar was quickly removed and revealed the stain used at the Peterson factory.  A surprisingly reddish-pink stain at that. 

    The stummel was taken to the sink for a scrub.  Murphy Oil Soap and a nylon scrub brush were used to remove the age and grime from the stummel.  Once scrubbed the soap was rinsed with warm water and the stummel dried with a cotton hand towel.

    Back at the workbench the stummel received a wiping with a make-up pad dipped in 95% ethyl alcohol.  The alcohol removed a bit more of the reddish-pink stain

    The stem was the next victim of my cleaning activities.  I used both bristle and fluffy pipe cleaners dipped in 95% ethyl alcohol to remove the slight smoking residue in the airway.

    The stummel was given a coat of Before and After Restoration Balm and allowed to sit for about 30 minutes.

    During this time I taped over the stem logo with a piece of Scotch tape.  The stem was in very good condition and did not have a heavy layer of oxidation.  There were some tooth marks near the button and those were filed and sanded with 320 then 400 grit sanding sponges.

    The stummel was wiped with an inside out athletic sock to remove the excess Restoration Balm. 

    At this stage I couldn’t help but admire the beauty of the rustication and contrast staining of the Peterson workmen.  I wondered if Paddy Larrigan himself had a hand in the crafting of this piece.

    The stem was sanded with a series of sanding sponges in grits of 320-3500.  Between each sponge I rubbed the stem with mineral oil and wiped it with a paper towel to remove sanding debris.

    I then taped the shank with painters tape to protect it from the buffing I was about to do.  The stem was mounted to the stummel as a handle and buffed with Red Rouge compound (I remain confused as to why the product had both “Red” and “Rouge” on the label).

    The stem was then worked with micro-mesh pads in grits of 3600-12000.  Between each of the pads I rubbed the stem with Obsidian Oil and wiped it with a paper towel.

    The stem was polished with both Before and After Fine Polish and Extra Fine Polish.  These polishes were applied with a fingertip and hand buffed with a soft cotton rag.

    The next step in the stem restoration was to pick out the old gold paint and to re-do the logo with Rub’nBuff Gold Leaf.  The old gold was picked out using a fly tying bodkin then scrubbed with 95% ethyl alcohol on a cotton swab.

    The new gold leaf was applied with the tip of the bodkin and allowed to dry.

    The excess gold  was scraped from the logo with my fingernail and hand buffed with a paper towel. I applied two coats.  The photo below is after the first but before the second.

    The stummel was given a coating of Renaissance Micro-Crystalline Wax applied with a baby toothbrush.  This was allowed to dry for a few minutes then hand buffed with a clean cotton terry cloth towel.

    The stem returned to the buffer for several coats of carnauba wax.

    The final stem was to hand buff the pipe with a microfiber polishing cloth.

    This Peterson Dunmore System 79 Rustic has returned to the world in all of it’s original glory. The 309 shape, 79 in the Dunmore line, is a favorite of mine and I can’t help wondering why it was ever discontinued.  The contrast stain on this pipe is lovely with the reddish highlights and the dark brown-black in the rustications.  The stem polished up very nicely and contrasted the smooth shank-end briar in a unique and subtle way.  The flat heel of the pipe does provide it with a “sitting” platform though not a terribly stable one.  Fortunately Nebraska is not prone to earthquakes and I no longer have any little ones in the house to provide anthropogenic tremors.  The dimensions of the Dunmore 79 are:     

    • Length:  6.31 in./ 160.27 mm.
    • Weight:  1.80 oz./ 51.03 g.
    • Bowl Height:  2.09 in./  53.09 mm.
    • Chamber Depth:  1.62  in./ 41.15 mm.
    • Chamber Diameter:  0.76 in./19.30 mm.
    • Outside Diameter:  1.26 in./ 32.00 mm.

    I do hope that you have found something here useful to your own pipe care, maintenance or restorations.  If you like this sort of thing, please click the like and subscribe buttons.  Thank you for reading the ramblings of an old pipe lover.

    Loading…

    Below are some photos of the finished Peterson Dunmore System 79 Rustic.

←Previous Page
1 … 9 10 11 12 13 … 26
Next Page→

Blog at WordPress.com.

Privacy & Cookies: This site uses cookies. By continuing to use this website, you agree to their use.
To find out more, including how to control cookies, see here: Cookie Policy

Loading Comments...

    • Subscribe Subscribed
      • NebraskaPeteGeek
      • Join 40 other subscribers
      • Already have a WordPress.com account? Log in now.
      • NebraskaPeteGeek
      • Subscribe Subscribed
      • Sign up
      • Log in
      • Report this content
      • View site in Reader
      • Manage subscriptions
      • Collapse this bar
    %d