Skip to content
    • About

NebraskaPeteGeek

  • American Pipe Makers
  • British pipe Makers
  • Danish pipe Makers
  • French Pipe Makers
  • German Pipe Makers
  • Irish Pipe Makers
  • Italian Pipe Makers
  • Others or Unknown Pipe Makers
  • Restorations
  • A Golden Square Apple Restoration

    December 10th, 2024

    Photographed and written by

    John M. Young

    I really like the apple shape.  It is one of those things that I can’t explain, kind of like the inexplicable pull to pat a dog on the head even though they haven’t done anything pat worthy.  Now this pipe, through no fault of its own, has remained unrestored for quite a while due to a previous owner smoking marijuauna or some cannabis with it.  I dread working on pipes used for pot.  The resins and tars from cannabis are a pain to remove from a pipe.  Those pot-heads who say. “But, smoking weed is “natural” and way healthier than tobacco” have apparently never compared the smoking residues of the two.  Not only does the cannabis smell terrible, when exposed to ethanol it kind of dissolves then as the alcohol evaporates the remaining resins become more like a soft plastic and resist further applications of ethanol.  Okay, I am sounding whiny, so I will leave it at this: 

    Cannabis users, please just eat your cannabis – edibles do not seem to leave any residue in a pipe. I think even Jeff Spicoli would agree with that statement.

    (https://gointothestory.blcklst.com/great-character-jeff-spicoli-fast-times-at-ridgemont-high-3375d9e42a28)  

    Background

    I began researching this pipe by visiting the pipephil.eu site.  Here I found the following:

    (Go-Gq — Pipes: Logos & Markings).   John Redman, eh.  As a kid I grew up on Redman avenue.  I am going to assume that the street was named in honor of the pipemaker though in reality I know this not to be true.  Stupid reality.  This John Redman produced several very nice looking pipes in his London factory.

    (Jo-Jok — Pipes : Logos & Markings).

    Now I wanted to know more about this factory and the history of my childhood street namesake.  I turned to pipedia.org.  There the entry was what I call lacking.  Though there was a nice photograph of the factory.

    “John Redman Ltd. and British Empire Pipe Co.

    Other lines include Aristocrat, Buckingham, Buckingham Palace, Canberra, Captain Fortune, Dr John, Golden Square, Redonian, Richmond (not Sasieni), Twin Bore

    Former factory located at 3-11 Westland Place, Hackney, London N1 7LP” (John Redman Ltd./British Empire Pipe Co. – Pipedia)

    (File:John Redman Ltd.jpg – Pipedia)

    My thirst for knowledge remained unfulfilled.  I tried searching the internet without a guide and found a wonderful article by an anonymous author on the vkpipes.com site.

    “This famous picture above is perhaps the only broad known illustration to materials about John Redman LTD & British Empire Pipe Co. And the majority of sources doesn’t move usually far beyond a couple of sentenses: this company did really exist, it was located at this address and there is their former building. However…

    However, this Edwardian building on Westland Place was only an annex and no actual manufacturing was located there. The principle place of business and offices were located in Whitecross Street 123/5/7, within 15 minutes of slow walking from Westland Place. Therefore, one of their series was named Whitecross – you may find it in the catalogue below. The building on Whitecross St. still stands there and you may see it on the picture below. The crossing street is the Fortune St., so we have got an explanation of another Redman’s brand name – Captain Fortune.

    Indeed, many Redman’s brands bear such toponomical signs: the “Golden Square” series comes from the Golden Square located between the Lower John and Upper John streets, “Dr. John” is the most probably related to the abovementioned John streets. There are also Canberra road and Canberra House in London (which might inspire stamping of the famous Canberra pipes) as well as Canterbury House (Canterbury series). Burlington pipes named after the Burlington Arcade (see also H. Simmons). The majority of them are located quite close to the John Redman’s main office. No wide explanations are needed for the series Westminster and Kensington. And of course, some British imperial charm was added with names Aristocrat, Redman’s Royal, King’s Ransom.

    John Redman (as it happened later to Eric Nording) was both a carver and an owner of a business of the same name. The first pipes were born in 1934, but personal efforts appeared soon to be insufficient, what inevitably led to emerging of the name John Redman LTD. Unfortunately, we don’t have artifacts, which could be unambiguously carried to the “pre-war” period. In the WWII years the company could hardly got to the list of lucky manufacturers, who received scarce briar from the state.

    But by the end of 1950s John Redman’s firm offered a well balanced portfolio – from popular and practical “Captain Fortune”, “Dr John”, “Golden Square” to top graded Redman’s Royal made of best briar and almost without any stains (comparable to GBD Virgin, but the “Royals” were usually much larger and carved in their own unique style). And of course, we shouldn’t forget about qualitative and still affordable Redonians, Aristocrats and Canberras – a very strong middle (and upper middle) segment. More details, list of offered brands as well as presentation and gift sets can be seen in the catalogue.

    It is known that in late sixties and later a part of the production was ordered from subcontractors, for example Blakemar Briars, and since 1992 trademarks of John Redman were taken over by Gerald Grudgings of Loughborough; this company wasn’t a top manufacturer, but many sources attribute the invention of the lovat shape to it.

    As the conclusion we are proud to express our sincere and warmest thanks to Robert Deering, who worked for John Redman in 1960s and gave us a number of very important directions.

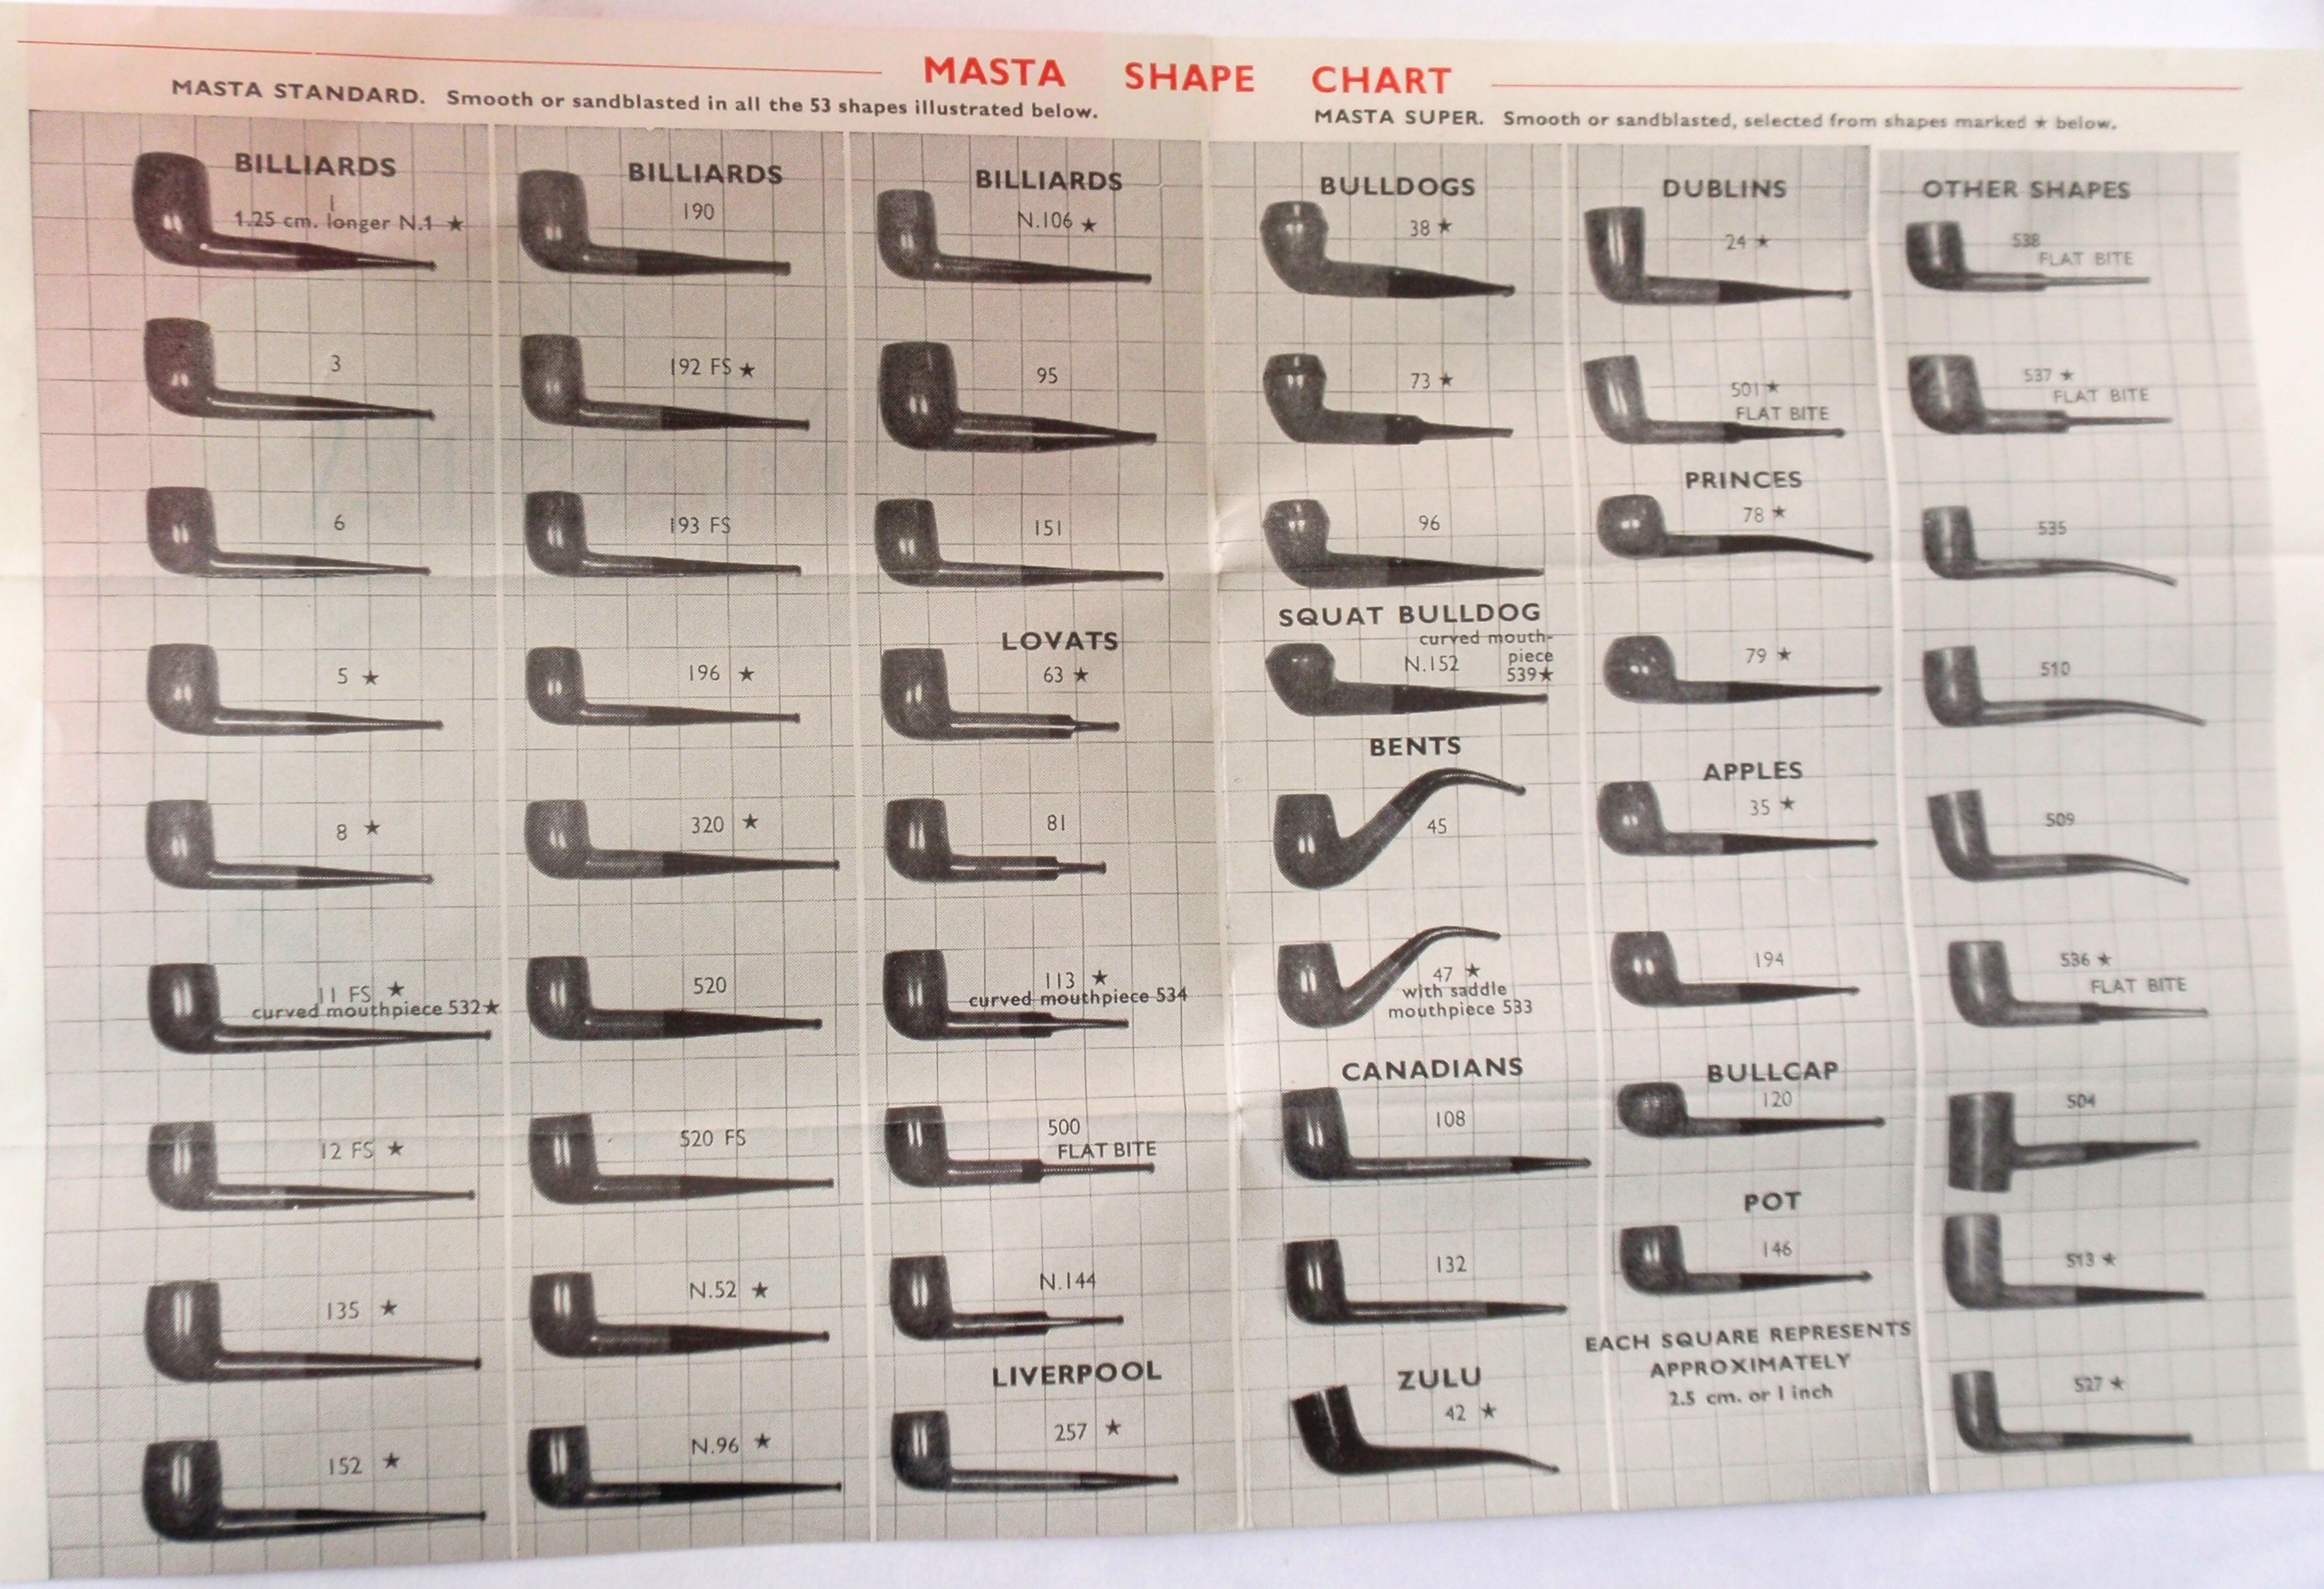
    ​Below you may enjoy the catalogue of the John Redman Ltd products approximately from the 1960s. A very rare finding!” (JOHN REDMAN Catalogue – Very Keen on Pipes)

    (JOHN REDMAN Catalogue – Very Keen on Pipes)

    The Restoration

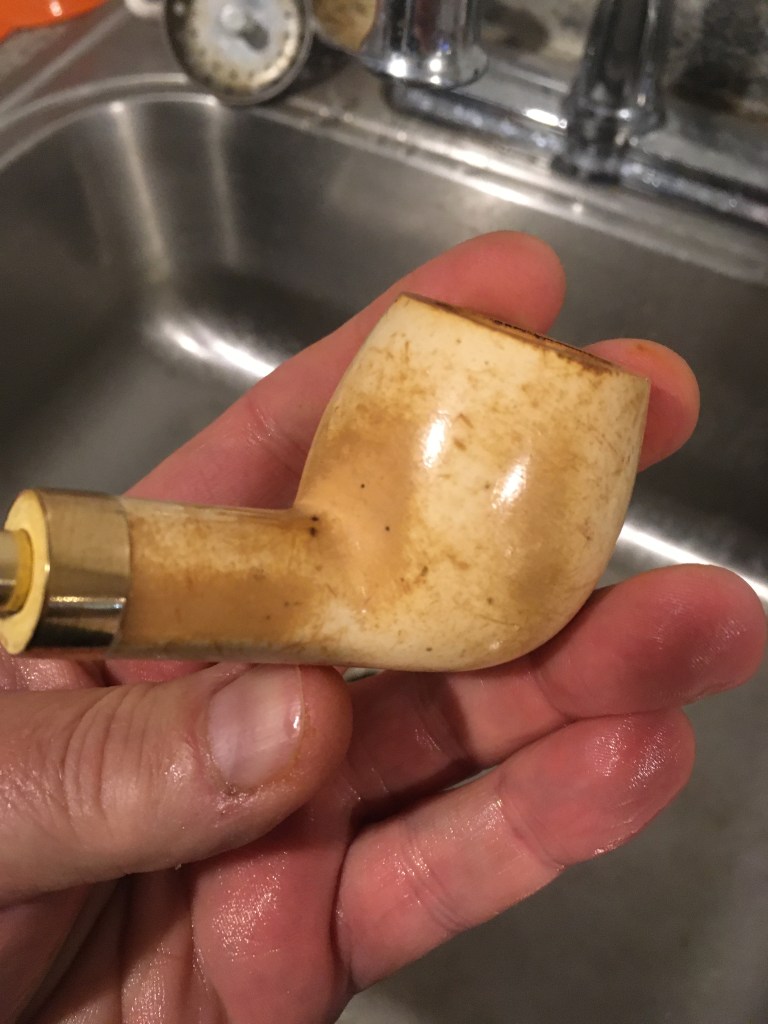
    I did start with a clean denim piece but only photographed the stem.  I’m not sure why.  I guess I wanted to get rid of that nasty marijuana smell so bad that I wasn’t thinking straight.  I used a channel lock with the jaws wrapped in masking tape to remove the stinger from the stem.

    The stinger was placed into a medicine cup where it was submerged in 95% ethyl alcohol.

    The stem cleaning went better than I thought it would, only requiring a couple of bristle pipe cleaners dipped in 95% ethyl alcohol.

    Next came the ream team and the reaming of the tobacco chamber.

    This too went quickly with the PipNet doing most of the work.

    The Tobacco chamber was sanded with 220 sandpaper wrapped around a wood dowel.  After the sanding I scrubbed the bowl with alcohol dipped cotton swabs, hoping to get rid of the smell.  The interior showed no signs of heat damage.

    The rim was not in too bad shape requiring only a little bit of scraping with a sharp pocket knife.

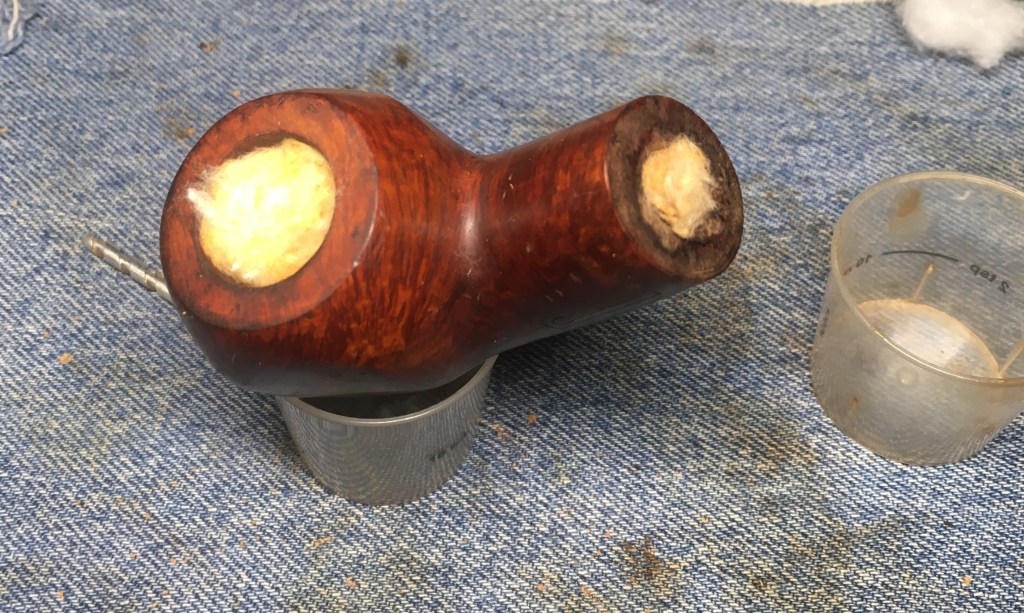
    The resulting surface looked better but there were two areas of charring, fore and aft as well as the deep rim dents.

    I decided to lightly top the rim to better analyze the best way to proceed with restoring the rim.  I used 320 sand paper laid flat on a countertop and circular sanding. 

    The rim was sanded wit 400 grit paper in the same fashion as with the 320.

    The front rim looked pretty good but the rear would require some filling with cyanoacrylate (CA< super glue) and briar dust.

    Next, the stummel was taken to the sink where it received a scrubbing with undiluted Murphy Oil Soap and a nylon scrub brush.  The soap was rinsed with warm water and the stummel dried with a cotton hand towel.

    There was the shine of a clear coat present after the scrubbing.  Alcohol had no effect on it soI tried acetone on a make-up pad.  This worked but was very slow acting.

    I recently refilled my acetone jar by topping it off with fresh acetone.  I submerged the stummel in the acetone and set the timer for 30 minutes.

    30 minutes later I removed the stummel and decided to scrub the airway of the shank while the tars and smoking residue were still softened by the acetone.  The shank was filthy and reeked of non-tobacco.  Scraping with a dental scraper and numerous cotton swabs and bristle pipe cleaners seemed to do little but anger the residues.

    I continued the assault.

    That unpleasant task finished, I turned to addressing the rim damage.  I beveled the inner rim with 320 sandpaper and a wood sphere.  The outer rim, I tried to bevel it with a flat file.

    Though better, those dents had to go.  I picked out the old fills with a fly tying bodkin figuring that I may as well do all the filling at the same time.

    Since there would be a significant amount of sanding with the new fills, I finished removing all traces of the clear coat with acetone dripped make-up pads.

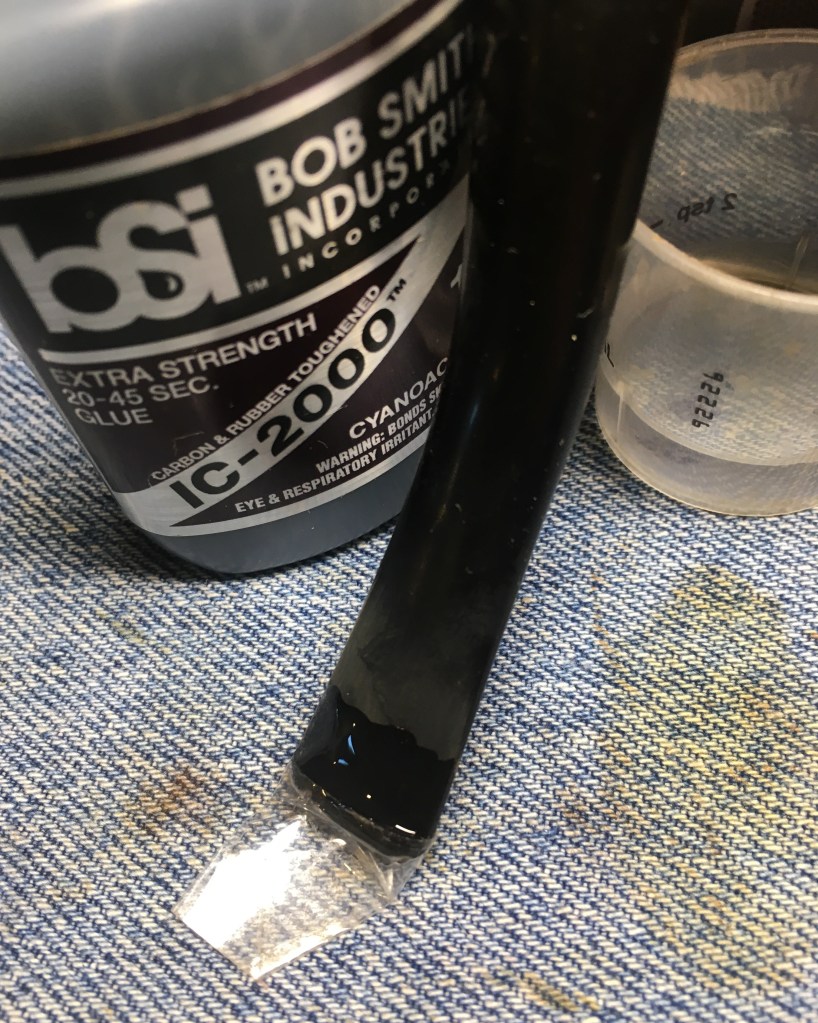
    I placed a small drop of brown CA onto/into each of the pits.  While it was still wet, I pressed a small scoop of briar dust into the pit.  The briar dust causes the CA to set-up and cure nearly immediately.  I used a brass brush to clear the loose dust from the area.  The photo below shows what the new fills look like at this stage.

    These new fills were filed with a small flat file to remove the excess new fill.  The light color of the fill indicates that it needs an additional application of CA and perhaps briar dust.  A completed fill appears dark.

    An additional application of CA and more briar dust was done.

    This created another round of light briar new fills to be filed.

    Eventually the new fills were smoothed with a 400 grit sanding sponge.

    At this point, I was thinking to myself, “Hey self, the name of the pipe is Golden Square.  Let’s try to lighten the briar to a more golden color.”  Self replied, “Brilliant, I’ll get the oxalic acid.”  Oxalic acid can be used as a treatment to bleach darkened or stained wood.  I had mixed this saturated solution several months ago and had used it successfully a few times.  

    I applied the solution with a cotton swab.  The effects occurred quickly.  Below is the stummel still wet with the solution.

    The solution was rinsed thoroughly then scrubbed with dish soap.  The basic nature of the soap helped neutralize any remaining acid.  The stummel was towel dried and allowed to air dry for several minutes.  The below photos show the lightened color of the briar.

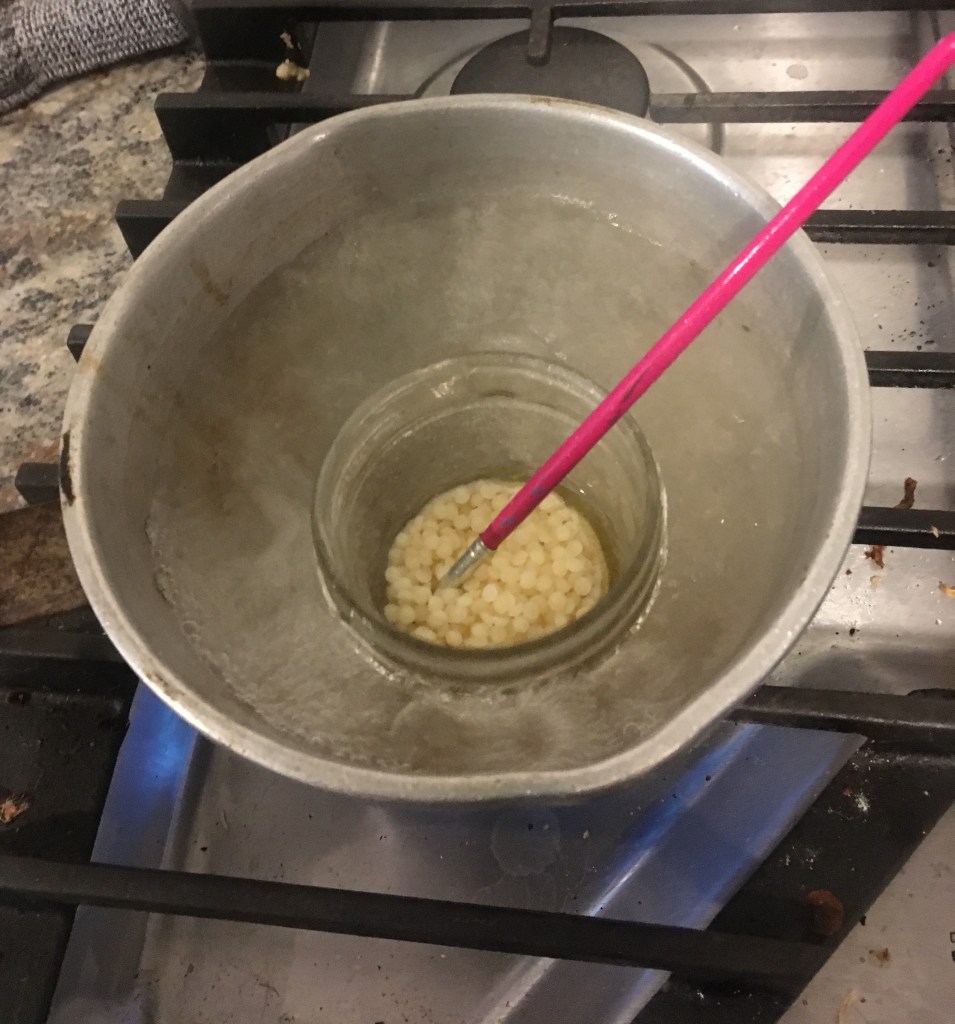
    I got the stem prepped for a dip into the deox tank, that is my term for the Skippy peanut butter jar filled with Before and After Extra Strength Deoxidizer.  The stem would be spending overnight in the solution.

    While the stem was soaking I apparently thought it best to completely not photograph the sanding of the stummel with sanding sponges 400-3500 and also not to photograph the micro-meshing of the stummel with micro-mesh pads 4000-12000.  I also failed to photograph me wiping the stummel with an alcohol moistened make-up pad between each sponge and pad to remove sanding debris.  For the life of me, I cannot understand why I chose not to do any of the above.  Darn old people…

    I did however photograph the application of Before and After Restoration Balm after all the sanding and micro-meshing was completed.

    After the balm had worked it’s magic for 30 minutes the remaining elixir was wiped from the stummel using an inside out athletic sock revealing the glorious briar of this Golden Square.

    The next day, I removed the stem from deox and allowed the excess solution to drip back into the jar.

    The stem was hand rubbed with a coarse shop rag to remove the excess solution and some of the loosened oxidized vulcanite.

    Below you can see the oxidized rubber that was removed.

    I cut a small piece of Scotch tape to cover the stem logo protecting it from the sanding barrage that was coming next.

    I wanted the stem in place with the stummel for the sanding to avoid rounding the joint where the two pieces meet.  I remembered that the stinger had been soaking in alcohol since the previous day.  The medicine cup was retrieved 

    and the stinger cleaned.

    The stem was reassembled and reinserted into the shank.  Next, I wrapped the shank with painters tape to protect it from the stem sanding.  The sanding progressed from sanding sponge 400-3500.  Between sponges I rubbed the stem with mineral oil and wiped it with a paper towel.  Oh, and photographed it.

    The stem was worked with micro-mesh pads 4000-12000.  Between each pad I rubbed the stem with a light coat of Obsidian Oil and wiped it with a paper towel.  Oh, and photographed it.

    The stem was looking very good but it needed to have the gold reapplied to earn it’s title Golden Square.  I cleaned the logo area with an alcohol dipped cotton swaband fetched the Gold Leaf Rub’nBuff.

    The gold was applied to the logo with a fly tying bodkin, pressing it into the stamped logo.

    The Rub’nBuff was then rubbed and buffed to remove the gold from the high points of the logo.

    I then used Before and After Fine Polish followed by the Extra Fine Polish.  Both compounds were hand buffed with a soft cotton cloth.

    The pipe, now cleaned, still had the lingering aroma of non-tobacco – yeah pot smoke.  I decided to give it an alcohol and cotton ball overnight treatment.  I stuffed cotton into the bowl and shank of the stummel then added 95% ethyl alcohol with a disposable pipette until the cotton was saturated.  This sat overnight.  In the morning, I found the following:

    The cotton was removed and the bowl and shank were again scrubbed with alcohol dipped cotton swabs.  The Ghost of Mary Jane was gone.

    The pipe was reassembled and taken to the buffer where it received several coats of carnauba wax.

    The final step was to hand buff the pipe with a microfiber polishing cloth.

    Overall this Golden Square Apple turned out very nicely.  I love the traditional well proportioned shape.  The pipe retained some of the contrast stain, enough that I did not think additional dying was needed.  The oxalic acid treatment did a nice job at lightening the briar without diminishing the original stain too much.  I could have continued with additional bleaching but I liked where I stopped.  The vulcanite of the stem polished up nicely and accents the briar well.  The dimensions of the Golden Square Apple are:     

    • Length:  5.58 in./ 141.73 mm.
    • Weight:  1.51 oz./ 42.81 g.
    • Bowl Height:  1.68 in./  42.67 mm.
    • Chamber Depth:  1.43  in./ 36.32 mm.
    • Chamber Diameter:  0.72 in./ 18.29 mm.
    • Outside Diameter:  1.53 in./ 38.86 mm.

    I do hope that you have found something here useful to your own pipe care, maintenance or restorations.  If you like this sort of thing, please click the like and subscribe buttons.  Thank you for reading the ramblings of an old pipe lover.

    Loading…

    Below are some photos of the finished Golden Square Apple.

  • A Cesare Barontini Sultana Kuttel Selection B6 Restoration

    December 5th, 2024

    Photographed and written by

    John M. Young

    The thing that drew me to this pipe for purchase and restoration was the thick briar wall of the Dublin shape.  Recently I have become smitten by thick walled pipes.  I know that I live by the phrase, “change is evil and must be destroyed” but this is different.  I mean, thick walls are just cool, right?  Both literally and figuratively.  Well, I saw this multinational beauty, an Italian from Dublin, and had to have it.  The auction was won and the pipe made the journey from Cedar Park, Texas all the way to the Northern Time Zone of southeast Nebraska.  The stamps on this pipe read:  Barontini, in a stylized script over SULTANA on the shank to and KUTTEL over SELECTION with a slightly offset B6 on the shank’s bottom.  Below are some photos of the pipe as it appeared before any work was done.  

    The pipe looked to be in good condition with no obvious damage or evidence of mistreatment.  There was of course the expected cake within the bowl, some tooth chatter near the button and oxidation of the stem.  Other issues that appeared upon closer examination were the numerous fills and the dreaded clear coat.

    Background

    In researching the Barontini name, I first visited pipephil.eu for an affirmation of what I expected to be of Italian origin.  There was what I had expected, an Italian flag.

    (Baro-Bd — Pipes : Logos & Markings).  There was no exact match to the stampings but this was obviously the same maker.  The stylized signature script was an exact match and the fourth photo from the top had a shape number of B8 and was a very close match to this pipe and the B6 that it wears.  The fifth photo from the top middle column, alludes to a briar band and an apparent black acrylic band at the stem shank joint.  This also matched the pipe in hand.  The stem of my pipe was lacking any of the cool logos of the included Barontinis which saddened me.  None of the associated links lead to further information or similarities except for the “L’artigiana” link.  Here there was a photo of a pipe which had a similar briar band on the stem.

    (L-Lab — Pipes : Logos & Markings)

    Next, I turned to pipedia.org for a bit more history on the Barontini company.  Not much information was there to be had.  I include it here in its entirety:

    “In 1890 Turildo Barontini opened a factory for the production of briar. In 1925 his son Bruno began to produce the first pipes. Cesare Barontini, son of Bruno, started direction of the factory in 1955, and still runs it together with his daughters Barbara and Silvia.

    Sub-brands & Seconds

    • Aldo Velani
    • Cesare
    • L’artigiana
    • Stuart
    • Cortina”

    (Barontini, Cesare – Pipedia).  The “Sub-brand” Aldo Velani, did prove quite interesting:

    “”Cesare” is a second brand produced by Cesare Barontini of Livorno / Italy. Cesare Barontini headed the company from 1955 on.

    Another Barontini 2nd is named “Aldo Velani“. The name is fiction. Cesare Barontini Pipes are still relatively unknown and under appreciated here in the United States. They do however offer a value rarely matched by some of their more recognized Italian counterparts. Barontini makes very fine pipes, particularly his premium lines. They offer a fine smoking experience at quite a bargain. There are a few brands of Italian pipes on the U.S. market that are hardly known in Italy, as they are made in factories dedicated to the export trade. Aldo Velani is a line imported from Italy by Lane Limited, Dunhill’s distributor. Made mostly in Livorno by Cesare Barontini, one of the best known private-label manufacturers, Aldo Velani pipes are classic shapes with an Italian ‘twist,’ according to Frank Blews, a spokesman for Lane. “Billiards with more ‘ball,’ bulldogs with more ‘jaw,”‘ is the way he characterizes the line. A medium to large pipe specifically developed for American tastes, the finishes use the names of Italian wines – Soave, Novello, Barolo, Refosco – to suggest their colors, and there is a lot of ornamental work.” (Cesare – Pipedia).  The phrase “Aldo Velani pipes are classic shapes with an Italian ‘twist,’” strikes me as an apt description of this pipe.  I referred to it earlier as a “multinational beauty, an Italian from Dublin”.  This sounds like exactly what Barontini is making with their Aldo Velani line – a traditional shape with a signature, Italian, twist.

    I could not find any information as to Barontini employing P-lip (Peterson style) buttons on their pipes nor were any shape charts discovered.  Perhaps some things are better off left as mysteries.  This mysterious Dublin from Italy seems to be an excellent illustration of that idea.  

    The Restoration

    I broke from tradition with this one and opted to not use a stained denim piece over the stained green flannel which underlies the denim.  I thought you might like a change.  Or, I was too darn lazy to get up and get a piece of denim from 6 feet (2 m) away.  

    The new-to-me PipNet got to go to work with this one along with the rest of the ream team.

    PipNet #3 blades started the process of reaming.

    The #4 blades continued and were followed up by the Smokingpipes Low Country reamer and the General triangular scraper.  All of them were followed by the 220 sandpaper wrapped around the wood dowel.  

    The sanded tobacco chamber was taken to bare briar and appeared free of any heat damage.  A condition the interior rim was not so lucky to avoid as there was some charing around the edge.

    Another view of the interior of the tobacco chamber and the unsightly fill of the rim.  Oh, you know that has to go.

    And go it did.  The old putty was picked out using a fly tying bodkin and a dental scraper.   The old putty was surprisingly hard.

    So hard, in fact, that I could not get all of it out.  I’ll get more of it in a few minutes.

    I used saliva and light scraping with a sharp pocket knife to scrape away some of the charred briar around the rim.  That helped but the dark ring persisted.

    Moving on to cleaning out the airway of the shank was the next task.  I used a dental scraper to remove some of the tar and smoking residue then scrubbed the airway with cotton swabs and bristle pipe cleaners dipped in 95% ethyl alcohol.

    My acetone in the acetone jar was getting pretty depleted due to use and evaporation.  I unfortunately did not have more on hand.  I tried to use a make-up pad dipped in the acetone to remove the finish on the stummel.  

    The finish was old, hard and thick.  A trifecta of resistance to removal.  I lightly sanded the stummel avoiding the stampings and placed the stummel into the jar to soak. 

    I had to repeat this twice, once for each end of the stummel since I could not completely submerge it into the remaining acetone.

    After two soakings in the acetone the finish began to relent and was mostly removed with some rubbing with a make-up pad dipped in acetone.  The stampings remained finish covered due to my unwillingness to sand.  I needed fresh acetone but didn’t want to drive into town for a $1.25 bottle of the finish removing elixir.  Fortunately A buddy and his son were coming down to go fishing and I asked them to pick up a bottle for me.

    The shiny spots all indicated places with finish remaining.

    The below photo is of the stamp on the bottom of the shank.

    My delivery arrived and a quick fishing trip gave the remaining finish a short reprieve.  Later that evening armed with a fresh bottle of acetone the finish was removed.  Another benefit of the acetone was that it softened up the fills allowing me to pick the material out far more easily.

    And there were quite a few fills to remove.

    To refill the pits I used brown cyanoacrylate (CA, super glue) by itself or with briar dust.  I wanted to see if I could use layers of CA only on the rim hoping to achieve slightly transparent fills.  While on the stummel I applied the CA to the pit and pressed briar dust into the wet CA.  In both cases the CA was allowed to cure or dry then it was filed using a small flat file and smoothed with a 400 grit sanding sponge.  If needed additional applications were done.  The photo below shows application #1 to the rim.

    The rim was propped to allow the CA to level and cure on its own.

    While the CA was curing I turned my attention to the stem.  I neglected to photograph the cleaning of the stem’s airway.  This was done with several bristle pipe cleaners dipped in 95% ethyl alcohol.  Those tooth marks had to go.  I used the small flat file to filed away material and blend the surface.  This stem was rather thick feeling between my teeth and I did not feel the need to fill the dents with black CA.  After the filing the stem was sanded with a 320 sanding sponge followed by a 400 sponge.

    The CA on the rim contracted as it cured and required a 2nd application to the deepest pit.  The two smaller fills can be seen in the photo below at 2:00 and 9:00 positions.

    The big rim pit needed a third application.

    Below you can see the other fills receiving their final sanding.

    Once the fills were done, I taped the stamps and began sanding the entire pipe with a series of sanding sponges from 400-3500.  Between each sponge I wiped the stummel with a make-up pad moistened with alcohol to remove sanding debris.  The stem was rubbed with mineral oil and wiped with a paper towel.

    After the final sanding wipe I removed the painters tape and wiped the shank with alcohol to remove any remaining adhesive from the tape.  The pipe was then worked with  a series of micro-mesh pads in grits 3600-12000.  Between each pad I wiped the stummel with a make-up pad moistened with alcohol to remove debris.  The stem was rubbed with Obsidian Oil and wiped with a paper towel.

    The pipe was then given a coating of Before and After Restoration Balm and allowed to sit for 30 minutes.

    The Restoration Balm was removed with an inside out athletic sock.  Sorry, I neglected to photo-document this step.  The stem was then hand polished using Before and After Fine Polish followed by the Extra Fine Polish.  Both compounds were applied by my fingertip and rubbed with a soft cotton cloth.

    Overall this Barnotini Sultana Kuttel Selection B6 turned out very nicely.  I love the shape and the thick walls.  The pipe retained some of the contrast stain, enough that I did not think additional dying was needed.  It did lose some of the deeper reddish hues which it had originally.  I think the red and the thick clear coat were only used to hide the numerous fills and their absence added to the attractiveness of the briar.  Okay, that is pure conjecture but I still think it looks better with a more natural briar than all the red.  The vulcanite of the stem polished up nicely.  If you are wondering why I did not use any deoxidation products on the stem it is because the filing and sanding were adequate to remove the oxidation without them.  The dimensions of the Barnotini Sultana Kuttel Selection B6 are:     

    • Length:  6.04 in./ 153.42 mm.
    • Weight:  1.81 oz./ 51.31 g.
    • Bowl Height:  2.07 in./  52.58 mm.
    • Chamber Depth:  1.83  in./ 46.48 mm.
    • Chamber Diameter:  0.88 in./ 22.35 mm.
    • Outside Diameter:  1.72 in./ 43.69 mm.

    I do hope that you have found something here useful to your own pipe care, maintenance or restorations.  If you like this sort of thing, please click the like and subscribe buttons.  Thank you for reading the ramblings of an old pipe lover.

    Loading…

    Below are some photos of the finished Barnotini Sultana Kuttel Selection B6.

  • A Peterson Dunmore System 79 Rustic Restoration

    December 3rd, 2024

    Photographed and written by 

    John M. Young

    This blog was originally posted on 12/01/2024 on Mark Irwin’s Peterson Pipe Notes 432.  It is reposted here as part of my ongoing saga.  It appears here with permission of the author, me. Also, this pipe is not available for sale.

    There are a few searches that I run on eBay frequently and Peterson Dunmore pipes are one of them.  When I first saw this rusticated rascal I thought about my budget and decided to give it a go.  The recent prices for estate pipes have been volatile to say the least.  I’ve watched auctions increase in price significantly over the past several years, sometimes going for far more than what I think something is worth and other times nowhere near the item’s value, in my mind.  This one would have been a hard pass 3 years ago but with inflation it fell within acceptable limits.  Besides, it was gorgeous.  The auction was won and after a Midwest adventure from Deerfield, Illinois to the wilds of southeast Nebraska it was home.  The pipe came with what I thought was the original box and ephemera.  At least that what they looked like in the eBay listing:

    The box looked correct in style for the early 1970s.  Upon examination I saw the following:

    Well, this sure as heck is not a 313 and it certainly is not smooth.  I messaged the seller explaining my disappointment.  They sounded sincere in their explanation that the pipe arrived to them in this box and that they did not intend to mislead.  I call this a learning moment for myself  and was reminded to avoid getting caught up in emotion.  I nevertheless provided very objective and honest feedback on eBay regarding the seller’s inaccurate item description. Live and learn, I guess.

    Below are some photos of the pipe prior to doing any work on it.  I also photographed the pamphlet and pipe sock and include those below as well.

    Background

    On June 25, 2024 I posted a blog about the restoration of a Peterson Dunmore 606.  Being a proud Generation X member, also known as a total slacker, I will include the background from that post in its near entirety (Original post:  Peterson Dunmore 606 Pot).

    “As much as I love the history of the Kapp and Peterson company and Peterson pipes, I will not get into that other than give you resources to read the history for yourself.  I will delve into the Dunmore, or Dunmoor line of pipes at greater depth.

    For a great history Mark Irwin and Gary Marlburg’s book is a must read for a Pete Geek.

    (Available at https://www.smokingpipes.com/accessories/books/moreinfo.cfm?product_id=471478)  Given the price is a bit high but worth every penny for a Peterson aficionado.

    The next site is pipedia.org’s History of Peterson by Jim Lilley (Peterson – Pipedia)

    Lastly the pipephil.eu site for all things logo:  Peterson: historical pipes — Pipes: Logos & Markings (pipephil.eu)  They also have a few other links to things like the Peterson timeline and P-lip information.

    Now to the stuff regarding this pipe:  A Peterson Dunmore.  I refer to Mark Irwin again here and his blog, Peterson Pipe Notes.  I can wholeheartedly recommend the free at

    https://petersonpipenotes.org/  Yes, you will get emails but only for things like the weekly blog post and occasional Peterson pipe drops (like the Peterson Pipe Notes Pipe of the Year) or offers for cool Pete Geek merchandise.  Anyway Mark has an article on the Dunmore line that is great. https://petersonpipenotes.org/226-documenting-the-dunmore-system-and-classic-lines/

    I will include the text here in its entirety but recommend the link for the photos. This is used with permission of the author (thank you Mark).

    “226. Documenting the Dunmore System and Classic Lines

    Milos “Mike” Bera at PipesPens&More.com on eBay recently wrote me to say that he’d run across two examples of a Peterson Dunmore Classic line he’d never seen before—a higher-grade line with a briar-in-brass sandwich band. As I thought they were not only gorgeous but undocumented, the time seemed right to take a look back at the history of the Dunmore System and Classic lines.

    I’ve been a fan of the Dunmore lines since I first saw them through the case back in the late 1980s and had to have one, a fat-bottom 72 (the 302 equivalent). Like everyone else, I thought there was some kind of mistake—“Where’s the nickel mount?” I remember asking. But the Dunmore System set out to be something a little different, yet within the classic Kapp & Peterson house style.

    The line originated in collaboration with Iwan Reis in 1971. How it came about is anyone’s guess at this point. Chuck Levi, the man who more than any other was responsible for bringing the great Danish artisan pipes to the US, was working with the creative minds at K&P to bring something new to the IRC catalog, and this was one of about a dozen K&P lines that debuted as exclusives in the Iwan Reis catalogs of that era.

    The concept was to modernize the System pipe by removing what was perceived as the old-fashioned nickel mount. And old-fashioned it was—if you look at pipe catalogs from the 1940s on through most of the rest of the 20th century, nickel ferrules and even bands were almost non-existent. K&P was virtually the only hold out, using sterling bands on the Sterling Silver Classic line and on the Premier & De Luxe Systems. A bead was then carved around the stummel at the mortise end. As you can see from the IRC detail, sometimes the contrast stain made the beads stand out, and sometimes not.

    But there were two more ingredients to the original Dunmore aesthetic which can be seen the photo below. Paddy Larrigan, K&P’s master-craftsman, was always striving to push the envelope in pipe engineering, and one of the things he dearly loved was a pipe that would sit, so he shaved off the bottom of the shank to allow the Dunmore System to sit on its shank and button, which gives it its uniqueness in the catalog. The downside of this is that I am not convinced that all the Dunmore reservoirs, being slightly smaller than the traditional System, are quite as effective.

    The third distinguishing mark of the original Dunmore lines is the stem. Both the System and Classic versions utilized the wide-shoulder “Comfort Lip,” with a painted  gold P on the stem. This doubtless helps the System sit as well as giving it a more muscular visual balance, strength being a long-standing concept in the design language of the company. While it gives the illusion of being an army “push” mount, of course it isn’t, but is a traditional tenon-mortise or “navy mount” as the old hands at K&P used to call it.

    The 1971 IRC catalog description reads, “dunmoor briar IRC ’71 modern system without sterling band, natural $12.00.” This intentional misspelling of “Dunmore” would persist through subsequent IRC catalogs, the copy-writer evidently under the spell of e.e. cummings and favoring an English flavor to his pipes. The name, like almost all K&P line names, is taken from the Irish landscape, in this case the town in County Galway famous for Dunmore Castle.

    The 1975 Orange Catalog shows the initial Dunmore System release was in only seven shapes:

    This was later expanded to include both the original bent dublin shape 5 (75) and XL5 (XL75) and the replacement calabash shape 5 and XL5. The remaining “new” System shapes were also added to the Dunmore lineup, the 01 becoming the Dunmore 73, the 02 the 70 and the 03 the 76. The fact that the 304 and 306 “setters” introduced in 1984 never entered the Dunmore System lineup adds the probability that the line had been discontinued by then.

    The smooth Dunmore System features a light brown natural finish, sometimes occurring with broad flames, as can be seen in these photos of an unsmoked 77 System:

    The rusticated version of the Dunmore System seems to have been finished in at least two techniques or versions. Neither is as deep as the Pebble Rustic finish  but they still feel very therapeutic under thumb and finger.

    Even when we were beginning our research on the Peterson book (due out in reprint later this year), most Pete fans had no idea there was also a Dunmore Classics line featuring the same beading at the mortise and wide Comfort Lip mouthpiece. Documentary proof was found in the rare 1978-79 Peterson-Glass catalog:

    The Dunmore System and Classic Lines from the 1978-79 Peterson-Glass Catalog

    I don’t know whether the Dunmore Classics was a short-lived line or whether it was primarily available in Europe, but it almost never appears on the estate market here in the US. As you can see from the catalog and the 406 pictured above, the same aesthetic was followed for the Classic line—light brown, nearly natural, higher-quality smooth bowl (or dark rustic) and faux army mount with gold-painted P, wide saddle and P-Lip stem. Only the Dunmore System, as far as I have been able to document, had the flattened stummel allowing it to set.

    I have always hoped to run across an unsmoked rustic Dunmore System with the dark contrast stains seen in the Peterson-Glass catalog. I wonder if this finish actually went into production, because the ones I’ve seen all look more-or-less like the XL75 shown above.

    The original Dunmore lines seemed to have been dropped at about the time the company went through its worst redundancy in 1984, as there are no more traces of it in the company’s ephemera from 1983 on. I remember the proprietor of my B&M, Cavalier Pipe & Tobacco in Barracks Road Shopping Center in Charlottesville, telling me when I bought my shape 73 Dunmore that the line was out of production, so I’d better get it if I wanted it (don’t you miss high-pressure salesmen?)—and that would have been 1986 or ’87.

    The second iteration of the Dunmore Classics line is that recently discovered by Mike at PipesPens&More on eBay. I would tentatively date it to c. 1995, well after K&P had gotten on its feet again and was doing some new and fascinating things. It seems to belong with three other briar adornment lines from the same period: Paddy Larrigan’s Briar in a Circle Systems and the Galway and Kapp-Royal higher-grade lines with their wonderful inset briar rings.

    Mike’s Dunmore Classics line is certainly on a par, from the two examples he’s found, with the Galway and Kapp Royal briars and maybe better, although probably not as fine as the Briar in a Circle Systems. Take a closer look at this 80S, which Mike sold within 24 hours of posting it on eBay:

    The last Dunmore Classics line made a brief appearance in the Dublin era’s second decade, somewhere in the 2000s, probably around 2005 or so. Jim Lilley’s old blog site made a reference to them, and I remember seeing them for sale at internet shops.

    I know it appeared well before I got interested in writing the Peterson book, because I don’t have any internet images of it in my files. These photos of the B5 and B11 give a good idea of what the line was like, although it appears to have begun in a higher range and then slipped to a lower.

    Updated Identification Guide

    Dunmore  (1971–c. 1984; c. 1995; 2006–2010)   Appeared in 1971 as Iwan Reis & Co. exclusive line “Dunmoor,” Premier-grade unmounted System in smooth natural or rustic dark chocolate contrast in all shapes, with beading at the shank, faux wide-saddle P-Lip with gold paint P.  Documented in Associated Imports catalog from 1973. Classic Range line from 1978 with same faux army mount and finishes. Second scarce Classic Range line, c. 1990, higher-grade smooth bowl with brass sandwich and briar band, P-Lip. A third Classic Range line, 2006–2010, mid-grade, featured standard and some B shapes, with beading around bowl instead of shank-face, for European market.

    Many thanks to Mike Bera
    Photos of the Dunmore 80s and 68 courtesy Mike’s Pipes Pens & More
    Photos of the B5 and 406 Dunmore courtesy Smokingpipes.com” (https://petersonpipenotes.org/226-documenting-the-dunmore-system-and-classic-lines/)”

    (https://wordpress.com/post/scimansays1787.com/6410 referencing myself feels weird)

    From the above documentation I think that I can safely assume that this Dunsmore 79 is of the original 1971-1978 time period.

    Interesting side note here:  In the above Mark Irwin says, “I have always hoped to run across an unsmoked rustic Dunmore System with the dark contrast stains seen in the Peterson-Glass catalog. I wonder if this finish actually went into production, because the ones I’ve seen all look more-or-less like the XL75 shown above.“  I emailed Mark and asked him if the Dunmore 79 in hand was what he was looking for.  I included some of the before and after photos from this restoration.  He replied, “Yup, that’s it!!😆” (Mark Irwin, personal email).

    The Restoration

    As boringly typical of my restorations, I began with a clean denim piece to protect the work surface.  Yeah, I know, the term “clean” doesn’t really describe the stained denim.

    The new to me PipNet came out and I had high hopes that it would be useful.  The standard ream team consisting of the Smoking pipes Low Country reamer, General triangular scraper and 220 sandpaper wrapped wood dowel were along for clean-up duties.  Low and behold the Dunmore 79 had precisely the wrong size bowl for either the #1 or #2 PipNet blades.  

    With the #1 blades too small and the #2 blades too large, plan B was put in motion.  The adjustable Kleen-Reem tool was called in to remove the minimal cake in the tobacco chamber.  The other two reamers were used then the chamber was sanded with the 220 on a stick.  Once down to the bare briar I could see that there was no damage to the briar and that this pipe looked like it had only been smoked a hand-full of times.

    Next was the cleaning of the shank.  Typically with Peterson System pipes this can be a chore.  Owners frequently fail to clean out the reservoir after a smoke which creates rather difficult tar deposits.  This pipe’s tar was quickly removed and revealed the stain used at the Peterson factory.  A surprisingly reddish-pink stain at that. 

    The stummel was taken to the sink for a scrub.  Murphy Oil Soap and a nylon scrub brush were used to remove the age and grime from the stummel.  Once scrubbed the soap was rinsed with warm water and the stummel dried with a cotton hand towel.

    Back at the workbench the stummel received a wiping with a make-up pad dipped in 95% ethyl alcohol.  The alcohol removed a bit more of the reddish-pink stain

    The stem was the next victim of my cleaning activities.  I used both bristle and fluffy pipe cleaners dipped in 95% ethyl alcohol to remove the slight smoking residue in the airway.

    The stummel was given a coat of Before and After Restoration Balm and allowed to sit for about 30 minutes.

    During this time I taped over the stem logo with a piece of Scotch tape.  The stem was in very good condition and did not have a heavy layer of oxidation.  There were some tooth marks near the button and those were filed and sanded with 320 then 400 grit sanding sponges.

    The stummel was wiped with an inside out athletic sock to remove the excess Restoration Balm. 

    At this stage I couldn’t help but admire the beauty of the rustication and contrast staining of the Peterson workmen.  I wondered if Paddy Larrigan himself had a hand in the crafting of this piece.

    The stem was sanded with a series of sanding sponges in grits of 320-3500.  Between each sponge I rubbed the stem with mineral oil and wiped it with a paper towel to remove sanding debris.

    I then taped the shank with painters tape to protect it from the buffing I was about to do.  The stem was mounted to the stummel as a handle and buffed with Red Rouge compound (I remain confused as to why the product had both “Red” and “Rouge” on the label).

    The stem was then worked with micro-mesh pads in grits of 3600-12000.  Between each of the pads I rubbed the stem with Obsidian Oil and wiped it with a paper towel.

    The stem was polished with both Before and After Fine Polish and Extra Fine Polish.  These polishes were applied with a fingertip and hand buffed with a soft cotton rag.

    The next step in the stem restoration was to pick out the old gold paint and to re-do the logo with Rub’nBuff Gold Leaf.  The old gold was picked out using a fly tying bodkin then scrubbed with 95% ethyl alcohol on a cotton swab.

    The new gold leaf was applied with the tip of the bodkin and allowed to dry.

    The excess gold  was scraped from the logo with my fingernail and hand buffed with a paper towel. I applied two coats.  The photo below is after the first but before the second.

    The stummel was given a coating of Renaissance Micro-Crystalline Wax applied with a baby toothbrush.  This was allowed to dry for a few minutes then hand buffed with a clean cotton terry cloth towel.

    The stem returned to the buffer for several coats of carnauba wax.

    The final stem was to hand buff the pipe with a microfiber polishing cloth.

    This Peterson Dunmore System 79 Rustic has returned to the world in all of it’s original glory. The 309 shape, 79 in the Dunmore line, is a favorite of mine and I can’t help wondering why it was ever discontinued.  The contrast stain on this pipe is lovely with the reddish highlights and the dark brown-black in the rustications.  The stem polished up very nicely and contrasted the smooth shank-end briar in a unique and subtle way.  The flat heel of the pipe does provide it with a “sitting” platform though not a terribly stable one.  Fortunately Nebraska is not prone to earthquakes and I no longer have any little ones in the house to provide anthropogenic tremors.  The dimensions of the Dunmore 79 are:     

    • Length:  6.31 in./ 160.27 mm.
    • Weight:  1.80 oz./ 51.03 g.
    • Bowl Height:  2.09 in./  53.09 mm.
    • Chamber Depth:  1.62  in./ 41.15 mm.
    • Chamber Diameter:  0.76 in./19.30 mm.
    • Outside Diameter:  1.26 in./ 32.00 mm.

    I do hope that you have found something here useful to your own pipe care, maintenance or restorations.  If you like this sort of thing, please click the like and subscribe buttons.  Thank you for reading the ramblings of an old pipe lover.

    Loading…

    Below are some photos of the finished Peterson Dunmore System 79 Rustic.

  • A Medico Gold Crest Meerschaum Apple Restoration

    November 28th, 2024

    Photographed and written by 

    John M. Young

    The quest to improve my skills of restoring meerschaum pipes continued with this Medico Gold Crest meerschaum apple.   Medico is one of those American classic brands which many people look at like they do codger blends – those were cheap drugstore pipes for grandads.  Well, maybe grandpa was right.  I can’t imagine that they sold millions of pipes merely because they were cheap.  I’ve restored a good number of Medico pipes though mostly prior to my blogging.  Over the last year I can only think of three:  A Frank Dublin, Medico Jet Stream and a Medico Guardsman.  That is only three of the 139 blogs (thus far published) so they are not what I’d consider a target species.  This one called out to me, perhaps it was the apple shape or the Austrian made meerschaum or that adorable gold band.  Whatever the reason, The auction was won and the pipe was mine.  The initial examination of the pipe revealed that the only marking proclaiming its origin was the Crest enclosed M on the stem and the stamping on the band:  MEDICO over 1/20 14K G.F. over MADE IN AUSTRIA. Below are some photos of the pipe as it appeared upon arrival.

    The Medico was used, though not abused.  There were some scratches on the meerschaum and some bite marks on the stem.  The bowl looked pretty good even with the lava flowing over the rim.  I thought that this looked like a nice relaxing restoration.

    Background

    According to TobaccoPipes.com,

    “When you trace the Medico tobacco pipes history, you have to trace it back to the origins of the company that created it. The company that originated the Medico brand is the S.M Frank & Co. This company dates back to the year 1900. In that year, a man named Sam Frank began selling pipes and related tobacco products. Eventually, the company began making its own line of pipes. With the help of an experienced pipe manufacturer, Ferdinand Feuerbach, the company produced the popular Royal DeMuth and Hesson Guard Milano tobacco pipes. The company continued to grow well into the early part of the 1930s.

    Medico History

    So, where did Medico pipes come into the picture?

    By the early 1930s, there were some concerns about the tars and nicotine found in tobacco smoke. In order to mellow out the flavor of hot tobacco smoke as well as to capture the tars and nicotine, the S.M. Frank & Co. introduced the Medico pipe filter. This is an absorbent paper filter that many people still use to this day. In order to accommodate the new filter, the company developed an accompanying brand of pipes known as Medico. That line of pipes continues in production today.

    The company ended up buying some of their main competition in 1955. That year the Kaywoodie brands came under the S.M. Frank Company. The Medico brand continued production through this transition without many changes. The next big change for the brand came in the late 1960s. In 1966, the company developed a synthetic material that combined the traditional briar wood with resins. It is known as Brylon. At that time, all Medico pipes were made from imported briar wood. In order to keep production costs down, the company began offering some lines with Brylon. Today, that is still true.

    Today, the Medico brand of pipes is still a top selling one for the S.M Frank & Co. This line of pipes comes in thirteen different finishes with five made of briar wood and the rest from Brylon. All come with the push bit with a filter inside. The filter is easily changed out when the smoker desires. In the briar wood finishes, this line includes the Silver Crest, Premier, Bold Rebel, Kensington, and Windsor. In the Brylon, the line includes the Lancer, Apollo, Standard, Varsity, Conqueror, Medalist, Cavalier, and V.E.Q. As far as price, the briar wood pipes tend to be higher in cost that the Brylon ones.” (Medico Pipes History | TobaccoPipes.com)

    I was unable to precisely identify the years in which the Gold Crest line was made.  I did find a couple of print advertisements from 1958 and 1966, at least that is what the eBay sellers were claiming.  The first ad is from 1958 and shows a Gold Crest with a list price of $5.  The ad says “NEW! See the 1958 series of MEDICO Crest”.   This could be read as meaning that the Crest line changed from year to year or that 1958 was the first year of the line.

    (1958 Medico Pipes Ad Filter Pipes Crest | eBay)

    The second ad looks quite “1966” but it doesn’t mention the Gold Crest pipe.  Neither advertisement had the M within the crest as with the Medico Gold Crest in hand. 

    (1966 Medico Gold Crest Pipe Art Illustration Photo Vintage Magazine Print Ad | eBay)

    Looking at just those two advertisements I would feel comfortable saying that this pipe is from around 1960.

    The Restoration

    As usual the restoration began with a clean denim piece.  Now, I have received slight criticism for the apparent boring appearance of the work surface covers.  Perhaps I will look into alternative fabric choices.  Maybe Sascha Mertens would prefer something in a paisley? 

    Due to the more fragile nature of meerschaum, the PipNet reamer remains in its case allowing the Smokingpipes Low Country reamer and the General triangular scraper (with the tip ground round) to take center stage.  The wood dowel wrapped in 220 sandpaper also was used after the scraping.

    The bowl was not terribly caked and was cleaned out quickly.

    The bowl was free of any gouging from previous reamings.  The grate at the bottom of the bowl can readily be seen in the photo below.  In the Medico Guardsman restoration I discovered how to remove the grate.  This pipe was slightly different in design and I was not able to remove the grate for cleaning.

    The next step was to clean the airway of the shank.  95% ethyl alcohol, cotton swabs, bristle pipe cleaners, a nylon shank brush, and a small rat tail file with a paper towel wrapped around it.

    After the airway cleaning I turned my attention to the rim.  One of the great benefits of meerschaum is the immunity of the mineral to charring.

    The rim was moistened with saliva and carefully scraped with a sharp pocket knife. 

    The stummel was taken to the sink for a scrub.  This scrub was done with warm tap water and a nylon scrub brush.  The stummel darkened with the scrubbing.  I assumed this would be a temporary condition that drying would eliminate.

    The darkening seemed to be associated with areas which received greater wear.  I assumed that this was due to the wearing away of the beeswax coating.

    The next phase of the restoration was to micro-mesh the meerschaum.  I wanted to make sure that the micro-mesh pads were clear and would not be transferring any vulcanite dust to the slight grooves and scratches in the meerschaum.  To do this I washed the pads with a small amount of Dawn dish soap and a nylon scrub brush.  Each pad was scrubbed, rinsed and dried.

    The cleaned pads looked much better than they looked before.

    I wrapped the gold band with painters tape to protect it from the micro-meshing of the stummel.

    The stummel was worked with each pad in succession.  Between each pad I wiped the stummel with a make-up pad moistened with 95% ethyl alcohol.  I did not try to completely remove all of the scratches as I thought they added a bit of character to the pipe. 

    The next step was to apply a fresh coat of beeswax.  I like to use a pan of water to heat a jar filled with beeswax.  The hot water melts and allows the wax to remain molten for longer periods of time as well as not getting the wax too hot.  Achieving the vaporization point of wax is not a great idea when heating with the open flame from natural gas.  I plugged the bowl with a wine bottle cork wrapped with several layers of masking tape.

    While the wax was melting I heated the meerschaum with a heat gun.  This allows the molten beeswax to better penetrate the pores of the meerschaum.

    Once the max was melted and the stummel heated, I held the stummel by the cork and painted the wax onto the meerschaum.  Even with all of the heating the wax cools and builds up quickly.  I rotated the coated stummel under the heat from the heat gun.  Any wax that was not absorbed by the meerschaum was caught in a tin, which can be seen in the above photo.  The below photo shows the newly waxed stummel cooling back on the workbench.

    As the stummel was cooling, I began work on cleaning the stem.  Again, 95% ethyl alcohol, cotton swabs and bristle pipe cleaners were used for this.

    The stem of this pipe was made of nylon.  Nylon is harder than the plastic of a Missouri Meerschaum pipe stem but softer than a traditional vulcanite.  It is also more resilient to abrasion from sanding and filing.  This makes smoothing out imperfections on a nylon stem a bit more difficult and time consuming than vulcanite.  I filed the tooth chatter smooth using a small flat file.

    Some of the marks in the nylon just refused to be removed.  I continued on with the sanding telling myself that perfection is not needed for a pipe I planned on keeping and using for myself.  The stem was sanded with a series of sanding sponges from 320-3500 grit.  Between each sponge the stem was wiped with a paper towel lightly moistened with alcohol.

    The gold band was taped over with masking tape and the stem log taped over with Scotch tape to protect them from the buffer and tripoli buffing compound.  I took the pipe to the buffer and buffed the stem. 

    The Scotch tape was removed to repaint the stem logo gold.  I used a modeling acrylic paint applied with a wooden skewer. 

    The gold paint was allowed to mostly dry then I scraped away the paint from outside the stamp.

    Below is the mostly cleaned newly repaired logo.  The tripoli compound can still be seen on the masking tape.

    The gold band was cleared of masking tape and the band polished with a Cape Cod Polishing cloth.

    The pipe was then returned to the buffer for several final coats of carnauba wax to the band and the stem.  The stummel was not waxed with carnauba as it just had fresh beeswax.

    The final step was hand buffing with a microfiber polishing cloth.

    I think this Medico Gold Crest meerschaum apple turned out beautifully.  I love the apple shape and think the scratches and scars add to the character of the pipe.   The  beeswax brought out a slightly more buttery look to the meerschaum which is accentuated by the glossy black of the nylon stem.  Though not perfect the stem is far far smoother than it was originally.  The pipe will surely bring enjoyment for another 60 years.  Probably not for me but I hope that it will be passed down to the next generation of grandpas who can appreciate the pipe’s heritage and utility.  The dimensions of this Medico Gold Crest meerschaum apple are: 

    • Length:  5.90 in./ 149.86 mm.
    • Weight:  1.65 oz./ 46.78 g.
    • Bowl Height:  1.78 in./  45.21 mm.
    • Chamber Depth:  1.30  in./ 33.02 mm.
    • Chamber Diameter:  0.82 in./ 20.83 mm.
    • Outside Diameter:  1.59 in./ 40.39 mm.

    I do hope that you have found something here useful to your own pipe care, maintenance or restorations.  If you like this sort of thing, please click the like and subscribe buttons.  Thank you for reading the ramblings of an old pipe lover.

    Loading…

    Below are some photos of the finished Medico Gold Crest meerschaum apple.

  • A Country Panel Bent Rhodesian Restoration

    November 26th, 2024

    Photographed and written by

    John M. Young

    This beaten and battered chubby panel Rhodesian didn’t just speak to me when I first saw it, it yelled.  I couldn’t resist the shape and had to bid.  The fact that I won such a chunky piece of briar for such a small price made the bidding even more rewarding.  The only stamp indicating any maker is the word COUNTRY within a rectangle on the left shank.  No country of manufacture, though for some reason it strikes me as French though the stockiness of the shank would make any Peterson a bit jealous.  The pipe came from Israel and was apparently shipped via sailing ship to the US or perhaps by row boat as the shipping time allowed my beard to grow significantly longer during its voyage.  Below are some photos of the ppe upon arrival.

    Definitely some very interesting features here.  The sheer number of fills to be picked and refilled was a bit daunting.  The removal of the old finish was a must.  The corked mortise might be salvageable.  The stem was heavily oxidized and would need significant time in an authorized deox facility, Is the Betty Ford Center still operating?  This looked to be a fun restoration.

    Background

    The “go to” sources at the start of researching a pipe are pipephil.eu and pipedia.org.  Both sites had no information on the COUNTRY.  Disappointed but not defeated, I tried searching through Comoy’s, Chacom and GBD shape charts for a matching shape.  Again, disappointment.  Still undeterred, I tried a Google search of “Chubby panel Rhodesian pipe”.  I scanned through the images which resulted and came across one from a restoration Dal Stanton did “Recommissioning a Classic Pocket Pipe:  A Fun Sport Horn Stem Sculpted Stubby Paneled Tomato” (https://rebornpipes.com/2019/07/30/recommissioning-a-classic-pocket-pipe-a-fun-sport-horn-stem-sculpted-stubby-paneled-tomato/).  This blog was posted on Steve Laug’s https://rebornpipes.com/ site.  Now, the pipe which Dal worked on had a similar shape. It was a far different pipe; in scale, texture, stem material, banding and it was stamped which allowed him some idea of the maker.  The one think that caught my eye was the tenon: 

    (Photo used with permission of the author – personal communication.  Originally published at(https://rebornpipes.com/2019/07/30/recommissioning-a-classic-pocket-pipe-a-fun-sport-horn-stem-sculpted-stubby-paneled-tomato/))

    The tenon of my Country had the tenon’s stinger intact, Dal’s version was stinger-less.  Nonetheless the similarities of the aluminum tenon were undeniable.  There was one other significant similarity between these two pipes – the cork mortise.  Unfortunately Dal was unable to determine the maker of his pipe and he is a far better and more diligent researcher than I.  He did conclude that his pipe was of French origin.  This conclusion reaffirmed my feeling about the origin of the Country in hand.

    I was now less undeterred (is that deterred or de turd?  It is a French pipe after all).  I reached out to Steve Laug who is always helpful with his vast experience and encyclopedic memory.  I sent him some photos and asked if he could tell me anything about pipes with similar shapes or with tenons like this.  Steve mentioned that he too thought the Country looked like a GBD or a Comoy’s product.  He then sent me a link to one of his blogs:  Reuniting an older Ropp Panel 062 Rhodesian with its original stem

    (https://rebornpipes.com/2021/10/16/reuniting-an-older-ropp-panel-062-rhodesian-with-its-original-stem/?fbclid=IwY2xjawGg2JtleHRuA2FlbQIxMAABHZQRWucpsG3aeTcXahiWJgFm7E_1D4CtWDBYz_F2J_9YlmXg7h6xA0JDKQ_aem_qQs4f3WxgbgUf1LL3z1TCQ).

    I will include a photo of Steve’s Ropp Panel 062 Rhodesian.

    (https://rebornpipes.com/2021/10/16/reuniting-an-older-ropp-panel-062-rhodesian-with-its-original-stem/?fbclid=IwY2xjawGg2JtleHRuA2FlbQIxMAABHZQRWucpsG3aeTcXahiWJgFm7E_1D4CtWDBYz_F2J_9YlmXg7h6xA0JDKQ_aem_qQs4f3WxgbgUf1LL3z1TCQ)

    Now, if you use your imagination and give that shank a bend it would be a near perfect match for the Country.  I’m sure that your inquiring mind wanted to know what the tenon of this Ropp pipe looked like.  

    (https://rebornpipes.com/2021/10/16/reuniting-an-older-ropp-panel-062-rhodesian-with-its-original-stem/?fbclid=IwY2xjawGg2JtleHRuA2FlbQIxMAABHZQRWucpsG3aeTcXahiWJgFm7E_1D4CtWDBYz_F2J_9YlmXg7h6xA0JDKQ_aem_qQs4f3WxgbgUf1LL3z1TCQ)

    Similar to the Country but not as close of a match as the tenon from the Dal Stanton pipe.

    And that, dear reader, is where I left the background for this pipe.  It is a chubby panel bent Rhodesian.  Likely made in France quite a while ago, judging by the level of oxidation of the stem and the aluminum stinger which pretty much went out of style by the 1970s.  Dal Stanton implies that these pipes may be older than what I think, “The presence of the cork could possibly add more weight to this Sport having some vintage to it.  Cork was often used on older pipes to grip the tenon” (Stanton, Dal. https://rebornpipes.com/2019/07/30/recommissioning-a-classic-pocket-pipe-a-fun-sport-horn-stem-sculpted-stubby-paneled-tomato/).

    The Restoration

    The below two photos show the Country intact and with the stem removed on her new temporary denim bed.

    You may notice that I obtained a replacement for my PipNet.  I finally found an older version with the opaque plastic rather than the newer version with the transparent amber plastic.  I once again have all four blade sizes for my PipNet.  The PipNet was joined by the Smokingpipes Low Country Reamer, General triangular scraper and wooden dowel wrapped in 220 sandpaper.  Also known as the Ream Team.

    The PipNet did most of the work in removing the cake as well as removing a bit of briar from the tobacco chamber.  I did not examine or feel the inside of the chamber, prior to the reaming, for rough surfaces from a poorly drilled chamber.

    After the reaming and sanding the interior of the tobacco chamber was bare briar and free of any heat damage.

    I started cleaning the shank airway.  As you can see by the very darkly stained cotton swabs in the photo the shank was quite filthy.  I used 95% ethyl alcohol and dipped the swabs in the alcohol.  I examined the mortise and found the cork “gasket” for lack of a better term had a worn front edge and looked ragged.  

    I continued trying to clean behind the cork and scrape the tars from the airway using a dental scraper.  3-4 ml of ethyl alcohol were poured into the tobacco chamber and the airway was scrubbed with a nylon shank brush.  The excess alcohol was then poured into a medicine cup.  The airway was then scrubbed with alcohol dipped cotton swabs. 

    This cycle of scraping, alcohol scrubbing, cotton swab scrubbing was repeated.  I seemed to be making little progress.

    Avoiding the cork was making the whole airway cleaning more difficult.  I started to experiment with making a new cork gasket.  I was thinkin that I could remove the old beat-up cork, clean the airway then insert the new cork.  I found a suitable cork from an assortment of corks that I had.  I drilled a 3 mm hole through the center of the cork. 

    I gradually used larger bits to enlarge the hole.

    Once it was large enough for the aluminum tenon I started thinking about how to cut the excess cork away.

    Razor blades seemed like the best answer.  The first couple of slices thinning the cork went well.  My fingers were cramping a bit so I decided to remove the old cork and give my fingers a rest from holding the cork and the razor blade.

    The old cork was scraped from the shank and the mortise was sanded with 320 sand paper wrapped around a rat tail file.

    I returned to cleaning or attempting to clean the airway.  It was much easier to do without having to work around the cork.

    I thought that a cotton alcohol treatment would do this pipe a world of good.  I packed the tobacco chamber and the airway with cotton.

    I then added 95% ethyl alcohol via a disposable pipette until the cotton was saturated.  The stummel was placed on a medicine cup at an angle which allowed the alcohol level of both ends to be level.  The alcohol would evaporate overnight and pull the tars from the briar depositing them in the cotton as it evaporated.

    I then began cleaning the stem airway.  This too was a filthy tar ridden mess.  Numerous bristle pipe cleaners dipped in ethyl alcohol were used. 

    Once cleaned, I took the stem to the jar full of Before and after Extra Strength Deoxidizer or as I like to call it – deox.  The stem had a pipe cleaner inserted into the tenon.  I did not want the aluminum to be submerged into the solution and the pipe cleaner acted as a hanger.  I planned on leaving the stem in deox overnight.

    The next day both the stem and stummel were waiting and ready for more restorative love. 

    I started with the stummel by removing the cotton then cleaning the airway with alcohol dipped cotton swabs.  The results were great, only taking a few swabs to clear the remaining tar.

    Next, the stem was removed from deox and allowed to drip off the excess solution.

    I placed the still damp stem on a coarse shop rag to absorb and hand buff some of the loosened oxidation from the vulcanite.

    The below photo shows the results of the hand buffing with the coarse rag.

    The stem was returned to the workbench looking much better without the oxidized rubber.

    I then proceeded to scrub the stem with several make-up pads drizzled with Soft Scrub cleanser.  This slightly abrasive cleanser removes the oxidized rubber.  As the oxidation is removed the color of the pads indicate when the has been removed. 

    I then took the stummel to the sink for a scrub with undiluted Murphy Oil Soap and a nylon scrub brush.  The soap was rinsed with warm water and the stummel dried with a cotton hand towel.

    The stummel looked much better but this clean briar showed the large number of fill which would require attention.

    I wanted to remove the existing finish from the briar.  I first tried 95% ethyl alcohol on a make-up pad to dissolve the finish.  It kind of worked but not very well.

    Next, I tried acetone on a make-up pad.  That worked better but still the results were very slow and elbow grease intensive.

    I placed the stummel into a jar filled with acetone and let the solvent work on the finish for 30 minutes.

    30 Minutes later the stummel was again wiped with an acetone dipped make-up pad.  This time the finish and stain were being removed.

    There remained a few shiny spots where the finish was not completely removed.  I planned on dealing with them as the stummel was sanded.  TO sand the stummel I wanted the stem and stummel to be connected to avoid the rounding of the joints between the two pieces.  I had not returned to the cork mortise so instead I wrapped the aluminum tenon with masking tape to thicken it and secure a tight fit of the stem to the stummel.

    The area around the stam was very carefully sanded to avoid the stamp.  The old fills were made even more obvious as I did the initial sanding.  The old fill material was picked out using a fly tying bodkin and a dental scraper.

    The plan was to place a drop of brown cyanoacrylate (CA, super glue) into the pit then add briar dust to the pit and press the dust into the CA with the back of the dental scraper.  The CA and the dust would compine filling the pit and curing quickly.

    In the photo below you can see the new fills looking like scabs.  The briar dust that comes in contact with the CA takes on a very dark color while the non-CA-contact dust remains light.

    The light spots were filed smooth using a small flat file.  The resulting dark spots indicate new fills of the old pits.

    I was not happy with the fit of the masking taped tenon and feared that I would round the edges of the joints.  It was time to finish the cork work.  First I tried to unscrew the aluminum tenon from the stem.  I was not sure if it was threaded or if it was glued.  I turned without much trouble using a channel lock pliers with the jaws well covered in painters tape.  Once freed the filthy threads were cleaned with a rather large number of cotton swabs dipped in 95% ethyl alcohol.

    The next few photos illustrate how reality attacks my well made plans quickly rendering them into refuse.  

    Plan #1 Use an existing small cork, drill out a hole for the aluminum tenon and trim the sides of the cork leaving a hollow cylinder, tube of cork, which would be inserted into the mortise.  This plan met with FAILURE several times as I could not cut the cork thin enough with a razor blade to make the cork tube.

    Plan #2 Use a set of cork hole borers (seen below) to cut the cylinder of cork.  FAILURE

    Plan #3 Use the cork hole borers to cut a cylinder of synthetic “cork”. FAILURE

    Finally, I thought to keep things simple.  Use the razor blade and carefully slice a thin piece of natural cork, measure the length of the cork rolled into a cylinder and trim it to length.  Insert this into the mortise.  If it works, glue it in place.

    It worked.  Below you can see the results before the cork was glued in place or the end trimmed.

    Once it was trimmed and glued (and allowed to dry) into place the stem was inserted and tah-da.  The tenon compressed the cork and the fit was nice and snug.

    Below is a photo of the trimmed and glued cork.

    That done, I could finally get to sanding the stem and stummel together.  Before I could do that I had a couple of fills which needed a finesse touch around the stamping.  This was done with careful application of CA and briar dust. And even more careful filing and sanding.

    The pipe was finally sanded with a series of sanding sponges from 320-3500 grit.  Between each sponge the stummel was wiped with a make-up pad moistened with alcohol to remove sanding debris.  The stem was rubbed with mineral oil and wiped with a dry paper towel. 

    The pipe was then worked with 4000-12000 micro-mesh pads.  Between each pad the stummel was wiped with a make-up pad moistened with alcohol while the stem was rubbed with Obsidian Oil and wiped with a paper towel.

    The pipe was then given liberal coating of Before and After Restoration Balm.  This product is amazing at rejuvenating the briar and makes the vulcanite look great too.

    The Restoration Balm was allowed to sit and work its magic for 20 minutes.  After the timer beeped, the excess balm was wiped off using an inside out athletic sock.

    The pipe was then taken to the buffer for a polishing with Blue Diamond  buffing compound.  The residual compound was wiped off with a paper towel lightly wetted with 99% Isopropyl alcohol then the pipe received several coats of carnauba wax. 

    The final steps were to take the pipe to the buffer where the stem and stummel were buffed with Blue Diamond compound.  The pipe then received several coats of carnauba wax and a final hand buffing with a microfiber polishing cloth.

    I think this Country Panel Bent Rhodesian restored beautifully.  I still love the shape even with all of its fills and blemishes.  The pipe clenches well and feels much lighter than the over 2 ounces (62 g) that it actually weighs in at.  The stem is still a bit thick feeling in the mouth but filing down would have altered the shape too much, in my opinion.  The original stain was preserved and reminds me of an antique gun stock.  The vulcanite deoxidized amazingly well and stands out gloriously as a contrast to the briar.  Overall, I am very happy with this mysterious beauty.

    The dimensions of this Country Panel Bent Rhodesian are: 

    • Length:  4.96 in./ 125.98 mm.
    • Weight:  2.19 oz./ 62.09 g.
    • Bowl Height:  1.70 in./  43.18 mm.
    • Chamber Depth:  1.24  in./ 31.50 mm.
    • Chamber Diameter:  0.71 in./ 18.03 mm.
    • Outside Diameter:  1.54 in./ 39.12 mm.

    I do hope that you have found something here useful to your own pipe care, maintenance or restorations.  If you like this sort of thing, please click the like and subscribe buttons.  Thank you for reading the ramblings of an old pipe lover.

    Loading…

    Below are some photos of the finished Country Panel Bent Rhodesian.

  • The Breaking and Repairing of an Austrian Meerschaum Pipe

    November 21st, 2024

    Photographed and written by 

    John M. Young

    I did not set out to break this cute little meerschaum pipe.  If the title of the blog insinuates that, I apologize.  During the summer, I decided it was time to learn more about meerschaum pipes and techniques for the restoration of meers.  I had worked on a few this year and had found them intimidating at first.  That was mainly just due to my inexperience with sepiolite or meerschaum.  Risking the proverb, “familiarity breeds contempt”, I continued to pick up various meerschaum pipes as I came across them, mainly through auctions.  That is where this little pipe enters the scene.  I was intrigued by it for a few reasons; it was unsmoked, made in Austria, looked to be a rather modular construct and it looked very light weight.  Oh, and it was under $20, yeah I’m cheap.  

    The little darling or kleiner Liebling, in German, made the journey to southeast Nebraska from Ormond Beach, Florida.  The only markings on the pipe was an adhesive sticker which read, “AUSTRIA”.  No stampings on the base, meerschaum bowl nor stem.  Below are some photos of the pipe after its arrival.

    Since this was not a restoration I had nothing to do to the pipe other than to fill it with tobacco and give it a smoke.  That is what I did and that is where the trouble began.

    Background

    Again, I stress my ignorance of most things, meerschaum.  I knew that prior to the discovery of briar, meerschaum was a widely used material for pipe making.  The cost of a meerschaum pipe was likely reserved for the upper classes, socio-economically speaking.  Folks of less disposable income likey smoked their tobacco with a clay pipe.  I also knew that artisans in London and Vienna had grand reputations for fine meerschaum pipes.  This little fact was the spark that fueled the intrigue regarding the AUSTRIA label.  

    I turned to the internet for a general search on meerschaum pipes.  There was a very informative article on tobaccopipes.com:  Meerschaum Pipes: The Complete Overview

    (https://www.tobaccopipes.com/blog/meerschaum-pipes-the-complete-overview/). 

    Regarding this Austrian meerschaum. I had little information to go on.  I messaged Facebook friend and fellow pipeman, Sascha Mertens.  Sascha is my German connection and provides a wealth of knowledge regarding everything from restoration tips to background on European pipe makers and tobacco.  I sent him photos of the little Austrian meer and asked what he could tell me about it.  From Sascha I learned the easiest way to tell if a meerschaum is a block or made of pressed meerschaum is to lick it.  He said that my tongue would stick to block and not pressed.  Hmm, could this be some strange German example of hijinx?  I tried it. 

    No striking on either the tobacco chamber nor the outside of the stummel.  Verdict – pressed meerschaum.

    I thought that I had better test a known block meerschaum for comparison.  I grabbed a Kiko Caveman and  – YIKES!  The anhydrous nature of the meerschaum pulled the water in saliva into the mineral at the speed of light.  To be honest I had done this kind of test many times.  I spent the first four years of undergraduate college as a Physical Geography major.  I had taken many physical geography and geology courses and had licked my share of minerals and this is indeed a field test for anhydrous minerals.  The feeling is still always a bit of a shock though.

    So, Now I knew that this little meer was a “cheap” meerschaum pipe made in Austria.  Hmm, that might explain the <$20.  Sascha said that the Turkish meers were never cheap.  Still no other information concerning the date of production  or the maker was to be had.  I guess I’ll just have to enjoy smoking the little cutie.

    The Break

    As you have probably surmised, smoking the Austrian meerschaum did not go as well as I had envisioned.  During the first bowl of tobacco the glue holding the bowl to the base failed and left me with a lap full of smoldering tobacco, a stem clenched between my teeth and a bowl rolling on the floor.  Hmm, I heard the voice of someone saying, “you get what you pay for.”  Stupid voices.

    Below are a couple of photos of the separated bowl and base. 

    There is no need to further describe the separation.  I am sure that your imagination can provide both the visual hilarity and the auditory barrage that ensued.  Please feel free to enjoy those imagined scenes.

    The Repair

    The planning of a repair is often my favorite part of a restoration.  If you have read a few of my previous blogs you may recall that I come up with a plan then attempt to execute said plan.  The execution occasionally goes along with the plan.  More often than not the execution has to deal with something called “reality” which cares little for my careful well thought out planning.

    The plan for this repair was to strengthen the joint securing the meerschaum bowl to the acrylic base.  To do this I came up with the following plan:

    1. Sand the surface of the bowl and the base.  This would remove the inadequate glue and roughen the surfaces allowing greater surface area for the new glue.
    2. Drill 4mm hole 2.5 mm deep into  the existing draft hole from the bottom of the bole up and from the top of the base down.
    3. Cut a 5 mm piece of stainless steel tubing, with an outside diameter of 4mm. This stainless steel tube would be the connector between the bowl and the base.
    4. Drill  2 small holes into both the bottom of the bowl and the top of the base to further add surfaces for the new glue to adhere to.
    5. Use a two part epoxy as the new glue.
    6. Clamp the bowl and base together and allow to cure for 24 hours.

    That seemed like a good plan.  Okay reality, what are you going to do to foil that?

    Step 1) The bottom of the bowl and the top of the base were sanded with 220 sandpaper laid flat on the countertop.

    I had 4 mm outside diameter (OD) stainless steel tubing from a previous restoration.  

    Step 2) I marked with a Sharpie 2.5 mm on the 4 mm drill bit and drilled out the draft hole at the top of the base.

    Still step 2)  This draft hole drilling was repeated for the bottom of the bowl.

    Steps 3 and 4)  The short piece of stainless steel tube was placed into the hole to check for fit.  Also in the photo below I circled four additional spots where I drilled indentations on the gluing surfaces of the bowl and the base.  This was done in an attempt to add surface area for the epoxy to adhere to (step 

    Step 5)  The stainless steel tube was a perfect fit for both the base and the bowl.  I proceeded to mix the epoxy.

    Some more step 5 and step 6)  The stainless tube, the base and the bowl were lightly coated with epoxy and clamped together.  The joints were wiped with a cotton swab dipped in acetone to remove any excess epoxy while the draft hole was cleared with a pipe cleaner dipped in acetone.  These pieces were allowed to cure for 24 hours.

    Tah-Dah!  

    The little Austrian meerschaum pipe was repaired.  I did not go back and shoot a series of photos since I did not do anything to the surface of the pipe.  The only noticeable difference is that the tobacco chamber is no longer unsmoked.  The repair seems to be holding very well.  I have smoked the pipe numerous times and have had no other lap fulls of smoldering tobacco nor has the epoxy separated.  Special thanks to Sascha Mertens for helping with the research and the plan development.  The little meer is a delightful working pipe that can join other favorites as outdoor work pipes and fishing buddies.

    The dimensions of the Austrian meerschaum pipe are:

    • Length:  6.08 in./ 154.43 mm.
    • Weight:  3.12 oz./ 88.45 g.
    • Bowl Height:  1.74 in./  44.20 mm. (including the base)
    • Chamber Depth:  0.99  in./ 25.15 mm.
    • Chamber Diameter:  0.74 in./ 18.80 mm.
    • Outside Diameter:  1.36 in./ 34.54 mm.

    I do hope that you have found something here useful to your own pipe care, maintenance or restorations.  If you like this sort of thing, please click the like and subscribe buttons.  Thank you for reading the ramblings of an old pipe lover.

    Loading…

  • A Corn Cob Meerschaum Restoration?

    November 19th, 2024

    Photographed and written by 

    John M. Young

    As a nearly lifelong Nebraskan and alumni of the University of Nebraska system, I do have an affinity towards corn as a symbol, a food stuff and a good old corn cob pipe.  My heart goes out to every youngster who is missing front teeth during sweet corn season and life goal is to never be more than 30 feet from a cob pipe.  

    The University of Nebraska Lincoln (UNL) football team has been known as the Cornhuskers since the 1900 season.  Prior to that they were known as the Bugeaters, Old Gold Knights, Antelopes and my favorite Rattlesnake Boys. For a very nice history of the Cornhusker name I will refer you to this site:  https://huskers.com/news/2017/7/24/origin-of-the-cornhusker-nickname. And by the way, Bugeater refers to the Nighthawk (Chordeiles minor) not to some prairie culinary experience.

    So, needless to say when I came across this ear of corn figural meerschaum pipe I had to bid.  

    The auction was won and the pipe liberated from the great state of California and brought to a state where it would certainly be more welcomed.

    The pipe arrived the day before I had to go out with a crew from UNL for 5 days of Prairie Rattlesnake research.  Now you see why I really liked the Rattlesnake Boys name.  As typical with a hand carved meerschaum pipe there were no markings on the pipe indicating the provenance.  And this pipe lacked a custom fit case which may have once had an indication of the maker.  The stem also lacked any markings but it did sport the orific button drilling indicative of pipes made before 1920.  The last thing to mention prior to showing the “before” photos is the sheer siE of the pipe.  It was large.  I photographed it with a standard size Kaywoodie Dublin for reference as I was preparing to give the corn meer a fresh beeswaxing..

    Okay, below are some photos of the corn meerschaum prior to being worked on but post harvest (corny joke).

    Background

    I have nothing for this pipe, no country of manufacture, no company, no clue.  As for the age, I can make some guesses.  Again, nothing definitive but a reasonable hypothesis.  Judging by the orific style button, I would think this pipe was from before 1920.  In a great blog written by Steve Laug concerning the history of the orific button, he states that the pipe in his collection “come from the mid to late 1800s and the early 1900s, literally another time and place. For some of them I can identify the time period they were manufactured and for some I have only the faintest idea of the era. The earliest datable pipe I have is from 1912 – this is knowable from the hallmarks on the silver band on the shank of the pipe. The earliest ones in my collection appear to come from the 1850s and possibly earlier as far as I can tell.” (Whatever Happened to the Orific Button? | rebornpipes).  From my personal experience I am unfamiliar with pipes made after the early 1920s with orific style buttons.

    Another contributing piece of data supporting this claim is the material of the stem.  It is a phenol-formaldehyde resin, also known as Bakelite.  When sanding and polishing the stem the unmistakable aroma of formaldehyde was present.

    Bakelite was invented by Leo Hendrick Baekeland (1863-1944) with the first of 400 Bakelite patents being granted in 1906.  According to the American Chemical Society,

    “Bakelite was also particularly suitable for the emerging electrical and automobile industries because of its extraordinarily high resistance (not only to electricity, but to heat and chemical action as well). It was soon used for all non-conducting parts of radios and other electrical devices, such as bases and sockets for light bulbs and electron tubes, supports for any type of electrical components, automobile distributor caps and other insulators.

    Along with its electrical uses, molded Bakelite found a place in almost every area of modern life. From novelty jewelry and iron handles to telephones and washing-machines impellers, Bakelite was seen everywhere and was a constant presence in the technological infrastructure. The Bakelite Corporation adopted as its logo the mathematical symbol for infinity and the slogan, “The Material of a Thousand Uses,” but they recognized no boundaries for their material.

    The Achilles heel was color. The pure Bakelite resin was lovely amber, and it could take other colors as well.” (https://www.acs.org/education/whatischemistry/landmarks/bakelite.html#properties-and-uses-of-bakelite)

    Using Bakelite as a guide I estimate the age of this pipe to be from 1906 (origin of Bakelite)-early 1920s.

    The Restoration

    In my excitement to begin this restoration I apparently failed to photograph the pipe on a clean denim piece.  Fear not, if you look closely there is a raggedy piece of denim underneath the white plastic envelope.  The reaming was done with the Smokingpipes Low Country Reamer, General triangular scraper and 220 sandpaper wrapped around a wood dowel.

    There was some cake removed though not a tremendous amount.

    The interior of the tobacco chamber was carbon coated and I attempted to remove the carbon cake without damaging the meerschaum.

    The rim of the pipe did not have a noticeable layer of lava.  Like Forrest Gump said, “One less thing to worry about”.

    The airway of the shank was cleaned with bristle pipe cleaners dipped in 95% ethyl alcohol and was quite clean.

    The interior of the stem was cleaned with bristle pipe cleaners and ethyl alcohol and was also relatively clean.  The cotton swabs were used to clean out the threads of the mortise.

    The stummel was scrubbed with warm water and a nylon scrub brush.  The stummel was dried with a cotton hand towel after being rinsed.

    Back at the workbench the stummel looked better without the years of grime.

    The scrubbed rim was markedly cleaner than before.

    The next phase of this restoration was to apply fresh beeswax to the stummel.  I have a kitchenette in the basement close at hand to the workbench.  On the stovetop I heated a pan with water.  Inside the pan I placed a small canning jar wil solid beeswax.  The water is heated by the stove and melts the beeswax.  This also allows me to turn off the flame and the hot water keeps the wax molten for a longer period of time.  With a large stummel like this, extra time is a benefit.  The tobacco chamber was plugged with a wine bottle cork to keep wax from entering the chamber.  While the wax was melting I used a heat gun to heat the stummel.

    As I was heating the shank I was a good deal of beeswax melt and pool in the carvings.  I had not seen excess wax like this before on a meerschaum pipe.  This indicated that the stummel had likely been waxed sometime after its initial carving.

    The molten beeswax was “painted” on using a paintbrush dipped in the molten was and applied to the hot meerschaum.  This was difficult to photograph as both of my hands were busy with either the paintbrush, stummel or heat gun.  Several coats were applied and the pipe moved around in the heat to allow the molten wax to evenly be absorbed by the meerschaum.  I waxed the Kaywoodie meerschaum also while I had the wax heated.  The below photo shows both pipes are cooling.

    Back at the workbench the stummel was looking very nice withit’s new wax.  The color had deepened and assumed a very appropriate yellow gold.

    The Bakelite stem had a couple of small tooth dents on both top and bottom.  The button end of the stem was sanded with a 40 grit sanding sponge to allow the cyanoacrylate (CA, super glue) additional surface area to bond to.  I planned on using clear thin CA to fill the dents.

    I “painted” the CA over a wider area than I needed to fill so that the CA could be blended during the sanding.  The CA was allowed to cure on its own as I did not know how the CA drying accelerator would affect the Bakelite.

    Below, you can see a couple of CA fill on the underside of the stem.

    Once cured the CA was filed smooth then sanded.  The entire stem was sanded with a series of sanding sponges 350-3500.  Between each sponge I rubbed the stem with Obsidian Oil and wiped it with a paper towel.

    The stem was then worked with 4000-12000 micro-mesh pads.  Again between each pad the sem was rubbed with Obsidian Oil and wiped with a paper towel.

    The stem was polished with Before and After Fine Polish followed by the Before and After Extra Fine Polish.  

    The final steps were to take the pipe to the buffer where the stem was buffed with Blue Diamond compound.  The stem then received several coats of carnauba wax and a final hand buffing with a microfiber polishing cloth.

    I think this Corn Meerschaum is a wonderfully carved piece of work.  The graceful curves of the stem with its translucent deep red Bakelite and amber-like fitting to the shank accentuate the earthy image of nature’s bounty. The beeswax deepened the color of the stummel to a very fitting shade.  The pipe is large and smoking it would be a long term commitment, perhaps perfect for watching a football game.  I do wish that I knew more about the country of manufacture or the carver but that is likely lost to time.  As for the present I am looking forward to smoking this pipe and imagining the journey it has taken to reach southeast Nebraska.

    The dimensions of this meerschaum pipe are: 

    • Length:  7.55 in./ 191.77 mm.
    • Weight:  3.12 oz./ 88.45 g.
    • Bowl Height:  3.43 in./  87.12 mm.
    • Chamber Depth:  1.81  in./ 45.97 mm.
    • Chamber Diameter:  0.83 in./ 21.08 mm.
    • Outside Diameter:  1.75 in./ 44.45 mm.

    I do hope that you have found something here useful to your own pipe care, maintenance or restorations.  If you like this sort of thing, please click the like and subscribe buttons.  Thank you for reading the ramblings of an old pipe lover.

    Loading…

    Below are some photos of the finished Corn figural meerschaum pipe.

  • Masta 45F Patent Standard Bent

    November 14th, 2024

    Photographed and written by

    John M. Young

    For the pipe connoisseurs out there the name Dunhill evokes strong feelings, rightfully so, of quality and workmanship.  I have yet to have the honor of restoring or smoking a Dunhill pipe so I feel inadequate to describe them.  I can say that there are a few brands owned by Dunhill which I have had the pleasure of restoring: These include Hardcastle, Parker and now Masta.  Yes, I know this does not make a Masta a Dunhill any more than a Mazda car was a Ford due to Ford’s ownership of a large amount of Mazda’s shares.  The fact remains that so far, this is as close as I have gotten to an actual Dunhill.  This Masta was purchased via eBay from a seller in Vilnius, Lithuania and thus took considerably longer to ship than a typical State side transport.  I think it was worth the wait.  The pipe arrived and was photographed as it appeared after the unboxing.  It is stamped MASTA over PATENT over STANDARD with 45F left of the stamping on the left shank of the pipe.  On the right shank is MADE IN LONDON over ENGLAND.

    The pipe appeared to have been cleaned though not restored .  This made for what looked like an easy relaxing restoration.  The tobacco chamber was mostly clean.  The Stem had some oxidation and a single bite mark on the bottom of the button. There were no serious dents or scars on the briar.

    Background

    As said earlier, I’d not be a good pipe snob, never having laid hands on a Dunhill.  When asked what my favorite pipe is, I’ve been known to reply, “The one between my teeth.”  When asked about my favorite tobacco, the reply is similarly “The one in my pipe.”  I have found that I prefer some pipes, tobaccos and people over others.  Generally, the rule is that I favor those which agree with me.  Aesthetically this Masta agrees with me.  Historically, I find the lack of information about Masta disagreeable.  Pipephil.eu has a few photos of stamping which verify this pipe is indeed a Masta but little else.   

    (Mas — Pipes: Logos & Markings)

    Turning to pipedia.org, I found a short blurb followed by a longer blurb.  The first is included below:

    “Masta was a brand founded around 1900. When Parker Hardcastle Limited was formed in 1967, they also incorporated the Masta Patent Pipe Company. From this point this was a Dunhill / Parker / Hardcastle offshoot, primarily for the scandinavian market. The brand no longer appears to exist. Masta was at the end rarely the equal of a Parker.” (Masta – Pipedia)

    Wow, so between 1900 and 1967 Masta apparently did nothing.  They were then taken over by Dunhill, along with Parker and Hardcastle, where they produced sub-Parker quality pipes for some “scandanavian”s who couldn’t even afford to capitalize Scandinavia.  Hmm, not too impressive  thus far.

    The second blurb appeared to have been taken from another source and was footnoted in the “References” at the bottom of the pipedia.org page.  Wanting the original source so, I followed the link to the below quote:

    “Produced in London by Masta ( Dunhill ). Masta Patent Pipes Company was founded around 1900 to London. The firm suffered numerous adversities (the factory was destroyed by a bombardment in 1941, during the second world war). the mark Masta was acquired in 1946 by Parker Pipes Co. (Dunhill) and the production continued in the establishment Parker-Hardcastle, next to St. Andrews Road. What the pipes Masta (how Hardcastle and Parker ) can be considered “second lines” of Dunhill (or exemplary not perfect, with defects that cannot be signed from the mother house) is common and very diffused opinion. To this opinion I habitually conform me. It is necessary to specify however that this hypothesis is controversial and it has never been confirmed. The only certainty seems to be that Parker , Hardcastle and Masta belong to Dunhill and the pipes they are produced in the establishment Parker-Hardcastle . Parker and Masta have in common usually forms and numbers of shape.” (Masta (Dunhill) Patent Standard – Very nice English briar pipe – No Reserve | #292597597)

    Well, that was better than the first blurb even with the apparent use of Google translate to convert it to English.  There were discrepancies among the dates, 1946 and 1967 for the purchasing of Masta by Parker and or Dunhill.  This still was a more objective version of Masta history. 

    Pipedia.org also has a nice Masta shape chart:

    (C_2-1.jpg (3574×2443))

    I still had trouble with the whole notion of a company as illustrious as Dunhill having to wage economic warfare on companies producing far lower quality products.  I couldn’t imagine many Dunhill aficionados ever hearing the announcement, “Attention K-mart shoppers…” during their pipe shopping excursions.  

    It was in a blog on Steve Laug’s Rebornpipe.com that I came across Robert M. Boughton’s blog “Identifying, Categorizing and Refurbishing a Masta Diplomat” (Identifying, Categorizing and Refurbishing a Masta Diplomat | rebornpipes).  Robert did a wonderful job explaining the history of Mast in a reasonable way which I found enthralling.  I highly recommend that blog as a read if you are interested in the history of the Masta Patent Pipe Company.  With that I felt like I now had a functional knowledge of the brand and turned to the restoration.

    The Restoration

    As usual I began with a clean denim piece to protect the work surface.

    The team was assembled; the PipNet with #2 blades, Smokingpipes Low Country Reamer, General triangular scraper (with the tip ground round) and 220 sandpaper wrapped around a wood dowel (AKA a 20 gauge shotgun magazine plug).

    The PipNet was used predominantly for the reaming with the other two scrapers just to clean off stubborn spots.

    The completed reaming showed slight damage to the rim.

    Once reamed the chamber was sanded with the 220 sandpaper.  No damage from heat was observed .

    The stummel was taken to the sink for a scrub with a nylon scrub brush and undiluted Murphy Oil Soap.  The soap was rinsed with warm water and the stummel dried with a cotton hand towel.

    Back at the workbench the stummel was wiped with a make-up pad dipped in 95% ethyl alcohol.  Very little color, existing finish, came off.  The grain patterns could be seen much better at this time and looked very nice.  I was very tempted to contrast stain the stummel here but thought that that would not hold true to the nature of this pipe.

    The shank airway was filthy and full of accumulated tar.  After numerous alcohol dipped cotton swabs, I decided to try a cottom/alcohol soaking to remove the tars.  The tobacco chamber and shank were stuffed with cotton and 95% ethyl alcohol was added to the cotton filled passages with a disposable pipette to the point of saturation.  The alcohol was allowed to work on dissolving the tars overnight.

    The next day the cotton had absorbed much of the tars liberated from the briar by the alcohol as it evaporated.

    The cotton was removed and the cleaning resumed and went at a much faster rate.

    The surface of the stem was scrubbed with Soft Scrub cleanser on a make-up pad.

    This produced very little discoloration on the pad indicating that the stem was not heavily oxidized.

    The button needed a little bit of reconstructive work.  I used cheap transparent tape to cover the button proper and confine the black cyanoacrylate (CA, super glue) to the stem where I wanted to fill the dent.  I prefer the cheap tape as the more expensive 3M brand Scotch tape softens and dissolves with exposure to CA drying accelerator.

    Black CA was applied to the area to be filled with a wide zone for blending. 

    The black CA was spritzed with a CA drying accelerator and filed smooth.

    The taping was reversed – covering the new patch and leaving the area to be filled uncovered.

    The black CA was applied to the dented spot on the button, building up the area.  This was then spritzed with a CA drying accelerator.  The tape was removed and the fill filed smooth and the button reshaped.

    The newly repaired button was sanded smooth and inspected to see if additional CA would be required.

    The stummel was very clean and free of any flaws except for one small pit.  This was filled with brown CA and allowed to sure on its own.  The stamps had been taped with painters tape to preserve them during the upcoming sanding.

    The stem and stummel were sanded with a series of sanding sponges from 600-3500 grit.  Between each sponge the stummel was wiped with a make-up pad wetted with alcohol.  The stem was rubbed with mineral oil and wiped with a paper towel between sanding sponges.

    After the final wipe downs from sanding the pipe was worked with micro-mesh pads from 4000-12000 grit.  Between sponges the stummel was again wiped with the alcohol wetted make-up pads while the stem now received a rubbing with Obsidian Oil and a wipe with a paper towel.

    The pipe was given a coat of Before and After Restoration Balm and allowed to sit for 30 minutes.

    With the balm doing the magic that it does for 30 minutes the remaining mysterious elixir was wiped from the pipe with an inside out athletic sock.

    The final steps were to take the pipe to the buffer for several coats of carnauba wax and a final hand buffing with a microfiber polishing cloth.

    I have to say that I think this Masta Patent Standard 45F is a beautiful specimen.  The graceful curves are well proportioned and elegant.  It appears to be a well crafted pipe with only one noticeable pit in the briar.  If this is what a Dunhill “second” looks like, I am going to be very impressed if I ever get to work on a Dunhill.  I retained the natural finish of the briar and it is quite lovely with attractive bird’s eyes and a nice flame grain on the front.  The stem polished up well and the high gloss black is a pretty contrast to the natural briar.  I am sure that this pipe will be a grand smoker and bring someone many years of enjoyment.  

    The dimensions of this Masta 45F Patent Standard Bent Billiard are: 

    • Length:  5.63 in./ 143.11 mm.
    • Weight:  1.49 oz./ 42.40 g.
    • Bowl Height:  1.79 in./  45.47 mm.
    • Chamber Depth:  1.60  in./ 40.64 mm.
    • Chamber Diameter:  0.70 in./ 17.78 mm.
    • Outside Diameter:  1.42 in./ 36.07 mm.

    I do hope that you have found something here useful to your own pipe care, maintenance or restorations.  If you like this sort of thing, please click the like and subscribe buttons.  Thank you for reading the ramblings of an old pipe lover.

    Loading…

    Below are some photos of the finished Masta Patent Standard 45F.

  • A Marxman Four Hundred Restoration

    November 12th, 2024

    Photographed and written by 

    John M. Young

    There it is, the apex of the Marxman line.  Well in this case what is left of the apex.  All that remains of this Four Hundred is the stummel.  The 14 karat gold band and original stem have been lost to the ravages of time.  The briar lives on clinging to her past glory.  I am going to do my best to restore this former queen to her proud majesty.

    Over the past three years I have only seen 3 Marxman Four Hundreds come to auction.  There was one on Etsy a couple of years ago and I still kick myself for not buying it.  This one and another on eBay listing for north of $200, if I recall correctly. 

    This pipe wears the stamp “The Four Hundred” in an Old English script on the bottom of the pipe, also on the bottom is “E152”.  On the left shank is stamped MARXMAN within the arrow above IMPORTED BRIAR.  As previously mentioned the gold band and original stem are missing.  The replacement stem is stamped FRANCE around the tenon end.  Below are some photos of the Marxman Four Hundred before I had done any work to the pipe.

    The pipe was quite dirty with years of grime on the stummel.  The rim had a significant lava deposit.  There was a slight superficial crack running along the front of the briar.  The tobacco chamber had a substantial cake build up present and of course the ill fitting replacement stem would have to be worked on.  My Four Hundred was in need of a good deal of work.

    Background

    According to pipedia.org:  “The Four Hundred was Marxman’s best series, characterized by very large pipes. Similarly famous was the Marxman Heirloom Pipes series, with around 80 pieces produced by well-known North American sculptors, such as Jo Davidson, Cecil Howard, Charles Kopp, and RD Lewis, contracted by Bob in 1947. Today these pipes are genuine collector’s items. The series included animal and human figures, selling at extremely high prices for the time.” (https://pipedia.org/wiki/Marxman)

    I have restored and blogged about several Marxman pipes over the past year.  I will include a few of them here if you are interested in more of the history of the brand.

    • Camel figural https://wordpress.com/post/scimansays1787.com/7445
    • Jumbo C https://wordpress.com/post/scimansays1787.com/7197
    • Jumbo Dublin https://wordpress.com/post/scimansays1787.com/3071
    • Mel~O pear https://wordpress.com/post/scimansays1787.com/6995

    The Restoration

    This restoration began on September 29, 2024.  It is now October 29, 2024.  Thank goodness for time stamps on photos.  I remember the process and with the correct sequence of photos describe the restoration in detail.  As usual the pipe got a clean denim piece as a work surface.

    Next, the ream team was assembled.  This tobacco chamber was large enough to require the large, size #4 PipNet blades along with the General triangular scraper, the Smokingpipes Low Country Reaming Knife.

    I started with the PipNet and the #2 blades.

    Progressing through the blades, #3 was next up.

    The #4 blade was the last of the progression.

    The chamber was reamed but still required sanding.  This was done with 220 sandpaper wrapped around a wood dowel.  You can also see from the photo below the extent of the lava on the rim.

    The chamber was looking far better and showed no damage from excessive heat from smoking.  This surprised me, in a good way.

    The mountainous pile of cake is not done justice by the below photo.  

    To provide a better representation of the cake it was placed into an empty snus can.

    The snus can was then dumped in preparation of it’s next task – to hold some undiluted Murphy Oil Soap.

    Tha stummel was placed rim down in contact with the Murphy’s to soften the lava while preserving the rim from an accidental heavy handed scraping.

    After about 30 minutes I checked the condition of the lava.  It had softened dramatically and was scraped away with a very light scraping with a sharp pocket knife.

    The stummel was then taken to the sink for a scrubbing with undiluted Murphy Oil Soap and a nylon scrub brush.   The soap was rinsed with warm water and the stummel dried with a cotton hand towel.

    Back at the workbench the stummel was beginning to show the previous glory which it had been robbed of.

    The rim, now cleaned of most of the lava, did not have any damage from doddle knocking.  I had feared what was under the lava.  Relief.

    I used the shank boring drill from the Kleen-Reem  tool to drill out the airway of the shank.

    The shank was quite filthy and drilling it out helped remove a good deal of the accumulated tar.

    The shank cleaning proceeded with drilling, scraping with a dental scraper and many alcohol dipped pipe cleaners.

    The cotton swab brigade also came around with 95% ethyl alcohol to further clear out the shank.

    The stem was filed to a much better fit.  This took considerable time and removed the FRANCE stamping completely.

    The airway of the stem was surprisingly clean.  Apparently the previous owner was aware of pipe cleaners and stems at least or, the old stem was just thrown out due to being as filthy as the shank.

    The stem was lightly buffed with 0000 steel wool in preparation of the Before and After Extra Strength Deoxidizer bath.

    Below you can see the stem entering the Before and After Extra Strength Deoxidizer bath. 

    The stem was allowed to soak in the deoxidizer solution for four hours.

    Once removed from the solution I allowed it to drip excess solution back into the jar for several minutes using the patented Drip-O-Matic.  Available at fine retailers near you.

    The stem was then rubbed with a coarse shop rag to remove the remaining solution and to abrade more of the surface oxidation which the solution had loosened.

    The stem was returned to the workbench for a scrubbing with make-up pads and Soft Scrub cleanser.

    At this point I paused the restoration of the Marxman for several days.  I needed to find a replacement gold band.  The original was a 14 karat gold band not plated, filed nor rolled but true 14K gold.  With the current price of gold and over $2700/ounce I opted against this option.  I reached out and called Tim West at J. H. Lowe & Co (https://jhlowe.com/).  Tim is always very helpful with products and advice for restorations.  He did not have anything in the 16 mm diameter that I needed.  He did suggest Vermont Freehand (https://vermontfreehand.com/).  Steve Norse at Vermont Freehand was very helpful and through a series of emails I was steered to their gold plated 16 mm band.  Now we come to another problem with restoring pipes in October – The Las Vega Pipe Show.  The entire Vermont crew was apparently in attendance at the Las Vegas show and the order had to wait until they returned back to work.  Also during this break in working on the Marxman, I restored several other pipes.  In the process I neglected to photograph the sanding and polishing of the Marxman stem and stummel.  I normally do not like to work on more than one pipe at a time for this very reason.  I am very easily distracted, undiagnosed Attention-deficit/hyperactivity disorder (ADHD) can play havoc with my ability to remain on task if allowed.  And this break not only allowed it but promoted it.  Long story short, The band arrived from The Vermont boys and work resumed.

    The below photo shows that the original band was about 4 mm thick and the new band 7 mm.  I thought about cutting the new band down but thought I should try it on first.

    I immediately liked the way the wider band looked.  The reshaped stem was a pretty good match of the original saddle stem.  I admit to assuming the original stem was a saddle as many of the photos of other Four Hundreds appear with saddle stems.  I have a couple of tapered stems of proper size, maybe someday I’ll be good enough at cutting a tenon to try making one for this pipe.

    The gold band was affixed using white all purpose glue.  Vermont and I had equally accurate measurements for this band making for a fit which was snug enough that I did not have to heat the band and force a fit. 

    The pipe was given a coating of Before and After Restoration Balm.  The Balm was applied with a baby toothbrush to work the stuff and it’s magic into the carvings.  It was allowed to sit for 30 minutes.

    The brush was cleaned with dips into 95% ethyl alcohol and rubbing the bristles on the denim a couple of times.

    After 30 minutes, the Restoration Bal was wiped from the pipe with an inside out athletic sock.

    The pipe was taken to the buffer for several coats of carnauba wax.  The rustications were wide and shallow enough that I felt comfortable using carnauba wax on them.  It took considerably longer working the wheel edge into the carvings but the result looked great.

    The final step was to hand buff the pipe with a microfiber polishing cloth to further raise the shine.

    The dimensions of this Marxman Four Hundred are: 

    • Length:  7.36 in./ 186.94 mm.
    • Weight:  2.48 oz./ 70.30g.
    • Bowl Height:  2.21 in./  56.13 mm.
    • Chamber Depth:  1.77 in./ 44.96 mm.
    • Chamber Diameter:  0.82 in./ 20,82 mm.
    • Outside Diameter:  1.80 in./ 446.37 mm.

    I do hope that you have found something here useful to your own pipe care, maintenance or restorations.  If you like this sort of thing, please click the like and subscribe buttons.  Thank you for reading the ramblings of an old pipe lover.

    Loading…

    Below are some photos of the finished Marxman Four Hundred.

  • Kiko Caveman Chimney Restoration 

    November 7th, 2024

    Photographed and written by 

    John M. Young

    “Another Kiko Caveman?”, you ask.  I reply. “YES!”  These pipes are so interesting, not just to look at but to hold.  The feel in the hand is remarkable.  The first thing that strikes me is how lightweight they are especially for a hunk of rock.  Second, is the sheer idea of the age of the mineral itself.  One source dates this Amboseli sepiolite (meerschaum) to the Late Pleistocene to Holocene age so, approximately 12,000-10,000 years ago (https://www.sciencedirect.com/science/article/abs/pii/S007045710870027X).  This is interesting since several pipes advertise “century old” briar.  How many can claim to be 100 centuries old?  Anyway, this Kiko came from an eBay auction and has a much less interesting acquisition story than the first Kiko Caveman.  Meerschaum is a hydrophilic mineral, meaning water loving.  A few weeks ago I was chatting with Sascha Mertens, a pipeman from Germany, he was explaining how to tell a block meer from a pressed meerschaum.  You need only to place your tongue on the meerschaum.  It will stick to a block meerschaum and not with a pressed.  This reminded me of testing minerals as a geologist.  The same thing would occur with anhydrous hydrophilic minerals.  Well, my tongue stuck most uncomfortably to the Kiko.  It was in need of a fresh coat of beeswax.

    The stem is the only part of the pipe that is stamped with any identifiers.  Here we can see the elephant logo on the left side of the shank and TANGANYIKA on the bottom surface.  

    The Meerschaum was in good shape and the tobacco chamber was mostly clean, no cake to speak of.  It looked like this restoration would be mostly stem work and of course a fresh beeswaxing.

    Background

    I did a restoration of another Kiko Caveman a couple of weeks ago.  I will include a link here to that restoration.  I will also use the background of the previous restoration here as both pipes are similar.

    The first step that I took in researching this pipe was to look up the logo at pipephil.eu.  There I found the following:

    (Ki-Km — Pipes : Logos & Markings (pipephil.eu))

    Turning to pipedi.org for some history of Kiko led to the following entry:

    “Kiko, meaning “pipe” in Swahili-Kiswahili to English translation, is probably the best known of the various brands listed below. In East Africa Meerschaum is found in Tanganyika, once known as German East Africa, and since 1964 part of the United Republic of Tanzania. The main deposit comes from the Amboseli basin surrounding the Lake Amboseli. Tanganyika Meerschaum is normally stained in shades of brown, black and yellow, and is considered to be inferior to Meerschaum from Turkey. Eventhough, the raw material is mined by the Tanganyika Meerschaum Corporation and to a large extent used for pipemaking. Uncounted pipemakers throughout the world were supplied with Amboseli Meerschaum, preferentially used for Meerschaum lined briars or leather-clad pipes. In Tanganyika the Kilimanjaro Pipe Company Ltd.” (Kiko – Pipedia) 

    And, more specifically the Caveman line of Kiko pipes.

    • “Caveman Fashioned from a piece of natural meerschaum.Every pipe is unique and – is in fact a geological specimen over a million years old.Attractively boxed.” (Kiko – Pipedia)

    A second entry at pipedia.org discusses the Tanganyika Meerschaum Corporation in greater detail. 

    “From Pipes, Artisans and Trademarks, by José Manuel Lopes

    Tanganyika Meerschaum Corporation is a company that formed in 1955 by Kenyan businessmen from Nairobi after the discovery of a meerschaum mine relatively close to the surface on Kilimanjaro. The meerschaum is tougher, less porous, and cheaper than the Turkish variety. Another mine was soon discovered in Sinya, in the famous Amboseli Game Park.

    The company, previously based in Arusha (Tanzania), became an associate of a Belgium firm, but closed some years after. It produced the Caveman, Countryman, Kiko, Killimanjaro, Sportsman, Townsman, and Wiga brands. It maintained a link with GBD for the making of the GBD Block Meerschaum series, and after its closure, the English firms, London Meerschaum and Manx Pipes (Manx Meerschaum) continued producing with African meerschaum.” (Tanganyika Meerschaum Corporation – Pipedia)

    To give more depth to the meerschaum story here is a quick lesson in geography.  

    Lake Amboseli is a rainy season body of water along the shared border of Kenya and Tanzania, northwest of Mount Kilimanjaro.  The straight white line on the image below is that border.  Sinya refers to the Sinya Mine (https://www.mindat.org/loc-266724.html).

    (https://www.google.com/maps/@-2.7763709,37.2580582,99656m/data=!3m1!1e3!5m1!1e4?entry=ttu&g_ep=EgoyMDI0MDkyMy4wIKXMDSoASAFQAw%3D%3D)

    Zooming in on the south western shore of the temporary Lake Amboseli you can actually make out the excavations of the old mining activities.  On the below image from google maps; pits, tailing piles, roads etc… can be discerned.

    (https://www.google.com/maps/@-2.7763709,37.2580582,99656m/data=!3m1!1e3!5m1!1e4?entry=ttu&g_ep=EgoyMDI0MDkyMy4wIKXMDSoASAFQAw%3D%3D)

    It appears that little to no mining is done at the site today.  Several sources say that the meerschaum deposit were close to the surface, not very large and were played out 

    Super fast history lesson:

    Before World War I, Tanganyika formed part of the German colony of German East Africa. It was gradually occupied by forces from the British Empire and Belgian Congo during the East Africa Campaign, although German resistance continued until 1918. After this, the League of Nations formalised control of the area by the UK, who renamed it “Tanganyika”. The UK held Tanganyika as a League of Nations mandate until the end of World War II after which it was held as a United Nations trust territory. In 1961, Tanganyika gained its independence from the UK as Tanganyika, joining the Commonwealth. It became a republic a year later. Tanganyika now forms part of the modern-day sovereign state of Tanzania. (https://en.wikipedia.org/wiki/Tanganyika_Territory)

    With all of that information in mind and assuming that the TANGANYIKA stamp on the stem is referring to the country of manufacture (COM) this pipe was made not after 1962.  

    The Restoration

    After getting a clean denim piece this pipe needed to have the stem freed from the tenon.  It was firmly attached firmly, as if someone appeared to have glued the stem in place.

    I wrapped the stem with several wraps of masking tape to protect the stem from the channellock pliers.  A twist and turn later the stem was freed.

    The tenon appeared to be aluminum as it was not attracted to a magnet and glued in place in the meerschaum.  When inserted completely the stem was loose but if backed out about 2 mm it was a perfect fit.  I decided that a cork washer would be the easiest fix for this situation.

    The photo below shows the light cake deposits in the bowl were removed with 220 sandpaper wrapped around a wood dowel.

    The stem was cleaned with bristle pipe cleaners dipped in 95% ethyl alcohol.  The stem was then placed into a jar with Before and After Extra Strength Deoxidizer.  The jar needed to be propped at an angle due to the length of the stem.

    The stummel was cleaned with warm tap water and a nylon scrub brush.

    Fresh beeswax was melted in a small glass canning jar placed in a pan of boiling water.  The surrounding water keeps the wax molten for longer enabling me to have more time with the molten wax.

    The heat gun was set up in proximity.

    I did not have a cork of suitable size to plug the tobacco chamber so through the power of adaptation I discovered a 20 gauge shotgun shell was the perfect diameter.  The shotgun shell was my plug and handle for the heating of the meerschaum with the heat gun.

    The molten beeswax was brushed onto the stummel and the meerschaum was heated with the heat gun.  The aluminum lid acted as a wax drop catch pan.  Several coats of beeswax were brushed onto the meerschaum.

    Below you can see the meerschaum was set aside to cool.

    After four hours the stem was removed from the Before and After Extra Strength Deoxidizer and it was allowed to drip excess solution back into the jar.

    The stem was hand rubbed/buffed with a coarse shop rag to absorb the remaining solution and abrade the softened oxidized vulcanite.

    The below photo is blurry but does show the oxidized rubber left behind on the rag.

    The stem was rubbed with mineral oil to prevent new oxidation.

    My masking tape protective layer was not quite adequate to protect the stem during the freeing from the stummel.  Doh!  That would need to be repaired with an application of black cyanoacrylate (CA, super glue).  Well, now you know that I make mistakes.  A lot of them…  The stem stamping and logo were covered with painters tape to protect them during the sanding.

    The dent was filled with black CA and allowed to dry/cure on its own.

    Once cured the repair was filed with a small flat file.  The stem was then sanded with a series of sanding sponges from 600-3500 grit.  Between sponges the stem was rubbed with mineral oil and wiped with a paper towel.

    The elephant logo area was cleaned with a cotton swab and ethyl alcohol to remove sanding debris and mineral oil in preparation of a new paint job.  White acrylic modeling paint was used.

    The paint was applied using a bamboo skewer.

    When dried the paint outside of the depressed logo was removed during the micro-meshing.  This was done with 4000-12000 micro-mesh pads.  Between each pad the stem was rubbed with Obsidian Oil and wiped with a paper towel.

    The stem was taken to the buffer where it was polished with Blue Diamond compound .  The stem then received several coats of carnauba wax.  The stummel, having just received fresh beeswax, did not have any carnauba wax applied.

    I am very pleased with how well this Kiko Caveman turned out.  I could not find any information concerning the shapes that the makers tried to carve for.  This pipe was very different in regards to the tobacco chamber drilling than the previously restored Kiko Caveman.  This pipe has a narrow 16.26 mm bore while the other Kiko has an 18.29 mm bore.  I tried the narrow bore with Carolina Red Flake virginia blend and it smoked very nicely.  The stem of this pipe polished nicely and the glossy black vulcanite accents the lighter meerschaum well.  The long stem does not make for a very comfortable clenching pipe but the “hand feel” makes up for that.  Besides, the flat bottom of this pipe provides a perfect and stable sitting base.  The dimensions of the Kiko Caveman Chimney are: 

    • Length:  6.85 in./ 173.99 mm.
    • Weight:  1.92 oz./ 54.43 g.
    • Bowl Height:  3.02 in./  76.71 mm.
    • Chamber Depth:  1.69 in./ 42.93 mm.
    • Chamber Diameter:  0.64 in./ 16.26 mm.
    • Outside Diameter:  1.92 in./ 39.88 mm. In line with the stem

     1.47 in./ 37.34 mm.  Perpendicular to the stem

    I do hope that you have found something here useful to your own pipe care, maintenance or restorations.  If you like this sort of thing, please click the like and subscribe buttons.  Thank you for reading the ramblings of an old pipe lover.

    Loading…

    Below are some photos of the finished Kiko Caveman Chimney.

←Previous Page
1 … 9 10 11 12 13 … 25
Next Page→

Blog at WordPress.com.

Privacy & Cookies: This site uses cookies. By continuing to use this website, you agree to their use.
To find out more, including how to control cookies, see here: Cookie Policy
 

Loading Comments...
 

    • Subscribe Subscribed
      • NebraskaPeteGeek
      • Join 37 other subscribers
      • Already have a WordPress.com account? Log in now.
      • NebraskaPeteGeek
      • Subscribe Subscribed
      • Sign up
      • Log in
      • Report this content
      • View site in Reader
      • Manage subscriptions
      • Collapse this bar
    %d