When naming this restoration I nearly called it a “A No Name Rusticated Pot Pipe”. I did not want to be considered a drug paraphernalia marketeer thus, the word “Pot” was eliminated from the title. The complete lack of any stampings makes me question the origins of this pipe. More on that in the “Background” section to the . The pipe has a very nice shape and size to it and though I prefer a tapered stem this saddle fishtail is a nice touch. Below are some photographs taken of the pipe before I started work on it.
Background
I know this is not a Custom-Built pipe but it has the characteristics of a Custom-built and is most likely a copied version of one Now Custom-Belts were first made in the mid 1930 by Tracy mMincer. They gained renown and popularity and this popularity most likely created a market for imitators.When I was a kid most knock-offs, as we called them, came from Taiwan and Japan Over the years those two countries greatly improved their quality control and craftsmanship and today are known to produce high quality products. After World War Two (WWII) There was a flood of cheaper made pipes entering the United States. The Tariff Act of 1930 had made an attempt to force countries to mark or stamp the country of origin on the products but this was not always as successful or regulated but usually it was. Enforcement after the early 1950s was much better and in 1963 new regulations specifically addressed pipes. (https://www.usitc.gov/publications/tariff_affairs/pub103s.pdf, p.533) Thus we see ENGLAND, FRANCE or ITALY stamped on lower quality or “basket pipes”. If a pipe has no Country of Manufacture (COM) stamp, that is an indicator that it was made in the USA.
During WWII the supply of briar wood was greatly limited. Various alternatives like Mountain Laurel, mainly from North Carolina, and Mission Briar, from California, were used. Neither wood was successfully adopted by pipe smokers. After the war the supply of briar was again accessible and most makers stamped their pipes stressing that they were indeed made from genuine briar. Thus we see stamps like IMPORTED BRIAR, REAL BRIAR, GENUINE BRIAR etc… What does this have to do with the pipe in hand? Since there is no COM I assume it was made in the US. Due to the lack of stamping about the origin of the wood, I questioned whether it is made of briar. Jumping ahead, after the restoration I was able to get a good look at the wood along the smooth surfaces and it is definitely briar. No other wood has the grain and bird’s eyes like briar. The heavily carved surface of this pipe and the large areas of fills, that you can see in the photos during the restoration, led me to hypothesize that this was a pipe made after Mincer’s Custom-Bolts had become popular. The briar is of lower quality requiring the heavy use of rusticated carving and fill/putty, again indicating war years. Could this have been a second of Custom-Bilt? Possible but I could not find any examples of a real Custom-Bilt pipe with a pronounced fish tail stem in William E. Unger’s book, Individual as a Thumbprint The Custom-Bilt Story. I also couldn’t recall any mention of “seconds” from the book.
The Restoration
I normally photograph a pipe on a cleaned denim patch at the beginning of a restoration. I did that this time also but completely failed to get a decent focus. Well, I can’t go back so here is another in the long list of documented mistakes.
This pipe did not need a reaming as the tobacco chamber had been recently done. It did need a date with a scrub brush and some Murphy Oil Soap. The soap was rinsed with warm water and the stummel dried with a cotton hand towel.
The pipe kind of looked cleaner but there were strange dark patches present all over the stummel. I used make-up pads wetted with 95% ethyl alcohol to wipe the exterior of the stummel. The pads were quickly stained with stain.
This got rid of some of the dark patches but not all. The below two photos show the patches. They appeared to be made of a fill material applied after the carvings then stained. The stain seemed to have penetrated easily and produced the dark patches.
At the front of the pipe the patch had a hole in it. This looked like the patch here was shoddily applied to cover a larger hole or pit in the briar.
I dipped a brass brush into the alcohol and worked the patch area in an attempt to get rid of the fills. The patches were again wiped with an alcohol wetted make-up pad.
This helped but did not remove the filler completely. I figured a longer soaking in ethyl alcohol may be required to soften the old filler.
The tobacco chamber looked good. I lightly sanded the interior with 220 sandpaper and inspected the chamber for any heat damage.
Everything in the chamber looked fine with no sign of damage.
No damage here either.
I checked the cleanliness of the shank.It was far from the level of clean that the tobacco chamber was. I ran the Kleen-Reem shank drill through the draft hole, did some scraping and swabbed the airway with cotton swabs. It was quite tar filled.
The shank would also benefit from an extended soaking in ethyl alcohol.
The jar of 95% ethyl alcohol was topped off with fresh alcohol and the pipe started it’s bath.
The stummel was in the bath overnight. Whe it emerged the fills were much softer.
I worked them again with a brass brush and they just disappeared leaving slight depressions.
These depressions were nothing that I felt obligated to refill.
Well, the obligation to fill did arrive when I looked at the front hole. This one would need to be refilled.
The airway of the shank was far easier to clean after the alcohol bath as well.
The hole in the front of the stummel was filled with brown cyanoacrylate (CA, super glue) applied with a fly tying bodkin. While the CA was wet briar dust was pressed into the wet CA. This was allowed to cure Then was roughed up with 220 sandpaper.
The stem was lightly sanded with 320 and 400 sanding sponges to remove the worst of the oxidation.
The stem was then vigorously rubbed with Soft Scrub cleanser on a make-up pad. This was done mainly to assess the level of oxidation.
The stem was severely oxidized enough that I thought a bath in Before and After Extra Strength Deoxidizer (deox) was in order. A pipe cleaner was inserted into the tenon to act as a hanger. The stem was in deox for 4 hours.
Upon removal from deox, I let the stem drip excess solution back into the jar for a few minutes.
I used a coarse shop rag to energetically rub the remaining solution and some of the oxidized rubber from the stem.
Below you can see some of the oxidation which came off on the shop rag.
I wanted to sand the stem in place on the stummel to avoid rounding the joint where the two pieces meet. The stem was sanded with a series of sanding sponges frome 320-3500 grit. The smooth sections of the stummel were simultaneously sanded. The stummel was wiped with a make-up pad moistened with alcohol between sponges while the stem was rubbed with mineral oil and wiped with a dry paper towel between sponges.
Normally I would have switched over to micro-mesh pads for the fine sanding but I wanted to try buffing the stem and stummel with rouge compound on the buffing wheel. That worked well and the finnish seemed adequate. The buffing compound was wiped from the pipe with make-up pads dipped in ethyl alcohol. The stummel then received a coating of Before and After Restoration Balm. The balm was allowed to sit and do it’s magic for 20 minutes.
The remaining Restoration Balm was wiped from the stummel using an inside out athletic sock.
I decided to use Renaissance Micro-Crystalline Wax as the finish for the stummel. I applied this with a baby toothbrush working it into the carvings. The product was allowed to dry for an hour then was buffed with a clean buffing wheel. The stem received several coats of carnauba wax also at the buffer.
The final step was a hand buffing with a microfiber polishing cloth.
I am quite pleased with how this No Name Rusticated Pot turned out. The briar is very lightweight and the shape feels amazingly good in hand. The stem polished up nicely with little indication of the previous oxidation. Saddle stems are not my favorite stem shape to restore as they are difficult to sand and polish. The area where the old fills were spread on so thick are noticeable under scrutiny but with a casual glance they appear to be just part of the rustication. I know they were there to cover for poor quality briar but the issues with quality are cosmetic, the structural integrity of the pipe is quite sound and I am sure this pipe will continue to serve me for many years. This gives me a “Custon-Bilt” like pipe for a fraction of the current market price of such a pipe. The Dimensions of the No Name Rusticated Pot are:
Length: 6.08 in./ 154.32 mm.
Weight: 1.67 oz./ 437.35 g.
Bowl Height: 1.69 in./ 4.93 mm.
Chamber Depth: 1.36 in./ 34.54 mm.
Chamber Diameter: 0.85 in./ 21.59 mm. (Conically bored diameter is at the top)
Outside Diameter: 1.75 in./ 44.45 mm.
I do hope that you have found something here useful to your own pipe care, maintenance or restorations. If you like this sort of thing, please click the like and subscribe buttons. Thank you for reading the ramblings of an old pipe lover.
Loading…
Below are some photos of the completed No Name Rusticated Pot.
I am strangely attracted to pipes that I call curiosities. Pipes with potentially innovative designs created by dreamers who certainly thought they were creating a better way to enjoy the smoking of a pipe. Reality frequently enters into the scene with most of these innovations and as usual, puts the invention to the test of the laws of physics and renders the idea a mere advertising ploy which does little but attract a buyer. This reinforces the old saying, “A fool and his money are soon parted.” Thank you Thomas Tusser for your words of wisdom from the mid-1500s. And thank you inventors and dreamers for allowing me to test both your ideas and Mr. Tusser’s prediction. I saw this SAMHARA pipe and was immediately attracted to it. It reminded me of the Needham pipe (below photo) that I restored last year except this one has the screw placed on top of the shank rather than below.
I wondered what kind of internal drillings were used to rout the smoke from the bowl to the mouthpiece. Well, curiosity and Mr. Tusser’s saying both won and enabled me to win the auction. Surprisingly there were 3 other fools who were also intrigued by this curiosity. The pipe made the journey from Scarborough, Maine to the wilds of southeast Nebraska and into my eager and foolish hands. The pipe was stamped SAMHARA over PAT.PEND. over IMPORTED BRIAR. Below are some photos of the pipe as it appeared shortly after being unboxed.
The stem was oxidized and would need a good deox regimen. The briar had decades worth of accumulated dirt and dust to be cleaned off. There was also a clear coat finish of some sort which I wanted to remove. The tobacco chamber looked used but only lightly caked. This looked to be a relatively easy clean-up and restoration.
Background
Surprisingly there was actually some information available on the Samara Pipe Company of pipedia.org. Since it is fairly short I will include it in its entirety.
Here we have an interesting system pipe. The Samhara Pipe Co. appears in U.S. patent records circa late 1940s.
Example and details, courtesy Benny King
Karl Harris, writes:
“The inventor was Samuel Harris from Dayton, Ohio. He was President of the Globe Clothing Company, Money Back Harris and Harris Clothing. He was born in Detroit Michigan, raised in Oakland, California which is across the Bay from San Francisco. The Family story was he slept through the legendary San Francisco earthquake of 1906. He graduated from the Hebrew Union College in Cincinnati, Ohio. He served as a Rabbi in Toledo Ohio for 4 years before settling in Dayton. He is my grandfather and last night I discovered four of his original unused Samhara Pipes in their boxes along with his notes and drawings.”
Note: Fantastic to have this information and history directly from Samuel’s grandson. Hopefully we will have more photos and additional notes to add soon.
The above advertisement clippings show a date of December 3, 1946 printed at the top of the above left photograph. This leads me to the conclusion that this pipe is from that time.
The only patent I could find for Samuel J. Harris is the below diagram and link to the text of the patent. There was no mention of the SAMHARA pipe like the pipe in hand.
(1498405586974277000-01976496). There are two other applications filed, from Samuel J. Harris from Dayton, Ohio for a Combination skirt and trousers hanger and a Trousers display device. With the same name, city, professional background (Clothing industry) and correct years active, I think it is safe to assume that this is the same Samuel J. Harris who was the inventor of the SAMHARA pipe.
Using photos and measurements from my pipe I was able to sketch out the drillings to approximate scale. The photo below shows the drilled out area in light gray. A photo of the actual tenon was scaled to fit the diagram. At the time of this writing I have not yet begun the restoration, much less actually tried to smoke the pipe. I have to say that I have reservations about the effectiveness of this system. I can imagine the smoke leaving the tobacco chamber, being drawn up the angled airway expanding and cooling slightly in the small top chamber, then proceeding into the stem and to the smoker. I cannot see the smoke going into the lower chamber (bowl-ward from the stem. I can see condensation flowing down from the upper chamber into the stem. I can also imagine condensation flowing into the lower chamber if the pipe were held at an angle where the bowl was lower than the button. I cannot imagine the smoke circulating in the lower chamber as it would be drawn towards the mouth of the smoker. The more I look at this diagram, the more I think that Samuel J. Harris’s invention was far less effective than he dreamt it was. I am getting ahead of myself with this prediction though. I need to get on with the restoration and test drive this old gal before making any claims.
The Restoration
As usual things began with a cleaned denim piece protecting the work surface.
The stem and airway screw were removed for cleaning. I started with the stem on this restoration.
The screw was placed in a medicine cup with about 5 ml of 95% ethyl alcohol.
The stem was cleaned with bristle pipe cleaners dipped in the alcohol. The exterior of the stem was rubbed with 0000 steel wool.
A pipe cleaner was inserted into the tenon of the stem to act as a hanger suspending it in the Before and After Extra Strength Deoxidizer.
I turned my attention to the stummel. The reaming tools were gathered. The PipNet, General triangular scraper, Smokingpipes Low Country Reamer and a wood dowel with 220 wrapped around it. A dental scraper and brass shotgun bore brush was also used for cleaning the grooves inside the tobacco chamber.
The PipNet with it’s #2 blades did the majority of the reaming with the dental scraper used for the grooves.
The below photo is of the reaming with the dental scraper but also shows the one large fill which would be replaced.
Below is a photo of the reamed, clean grooved, and sanded tobacco chamber. I noticed some charsing of the groove ridges. This idea of providing grooves or ridges to help speed the cake building is an interesting idea but in my mind it would do little but provide greater surface area for fire to char the briar. Which it appears to have done.
I tried to remove the existing finish from the stummel with a cotton swab dipped in acetone to test the effect. It worked but was very slow.
The solution was an acetone bath. The stummel was placed into my jar of acetone. Fresh acetone was added to fill the jar completely. The stummel was allowed to soak for 45 minutes.
The stummel was then removed from the acetone. I used a brass brush dipped in the acetone to work the rusticated surface of the stummel and free any softened finish that remained.
The stummel was then wiped with a couple of make-up pads wetted with fresh acetone to remove the remaining clear coat.
While the tars in the airways were still soft from the acetone, I cleaned the airway with bristle pipe cleaners and cotton swabs dipped in 95% ethyl alcohol.
The acetone had evaporated during the airway cleaning and only a slight aroma of it remained. I took the stummel to the sink for a scrub with a nylon brush and undiluted Murphy Oil Soap. I thought that I may have done the scrubbing sequence out of order and maybe should have done it before the acetone bath. It did remove debris from the stummel and discolored the soap lather so something was being removed. The soap was rinsed with warm water and the stummel dried with a cotton hand towel.
Returning to the workbench, I wiped the stummel with a make-up pad dipped in 95% ethyl alcohol and ran an alcohol dipped pipe cleaner through the airway. Both the make-up pad and the pipe cleaner came back with very little color. This indicated that the inside and outside had been thoroughly cleaned;
The stem was allowed to spend 3 hours in the Before and After Extra Strength Deoxidizer (deox). I removed it and hung it by the pipe cleaner to drip excess solution back into the jar.
I used a coarse cotton shop rag to scrub the stem. This absorbs the remaining solution as well as helps to remove loosened oxidized vulcanite.
The below photo shows the removed material.
The stem was scrubbed with make-up pads sprinkled with Soft Scrub cleanser to further remove the oxidized vulcanite. I failed to photograph this, apologies. The stem was oiled and the project took an overnight break.
The next day I began sanding the stummel looking for fills which would need to be replaced or repaired.
I only found one that I thought needed attention and it was actually in two places as it went from the side to the rim.
The old fill was picked out using a fly tying bodkin.
The plan was to apply a coating of brown cyanoacrylate (CA, super glue) to the pit then add briar dust to fill the missing material.
The CA was applied.
Briar dust was then added and pressed into the wet CA.
A top coat of brown CA was applied. This was allowed to cure on its own.
Once cured, the new fill was filed with a small flat file then sanded with a 400 grit sanding sponge.
A second view of the fill from the side.
A view of the fill from the top (it is at the 11:00 position)
The pipe was then sanded with a sequence of sanding sponges from 400-3500 grit. The stampings on this pipe were very deep. This led me to think that I could sand the stamped area very lightly without protecting it with a layer of tape. The stem and stummel were together as I was sanding both pieces. Between each sponge I wiped the stummel with an alcohol wetted make-up pad. The stem was rubbed with mineral oil and wiped with a dry paper towel.
The pipe was then worked with micro-mesh pads 4000-12000. Between each pad the stummel was wiped with a make-up pad dipped in alcohol. The stem was rubbed and wiped as above but Obsidian Oil was used in place of mineral oil.
I coated the briar with Before and After Restoration Balm worked into the rustications with a baby toothbrush. The balm was allowed to sit and work its magic for 20 minutes.
The remaining balm was removed with an inside out athletic sock.
The pipe was then taken to the buffer for several coats of carnauba wax. I applied minimal pressure to the stummel while waxing in an attempt to keep the wax only on the smooth surfaces. The rustications would receive Renaissance Microcrystalline Wax applied with a baby toothbrush and hand buffed with a microfiber polishing cloth.
Overall the restoration of this SAMHARA pipe restoration ended very well. The finish of the briar provides a glimpse of lovely grain on the smooth surfaces. I think the carvings are less than attractive and seem a bit cartoony. The stem polished very nicely and provides a nice contrast to the rustic briar. The one large fill that was redone blended in well and is barely noticeable. Now the big question: “How does the SAMHARA System perform?” For this test I wasted a neutral Virginia based tobacco so, I chose Orlik Golden Sliced tobacco. The bowl was filled to approximately 2/3rds. The pipe had a nice draw though it did feel slightly constricted. Once lit the pipe performed well. The briar of the bowl was thick enough to disperse the heat of smoking without getting hot in hand. The smoking session lasted around 45 minutes and was cool and dry to the mouth. I usually sip Virginias but I tried to push this one a couple of times. The smoke never did feel too hot in my mouth nor with the pipe in hand. Was this a great “game changing” invention? No, I don’t think it was. Clever and innovative yes, but hardly providing noticeable improvements. The grooves to aid cake development merely provide more surface for charring of briar to occur. The convoluted airway path perhaps would have led to condensing some water from steam but nothing that Peterson System pipe had not been doing for over 50 years. Alltold, this is an interesting pipe and another advertising gimmick more than an improvement for the pipeman. If you are interested I thoroughly cleaned the pipe after the Orlik Golden Sliced smoke and documented that at the very end, after the “finished pipe” photos The dimensions of the SAMHARA are:
Length: 5.61 in./ 142.49 mm.
Weight: 1.45 oz./ 41.11 g.
Bowl Height: 1.85 in./ 46.99 mm.
Chamber Depth: 1.46 in./ 37.08 mm.
Chamber Diameter: 0.78 in./ 19.81 mm. (Conically bored diameter is at the top)
Outside Diameter: 1.50 in./ 38.10 mm.
I do hope that you have found something here useful to your own pipe care, maintenance or restorations. If you like this sort of thing, please click the like and subscribe buttons. Thank you for reading the ramblings of an old pipe lover.
Below are some photos of the completed SAMHARA pipe.
The test smoke: ⅔ bowl of Orlik Golden Sliced.
The post smoke ash tray.
The down bowl photo post smoke.
I cleaned the airway with alcohol dipped pipe cleaners.
The down mortise photo. This shot was taken after cleaning the airway and does contain some alcohol from that cleaning in the lower chamber thus making it look “wetter” than it did after the test smoke.
The stem was then cleaned with alcohol dipped pipe cleaners.
Whenever I read about a pipe with a cult-like following I get interested, “what is it that all those people know, that I don’t”. Maybe it is the fear of being left out or just a general need for ignorance mitigation. Either way, I am drawn to finding out what it is that I have been missing. It was that way with Kirsten pipes, for me. I had read about them, seen people discuss their virtues on Facebook groups, and watched many auctions sell for what I considered high prices. Like the old codger tobacco blends, they must be good or they would have never lasted this long. I finally came across a Kirsten as part of an estate lot. This pipe wore the stamps Kirsten in a scroll type script on the left shank and PATS & PATS PEND with an M offset towards the stem. Below are some photographs of the Kirsten before any work had begun.
This pipe’s greatest issue was the oxidation of the stem. The aluminum was in great shape, needing only some buffing. The interior probably would require a good cleaning but it didn’t appear too bad. The bowl was in fine shape with little cake build-up and only moderate lava flow on the rim.
Background
The story of the Kirsten pipe begins with the inventor, Frederick K. Kirsten. According to wikipedia, the greatest source of information and spoken of with disdain by my sister the librarian, “Frederick Kurt Kirsten (born Kurt Friederich Johannes Kirsten, March 13, 1885 – November 19, 1952) was an American professor, engineer and inventor.[1]
Kirsten was born in Germany and immigrated to the United States in 1902. He graduated from University of Washington in 1909 and later taught there as a professor of aeronautical engineering. During his life he was granted numerous patents on a wide variety of subjects.[2] Among his inventions were the Kirsten pipe [3] (a tobacco pipe), and the Kirsten-Boeing propeller (a cycloidal propeller ).[4] The Kirsten Wind Tunnel at University of Washington was promoted by and named after him.[5]“ (https://en.wikipedia.org/wiki/Frederick_Kirsten). I understand why librarians are so critical of wikipedia.org, the notion of people being able to openly edit entries without verifying content can be problematic for scholarly writing. It nevertheless is a wonderful source for general knowledge.
Turning to a more trustworthy though questionably objective source, the Kirsten Pipe Company website. Here is a short description of the founder and inventor:
“Professor Kirsten
It is by no means merely puffery to say that Professor Frederick K. Kirsten was a genuine American original. He first sailed to this country in 1902, as a cabin boy from Hamburg, Germany. After successfully rounding the Horn and eluding the Shanghai gangs of the West Coast, he navigated the educational system at the University of Washington to become a Professor of Aeronautical Engineering. Here, his inventive spirit took wing. He created the world-famous Kirsten Wind Tunnel, Air-washing equipment for factories, an air-cooled Utopian Bed, and, most notably, a revolutionary propeller which enables boats to stop and turn on a dime. Today, in the same waters where he jumped ship almost 100 years ago, ocean-going vessels are landed by sturdy tugs driven by Kirsten cycloidal propellers, piloted by equally sturdy captains smoking cool Kirsten pipes.
Rightly called the coolest pipe in the world, this latter innovation came about when a doctor advised Professor Kirsten to switch from cigarettes. He quickly dreamed up a way to trap the moisture, tars and tongue-biting acids which attack the users of briar pipes. After 80 years and counting, Kirsten pipes are still produced by the Kirsten family, faithfully following the basic designs of this father of invention.”
The next source comes to us from the University of Washington, where Professor Kirsten was a staff member. Here too the information may have a slightly romanticized bent, it is still a fun and informative read and gives examples of his contributions in science and the university.
“The Inventive Mind
Frederick Kirsten — 1915-1951
I am a research man.
Frederick Kirsten
Fredrick Kristen explaining one of his inventions. (aa.washington.edu)
Frederick Kurt Kirsten was one of the founders of the UW Department of Aeronautics. He earned the first patent awarded to a UW faculty member. He was the public face of UW engineering for three decades, tirelessly promoting technology as the future’s greatest hope.
Born in Germany, Kirsten graduated from the UW in 1909 with a bachelor’s degree in electrical engineering. He was immediately hired by an industrial firm and by 1913, was supervising construction of the underground electrical service at MIT. Recruited back to UW, he agreed in 1920 to teach the entire curriculum of the new Department of Aeronautics: aerodynamics, airplane design, and propulsion.
On December 1, 1921, Kirsten filed the first patent awarded to a member of the UW faculty. He and William Boeing went into business together as the Kirsten-Boeing Engineering Company to develop Kirsten’s invention – the cycloidal propeller, first for aircraft and then for boats. He obtained a $290,000 grant from the Guggenheim Foundation to build the UW aeronautical engineering laboratory in 1926, and led the campaign to finance a state-of-the-art wind tunnel in 1936.
Kristen Wind Tunnel – February 1939
The team lowers an experimental Kirsten cycloidal propeller boat for testing. (Kirsten Collection. University Archives. Special Collections, UW Libraries)
Kirsten was confident and stubborn; his designs were based more on trial and error than on analysis. Endlessly inventive, he never gave up the quixotic effort to perfect the cycloidal propeller, and patented more than two dozen other inventions, including the Kirsten pipe, air-raid sirens, fire extinguishers, neon lights, and air cleaners.” (https://www.washington.edu/innovation/the-inventive-mind/)
“It’s variations like this that give some of the Kirstens extra individuality. There is one pipe, a Generation 1.5, that shows up occasionally and has an entirely different valve than any others. It is a pipe that I have never seen in old Kirsten catalogs or brochures. In addition to the different shaped valve, which has an “O” ring while the mouthpiece does not, the pipe has a flat top with no bowl basin on top of the radiator tube. It usually has the Kirsten script logo but never a model letter on it. It is a short, straight pipe.
Kirstens are kept track of by their model numbers. The following table is an attempt generation by and shape to provide some guide to Kirstens and their genesis:
1st Generation No O rings – stamped “Pat. Appl. For” and “Pats. & Pats. Pending”
Straights
Companion First edition in rough finish.
S Standard 1st generation with full-length cooling fins
M Medium
L Large
A Aristocrat Extra large 1st generation
1.5 Generation O rings either valve or mouthpiece, none on other end – stamped “Pat. Pending” and “Pats. & Pats. Pending” some with “Made in U.S.A.”
Straights
K Companion
M Medium
L Large
Other Transition Models
Thrifty Nice early model with black offset valve that works in reverse – O ring on valve, none on stem … takes same mouthpiece as No Letter/No Name model
No Letter/No Name Unmarked short pipe w/different valve and O ring, no O ring on stem
2nd Generation O rings – Stamped “Pat. & Pats. Pending” and “Made in U.S.A.”
Straights
K Companion
G Gem
S Sportsman
SX Sportsman Brass
M Mariner
MB Mariner Black
L Lancer
Quarter-Bents
A Aladdin
V Vagabond
CX Cavalier Brass
T Tyrolean
Full bents
W Westerner
B Beau Geste
P Premier
F Firesider
3rd Generation O ring current models stamped “Made in U.S.A.”
The next piece of information here is the original patent drawing from 1938. I will include the link to the PDF of the patent for those interested in reading that as well here: 1499073238500980922-02200237
()1499073238500980922-02200237. The diagram above is quite detailed and can be further explained by the writings within the patent documentation found in the PDF. For ease of understanding, I refer to a much simpler diagram of the Kirsten pipe from pipedia.org. Here we can see the four main parts of the Kirsten pipe; the imported briar bowl, the valve, the Kirsten “Radiator Stem” and the vulcanite mouthpiece. It could be argued that the screw holding the bowl to the stem is a fifth part.
Using the information from the pipedia.org article:
“It was determined that the ‘PAT APPLIED FOR” stamp was only used for a couple of years so I concluded that those pipes were probably produced in 1936 and were produced until 1938 and the ones stamped “PATS & PATS PENDING” were most probably made from around 1938 until about 1958” (https://pipedia.org/wiki/Kirsten_Pipe_Company),
“1st Generation No O rings – stamped “Pat. Appl. For” and “Pats. & Pats. Pending”
Straights
Companion First edition in rough finish.
S Standard 1st generation with full-length cooling fins
I can safely conclude that this pipe is consistent with a Generation 1 thus produced between 1938-1958.
The Restoration
The restoration began with a clean denim piece on the workbench.
The bowl was drilled with a pronounced taper so the only tools used would be the General triangular scraper and the Smokingpipes Low Country Reamer. Of course the sandpaper wrapped wood dowel would join for the bowl sanding.
The light cake was quickly removed.
The bowl was sanded to bare briar and showed no signs of heat damage.
The lava on the rim was obvious and I hoped that it did not conceal any underlying charing.
A moistening with saliva and scraping with a sharp pocket knife removed most of the lave
The bowl screw was removed and further cleaned with 95% ethyl alcohol dipped cotton swabs.
The bowl was taken to the sink for scrubbing with a nylon brush and undiluted Murphy Oil Soap. The soap was rinsed with warm water and the bowl dried with a cotton hand towel.
Back at the workbench the bowl looked clear of finish and grime.
I wiped the surface with a make-up pad dipped in 95% ethyl alcohol, which removed a bit of dye from the briar.
I started cleaning the aluminum parts with the valve. This piece looked fairly clean until I saw the inside. Here it was coated with black hardened smoking residue. The outside cleaned-up quickly with an alcohol dipped make-up pad.
The valve was placed in a medicine cup with 95% ethyl alcohol.
A few minutes later the alcohol had begun to dissolve the residue inside the valve.
Several cotton swabs were required to clear the residue along with a small piece of 0000 steel wool also wetted with alcohol.
The valve was eventually cleaned of the hardened yuck.
The body of the pipe or, “Radiator Stem” as Kirsten nomenclature called it, was also quite dirty with dried hardened smoking residue. Here a nylon scrub brush dipped in the ethyl alcohol and a bunch of folded over bristle pipe cleaners were used to clear the radiator stem.
The piece of 0000 steel wool was also wetted with ethyl alcohol and pushed back and forth through the stem.
The mouthpiece consisted of the vulcanite bit and an aluminum rod. The two were molded together and the aluminum exterior was cleaned with the alcohol wetted steel wool while the interior and vulcanite were cleaned with alcohol dipped pipe cleaners from the button end. was cleaned
The vulcanite was initially sanded with 320 and 400 grit sanding sponges.
A pipe cleaner was threaded through the draft holes and made into a hanger which suspended the vulcanite portion of the mouthpiece into the Before And After Extra Strength Deoxidizer solution.
Below is a side view of the mouthpiece suspension hanger.
After 4 hours in the solution the mouthpiece was removed and vigorously rubbed with a coarse shop rag to absorb excess solution and remove oxidized rubber.
Back at the bench, the vulcanite was worked with Soft Scrub cleanser applied to a make-up pad and rubbed aggressively. The mouthpiece was then worked with a series of sanding sponges from 400-3500 grit. Between each sponge I rubbed the stem with mineral oil and wiped it with a paper towel. I failed to photograph these steps.
The stampings on the aluminum were covered with strips of masking tape to preserve them from the buffer.
The radiator stem, valve and mouthpiece were then taken to the buffer and worked with the rouge compound.
The bowl was micro-meshed with pads 4000-12000. Between each pad I wiped the bowl with an alcohol moistened make-up pad to remove debris.
The bowl was coated with Before and After Restoration Balm and allowed to sit for 20 minutes.
I hand buffed the aluminum with a Cape Cod Polish Cloth. I absolutely love the smell of this product. It almost makes polishing silver bands on a pipe enjoyable.
The Restoration Balm was wiped from the bowl using an inside out athletic sock.
The stem still had areas of brown that I was not happy with. Mark Hoover, creator of the Before and After products, told me that he will give tough to clean stems a second dip in the Extra Strength Deoxidizer for 45 minutes. I tried it, and I left the mouthpiece in for a bit over an hour. Removed it and did the coarse rag rubbing.
Mark said that he just uses the Before and After Fine Polish hand rubbed with a piece of t-shirt material. I tried that, as well.
Under normal room lighting the stem looked nice. When I placed it under the bright photo lights the stem looked like the below photos.
I was about to claim defeat with this stem. Then I decided that two dips in deox and all of the sanding and micro-meshing could not be for naught. Those damned brown smudges had to go. I took the pipe back down to the workbench and started filing the oxidized vulcanite from the stem. This was an extreme measure for an extremely cool looking pipe.
Focusing on just the areas that had brown oxidation proved difficult so nearly the whole mouthpiece was eventually touched with the files.
For the curved area at the saddle a rounded file was used.
All this filing did mean that the entire sanding process would need to be repeated. And it was from grit 320-3500 to the mineral oil rubbing and paper towel wiping.
I micro-meshed with the 4000-12000 pads. Betweeneach pad the mouthpiece was rubbed with Obsidian Oil and wiped with a paper towel.
The Before and After Fine Polish was used again with a soft cotton cloth and was followed by the hand polishing with Before and After Extra Fine Polish. The pipe was then taken to the buffer for several coats of carnauba wax to the mouthpiece and high spots on the bowl. The pipe was hand buffed with a microfiber polishing cloth as a final step.
I have to admit to being smitten by this old pipe. Having seen them only in photos and wondering about them for so long, I finally got to lay hands on one. I was impressed by the simplicity yet ingenuity of the design. I tried smoking the pipe shortly after finishing it and it performed very well. The Radiator Stem absorbed the heat from the smoke and dissipated the heat quickly, living up to the “radiator” name. The stem did indeed trap condensation and I was impressed with the amount of liquid collected. Cleaning was fairly easy with a disassembly and washing with soap and water. I appreciate the aesthetic of the aluminum and how it is set off from the black of the mouthpiece yet it retains the old school look of briar with the briar bowl. Overall a lovely old pipe that performs as advertised. The dimensions of the Kirsten are:
Length: 5.43 in./ 137.92 mm.
Weight: 1.22 oz./ 34.59 g.
Bowl Height: 1.06 in./ 26.92 mm.
Chamber Depth: 0.85 in./ 21.59 mm.
Chamber Diameter: 0.80 in./ 20.32 mm. (Conically bored diameter is at the top)
Outside Diameter: 1.48 in./ 37.59 mm.
I do hope that you have found something here useful to your own pipe care, maintenance or restorations. If you like this sort of thing, please click the like and subscribe buttons. Thank you for reading the ramblings of an old pipe lover.
Loading…
Below are some photos of the completed Kirsten pipe.
The story and mystique of Custom-Bilt or Custombilt pipes and their inventor, Tracy Mincer, are things of pipe legend. I have to admit to having only restored one Custombilt pipe and it was a pipe actually made after the death of Tracy Mincer in 1964. My only Custombilt was a Wally Frank ere pipe probably made in the 1970s (that restoration can be found here: https://wordpress.com/post/scimansays1787.com/3262). Although, I also did restore a Doodler. Declaring that pipe an actual Tracy Mincer piece would be fraught with uncertainty (https://wordpress.com/post/scimansays1787.com/369) This pipe was older and wore the following stamps Custom-Bilt on the left shank, IMPORTED BRIAR on the bottom and a circle on the lower right shank. Below are some photographs taken prior to working on the pipe.
As you can see it was a rusticated pipe typical of Mincer Custom-Bilts. The size was smaller, what I would call medium sized. The most glaring issue was the chipped mouthpiece which would require some creative repairs. The tobacco chamber had a significant cake build-up indicative of a well used pipe. This was also evident in the lava flowing onto the rim. There was also the expected dirt and grime ground into the rustications. This was going to be fun.
Background
The standard starting point for researching a pipe typically includes pipedia.org. The query of Tracy Mincer, originator of Custom-Bilt, will take you to this brief entry:
“Tracy Mincer started the original Custom-Bilt pipe company in 1934. In 1946, the name was changed to Custombilt after Mincer began an association with Eugene J. Rich, Inc. There were some big changes in advertising and distribution. The slogan “AS INDIVIDUAL AS A THUMBPRINT” began at this time as well.
In the early 1950’s, Tracy Mincer developed severe financial problems that caused him to stop making the Custombilt, and he lost the name. n 1952, Mincer began a new pipe, The Doodler, that due to the holes in the bowl had to made primarily in a billiard type shape in three sizes. In the early 1950s, National Briar was turning the bowls for Mincer. Based upon the documentation, it appears that Mincer made the pipe until the mid 1960s, when National Briar Pipe Co., Inc. began making and selling the Doodler.
Mincer died in 1964. Based upon the information provided, Mincer seemed to always have money, production, distribution and other problems. Mincer was probably a terrific craftsman but a very poor businessman and administrator. To me, Mincer sounds like your typical small business entrepreneur who always knew what was right and if you disagreed¼problems. Mincer always seemed to be on the brink of going out of business, not meeting payroll and so on.
Claude Stuart purchased the Tracy Mincer Pipe Company and began making pipes using the Tracy Mincer stamp. Stuart finished nearly all the pipes produced, mostly carved and textured bowls and the occasional straight grain. Claude made the Tracy Mincer Pipe Company a moderate success. Stuart became ill and in 1990 The Tracey Mincer Pipe Company went out of business. Currently, Jim Tedesco owns the Tracy Mincer name.
These interesting examples bellow are pipes made with the Tracy Mincer stamp. If you any additional information about these pipes, or can otherwise add to the history of this interesting pipe man, please add it here, or send it to sethile.pipes@gmail.com, and we can add it for you.” (Mincer – Pipedia).
There is a book written by William E. Unger, Jr.,Ph.D titled “As Individual As A Thumbprint”: The Custom-Bilt Pipe Story. This book appears to be self published by Dr. Unger at The Graphic Touch, of Columbus, Ohio. Printed in 2001 and bound with a black plastic spiral, the book states that the entire contents are “All rights reserved…without permission in writing from the author”. Dr. Unger passed away January 1, 2013 (obituary: https://www.legacy.com/us/obituaries/dispatch/name/william-unger-obituary?id=12197453) and the book is no longer in print. This unfortunately means that I will not be including any quotes from the book. We’ll see how I get around that, I guess. I got lucky and purchased a copy from eBay for under $30 (with shipping) earlier this year, after watching several copies sell for what I considered astronomical prices. The book is a remarkable piece of work and is the definitive history of the Custom-Bilt pipe. The research that Dr. Unger put into getting the story correct is amazing. Fortunately there were several past employees, friends and relatives associated with Tracy Miller and the company that were able to give interviews and explanations to the inner workings of the company.
In regards to the stamps on the pipe in hand, I will speak to what I have found in Unger’s book, without quoting any of it. The first thing that needs clarification is the Custom-Bilt vs. Custombilt name. I’ll paraphrase William Unger here, the first stamps used by Tracy Mincer were “Custom-Bilt”. These were used from 1938-1946 definitively and less definitively prior to 1938. You could, perhaps, find reference to this in the book on page 91. There, I think that should give me legitimacy and keep any lawyers at bay. Next we examine the IMPORTED BRIAR stamp on the bottom of the pipe. Unger states that he has inspected a large number of Custom-bilt pipes and that about ½ of them do not have this stamp. He declares that he is at a loss to explain either their absence or presence This lack of explanation might be seen towards the bottom of page 114. The final stamp on this Custom-Bilt is the geometric circle stamped on the shank. Certainly these stamps have some utilitarian meaning. Nope. Unger declares that he is not able to explain any system where shapes such as circles, triangles, stars, rectangles, half moons or even trapezoids have any systematic meaning. This may or may not be seen on the top of page 114.
Pipephil.eu does allow quotations with proper referencing and shows nice examples of the above-mentioned geometric stamps.
The photos don’t show it very well but I didn’t feel too bad about the stains on the denim in comparison to the dirtiness of this pipe.
The first step was to gather the remaining tools: The PipNet, Smokingpipes Low Country Reamer, General triangular scraper and 320 sandpaper wrapped wood dowel.
The #2 and #3 blades of the PipNet did their work beautifully with little need for the other scrapers.
The tobacco chamber was sanded to bare briar and showed no signs of any damage.
The shank was cleaned out by running the Kleen-Reem drill through the airway. The drill had to be cleaned out several times as the tars from the airway filled the grooves. 95% ethyl alcohol was used with the nylon shank brush, bristle pipe cleaners and cotton swabs to clean out the yuck.
The stummel was taken to the sink for a scrub with undiluted Murphy Oil Soap and a nylon scrub brush. The soap was rinsed with warm water and the stummel dried with a cotton hand towel.
There remained some ground in dirt and grime in the rustications and the rim did not clean-up as well as I like so a second scrubbing with the Murphy’s was done. This time with a brass brush. That worked a bit more aggressively to remove the external yuck.
Again, the stummel was rinsed with warm water and dried.
Back at the workbench the stummel was wiped with a makeup pad dipped in 95% ethyl alcohol. The wiping removed a bit more of the accumulated grime but the briar looked much better.
The stem was quite dirty and required a good number of bristle pipe cleaners dipped in 95% ethyl alcohol to clean out the airway.
The stummel was given a coating of Before and After Restoration Balm and allowed to sit for over an hour.
After the break I returned to the stummel and wiped the remaining balm from it with an inside out athletic sock.
Also during the break I came up with a plan for repairing the chipped section of the button. I planned on using the Dremel tool and the bit I use for cutting a new slot in a mouthpiece. The below photo shows the bit.
The next photo is the bit in reference to a piece of 2 mm brass rod.
The goal was to use the Dremel to cut a channel for the brass rod to fit into spanning the missing section. Below you can see the brass rod cut to fit into these grooves. The piece of green plastic is a piece of a lid that I cut to act as a dam, preventing glue from seeping into the airway.
I used cyanoacrylate (CA, super glue) to fix the brass rod into position.
To make sure the brass rod did not emerge through the new button material I ground the brass down using the same Demel bit. The photo below shows the tapered brass after grinding.
With the brass rod in place and held at its opposite ends with CA, I planned on building up the missing material with black two part epoxy. To prevent the epoxy from adhering to the dam, I coated it with petroleum jelly and reinserted it into the airway.
The epoxy was mixed on a piece of plastic. I accidentally got more of one part than I intended, thus the usable part of the mix in the half below the fly tying bodkin in the below photo.
The epoxy was applied to the stem thickly enough as to rebuild the missing button.
The shank of the pipe was wrapped in masking tape to protect it from any sanding of the stem. Since the area to be replaced was the underside or bottom of the button, I let gravity pull the curing epoxy earthward. This allowed the “drip” to thicken the button where I wanted more material.
After 2 hours I removed the dam. The button looked rough but the epoxy had provided enough material to be reshaped into a new button.
After curing for about 2 hours the epoxy had assumed its shape and was no longer flowing. It did remain soft though. Soft enough for me to cut a nice straight edge with an Exacto knife.
The epoxy was allowed to cure for an additional 4 hours. After this time it was hard enough to allow me to file and sand the button to an appropriate shape.
The below photo shows the slight color difference of the black epoxy prior to it being finish sanded, micro-meshed and polished.
The stem was sanded with a series of sanding sponges from 400-3500 grit. Between each sponge I rubbed the stem with mineral oil and wiped it with a paper towel.
The stem was then worked with micro-mesh pads 4000-12000. Between each pad the stem was rubbed with Obsidian Oil and wiped with a dry paper towel.
With a surface as rusticated as this I opted to apply Renaissance Micro-Crystalline Wax instead of carnauba. The wax was applied with a baby toothbrush and allowed to dry for a few minutes. I then took it to the buffer and buffed it with a clean flannel wheel.
The stem received several coats of carnauba wax from the buffer. The entire pipe was then hand buffed with a microfiber polishing cloth.
Overall, this circle stamped Custom-Bilt turned out beautifully. I have a new appreciation for Tracy Mincer’s work. The pipe is smaller than I expected a Custom-Bilt to be but it has thatTracy Mincer look with its deep rustications and hefty wall thickness. It is lightweight and feels great in hand. I am happy with the stem rebuilding but not with the quality of the vulcanite. There seem to be tiny inclusions in the rubber. These are readily available under very bright light yet not noticeable with normal room light. I think they are due to the recycling of tires for rubber during the war years of World War Two. I can certainly understand why the pipes have attracted a following, even 80 years after they were made and 60 years after Tracy Mincer’s passing.
The dimensions of the Custom-Bilt are:
Length: 4.89 in./ 124.21 mm.
Weight: 1.28 oz./ 36.29 g.
Bowl Height: 1.70 in./ 43.18 mm.
Chamber Depth: 1.36 in./ 34.54 mm.
Chamber Diameter: 0.79 in./ 20.07 mm.
Outside Diameter: 1.49 in./ 37.85 mm.
I do hope that you have found something here useful to your own pipe care, maintenance or restorations. If you like this sort of thing, please click the like and subscribe buttons. Thank you for reading the ramblings of an old pipe lover.
Loading…
Below are some photos of the completed Custom-Bilt Circle Stamped pipe.
I cannot explain why but I find metal pipes fascinating. I don’t find them particularly beautiful but more utilitarian, like a good tool. I remember first seeing a Dr Grabow CDL online and found them to be rather disjointed in appearance. The stems and shanks looked segmented. Still, they intrigued me. The advertisements spoke highly of their cool and dry smoking characteristics but then nearly all advertisements make similar claims. I decided that I needed to find and restore one to see this for myself. The search for a subject was not fast and easy. For many months the auction listings were far more expensive than what I was willing to pay. I remember thinking, “Who in their right mind would pay over $100 for a Dr. Grabow?” The listings seemed to be of two categories; one around $30 and the other +$100. I personally thought that both were too high, at least for a pipe to satisfy my curiosity. Eventually, I found a likely subject for under $20. The pipe was an eBay purchase and arrived from Reno, Nevada. On the bottom of the stummel was stamped DR. GRABOW IMPORTED BRIAR in a circle around CDL. Below are some photos of the Dr Grabow CDL before any work was done.
The pipe appeared to be unsmoked and there was a clean filter within the stem. How the nylon bit became so heavily dented with what looked like tooth chatter, I couldn’t figure out. There were a few marks on the stummel that looked like the finish had been worn away. I wondered if the pipe had been jostled in a drawer of a vehicle glovebox, purchased but never used. For whatever reason this pipe had gone neglected for the past 50 years and would soon be back in the game.
Background
Dr Grabow is perhaps one of America’s best known pipe brands. This renown has brought with it a following of two main camps: Those who love their Dr Grabows and those who do not. In an attempt to remain objective, I can say that I love a couple of the Dr Grabow lines; the old 1930s Linkman pipes and the more recent Westbrooks are in my “favorites” category while many of the other lines are considered “less than” pipes. By that I mean less than preferred. Whatever your impression of Dr Grabow, they have a long and significant history in our hobby. I will include a link to the history of the brand from pipedia.org for those who would like access to a more complete history here.
As for the CDL pipes, I first turned to pipephil.eu for information. According to this site the CDLs were manufactured for about a decade starting in 1975 and never made it past test marketing.
Next, I found a nice restoration of a CDL by Charles Lemon of dadspipes.com. In his blog he included an image of an ad from pipephil.eu. I found this interesting but could not find the ad on the pipephil.eu site. I do not know what the “Magni” implies in the ad but it certainly must be important as it is found in three of the components of the pipe. Perhaps “magni’ficent? The prefix comes from Latin meaning, large or great, if memory serves.
Whenever I research any pipe consisting of metal parts, I turn to smokingmetal.co.uk. This is a wonderful resource for pipes made from, you guessed it, metal. The entry is included in its entirety.
“Not totally sure where this pipe fits in. Metal stem it certainly has, but unsure if bowl is meant to be detachable 6.2 inches long and the facility to take an in line filter in the stem. The stem continues right through the bowl and enables air to be drawn through from front of bowl as well as smoke from bowl
This example thanks to John Phillips of Arkansas.
Ed James tells me that CDL is for Cooler,Dryer,Lighter. He has a display card with this on, the pipe retailed at $4.95 at that time.
“A couple of other things I remember about the CDL pipe. It was produced from 1975 to 1983 in limited qualities and test marketed in several U.S. cities but apparently never mass marketed” from Dave Whitney” (http://www.smokingmetal.co.uk/pipe.php?page=391)
Another interesting link is the Dr Grabow timeline produced by Tiki Vegas. I find this useful for dating various Dr Grabow lines. According to Vegas, the CDLs were made starting in 1974 not 1975 as previously recorded.
Turning to a forum post, I found a quote from a user named theloniousmonkfish who stated:
“Made from 75-83 and test marketed in cities across the US, never took off.
From the former COO of Grabow, Tom Douglas
“The predecessor of the CDL was bought in 1967 in LaGuardia airport by Paul Fish. It sat on Pauls desk until his death in 1972. It was a simple bowl and a simple metal stem with attatched bit. I’ve always speculated that it was sold by Mastercraft.
Jack Martin became President of Sparta Pipes in 1972. The CDL sat on his (and Paul’s) desk for years.
In about 1974 we decided to design and try the concept. Tooling for the “shank”, and the mould for the bit were EXPENSIVE, but we tried.
Best I recall… we made 300 and sent them FREE to RJR customers who had ordered Westbrook etc. along with a survey. Knew we had pipe smokers.
Comments were.. Coolest smoke I ever had.
Dryest smoke I ever had.
Lightest pipe I ever owned.
But Invariably.. Ugliest pipe I’ve ever seen.
Guess we should have called it CULD.
I’m really curious about what those who have never tried a CDL will think about it. It is a wonderful smoke…. not to be seen outside with…… Td”“
In summary, it appears that the CDLs were produced by Dr Grabow as a test to see if the product would be accepted by pipe smokers. The pipes were manufactured in 1974 or 1975-1983. For whatever reason the line never caught on with pipe smokers and was discontinued.
The Restoration
The Dr Grabow CDL received a clean denim piece for the restoration. Well, actually it would be more of a refreshening than a restoration.
The first step was to clean the accumulated years worth of dirt and dust from the patient. This was done with undiluted Murphy Oil Soap and a nylon scrub brush. The soap was rinsed with warm water and the stummel dried with a cotton face towel.
The pipe was already looking better. I was not sure why there were areas within the rusticated surface which looked like scratches in the finish.
Alos confusing was the high number of what looked like tooth chatter.
The interior of the stem was cleaned with a cotton swab dipped in 95% ethyl alcohol. This came back clean reaffirming my impression that the pipe had never been smoked.
To address the damage to the stem, I filed the dented surface with a small fine file. The nylon bit proved to be difficult to file not because it was too hard but more due to its plasticity. The shank was wrapped in painters tape for its protection. I then worked the stem with a series of sanding sponges from 320-3500 grit. Occasionally I would rub the stem with mineral oil and wipe it with a paper towel. This helped me see where I needed additional sanding. The stem was then taken to the buffer where I buffed it with a Red Tripoli wheel followed by a White Diamond wheel. The finish of the stem was far better but also far from perfect. This was, though, as good as I was going to get it.
The worn spots on the stummel were stained using a walnut Furniture Touch-up Marker. Below are a few before and after photos..
I used Renaissance Micro-Crystalline Wax Polish to help preserve the rusticated briar. This was applied with a baby toothbrush.
The instructions said that the product “Dries hard instantly”. I found that their definition of instantly differed from mine.
After the wax was applied I let it sit for 5 minutes then hand buffed it with an inside out athletic sock.
The pipe was returned to the buffer where I applied a couple coats of carnauba wax to the stem, shank and base of the stummel. The pipe was then hand buffed with a microfiber polishing cloth.
I am actually smoking this pipe as I type this conclusion, I am quite pleased at how much better the pipe looks after the restoration. The worn surfaces are refreshed and the stem much better and nearly chatter free. The pipe does smoke very nicely. I give credit to the Dr Grabow designers full credit for that. The walls of the stummel are 0.35 inches (8.89 mm) wide. This, the “Magni-vent” and the “Magni-chamber” do combine to make a nice cool smoking experience. I am smoking it without a filter and will compare that to filtered smoke in the future. The dimensions of the Dr Grabow CDL are:
Length: 6.19 in./ 157.23 mm.
Weight: 0.99 oz./ 28.04 g.
Bowl Height: 1.46 in./ 37.08 mm.
Chamber Depth: 1.24 in./ 30.73 mm.
Chamber Diameter: 0.78 in./ 19.81 mm.
Outside Diameter: 1.48 in./ 37.59 mm.
I do hope that you have found something here useful to your own pipe care, maintenance or restorations. If you like this sort of thing, please click the like and subscribe buttons. Thank you for reading the ramblings of an old pipe lover.
Loading…
Below are some photos of the finished Dr Grabow CDL.
I remember an old advertisement for Camel cigarettes where the main actor walks a mile for a Camel cigarette. That commercial was made about thirty years after this pipe while the advertisement campaign by Camel was actually started in 1920. (https://tobacco-img.stanford.edu/wp-content/uploads/2020/03/06212512/camel_creativehistory.pdf) I still associate camels with tobacco. If you have followed my blog for any time you have seen me restore several Marxman pipes. I admit to being a Marxman fanboy. Having read about and seen images of Robert Marx’s figural pipes I knew I wanted to have one in hand. That is where this camel enters the story. I saw the photo from the eBay listing:
Background
As I said earlier, I have restored several Marxman pipes this year. I will link a couple which I think did a fair job at documenting the company history: Marxman Jumbo and Marxman Mel~O for those who are interested in reading about this amazing company.
Back to the pipe in hand, The eBay listing photo was not a great photo and the others were no better.
I could tell, kind of, that this was a similar camel from the 1950 Marxman catalog.
Image above is from pipedia.org circa 1950s catalog. Now, I know that the above image is not stellar quality but I think the camel in hand looks to be of better quality than the quality of the carved pipe in the catalog image. There seems to be a great difference in the carving quality of some of the Marxman carved figural pipes which I have seen photos of. I can’t help but wonder if the figurals from the early 1940s were of a higher quality than those of the 1950s. Allow me to show a couple of screen captures from Etsy and eBay of recent auctions to make this point.
The first two images below appear to be rather good quality carvings and I realize that image quality plays a major role in assessing the apparent quality of a piece.
While the next two images show carvings of a lower quality or lesser detail:
All of the pipes are listed as “Marxman” but stampings of the shank can only be verified on the Ubangy Male and the parrot pipes.
MasterCraft purchased Marxman in 1953 and started importing pipes from France and Italy. These foreign made Marxman pipes do not have the “magic” of the Marxmans made in New York. I cannot quantify the magic and I do have a French made Marxman spigot that is a truly wonderful smoking pipe but there is just something missing from the Marxmans after the sale to Mastercraft.
The Restoration
The Camel got itself a nice soft piece of denim to rest upon.
The first stem was the reaming of the tobacco chamber.
The very deep tobacco chamber. The Kleen-Reem was used for this due to its reach. The chamber was also scraped with the Smokingpipes Low Country reaming knife and sanded with 220 sandpaper wrapped around a wood dowel.
The stummel was then taken to the sink for a scrub with undiluted Murphy Oil Soap and a nylon scrub brush. The soap was rinsed with warm water and the stummel dried with a cotton hand towel.
Back at the workbench the briar was looking better without the years of accumulated dirt and grime. Fortunately it did not smell like a wet camel.
There was still some lava present in the carvings on the rim. I cleaned this with 95% ethyl alcohol and a brass brush.
I failed to photograph the cleaning of the shank. I guess I was so excited to be working on a Marxman figural that I lost myself in the task.
I did regain my composure while cleaning the stem. This was done with 95% ethyl alcohol and bristle pipe cleaners. You can see from the pipe cleaners, in the photo below, that the stem was in need of a cleaning. I assure you that the shank was also quite dirty and required many scrubbings with a nylon shank brush, alcohol dipped cotton swabs and folded pipe cleaners.
The stem exterior was in far better shape than the interior. It had slight tooth chatter but no deep dents.
I filed the tooth chatter with a small flat file on both the top and bottom of the stem.
I wrapped the shank in painters tape to protect it during the sanding. Oh, below you can see how the lava cleaned up from the rim too. Sorry for not photographing that cleaning.
The stem was sanded with a series of sanding sponges from 400-3500 grit. Between each sponge I rubbed the stem with mineral oil and wiped it with a paper towel.
The stem was then worked with micro-mesh pads from 4000-12000. Between each pad the stem was rubbed with Obsidian Oil and wiped with a paper towel.
The stummel had a coating of Before and After Restoration Balm rubbed into the carvings by a baby toothbrush.
The Restoration Balm was allowed to work it’s magic for 20 minutes. It was then vigorously hand buffed with an inside out athletic sock to remove the excess balm.
I cleaned the baby toothbrush by dipping it into 95% ethyl alcohol and rubbing the brush on the denim piece. This was repeated several times to remove all of the Restoration Balm on the brush bristles. I then used the baby toothbrush to apply Renaissance Micro-Crystalline Wax to the stummel. I buffed the stummel with a shoeshine brush then with a fluffy microfiber polishing cloth.
The pipe was taken to the buffer where I applied several coats of carnauba wax to the stem and to the smooth heel where the briar was stamped. I did not apply carnauba to the carved surfaces of the stummel. The stem was hand buffed with the microfiber polishing cloth to further raise the level of shine.
There you have it, the 1940s Marxman Camel restoration. Although I am sure my oldest granddaughter will declare this is a llama not a camel. She has a thing for llamas and rearranging the pipes in my pipe racks. I am very pleased with how this restoration turned out. I’d always wanted to lay hands on a Marxman figural and this one was a beauty. The briar looks great, cleaned and conditioned. The stem polished-up wonderfully and together they are quite stunning. Filling the entire cavernous bowl would provide lengthy smoke. I am thinking at least a couple of hours. Certainly enough time to walk a mile.
The dimensions of this Marxman Jumbo C are:
Length: 6.08 in./ 154.65 mm.
Weight: 2.67 oz./ 75.60g.
Bowl Height: 3.5 in./ 80.00 mm.
Chamber Depth: 2.24 in./ 57.00 mm.
Chamber Diameter: 0.79 in./ 20.07 mm.
Outside Diameter: 1.57 in./ 39.88 mm.
I do hope that you have found something here useful to your own pipe care, maintenance or restorations. If you like this sort of thing, please click the like and subscribe buttons. Thank you for reading the ramblings of an old pipe lover.
Loading…
Below are some photos of the finished Marxman Camel.
Oh to have both of the pipes in this matched pair. I don’t mean to complain as this was part of an estate lot where I was targeting a single pipe. The target was a Peterson meerschaum Dublin 120. This pipe was just an innocent bystander caught up in the crazed Peterson Pipe Acquisition Disorder (PPAD) that wreaks havoc on my life occasionally. If you are curious regarding the meerschaum pipe here is the link to that restoration. Below is a screenshot from the original eBay listing back on August 4 of 2024. There was a second Kaywoodie but a White Briar is no Matched Grain.
The lot came from Rockmart, Georgia and did have several interesting pipes. Below are some photos of the Matched Grain prior to working on it.
“Free tobacco with the purchase of one chomped on Kaywoodie.” I don’t think that advertising campaign will catch on.
The stummel needed almost nothing except the general lava cleaning, reaming and cleaning, the stem on the other hand… You may have noticed that the stem immediately behind the button had been filed. I did that before I took the above photos. I was thinking about how to reinforce the button for its reconstruction. So in full transparency, there was a little bit of work done to the pipe prior to the above photos.
Background
I am using pipedia.org’s Collector’s Guide to Kaywoodie Pipes to tell the history of the company and the Matched Grain lines as they are far better at it than this lazy writer. “According to Hacker (1), the firm of Kaufmann Bros. & Bondy (KB&B) began producing the Kaywoodie (2) Pipe in 1915. Hacker notes that:
“The company was originally started in 1851 in New York by two brothers named Kaufmann, who sold meerschaums and clays that a third :brother sent them from Vienna. Business thrived and in 1854 the Kaufmanns took in a partner named Bondy. … The three partners retired :in 1898, but their relatives continued on with the firm, which had begun to manufacture their own briar pipes under the KB&B trademark. :In 1915 the Kaywoodie brand was created as a marketing umbrella for a new briar pipe which the KB&B company introduced. …”‘
The “marketing umbrella” mentioned by Hacker included lower grade Kaywoodies that were later marketed under the “Yello-Bole” name. (According to a 1948 Yello-Bole catalog, “Yello-Boles have been on the market since 1933. About 25 millions of these pipes have been sold”). Hacker concludes his history of Kaywoodie Pipes by noting that:
“The KB&B briar pipe brand existed from 1900 until just after World War I (with some overlapping with the Kaywoodie from 1915 — 1917), :and collectors refer to the KB&B as a Kaywoodie transition pipe. During the early years of the 20th century a number of filter systems :were designed by the KB&B firm and incorporated into their Kaywoodie Pipes under the names of Synchro-Stem and Kaywoodie Drinkless3 :filters. During the late 1920’s and throughout the 30’s the Kaywoodie became a highly respected pipe in spite of its filter system (which :was popular among many smokers of the era) primarily due to the fine quality of the straight grain and the flame grain models. :Unfortunately, the hard-to-get-briar years of World War II marked the decline of the Kaywoodie Pipe, a plummet from which it has never :recovered as far as collectors are concerned….”
The pre-Kaywoodie KB&B pipes were marked on the shank with a cloverleaf around KB&B. Some early Kaywoodies had this same marking on the shank, but the practice was dropped some time prior to 1936. Yello-Boles also had KBB in the leaf on the shanks, but did not have the ampersand found on Kaywoodies.
Early (pre-1936) Kaywoodies had an “elongated” white cloverleaf on the bit, a large fitment, and four-digit shape numbers. The 1936 catalog shows a larger, “fuller” leaf, but lists two-digit shape numbers. Sometime between 1936 and 1947, the better pipes were marked on the bits with a black cloverleaf in a white circle. The white cloverleaf continued on the lesser pipes. However, this was not a consistent convention, as pipes of the same grade could have either type of leaf.
The S.M. Frank Co. now owns the Kaywoodie name, but no longer makes pipes. However, Italian made “drugstore” grade Kaywoodies are still being marketed in this country. These Italian-made Kaywoodies have a “whiteoutline” cloverleaf logo.
Pipedia Editor’s Note: Thankfully, Kaywoodies are again being made in the U.S. ”
The Kaywoodie shape 10 has remained very consistent in catalogs since if first appeared in the 1936 catalog as appears from the Collector’s Guide yo Kaywoodie Pipes:
The below Kaywoodie Lines and their dates are clipped from the Guide and are a compilation:
“THE 1947 KAYWOODIE LINE OF PIPES
The Matched Grain first appears in the 1947 catalog. According to the Collector’s Guide or Kaywoodie Pipes: “In addition to these individual pipes, the 1947 catalog shows two- and seven-pipe matched grain sets(5).
Two-Pipe Matched Grain Setb: $25.00
Seven-Pipe Matched Grain Setc: $125.00”
“THE 1955 KAYWOODIE LINE OF PIPES
The line-up of pipes in the 1955 catalog (Table 3) was more extensive than in previous years. The catalog presented an expanded line of meerschaum pipes and introduced a 4-pipe set of Matched Grain Pipes, as well as several pipes with “special features”.”
Matched Grain Set (4-Pipes): $50.00
Matched Grain Set (7-Pipes): $125.00”
“THE 1968-69 KAYWOODIE LINE OF PIPES
In addition to the two-, five-, and seven-pipe Matched Grain pipe sets listed in Table 4, the 1968-69 catalog introduced the Presentation Pipe. The catalog states that in “Every 8 or 10 thousand briar blocks, we come across a single piece that is as near to perfection as briar can get. This rare find is set aside and turned over to a master pipe craftsman. He lovingly sees this precious briar through each step, until it takes shape as one of the rarest pipes in the century.” The Presentation Pipe was packaged in a walnut grain, velvet lined, leather case. (See Section 3.5 for description of other Kaywoodie Presentation Pipes).”
Matched Grain Sets:
2 Pipesa: $75.00
5 Pipes: $175.00
7 Pipesa: $250.00”
“Presentation Collection. “The most illustrious collection of pipes ever assembled – the Kaywoodie Presentation Collection. It presents a set of 28 Kaywoodie Matched Grain Pipes . . . pipes as perfectly, flawlessly, magnificently matched as a string of rare Oriental pearls. Over 500,000 blocks of pristine briar must be sorted to find just one such matched collection; hence no more than 12 sets can be produced in any one year. Hand fashioned from tapered bit to burnished bowl, every pipe in this Collection becomes a prized possession. A Carved Headbriar [see note concerning “carved heads” in the discussion of Heirloom pipes, Section 3.4], a Calabash and a Meerschaum complete this Collection of 31 pipes. This precious ensemble is housed in a custom-designed walnut cabinet of distinguished elegance. It contains a tobacco humidor and a handy compartment for pipe smoking utensils. A brass plate, engraved with the recipient’s name, personalizes the presentation” (Price: $2500). The Presentation Collection did not appear in the 1955 catalog, but was apparently introduced shortly thereafter. A “brief” article in the September 17, 1956 issue of Newsweek supports this contention. The article, entitled “Pipe Dream”, contains a photo of the Presentation Collection, which is described as the “costliest pipe set ever marketed in the U.S.” (Lowndes notes that a small (undated) WWII era catalog showed the Presentation Collection in a smaller cabinet with legs that sold for $1000.)”
From all of the above we can be assured that this pipe was indeed part of a set. Most likely it was one of a pair of pipes made between 1947 and 1969. Its companion piece or pieces are lost to time thus reducing the value and importance but not the beauty of the selected briar and the craftsmanship that went into this pipe.
The Restoration
In the beginning there was clean denim. Kind of a Genesis vibe to the resurrection of this lovely pipe.
I started with the stem. It was lightly sanded with a 600 grit sanding sponge to remove the hardened oxidation and surface grime.
Next, the stem had a pipe cleaner inserted into the tenon to act as a hanger and it was submerged into the jar of Before and After Extra Strength Deoxidizer. Here it sat for 4 hours.
The stummel was exorcized of the remnant tobacco.
The ream team was gathered and included the PiNet, Smokingpipes Low Country reaming knife, General triangular scraper and wood dowel wrapped in 220 sandpaper.
The reaming was quickly completed and the bowl sanded to bare briar. This revealed no damage to the interior of the tobacco chamber.
The rim was moistened with saliva and gently scraped with a sharp pocket knife.
The scraped rim looked mostly free of any charring.
I tried a scrub with 95% ethyl alcohol on a make-up pad to assess the finish on the briar. The pad turned a yellow brown indicating that the finish was susceptible to ethyl alcohol.
I took the stummel to the sink for a scrub with undiluted Murphy Oil Soap and a nylon scrub brush. The soap lather turned a yellow brown color with scrubbing. This was rinsed with warm water and the stummel dried with a cotton dish towel.
Back at the workbench the stummel was wiped with a make-up pad with 95% ethyl alcohol and more of the finish was removed. The result was a finish-free stummel with lovely grain.
Next came the shank cleaning. This was done with folded bristle pipe cleaners and cotton swabs both dipped in the ethyl alcohol.
I lightly topped the rim to remove the dottle knocking scars and the light charring on the rim. 220 and 400 grit sandpaper were used.
Below you can see the rim after the topping.
I was anxious to see the briar grain and applied a coat of Before and After Restoration Balm before I sanded or micro-meshed the briar. I know patience is a virtue but I couldn’t wait.
The stem was removed from the Deoxidizer solution after four hours. It was allowed to drip a good deal of the excess solution back into the jar.
My normal coarse shop rags were both in the laundry so an old bathroom face towel was used to buff away the remaining Deoxidizer solution. I’ll see if the oxidized vulcanite is effective at staining white cotton face towels. The stem on the other hand was looking much better.
The stem was cleaned with bristle pipe cleaners and 95% ethyl alcohol.
Make-up pads with Soft Scrub cleanser were used to further remove any remaining surface oxidation.
The below photo shows a clean black stem with quite a bit of pitting from the deoxidizing of the vulcanite. The stem had been oiled with mineral oil to prevent further oxidation.
For the moment you’ve all been waiting for: “How the heck is that stem going to be salvaged?” My imagined plan was to file immediately behind the button and glue two brass pins across the gap. These pins would provide a scaffold for the building up of cyanoacrylate (CA, super glue) and black JB Weld Epoxy. The pins would be completely encased in CA and Epoxy and not be seen while providing rigidity for any future chomping. The thickened rebuilt zone would be the “new button” The old button end would be filed off, shortening the stem by a couple of millimeters. This plan worked brilliantly in my damaged brain but how would it fare in reality? I wasn’t sure but I knew that I’d have a heck of a hard time finding a perfect replacement stem so, this seemed like the best remedy.
Two brass pins were measured and cut to span the gap. The first pin was glued into place using black CA. I allowed the CA to cure on its own and did not use a CA drying accelerator.
I wanted to work on the stem, one side at a time and be able to access the airway to sand and smooth the airway if needed. I made a dam from a piece of plastic lid and thickened the plastic with several layers of Scotch tape. This would be inserted into the airway to prevent the CA and Epoxy from entering where I did not want it.
With the dam inserted I was ready to start layering reinforcements of black CA.
The black CA was applied using a fly tying bodkin. Unfortunately the black CA was slightly transparent. This is why I thought that I would also have to use the JB Weld epoxy. Imagine the brass pin inside the new button and the old button, that you see below, as being filed off.
Below the CA was allowed to cure and the dam removed. Everything was going according to the plan.
After the CA had cured I cut an emery board nail file to fit into the airway. I used this to smooth the interior of the airway. Below is an early photo of the smoothing. You can see that the brass pin is completely encased in CA.
The process was then repeated for the opposite side with the placement of the second pin.
Black CA was used to fill around and encapsulate the brass pin.
To build up material around the new button I used black JB Weld with the addition of very finely ground carbon powder. I wanted to make sure that the epoxy was not even slightly transparent. I emptied a capsule of carbon into the mortar and used the pestle to grind it into a very fine powder.
The two part epoxy was mixed and a small amount of ground carbon powder was added. To keep the epoxy from fouling the airway another plastic dam was used. This time I coated the surface of the dam with Vaseline petroleum jelly to keep the epoxy from adhering to the dam.
The JB Weld label says the product sets up in 15 minutes. I think they meant to say 15 hours. It does set up to the point that it stops flowing in 15 minutes but I usually give the epoxy at least 24 hours before I try to file or sand it.
The next day, I mixed a second batch of epoxy as with the first batch. This was applied to the bottom side of the stem. I propped up the pipe as shown in the photo below.
The below photo shows how the first application of the epoxy looked after 24 hours.
Here is the second application cured for 24 hours.
This photo shows the two applications in profile.
The button was filed to reshape it. Below is the top view of the reshaping.
The bottom view of the reshaping.
Profile of the reshaping.
I taped the shank off to protect it, with masking tape, then sanded the stem with a series of sanding sponges in grits 320-3500. Between each sponge I rubbed the stem with mineral oil and wiped it with a paper towel.
The stem was then micro-meshed with 4000-12000 pads. Between each pad I rubbed the stem with Obsidian Oil and wiped it with a paper towel.
The stummel was worked with micro-mesh pads 3200-12000. Between each pad I wiped the stummel with a make=up pad dipped in 95% ethyl alcohol.
The pipe was taken to the buffer for several coats of carnauba wax. The final step was to hand buff the Matched Grain with a microfiber polishing cloth.
This beautiful Matched Grain Kaywoodie will unfortunately and most likely never again see it’s mate. It’s beauty will have to be appreciated on it’s merits alone. I think the pipe turned out very nicely. The briar is exceptional with outstanding grain and free of any pits or flaws. The stem reconstruction actually went as I imagined it would. That comes as a welcome shock to me. More times than not my imagined plans are dealt a rude awakening by reality. The dimensions of this Matched Grain 10 Bent Billiard are:
Length: 4.90 in./ 124.46 mm.
Weight: 1.28 oz./ 36.30g.
Bowl Height: 1.72 in./ 43.69 mm.
Chamber Depth: 1.47 in./ 37.39 mm.
Chamber Diameter: 0.72 in./ 18.03 mm.
Outside Diameter: 1.39 in./ 35.31 mm.
I do hope that you have found something here useful to your own pipe care, maintenance or restorations. If you like this sort of thing, please click the like and subscribe buttons. Thank you for reading the ramblings of an old pipe lover.
Loading…
Below are some photos of the finished Matched Grain 10 Bent Billiard.
When I first saw photos of an Aristocob I was intrigued. My view then shifted to unnecessary and gimmicky as I became more enamored with new and old corn cob pipes. Still, the intrigue remained. The price of these pipes also played a part in my general lack of interest in acquiring and restoring one. I then read about the lack of availability of replacement interior corn cob replacement bowls. That was a real strike against the pipe, in my opinion. A pipe which required a disposable part that was no longer produced made me question the lasting qualities of these pipes. I remember looking through auctions for replacement bowls. When available, a 3 pack of replacement bowls was nearly the price of an Aristocob pipe. Which I thought was already rather high. Then one day I won an auction for an estate lot and surprise surprise, there was a new box of 3 unused Aristocob bowls. That meant that I would HAVE to purchase an Aristocob pipe. The completionist character flaw was rearing it’s ugly head and winning.
Well, two years or so later, I finally found an adequately priced Aristocob in need of restoration and probably in need of a fresh corn cob bowl. The auction was won and the pipe made a journey from Brooksville, Florida to southeast Nebraska. There are no stampings on the pipe nor on the stem. The only item which had any nomenclature was a stained Medico filter which resided in the shaft/stem of the pipe. Below are some photographs of the pipe as it appeared upon arrival.
I was reminded of the old Wendy’s restaurant commercial “Where’s the beef?” except I was thinking “Where’s the briar?” Yeah, if you got that reference, you are old and American. Anyway, I wasn’t sure exactly how to proceed with a wood-free pipe. I guess clean everything, buff the metal, sand the stem (that part was familiar) and see how it all looks when finished.
Background
As I disassembled the pipe I was first concerned with ridding the pipe of the dry crusty smoking residues and tar. As I cleared that away I was impressed with the quality of work and the amazing design of this pipe. My initial intrigue became more appreciation as I was able to examine the details that J.W. Zarikta, the inventor, incorporated it into the design. Little things like; the rubber o-ring seating the stem in the shank, the reservoir beneath the bowl allowing condensed water to pool below the bowl keeping it from absorbing the liquid, the slight air space around the con cob bowl allowing expansion and the fins of the aluminum stummel acting to radiate heat while allowing the handler of the pipe not to touch a overly hot pipe. The words “brilliant” and “genius” came to mind. Then the engineering and machining that impressed me as well. The casting of the aluminum was good with no noticeable pits and the only seams, from casting, were observed along the middle above the shank and between the cooling fins.
According to smokingmetal.co.uk,
“The ARISTOCOB is an American made system pipe with corn cob bowl inserts.
Originally the AL-COB CORPORATION out of Grand Haven, Michigan, which later became ARISTOCOB INCORPORATED from Caledonia,Michigan. Later still they were bought out by Missouri Meerschaum Company
Apparently available in the first place in a plastic case containing one pipe, 2 replacement corn cob bowl inserts and instructions for use
The cob inserts were made for some time by The Missouri Meerschaum Company, manufacturer of corn cob pipes in Washington, MO. The box shown is their box. They made the inserts from the early 1970’s until 1983. They are no longer available from that source but do appear on ebay at times
The top of the vaned bowl outer unscrews to enable easy replacement of the bowl insert. An inline filter can be used in the stem.
The mouthpiece has been seen in two version, with and without an �O� ring
Using the above dates it is a safe assumption that this pipe was made between 1966 and the early 1970s in Caledonia, Michigan. The box of replacement bowls were of the original make as well marked with the Caledonia, Michigan location indicating that they were from prior to the purchase of the Missouri Meerschaum Company.
The Restoration
This restoration began with a clean denim piece on the work surface.
The pipe was disassembled with the rim going into a 95% ethyl alcohol bath and the bowl chamber filled with enough ethyl alcohol to cover the smoking residue.
I allowed the aluminum to soak for 20 minutes to soften the tars. The chamber, shank and rim were then cleaned using cotton swabs and a light rubbing with 0000 steel wool both wetted with ethyl alcohol. With the aluminum parts cleaned of their crusty tar I took the stummel to the buffer where I buffed it with a flannel wheel and rouge buffing compound.
Back at the workbench I wiped the buffing compound away with make-up pads dipped in ethyl alcohol.
The aluminum had returned to a lovely shine.
The stem was made from a nylon, I think, that was similar to the black plastic stems of Missouri Meerschaum (MM) corn cob pipes. I was leery of filing and sanding the plastic, fearing that I would not be able to restore the original luster. I decided to file and sand it anyway as I wanted to remove the tooth chatter and couldn’t think of another way to do that.
I then cleaned out the airway of the stem using cotton swab and bristle pipe cleaners dipped in 95% ethyl alcohol.
The light filing and sanding appeared to work well to remove the tooth chatter. Now would sanding allow a fine finish? The answer was yes. The sequence of sanding sponges from 400-3500 worked well to remove the chatter and restore the stem to a like new condition. To better hold the stem during sanding I inserted it into the stummel and wrapped the shank with painters tape to protect the aluminum.
To further polish the stem I micro-meshed it with 4000-12000 pads. Between the pads I applied a small drop of Obsidian Oil which was rubbed onto the stem then wiped with a dry paper towel. Below you can see the taped shank.
The stem was then hand buffed with Before and After Fine Polish on a soft cotton cloth.
The Fine Polish was followed by Before and After Extra Fine Polish with the same cloth.
The tape was removed and the entire pipe was buffed with white buffing compound at the buffer. After the compound was cleaned and wiped away using make-up pads and ethyl alcohol the pipe received several coats of carnauba wax applied with the buffer.
Looking at the finished pipe I wondered why in the world it took me so long to restore one of these remarkable and attractive old pieces of ingenuity. The design and manufacturing was a testament of the grand idea that this pipe imbues and is a testament of inventiveness. I also cannot help but think an easy fix to the problem of not being able to get additional corn cob replacement bowls would be to custom make a meerschaum bowl. I know this would violate the whole “cob” of the “Aristocob” concept but it would be a cool upgrade. The dimensions of this Aristocob are:
Length: 5.48 in./ 139.19 mm.
Weight: 1.35 oz./ 38.40 g.
Bowl Height: 1.68 in./ 42.67 mm.
Chamber Depth: 1.11 in./ 28.19 mm.
Chamber Diameter: 0.63 in./ 16.00 mm.
Outside Diameter: 1.38 in./ 35.05 mm.
I do hope that you have found something here useful to your own pipe care, maintenance or restorations. If you like this sort of thing, please click the like and subscribe buttons. Thank you for reading the ramblings of an old pipe lover.
This may just be the longest restoration yet. Trust me when I say this project has been ongoing since August 15 and today is September 10. For context a normal restoration takes me 2-4 hours not including drying or soaking time. Let me start in the beginning which normally is where stories begin. This pipe was purchased on August 6. I knew it had issues, which you will see shortly, and would allow me to practice several techniques that I wanted to become better at. The pipe was listed on eBay as a “Buy now” for $20 or best offer. I offered the seller $16 and they accepted. In a few minutes you will think I am losing my cognitive faculties or that I probably never had that large of a faculty to start with.
The pipe was sent from Hudson, New York to the wilds of southeast Nebrask and arrived after 6 days, August 12. Upon opening the package I was a bit surprised at the severity of the issues which I had willingly adopted. I’ll let the photos speak for themselves. Here is the pipe prior to any work done.
Remember, I said it had issues. I can hear folks saying, “What kind of masochistic idiot are you?” and probably some comments about wanting to sell me fine swamp land in Louisiana or perhaps a bridge in Brooklyn. I wanted to practice the cracked bowl pinning technique by Charles Lemon (you can see that here), repairing cracked shanks and I am continuously working on different ways to repair chewed up mouthpieces (this time with black epoxy resin). So, now you see I thought I could do all of those things with one pipe. There was madness to my madness. No wait, that’s supposed to be, there was a method to my madness.
Background
Over the past almost a year, I have restored 7 Marxman pipes. This will be the 8th. And you say, “I thought you went by the name Nebraska Pete Geek?” Well, I just counted and I have done 12 Petersons so, the name is well founded. I do love an old Marxman pipe though. The amazing history of Robert Marx was summarized by me in an earlier blog which I will include again here:
On January 11, 2024 I blogged about a Marxman Gold banded Dublin (linked if you are interested) and wrote the following about Robert Marxman and Marxman pipes:
“My recent fascination with the post-World War Two (WWII, to properly use an acronym) led me to further appreciation of the Marketing genius of Robert Marx, the founder of Marxman Pipes Inc. Allow me to illustrate:
Those are the back covers of Pipe Lovers Magazine for each month of 1946. That represents a substantial investment in building and maintaining one’s brand name.
Here is a quick review of Marxman pipes from pipedia.org:
“Marxman (Marxman Pipe Company) was created by Robert (Bob) L. Marx in 1934, when he was 29, and after he had worked for the William Demuth Company. His pipes were not outstanding because of the quality of their wood (probably Algerian), but Bob started making unique sculpted pieces, which brought the brand fame in the World of Hollywood cinema. Actors like Zachery Scott, Dennis Morgan, Jack Carson, Alan Hale, Joel McRae, and Ronald Reagan were some of the faces that appeared on the bowls.
Bob knew how to innovate and took full advantage of marketing and press advertising in order to sell the brand–one of his slogans being “Relax with a Marxman”.
In a recent forum post on Pipesmagazine.com, contributor jguss posted the following from the February 2, 1935 issue of the UnitedStatesTobaccoJournal:
A remarkable article showing the business acumen as well as a photo of the man himself. Thank you, jguss.
This is one of my favorite quotes about Rober Marx:
“Ted also said: Several years before UST bought Mastercraft, M/C had aquired Marxman Pipes. A wonderful kind man, Bob Marx was still working as a salesman in NYC, and I was fortunate to make a few sales calls with him. You all remember Charles Atlas? Bob Marx was about 76 and had just been awarded the (I think) Atlas Award for being the finest speciman of manhood over 70 years old in NYC, or maybe the state.
M/C had some inventory of Marxman stuff, but not a lot. I know very little about Marxman. Did they make, import, or both?” (Mastercraft – Pipedia)
The “Ted”, who is being quoted above, was the nickname of Tom Douglas. Here is an announcement of Mr. Douglas’ passing from Pipesmagazine forum November 26, 2018:
“Tom Douglas passed away at 71 years of age, this past Saturday, in Florida. It seems he had an infection in his stomach, but I don’t know much more than that, regarding what actually contributed to his death. He did have a history of heart and other health complications. I just spoke very briefly with his wife Joyce; you can imagine how she’s doing.
The impact Tom had on the pipe community is huge…beginning with an immense library of pipe knowledge through the pages of the Dr. Grabow Collectors Forum….his 25 years of service at the Grabow / Sparta pipe factory (where he retired in 1991)….his executive leadership over Mastercraft distribution for many years…”
So, at 76 years old Robert Marx was still involved in the business that he must have loved. This would have been around 1980.”
Then last winter, Mark Irwin, of Peterson Pipe Notes and author of The Peterson Pipe book, sent me a c. 1945 Marxman Brochure. I photographed the pages of the brochure and included them below.
One of the easiest things to date is a Marxman pipe. The company was formed in 1939 and sold in 1953 to MasterCraft. Though the Marxman name continued after 1953 the pipes were made in France or Italy and stamped as such with Country of Manufacture (COM) stamps. This means that a non COM stamped Marxman pipe was made in New York City between 1939-1953.
This pipe is undoubtedly a Marxman Jumbo as seen on page six of the above brochure. As a “C” size this pipe would have commanded a price of $10 in 1945. According to the Consumer Price Index inflation calculator that would equate to $173.78 today (July 1945 to July 2024). (https://data.bls.gov/cgi-bin/cpicalc.pl?cost1=10&year1=194507&year2=202407)
The Restoration
Oh no, the poor battered beauty can’t even get an unstained denim piece to rest upon. The bright side is that it will look significantly worse shortly.
I started with the reaming of the tobacco chamber using a PipNet with the size 3 and 4 blades. The #4 rarely gets to come out and play.
Typical of Marxman pipe the reaming was very easy with the cake coming easily off the briar. The chamber was sanded with 320 sandpaper wrapped around a wood dowel and taken to bare wood. No heat damage was observed.
The shank was a dirty mess. For as easily as the tobacco chamber gave up it’s accumulated cake the airway clung to it’s smoking residues tenaciously. Several scrubs with 95% ethyl alcohol and a shank brush followed by alcohol dipped cotton swabs were used. I was getting frustrated and my thoughts turned to the next steps.
It was during the repetitions of scrubbing that my mind started to process ways to repair the cracked shank. The first thought was merely a brass band. I did this with a Marxman Mel-O and that restoration turned out very well as the below photo illustrates:
My thoughts shifted to considering an internal band. I had seen a video on how to make a pipe with a military mount by J. Alan of jalanpipes.com a few years ago. Here is that video. In the video he used a piece of brass and filed teeth into the brass tube. He then used the tube to cut a circular slot or hole just outside of the mortise on the shank. A piece of brass tube was inserted into this circular slot and the shank had a reinforcement that could take significant abuse. I filed that away in the back of my mind. For whatever reason the thought of a brass reinforcing band inside the shank of this pipe seemed like a good idea. The shank was thick and could easily accommodate a band and what the heck, it was already cracked. How badly could I screw this pipe up? In hindsight, I should have watched the video again or researched this technique more but I was in “problem solving” mode.
I looked through the stock of brass tubing that I had and found a piece which looked to be the perfect diameter. It was 5/8th inch outside diameter tubing. Next I started filing teeth on the edge of the tube. I couldn’t remember how many teeth were used in the video and couldn’t be bothered to rewatch it. As you may have guessed by my complete lack of video that I really do not like videos. I think it comes from being a teacher for 32 years. Rather than read, research and learn things like I did as a student, all students ever wanted to do was “watch a video”. This is fine and dandy for seeing how to replace the gas cap door on a 2004 Ford F150 (yeah, I just did that) but there isn’t a video on the life of Robert Marx. Videos are a great tool for some things but they are not the sole source of learning. Anyway, I filed some teeth.
They looked like they would cut briar. They also looked like they would have to be brought out of the hole and have the saw dust blown off of them frequently. I was in uncharted territory and expected some learning by trial and error.
In my imagination the brass tube/cutter would be clamped into a chuck of some type and spun at some speed, probably slow and lowered or slid into the shank which would be clamped somehow. Yeah, there was a lot of “some” in my thought process at this time. I do not have a drill press nor a lathe. The thought of using hand tools for this operation seemed ridiculous. I then contacted my son-in-law’s brother who is a machinist extraordinaire. The date was August 15, 2024. He replied the next day and was worried about brass being able to cut the briar. I then realized that he spent his days cutting far tougher material like steel, stainless steel, titanium and cobalt-chromium alloys. Yeah, he works in a prosthetics lab. He had the experience, tools and know-how needed to help with this endeavor. More on this later.
I had a rim to clean up and a stummel to scrub and a whole bunch of clean cotton swabs which were demanding to be filthy..
So that is what I did. The stummel was taken to the sink and scrubbed with Murphy Oil Soap, undiluted , and a nylon scrub brush. The years of dirt and the lava came off quickly. The soap was rinsed with warm water and the stummel dried with a cotton hand towel.
Back at the bench things were looking good both in the reality of the drying stummel and in the realm of my imagination of how the shank repair would proceed.
I certainly was back in reality, with a really dirty shank.
That brought me to the next new idea I wanted to try. In one of the Facebook groups that I am in, someone mentioned using two part epoxy to repair and reconstruct buttons. I wish I could remember what group or who the person was who had sown this seed in my brain. I thought that I needed to try it out and this stem was a perfect subject. The stem was cleaned using 95% ethyl alcohol and bristle pipe cleaners then lightly sanded to remove some of the surface oxidation and allow the Before and After Extra Strength Deoxidizer access to the vulcanite.
A pipe cleaner was inserted into the remaining button, to act as a hanger suspending the stem in the deoxidizer, and it was lowered into the deox ( my term for the liquid).
According to the time stamp on the photos the stem was in deox for 7.5 hours.
That gave me plenty of time to soil another stack of cotton swabs in an attempt to exorcize the tar demons from the airwair. Finally, I was victorious and the airway was clean.
The seemingly unending airway scrub did allow me time to ponder the next step and the next technique that I wanted practice with. That is the repair of a cracked bowl using strategically placed brass pins. I first saw this technique in a post by Charles Lemon of Dads Pipes. Charles is a real restorer, unlike me, and actually does this for a living bringing back family heirlooms and working magic with his impressive skills. You can find Charles’ pinning tutorial blog here. I had used pins to repair a cracked shank as a first time practice ordeal and again with a cracked bowl, both blogs are linked if you care to make fun of my attempts. This cracked bowl was more of a cosmetic crack in the briar. It did not extend through the wall of the tobacco chamber and looked more like it was from an improperly cured piece of briar rather than a case of excessive cake. Either way, I was going to repair it with brass pins. I first filled the crack with brown cyanoacrylate (CA, super glue) pushed into the crack with a fly tying bodkin. The CA was allowed to cure in it’s own time and was not accelerated by a CA drying accelerator.
Once cured the surface of the CA was roughened up a little bit to better blend it with the carving on the stummel. I used a round rat tail file and a diamond needle rat tail file for the roughening.
My jumping around from task to task with this restoration shows my desire to plan and think through each of the multi-step procedures used with each technique. I use the time stamps from the photos to sequence the restoration process that I present to you. I apologize if this makes it hard to follow while reading. This is the way it all happened though
I wanted to give the CA adequate time to cure so I busied myself with the repair/rebuilding of the stem. Someday I’ll get a drill press or a lathe and that cool tenon turning tool and I’ll just make stems rather than try to reconstruct them. There’s that imagination again. Anyway, the stem was removed from deox and wiped with a coarse shop rag. This more abrasive material is great for absorbing the excess deoxidizer and abrading away some of the oxidized vulcanite.
Aug. 15 (I’m using the dates here to show the curing times of the epoxy.)
To rebuild the button, I first cut a dam from a plastic lid. This dam was coated with petroleum jelly and inserted into the airway in an attempt to keep the epoxy for sealing it off. I mixed the two part J. B. Weld black epoxy as per product instructions.
I used a piece of Scotch tape around the bottom of the stem to aid in keeping the epoxy on the top then applied the epoxy to the fill area with a fly tying bodkin. The stem was set aside for 24 hours to cure.
Aug. 16
The next day, I checked on the epoxy to see how well it was working as a fill material.
The dam was removed easily and appeared to have work at keeping the epoxy from the airway.
I took the stem to the photography bench for some better than the phone photos.
The surface was roughed up with a 320 grit sanding sponge to give the next application of J.B. Weld something to bond to and the dam was reinserted.
Another batch of epoxy was mixed then applied to the area to build up the missing material for a proper button. This application was again set aside for 24 hours.
Aug. 17
This was nowhere near as quick as using a black cyanoacrylate (CA, super glue) to fill an area but I was still curious as to its effectiveness. I filed the 2nd application and reformed the button.
The epoxy filed and sanded more easily than CA would have. I was sure that it would cure to a harder consistency in a couple of days.
Aug. 18, 8:30am
A third application of J.B. Weld was applied to the stem. This time to a larger area. I wanted a wider area to use for blending the original stem to the new patch. This application also was spread on the top and bottom of the stem.
A pipe cleaner was inserted to act as a hanger and the stem was hung to cure.
Aug. 18, 9:50pm
13 hours later, I checked on the curing of the epoxy. The surface was rough rather than smooth, as it had been with the previous two applications. I did like the way tha material built up though.
Aug. 19, 1:00pm
Another 15 hours later and I returned to the cured epoxy on the stem. The rough texture remained and the epoxy felt more tacky than the previous iterations. The new material pulled away from the second application as I was filing it. Bah, that won’t do. I peeled the 3rd application off the stem. I was not sure if it was a bad mix or what had happened. One thing that I was certain about was that I preferred to use black CA for rebuilding buttons.
All this time between sessions with the pipe did allow me to thoroughly plan how I wanted the pinning to go. I drilled 3 holes with a 2mm drill bit. Each hole was drilled at a different angle and each transected the crack. The below photo shows each hole with a piece of 2mm brass rod. I had gotten better with my drilling and none of the holes had emerged all the way through the stummel.
The hole depths were measured with their respective rods. Each rod was cut slightly shorter than the depth of the hole.
I applied a small drop of brown CA to a hole and quickly pushed the corresponding rod into it to a point below the briar surface. The below photo shows all three rods pressed into place. You can still see the brass peeking from the holes.
The holes were then filled with another application of brown CA and topped with a small scoop of briar dust. The dust was pressing into the wet CA. The fill was then sanded smooth on the rim and slightly smoothed in the carved areas. This project took an intermission while I waited to schedule a visit to the machine shop of my fellow conspirator.
Sept. 9
A date had been set for the machine shop visit. This was a clandestine operation after hours. In preparation for the event, I needed to glue the shank crack with CA. I used a thin clear CA to penetrate the crack as deeply as possible. This was applied with the ever popular fly tying bodkin and quickly clamped.
The clamping provided no visual compression of the crack but it made me feel like I accomplished something. I then applied a thin line of brown CA to the crack to fill it with the fly tying bodkin.
Sept. 10
Now to protect my fellow conspirator’s identity, since we were infiltrating his shop after hours and without the knowledge of his overlord, I will refer to him as Christian. A fitting name and perhaps title. I explained what I thought we could do and how I imagined it happening. Christian immediately understood and dashed my imagined process with a healthy dose of reality. He said that this was a job for the milling machine. The first order of the new reality based procedure was to shorten my brass cutter to fit into a collar which could be mounted into the chuck of the milling machine.
Next we needed to clamp the stummel into position in a way that limited movement without marring the briar. This was done with a couple of scraps of a clear soft plastic between the vise jaws and the stummel.
The cutter was aligned with the shank.
Turtle speed was selected on the milling machine.
And the cutting was begun, very slowly, maybe 0.5 mm then I’d blow the dust away with the compressor.
This continued and was looking very promising. I hadn’t really thought about how deep to make the slot. It was determined that 5 mm would probably be sufficient.
The depth gauge was set to the 5 mm goal and the cutting proceeded.
Once achieved, the slot looked as good as I had imagined.
The next task was to cut a 4.7 mm wide brass band from the same tube the cutter was made with. This would ensure a perfect fit. We moved to the lathe to square up the end of the brass tube.
The lathe was set to cut a precise 4.7 mm wide band. We thought that this would allow me to press the band into the slot so that it would be flush with the face of the mortise and would require no sanding of the brass band. The no sanding was important for a proper fit with the stem to maintain the shank to stem joint.
The band cutting proceeded successfully on the second attempt after Christian had sharpened the cutter. The first attempt met with a hot mess. Literally, the dull cutter made an out of round band that was very hot.
The band seemed to fit beautifully. It was not pressed in fully as there was no way to extract it once it was in there. Also, my crack glue-job seemed to be holding without the reinforcing band.
After many thank-yous, a Mission Impossible like extraction from the machine shop and a drive back home the Marxman was back to the home workbench.
I thought about which glue to use, CA or epoxy for gluing in the band. I settled on epoxy due to my fear of not being able to move fast enough for the CA and having the CA set-up before I had the band fully pressed into place.
I applied a bead of epoxy to the slot.
Surprisingly, I remembered to roughen the inside and outside of the brass band with a sanding sponge.
The band was then pressed into position.
The excess epoxy was cleaned up with a cotton swab dipped in acetone and… (dramatic pause). OH CARP! There was about 0.2-0.5 mm of brass band sticking up above the surface of the mortise. What had gone wrong? I texted Christian, if that is his real name, and explained what I was seeing. We had both noticed that my brass cutter was significantly more dull when we finished cutting, back at the shop. He thought that the dulled teeth would have given a false 5 mm depth to the cut. I agreed and thought that maybe the epoxy would have added another fraction of a mm. In hindsight, the band would have been better cut at 4.5 mm to ensure greater clearance.
I used a small flat file to remove as much of the brass as I felt comfortable removing. I had to go very slowly and with great care to avoid filing any briar. I then took the stummel to the topping board there. I very slowly sanded the brass to flush with the briar. I failed to photograph any of this, apologies. I did photograph the resulting fit though.
Below is a photo of the internal brass band in all of it’s glory.
Now to finish this stem. I thought I could go over the patch on the bottom of the stem with black CA and that it would make the difference in the vulcanite and the black epoxy disappear. Once again the imagination was working beautifully and all of the imagined repairs were equally as beautiful.
I painted the bottom of the stem with the black CA.
The CA was then spritzed with a CA drying accelerator. The subsequent area was filed and sanded to blend the vulcanite with the patch. You’ll have to wait or jump to the end to see how reality dealt with my imagined results. This is mainly because I failed to photograph it. Umm, I mean, that I want to build anticipation. Yean, that’s the ticket.
To rebuild the button proper, I Scotch taped the stem right against the button This kept me from having to re sand the blended stem patch. It also allowed me to file and sand the button without scratching up the already smoothed stem. I applied layers of black CA to the button, spitzed with the drying accelerator and while the CA was still soft, I made a straight cut through the still pliable CA giving the button a more defined seam where it met the stem.
The above was done for both the top and bottom. Both sides were filed then sanded to a proper shape.
Here you can see the progress from the side.
Eventually the stem was sanded with a series of sanding sponges from 400-3500 grit. Between the sponges the stem was rubbed with mineral oil and wiped with a dry paper towel.
I was apparently getting tired and failed to photograph the micro-meshing of the stem. The next step was to coat the stummel with Before and After Restoration Balm and let it sit for 30 minutes.
After 30 minutes the Restoration Balm was wiped off with an inside out athletic sock.
It was at this point that I decided to try another novel technique on this pipe. I had not worked with a shellac finish on a pipe in a long time, perhaps even before I started blogging back in October of 2023. I slid the stem out about ¼ inch or ½ cm to provide a handle but not get any shellac on it. I used a disposable foam brush to apply a very thin coat of shellac to the stummel. The briar absorbed the shellac quickly and it dried as the alcohol solvent evaporated. Now for the weird part – I slightly wetted a paper towel with 99% isopropyl alcohol and wiped the stummel with the paper towel. This smoothed the shellac remaining on the surface of the panels. I only applied the single coat of shellac as I don’t really like the look of a clear coat on pipes. This wasn’t really a clear coat, more of a sanding sealer and a layer of protection of the carved surfaces from dirt and hand oils. I let the stummel dry for about 15 minutes then took it to the buffer for a polish with white diamond compound. The entire pipe was then wiped with a clean dry cotton cloth to remove any remaining buffing compound. The stem and stummel then received several coats of carnauba wax with the buffer. A quick hand buffing with a microfiber polishing cloth and she was finally finished.
I would like to thank you for making it this far into this dissertation. It is actually longer than many Masters Degree dissertations that I’ve read. Perhaps I’ll be awarded an honorary masters from some pipe restoration university. That’s a thing, isn’t it? A special thanks goes out to the machinist Christian, who may or may not actually go by that name. I had now successfully turned the $16 pipe into a $25 pipe, which equated to about $0.50/hour. Good thing I’m retired or the U.S. The Department of Labor would be filing suit for unfair pay. In all honesty, this pipe provided me with some new challenges and did exactly what I wanted it to do, allowed me to practice doing what I love to do – learn new and hone existing techniques. The pipe turned out amazingly well. This one will be joining my personal collection. The dimensions of this Marxman Jumbo C are:
Length: 6.01 in./ 152.65 mm.
Bowl Height: 1.73 in./ 43.94 mm.
Weight: 2.13 oz./ 60.60g.
Chamber Depth: 1.32 in./ 33.53 mm.
Chamber Diameter: 0.91 in./ 23.11 mm.
Outside Diameter: 1.76 in./ 44.70 mm.
I do hope that you have found something here useful to your own pipe care, maintenance or restorations. If you like this sort of thing, please click the like and subscribe buttons. Thank you for reading the ramblings of an old pipe lover.
Loading…
Below are some photos of the finished Marxman Jumbo C.
Proof positive that I have turned away from restoring pipes from the 1940s. Okay restoration may be too strong of a word for this entry. I can’t be certain that this pipe ever saw a flame. It is a lovely example of the craftsmanship that Dr Grabow is capable of. This beauty was part of an estate lot from Norman Park, Georgia, USA via an eBay auction. The pipe was not stamped with The name Dr Grabo yet it wears the Dr Grabow logo on the stem. The only stamp is COLLECTOR over 2002. Below are some photos of the Collector 2002 as it looked upon arrival.
I’m not sure if that is the original filter. It came that way though.
I always find it funny to find an unsmoked or seldom smoked pipe that has tooth dents or chatter.
Background
Dr Grabow has a long and well documented history, in general. This line, unfortunately, is not part of that “general”. In an earlier blog of mine, I briefly detailed this history. I will include that summary here:
“In one of my very first blogs I wrote about the restoration of an MLC pipe. “The stamp that I could not make out on my pipe was the MLC. This stands for Mary Linkman & Company. This is the same company formed by Louis B. Linkman, the originator of Dr. Grabow pipes. In 1898 Linkman and August Fisher started a small business making pipes. The business grew and, “in 1907 M. Linkman & Company was incorporated with Louis B. Linkman as president, August Fisher, vice-president…” (https://pipedia.org/wiki/M._Linkman_%26_Co.). If you would like to see a very early blog about the MLC Hell Maria here is that link.
So, two youngsters started up a pipe making company at the turn of the last century. It doesn’t end there, friends. I wrote the following in a blog about another Linkman’s pipe: “ “BACK IN 1898, two ambitious young men reached the momentous decision to go into business for themselves. They were Louis B. Linkman and August Fisher. From the time they were in knee pants they had worked for a pipe jobber in the mid-west.” (https://pipedia.org/wiki/M._Linkman_%26_Co.). These two young entrepreneurs were joined by a third, “Anton Burger, who had also been employed by a pipe jobber in the mid-west, approached them and was taken in as a partner. M. Linkman & Company proceeded as a partnership; the business developed rapidly through the untiring efforts of these men in producing quality pipes and rendering good service to their customers.” (https://pipedia.org/wiki/M._Linkman_%26_Co.). The company eventually
came to be known as Dr Grabow.”
According to Tobaccopipes.com “The birth of the Dr Grabow smoking pipe is simple enough. It started off when Dr Grabow himself and his acquaintance Dr Linkman regularly visited the local pharmacist at Brown’s Drug Store in Lincoln Park Chicago. Dr Linkman was on the lookout for a doctor’s name to Christian an innovative line of pipes in order to mellow out the smoking apparel’s smoggy image. He asked Dr Grabow to allow him to use his name to which he agreed and the name has stuck since then. Linkman continued to manufacture his Dr Grabow pipes until 1953.
The earliest of these exclusive pipes were stamped both with Linkman’s and Dr Grabow. They included a propeller emblem that was white in color at the top of the mouthpiece. Linkman’s pipes are also stamped with their own four digit code. This code indicates their model and shape. For example, the PRE – 1944 model names included the “Special”, “Supreme” and “Deluxe” versions of Dr Grabow’s pipes.
I have frequently said things like, “I ain’t too bright but…” or “I may have been born at night but, it wasn’t last night” regarding my own intelligence. With that in mind, I can pretty assuredly surmise that this pipe is from Dr Grabow’s Sparta, North Carolina factory and was made in 2002.
The Restoration
Okay, not a real restoration, more like a refreshment. Although that makes me think it needs a cocktail umbrella or something sticking out of the bowl though.
I did ream out the bowl as it was rough with what I assume was a lumpy bowl coating.
Below you can see a couple of the lumps I was referring to. The tobacco chamber was sanded smooth with 220 sandpaper wrapped around a wood dowel.
I cleaned the airway of the shank with cotton swabs and folded bristle pipe cleaners dipped in 95% ethyl alcohol.
The stummel was scrubbed with undiluted Murphy Oil Soap and a nylon scrub brush to remove 22 years of dust. The soap was rinsed with warm water and dried with a cotton hand towel.
Before polishing the brass band I first taped the stem with painters tape. This was to keep the metal polish from the plastic of the stem. I always enjoyed polishing the brass on my JROTC uniform back in high school. Though this Cape Cod Metal Polish smells far better than the Brasso of 40 years ago. The brass band polished up very nicely.
The stem was cleaned out using cotton swabs & bristle pipe cleaners with 95% ethyl alcohol.
I’m not sure how an unsmoked pipe can get teeth marks but they do. I used a small flat file to smooth the area behind the button on both top and bottom. The filed surface was then sanded with a 400 grit sanding sponge.
The stem was sanded with a series of sanding sponges from 600-3500 grit. I was a bit nervous about achieving a factory like finish on this plastic stem but continued and hoped for the best.
The stem was micro-meshed with 4000-12000 pads. Between each pad I applied a small drop of Obsidian Oil. The stem was looking great, no need for my earlier worries.
I removed the painters tape and used Before and After Fine polish hand buffed with a soft cotton cloth. I buffed both the brass band and the plastic of the stem.
Before and After Extra Fine Polish followed the Fine Polish.
The pipe was then taken to the buffer for several coats of carnauba wax from the buffer. The rustications on this pipe were not very deep so I figured that buffing carnauba would be OK and it appeared like I was correct. The final step prior to photographing the finished pipe was a hand buffing with a microfiber polishing cloth.
I have to admit that I am not the biggest fan of Dr Grabow pipes. I mean, I love the Westbrooks and the old Linkmans that I have. I find that the Dr Grabow filters are a bit too constricting for my taste. The factory finishes that come with many Dr Grabow pipes are high gloss clear coats which is something that I do not prefer and many of the carved or rusticated versions look cartoon-like. However, this Collector 2002 is a beautiful pipe. I still do not like the draw with a filter inserted but without the filter it is wide open and very nice. The finish is a nice light sandblast which shows off the briar grain beautifully. The stain is a bit dark for me but it works well with the brass band. The stem is polished exceptionally well and has a gorgeous high gloss. Overall this is a darn good looking and feeling pipe which Dr Grabow should be proud of. The dimensions of this Dr Grabow Collector 2002 Billiard are:
Length: 5.92 in./ 150.39 mm.
Weight: 1.43 oz./ 40.80 g.
Bowl Height: 1.76 in./ 44.70 mm.
Chamber Depth: 1.39 in./ 35.31 mm.
Chamber Diameter: 0.75 in./ 19.05 mm.
Outside Diameter: 1.35 in./ 34.29 mm.
I do hope that you have found something here useful to your own pipe care, maintenance or restorations. If you like this sort of thing, please click the like and subscribe buttons. Thank you for reading the ramblings of an old pipe lover.
Loading…
Below are some photos of the finished Dr Grabow Collector 2002 Billiard.


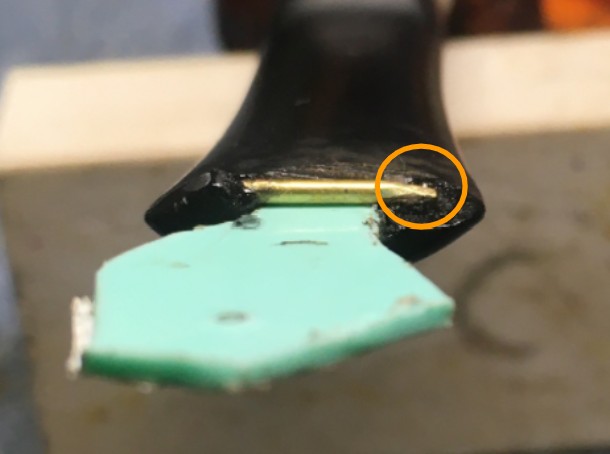


 were no better.


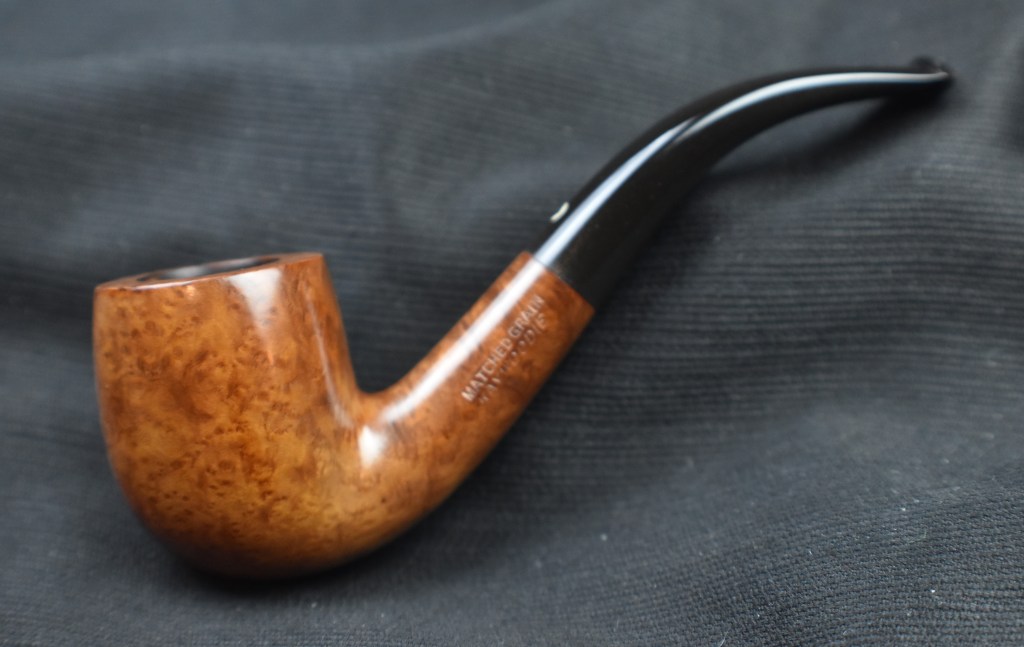


 (
(


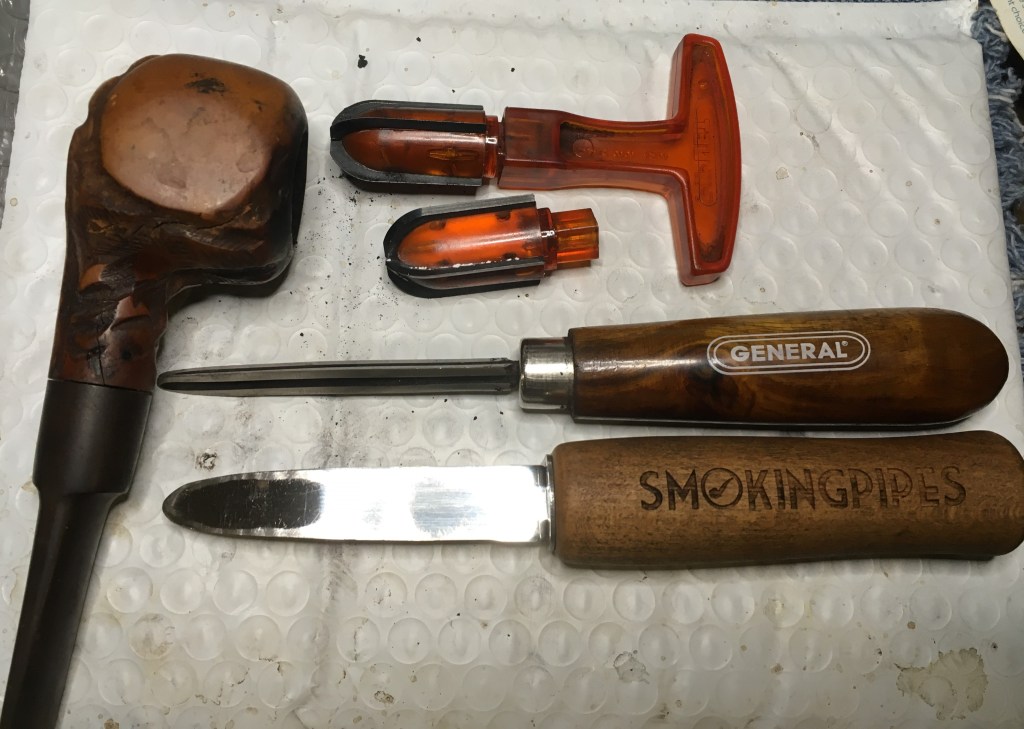


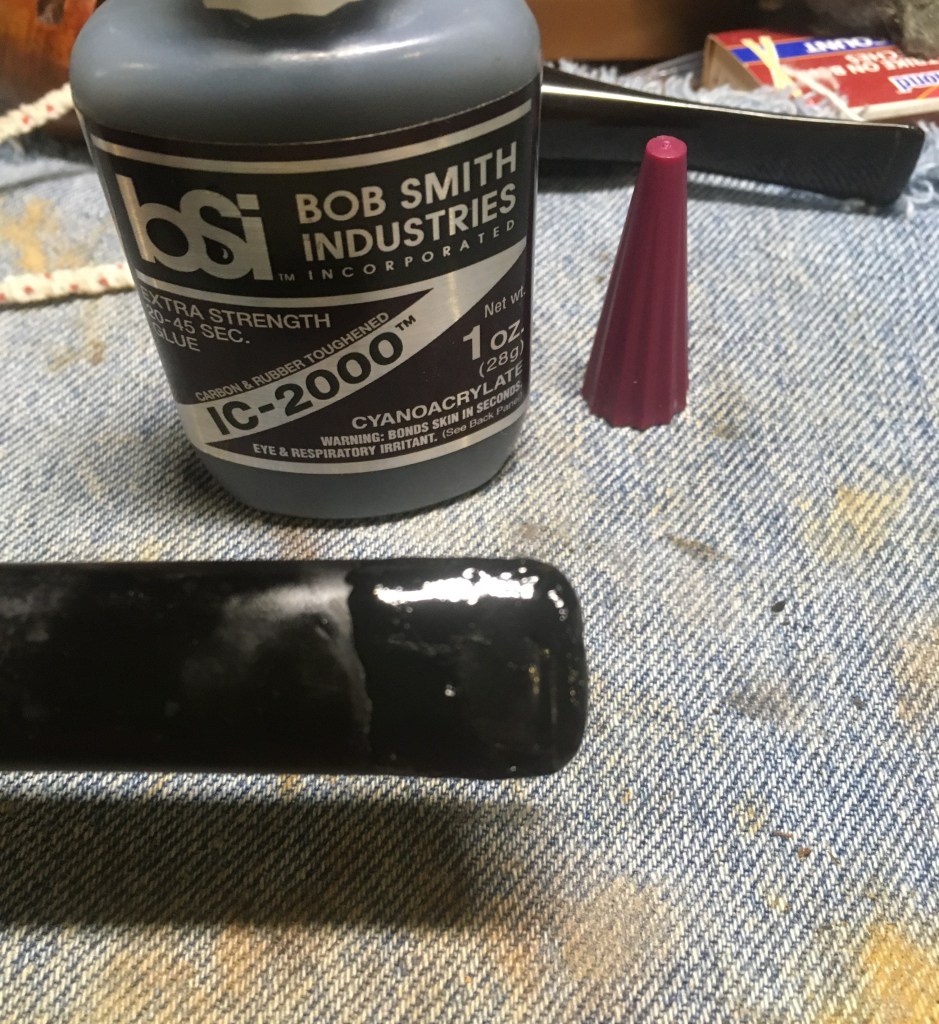


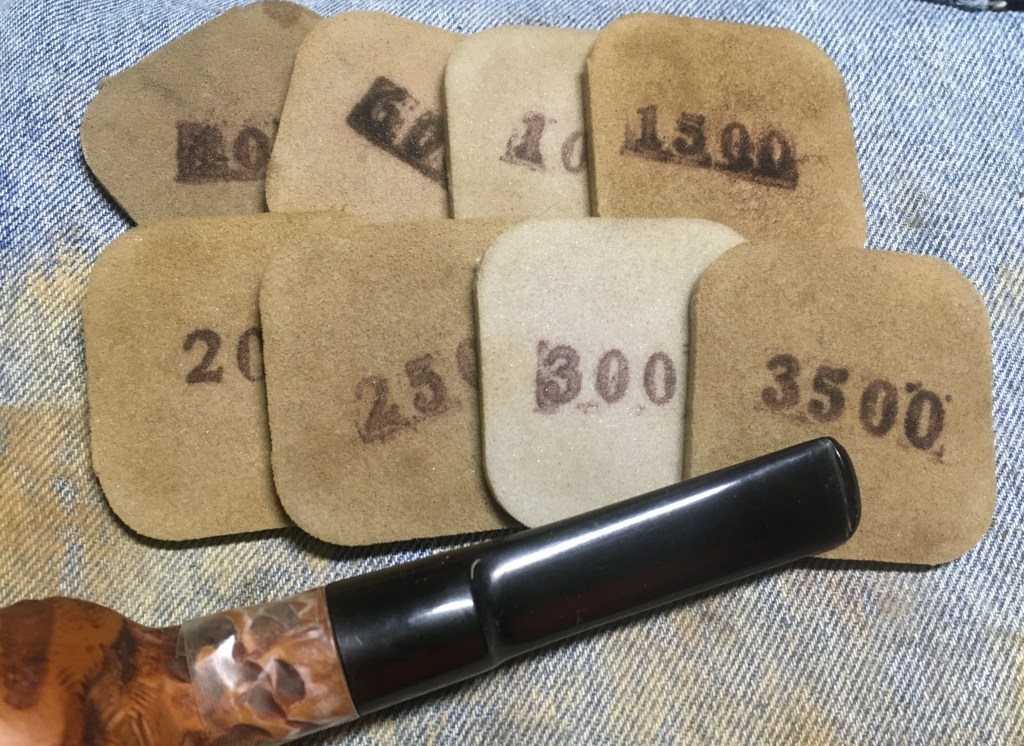


