In a previous blog about customizing a Missouri Meerschaum Riverboat Gambler I made the following comment, “Expecting perfection from a new corn cob pipe is kind of like expecting a perfect first date. Sure it can happen but more often than not the pipe will have flaws typical of cobs like a first date will undoubtedly have awkward, “damn, I should never have said that” moments.” () As far as cobs go, this is a rather expensive one Missouri Meerschaum (MM) lists the Freehand at just north of $50 (https://corncobpipe.com/product/freehand-corn-cob-pipe/). I have to say I was a bit disappointed when I held my new cob for the first time. The size was impressive and the stem beautiful but the nickel collar was wonky.
Given the wonkiness was not very much but it was enough to bother me.
When I tried removing the stem, the shank separated from the cob.
So now I had a new MM Freehand in two pieces, which I wanted, but not in the way I wanted. The stem fit was very tight and I was able to liberate the stem from the shank with more force than I thought necessary. Once separated the wonk was even more pronounced.
Now given, it was only a couple of degrees off but it bothered me.
To remedy the stem collar fit I first had to remove the collar. The glue here was holding fast, unlike the shank… I used a heat gun to heat the collar and soften the glue.
The heat worked and the collar was removed.
Looking at the stem, I wondered why it was so darn tight. It had been sanded as evident by the sanding marks on the tenon.
The one side of the tenon looked as if it had been polished to a high gloss. Weird, is all I could think. I sanded the tenon with a 400 grit sanding sponge until I got a tightness which I thought more appropriate.
I looked at the collar wondering why it was not fitting the shank. It was even in thickness.
When placed standing upright the stem had a cant to one side. It is hard to notice in this photo but trust me it was there and annoying.
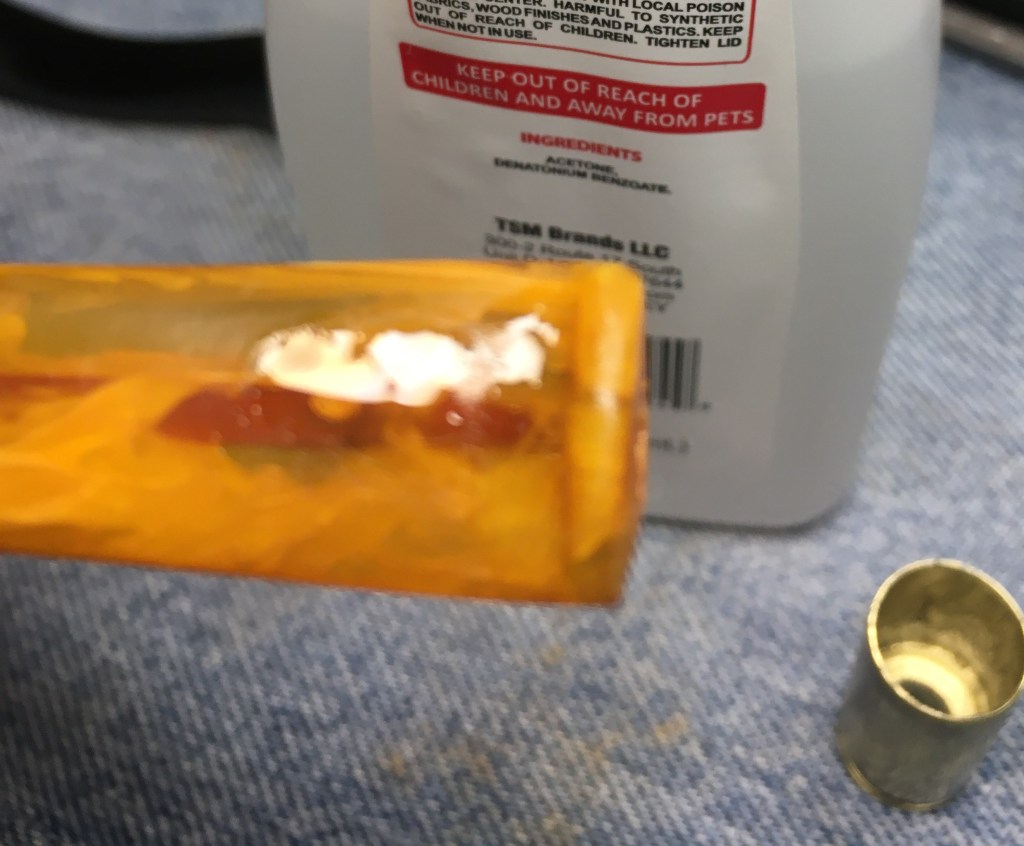
Upon close examination of the collar I saw the issue. There was an inner flange to the collar which was not flush with the outer collar. Hmm I thought, “how can this be adjusted?”
I looked through a snuff tin of various parts and scraps from previous restorations and found a solution in true Redneck Merican fashion – a gun and a hammer. Well not really a gun but a spent .44 Mag case which had donated much of its length for a band at some time. I thought the brass case could be tapped with a hammer to straighten the flange of the collar.
It worked. Although it did take some fine tuning by flipping the collar ofer after adjusting too far.
The inner flange was eventually made flush with the outer edge of the collar.
Now when pressed back onto the shank, the stem stood upright perpendicular to the benchtop.
The collar was glued in place using brown cyanoacrylate (CA, super glue).
Since the shank was no longer fixed to the cob, I thought that I may as well trim the inside tobacco chamber end of the shank. I know this is not necessary but it was already apart so why not? I marked the excess shank with a pencil.
Below is the marked shank removed from the cob.
I used a cutoff bit in the Dremel rotary tool to cut the end from the shank and smooth it.
Once reinserted the shank end could be just seen.
The shank was glued into place using Elmer’s white general purpose glue. The glue was applied to both surfaces, pressed together tightly and allied to dry for 15 minutes.
Below is a photo of the mounted shank as it was drying.
Since I had a few minutes until the glue had dried, I thought, “why not use the new tapered bit from Vermont Freehand to open up the airway in the stem?”
I do hope that you have found something here useful to your own pipe care, maintenance, restorations or customizations. If you like this sort of thing, please click the like and subscribe buttons. Thank you for reading the ramblings of an old pipe lover.
Loading…
Below are a couple of photos of the finished Missouri Meerschaum Freehand.
Expecting perfection from a new corn cob pipe is kind of like expecting a perfect first date. Sure it can happen but more often than not the pipe will have flaws typical of cobs like a first date will undoubtedly have awkward, “damn, I should never have said that” moments. I recently bought three brand new Missouri Meerschaum Riverboat Gamblers with very pale complections, brass collars and white stems.
My thought was to dye the stummels black and make some very sharp looking custom cobs. Well the thought worked out well for two of the three pipes. The third pipe had a stem that was cracked at the base of the tenon. This crack led to a break while trying to remove the stem. This is not something that I have had occur with a new pipe but I wasn’t too upset by it thinking that this was an excuse to purchase a Forever Stem from Vermont Freehand for the pipe.
A drywall screw was used to pull the broken tenon from the shank.
“To the Internet!” was the battle cry. I chose and ordered a replacement stem from the great options from Vermont Freehand. The shipping was quick and I soon had a replacement stem. I still wanted to dye the cob and stem black as I was very happy with how the other two Riverboat Gamblers turned out.
I wanted to maintain the Missouri Meerschaum logo sticker so I covered it with Vallejo Liquid Mask. This is a quick drying latex that is used to keep paint from areas where it is not wanted. Once dried it can be easily peeled off.
The cob and stem were sanded with 320 and 400 grit sanding sponges. I do not like to go finer than that before dying briar due to my thoughts that finer sanding does not allow the dye to penetrate as well into the wood. I was not concerned with masking the band at the end of the shank since the brass collar would completely cover it.
Once the sanding was completed I prepared the dye gear. This included a cork to plug the tobacco chamber and act as a handle, a lighter for flaming the wet dye, a bend pipe cleaner as an applicator, a paper towel surface cover and the Fiebing’s Leather Dye in black. I also had a heat gun to heat the cob before applying the dye.
The cob was briefly heated then painted with the black Fiebing’s Leather Dye. The first coating was applied and quickly absorbed into the cob and stem. I tried to flame the stummel but there was just nothing to burn.
I applied a second coating of Fiebing’s this time the flaming attempt did work but very briefly. The pipe was taken to a vise where I clamped it and allowed it to dry overnight.
The next day I applied a third coating of black dye and set the pipe to dry for two hours. Once completely dry I wiped/rubbed the cob and stem with a paper towel to remove any of the dye that might come off on a person’s hands while handling it. I then proceeded to apply a coating of Danish Oil to the cob and stem. I used a fluffy pipe cleaner to apply the Danish Oil.
I allowed the Danish oil to dry for about an hour and applied a second coat. This one was allowed to dry for another hour.
I peeled the Liquid Mask latex from the logo sticker.
The mask did exactly what it was supposed to do and kept the dye from coloring the sticker.
The last steps included giving the pipe a couple of coats of carnauba wax with the buffer followed by a hand buffing with a microfiber cloth.
I do hope that you have found something here useful to your own pipe care, maintenance, restorations or customizations.If you are interested the two Riverboat Gamblers from the earlier customizations are available. Feel free to message me in the comments if you would like one of them. If you like this sort of thing, please click the like and subscribe buttons. Thank you for reading the ramblings of an old pipe lover.
Loading…
Below are some photos of the finished RIverboat Gambler 2.
How it looks after one bowl of Prince Albert. The light interior of the tobacco chamber is now properly colored, as well.
My love affair with Marxman pipes sometimes gets the best of me or worst of me. This pipe started out as just a typical listing on eBay for two pipes. The E. Wilke is the one that caught my eye and the Marxman was a deal sweetener.
I made an offer that was accepted. The seller messaged me saying that he broke the Marxman while putting the stem back on and that he was going to substitute a Dr Grabow pipe. I replied by saying that I bought the two pipes from the listing and did not want a Dr Grabow. We messaged back and forth, him saying the pipe was thrown away, me saying I’ll still take it but I wanted a discount of the original price. He eventually sent me the broken Marxman, though without the chipped piece from the shank and the Wilke. Below are some photos of the Marxman prior to work being done.
The glaring repair was the large chip from the shank. I thought the best way to fix this would be to cut a piece of briar from a donor pipe and carve it to fit. The whole piece would then be covered with a band. The replacement briar would provide the strength and fill the void. Other than that this looked like a typical restoration.
Background
I have restored numerous Marxman pipes and blogged about several. I will not go into great detail fawning over the amazing Robert Marx and his marketing genius. I will include a link to one blog where I detailed the history of the; company, myth, legend and the man that was Robert Marx. If you’d like a nice brief history, pipedia.org has a nice Marxman primer HERE.
The Restoration
The poor broken Marxman made its way to the workbench and a clean denim piece.
The first task was to find a donor pipe that was close in size. I found an old Bruyere Guarente with nearly the same diameter. I felt a little bit sad for the poor donor then looked upon the large number of fills in the old French billiard and thought that would live on in this Marxman.
I measured the approximate chip dimensions and marked them on the donor.
The ream team was gathered and included the PipNet, Smokingpipes Low Country Reamer and the General triangular scraper.
The PipNet #1 blades were used for most of the work. The #2 blades were just a bit too large for the tobacco chamber so the other two reamers were used to finish the scraping.
The tobacco chamber was then sanded with 220 sandpaper wrapped around a wood dowel. No heat damage was observed in the chamber.
Airway cleaning was next. The initial alcohol soaked cotton swabs and pipe cleaners came back black with smoking residue. The best part about the chipped shank was that I could get a little bit deeper into the shank with the dental scraper. The scraping produced a great deal of tar and yuck.
The cleaning continued with more alcohol, cotton swabs and bristle pipe cleaners. There was also more scraping and scrubbing with a nylon shank brush.
The stem was cleaned with 95% ethyl alcohol and bristle pipe cleaners. The tooth dents were filed with a small flat file.
The filing also addressed the reshaping of the button.
A couple of weeks ago Richard Messineo (BRIARVILLE TOBACCO PIPE REPAIR & RESTORATION) asked for my address. He said that he’d like to send me some of Briarville’s Stem Oxidation Remover to try. Apparently he had read the blog and still thought that Briarville should be associated with this blog. Weird, eh? Heck, I don’t even know if I want to be associated with some of the ramblings found here… Anyway, the Briarville Stem Oxidation Remover (Briarville deox) arrived and I was anxious to give it a try. The label said to leave the stem in the solution for between 2-24 hours. The solution was a lovely bright yellow and was far more liquid than the Before and After Extra Strength Deoxidizer (deox) that I have been using for the past several years. The Briarville deox also has a much less offensive aroma than my old deox. The stem received a pipe cleaner to act as a hanger to suspend the stem in the solution.
As I was cleaning the shank and stem I was thinking about the best way to cut the donor shank and remove the patch. I opted to use the Dremel rotary tool with a cutoff bit.
The large diameter would create a larger cut on the donor but the thin nature of the cutoff bit was a plus.
The cutting went without issue and provided me with a pretty good match to the chipped portion of the Marxamn. Some minor shaping was done to improve the fit with the flat surface of the cutoff bit.
Below you can see a rough fitting of the patch.
Here is the opposite side.
The stummel was taken to the sink for a scrubbing with undiluted Murphy Oil Soap and a nylon brush. The soap was rinsed with warm water and the stummel dried with a cotton hand towel.
I looked over at the Briarville deox. The stem had been in the solution for about an hour. I noticed there was a brown swirl at the bottom of the jar. Cool, it works.
Back at the workbench, the stummel looked better. The scrubbing revealed a couple of old fills that were quite soft, one on the left of the bowl and another on the right at the junction of the shank and bowl. I picked the old fill out of the pits with a fly tying bodkin.
I wiped the surface of the stummel with a make-up pad dipped in 95% ethyl alcohol.
Below is the pit picked of the old fill.
And the second pit.
The pits were filled with brown cyanoacrylate (CA, super glue) applied with a fly tying bodkin.
I then pressed briar dust into the pit. The new fill was then filed smooth and sanded with a 400 grit sanding sponge.
And the second fill.
The next day I returned to the stem. It had spent about 12 hours in the Briarville deox.
The stem was removed and placed on a coarse shop rag.
I vigorously rubbed the stem with the shop rag. Some oxidized vulcanite was removed by the rag.
Back at the workbench I examined the stem and compared the results between the two solutions. There was a light brown residue on the stem. The residue was also present in the stamping of the stem logo.
I wanted to treat the stem like I would if I were using the Before and After product so I scrubbed the stem with Soft Scrub on a make-up pad. The Soft Scrub removed more oxidized vulcanite. The light brown residue was removed with this scrubbing.
After the scrubbing I applied Before and After Hard Rubber Balm.
I gathered the stuff that I needed for the gluing of the patch into the chipped area. I wanted to use epoxy due to the more forgiving nature and longer setting time.
I wanted to glue the patch in place with the assistance of the tenon to keep this aligned. To keep the epoxy from adhering to the tenon, I applied a coating of petroleum jelly to the tenon.
Below, you can see the well greased tenon.
The epoxy was placed on all of the surfaces and clamped. The next three photos show various views of the clamp. This epoxy is said to set-up in 15 minutes. I let it sit for 30 before removing the clamp and stem.
While the epoxy was setting-up I measured the width of the brass band. I thought that a band that completely covered the patch looked too large for the size of this pipe. I chose to make the band a bit smaller and looked more appropriate.
After 30 minutes the clamp and stem were removed. The patch looked good. I thought that it provided good contact with the existing shank and the tenon. The band would provide the reinforcement strengthening the whole shank end.
I began filing the patch making the patch fit the contours of the shank.
There were small seams which I filled with brown CA and briar dust, as with a normal fill.
The above fills were smoothed with a file and sanding sponges. In preparations for the sanding, the shank stamps were taped on both the left and right sides.
The stummel was sanded with a series of sanding sponges from 320-3500. Between each sponge the briar was wiped with a make-up sponge moistened with alcohol.
The stummel was then worked with micro-mesh pads 4000-12000. Again, between each pad the stummel was wiped with a make-up pad wetted with alcohol.
To keep the joint from being rounded by sanding I wanted to sand it attached to the shank. I was not worried about rounding the shank end since it would be under the band but I still did not want to remove briar from the shank so, I wrapped it in masking tape.
The stem logo was taped over with masking tape for its protection. The stem was sanded with a series of sanding sponges from 320-3500 grit. Between sponges the stem was rubbed with mineral oil and wiped with a paper towel to remove sanding debris.
The stem was worked with micro-mesh pads from 4000-12000. Between pads I rubbed the stem with Obsidian Oil and wiped it with a paper towel.
The brass band was temporarily fitted. I could see that the filing and sanding of the shank end had made it lighter color than the rest of the shank. I thought that I could match the color better with a Furniture Touch-up marker. Oak was the color of choice.
Below you can see the stained shank end.
To glue the band in place I used brown CA applied to the shank and pressed the band in place against the workbench.
I thought the stem logo would look good in a color that accentuated the brass band so gold leaf Rub’nBuff was used. I first cleaned the logo stamping with alcohol on a cotton swab.
The Rub’nBuff was applied with a fly tying bodkin and worked into the stamping.
The Rub’nBuff was buffed off holding the stem and rubbing it on the denim work surface.
The stem was then re-oiled with Obsidian Oil.
The stummel received a coating of Before and After Restoration Balm and was allowed to sit for 20 minutes.
After the Restoration Balm worked its magic the excess balm was wiped with an inside out athletic sock.
The pipe was taken to the buffer to polish the brass band with white buffing compound.
After the metal polishing the pipe was wiped thoroughly and waxed with several coats of carnauba wax with the buffer.
The final step was a hand buffing with a microfiber polishing cloth further deepening the shine.
I think this Marxman turned out very well. I am still having internal debates as to the band width. I think it looks great with this band but I wonder if a band that concealed the whole scar would have been okay. The repair is solid and the stem fit is very good. I have no worries about the repair failing. The band looks like it is original and adds a flourish which improves the look of the pipe. The Briarville Stem Deoxidizer was a very nice product to work with. I cannot say at this point whether I prefer it or not over the Before and After Extra Strength Deoxidizer. More testing will be done on future restorations. I can say that it works well and is less messy to use. The stem looks great with no signs of oxidation but it was not a heavily oxidized stem to begin with. These dimensions of the Marxman lovat are:
Length: 5.20 in./ 132.08 mm.
Weight: 0.74 oz./ 20.98 g.
Bowl Height: 1.56 in./ 39.62 mm.
Chamber Depth: 1.37 in./ 34.80 mm.
Chamber Diameter: 0.67 in./ 17.02 mm.
Outside Diameter: 1.20 in./ 30.48 mm.
I do hope that you have found something here useful to your own pipe care, maintenance or restorations. If you like this sort of thing, please click the like and subscribe buttons. Thank you for reading the ramblings of an old pipe lover.
Loading…
Below are some photos of the finished Marxman lovat.
I am stepping a bit away from a restoration with this blog. These are brand new Missouri Meerschaums that I saw on sale from The Pipe Nook a while back. I was not terribly impressed with the color scheme but I thought that they would look lovely if dyed with black. The gold (brass) collar and the white stem looked amazing in my vivid mental image. Well, I ordered three of them and completely forgot about them until the day they arrived. Below are a couple of photos of the pipes upon arrival.
Background
The three pipes in my vivid mental image reminded me of the Three Amigos movie. Perhaps due to the color scheme of because I found both to be funny.
Corn cob pipes by their very nature make me think of down home utilitarian goodness. Nebraska, my home state, is known as the home of the University of Nebraska Lincoln (UNL) Cornhuskers. Immediately to our southeast is the state of Missouri, home of the Missouri Meerschaum Pipe Company. According to pipedia.org,
“Washington, Missouri has long been known as the “Corn Cob Pipe Capital of the World.” It was the Missouri Meerschaum Company, still the world’s oldest and largest manufacturer of the cool, sweet-smelling corn cob pipes, that began the tradition for which Washington became famous.
In 1869 Henry Tibbe, a Dutch immigrant woodworker, first began production of the corn cob pipe. Legend has it that a local farmer whittled a pipe out of corn cob and liked it so much he asked Henry Tibbe to try turning some on his lathe. The farmer was well-pleased with his pipes so Henry made a few more and put them for sale in his shop. They proved to be such a fast selling item that soon Tibbe spent more time making pipes for his customers than working with wood. Soon Tibbe went into full time production of corn cob pipes. In 1907, the H. Tibbe & Son Co. became the Missouri Meerschaum Company
The word Meerschaum is taken from a German word that means “sea foam”. It is a Turkish clay used in high grade pipes. Tibbe likened his light, porous pipes and their cool smoke to that of the more expensive meerschaum pipes and coined the name “Missouri Meerschaum” for his pipes. Tibbe and a chemist friend devised an innovative system of applying a plaster-based substance to the outside of the corn cob bowls. In 1878, Tibbe patented this process.
A nationwide distribution system was established for the sale of his pipes. Other pipe firms also developed; by 1925 there were as many as a dozen corn cob pipe companies in Franklin County, most of them in Washington. Today, Missouri Meerschaum stands alone as the first and only surviving piece of the living history. These gentle pipes are smoked and loved all over the world as well as being used as souvenirs, often imprinted with the name of the city, business or event.” (Missouri Meerschaum – Pipedia)
These three lovelies are brand new products of Missouri Meerschaum.
The Customization
The three amigos made their way to the workbench and nestled in with a clean denim piece.
I thought the natural rim of these pipes would look interesting if I kept it in it’s natural state. TO do this I planned on applying a coating of Vallejo Liquid Mask to the rim. This product is a liquid latex which dries quickly and will seal off the surface. It is used by model painters to keep paint off surfaces where paint is unwanted. Once dry it can be easily peeled off. I planned on pouring a small amount onto a try and dipping the rim into the Liquid Mask.
Well, the plan came to a quick detour. The liquid was thicker than I remembered it being so a fly tying bodkin was used to stir it and apply a layer to the rim.
As the mask dries it loses the pastel color and becomes more clear.
Below you can see the mask clearing. I sanded the stummel and shank with a 320 sanding sponge and followed that with a 400 grit sponge. The bare wood/cob was wiped with a make-up pad moistened with alcohol to remove sanding debris.
The dye of choice was Fiebing’s Leather Dye in black. I wanted to heat the surfaces to be dyed with a heat gun prior to the dyeing to help the dye penetrate.
The dye was applied with a folded pipe cleaner. I applied two coats and tried to flame the wet dye but most of the alcohol had evaporated. Instead I used the heat gun to apply heat to the stummel.
A third coat of dye was applied. This time it did flame but not much so the heat gun was used again.
Back at the workbench the stummel was allowed to dry for over an hour.
I was happy with how the cob and wood had taken the dye.
I peeled the Liquid Mask from the rim.
The mask worked brilliantly but I Was not sure if I liked the natural rim or not.
Tha base and the logo looked okay.
For pipe number two, I sanded as with number 1.
This time I applied the Vallejo Liquid Mask to the logo on the bottom of the pipe.
Below is the dye kit used for the second pipe.
Number two was dyed black.
A second coat of black on number two.
A third coat of black on number 2.
Both pipe 1 and 2 were set aside for an hour to completely dry. As I looked at the two side by side, I decided that I did not like the natural rim. I used a cotton swab to carefully apply Fiebing’s Leather Dye to the rim of pipe number 1.
I liked that better. Some dye made it past the cork plug and into the tobacco chamber with both pipes. I do not think this will be noticeable when smoked or if it is I’m sure it will be very temporary.
As the first two were dying st started on the third pipe. As I was twisting the stem loseI noticed it was cracking. As I continued it broke completely leaving the broken tenon in the mortise.
I used a drywall screw to remove the broken tenon piece. Hmm, not happy but this will be an excuse to buy a Forever Stem from Vermont Freehand. I think one of the light bone sems would look amazing. Stay tuned for that blog.
The natural and the black backgrounds for the logos both looked good to me so, I left it weil enough.
The next day I applied a coating of Nordicare Danish Oil to the black dyed surfaces. This was allowed to dry for an hour.
A second coating was added and allowed to dry for several hours.
I wrapped the shanks of both pipes with masking tape to protect them while I buffed the collars.
White buffing compound was used on the dedicated white wheel. This did put some smudges on the white stems but wiped clean with a cotton cloth.
The pipes were then lightly waxed using carnauba wax on the buffer.
The final step was a hand buffing with a microfiber polishing cloth.
I think these two corn cob pipes turned out very nicely. They match the vivid mental image I formed in my imagination when I first saw them. The whole process went pretty much as planned. I think the slightly matte finish goes with the whole cob character as does the slightly rough finish of the shank. The white stems are a beautiful contrast to the black dyed stummels and those polished brass collars add a touch of class few expect from a corn cob pipe. These pipes are ready for a classy night at the opera or at least Grand Ole Opry.
These dimensions of these two Missouri Meerschaums should be very similar, being lazy, I only measured one:
Length: 6.30 in./ 160.02 mm.
Weight: 1.31 oz./ 37.13 g.
Bowl Height: 1.80 in./ 45.72 mm.
Chamber Depth: 1.67 in./ 42.42 mm.
Chamber Diameter: 0.69 in./ 17.53 mm.
Outside Diameter: 1.48 in./ 37.59mm.
I do hope that you have found something here useful to your own pipe care, maintenance or restorations. If you like this sort of thing, please click the like and subscribe buttons. Thank you for reading the ramblings of an old pipe lover.
Loading…
Below are some photos of the finished Missouri Meerschaum Riverboat Gamblers.
I will probably catch grief for calling this a squat apple and be corrected by some saying it is a tomato or an author but to my eye, it looks like an apple and to be specific an Cortland Apple sans the anthocyanins and their red. Sorry, my previous life as a chemistry teacher emerged and demanded recognition. This plump little darling caught my eye along with its long shanked Marxman coconspirator. The eBay listing only had two photos, the below is a screenshot of one of them:
Those adorable chubby cheeks demanded that I buy the pair. There was a little bit of drama but I’ll leave that to the blog about the Marxman but after a few days wait, the E. Wilke and Marxman both arrived.
Below are some photos of the pipe prior to working on it.
Yeah, it had some issues but that shape, that amazingly round bowled shape. I was smitten. The stem looked like a Weber that had been left out in the sun. The pipe had obviously been smoked and showed the signs of moderate use, as shown by the charring and lava on the rim. There was also that strange dark streak of the right shank and that truly dreadful fissure on the bottom of the shank but those chubby cheeks could not be denied. I would reclaim this dilapidated doll and make her mine.
Background
E. Wilke stamped on the shank of this pipe refers to Edwin Wilke. According to pipedia.org,
“Edwin Wilke founded Wilke Tobacco in 1872. As the story goes, according to a 1937 New York World-Telegram article, he had no sons, and so he taught his two daughters, Anna and Louisa Wilke, how to make pipes and blend tobacco, and by his death in 1930 they were well versed in both trades, and adamant about only using quality briar. In 1950, when they were the focus of an article in the Sarasota Herald-Tribune, they were the only women pipe makers in the United States, and had sold pipes to Herbert Hoover, Lord Halifax, John Steinbeck and others. The sisters also blended pipe tobacco and repaired pipes. They did not, however, smoke pipes.
Wilke prided itself on “unpainted pipes”, and promised that only Macedonian briar was used, without paint, varnish, plug, or putty of any kind. As of 1950, some of their pipes were selling for up to $100.00, or just under $1,000.00 dollars today. By the release of a 1970 New York Magazine highlight of the shop, that claim had risen to $500.00, or over $3,000.00 today.
The Wilke Pipe Shop was located for decades at 400 Madison Avenue and 48th, in New York City, and in the 1970s opened a satellite store in the famed Wanamaker’s department store in Philadelphia, selling Wilke pipes made by Steven Johnson. In 1983, the brand was purchased by pipe maker Elliott Nachwalter and his wife, Carole Burns. They continued to operate the Madison Avenue store until the early 1990’s, at which point the couple moved to Vermont and Pipeworks & Wilke was born as a mail-order business.
Carole Burns[1] continued blending tobacco in Montpelier, Vermont till July 2017. Now John Brandt looks to continue blending Wilke’s traditional blends and bringing back some of the older blends from the early days to keep the 145 year old brand alive and growing.[2]“ (Wilke – Pipedia)
Now, this pipe did seem to fit a couple of the characteristics from the pipes.org article; it was unvarnished and it did not seem to have any putty filling imperfections in the briar. I cannot speak to the “Macedonian briar” as there is no stamp indicating the origin of the briar. I still think that the stem of this pipe reminds me of Weber made pipes from the same era. In researching further I found an old Google Groups discussion of E. Wile pipes from 2002. Here the user “” started a thread with the following,
“Can anyone give me a brief history about this manufacturer or brand? I
am curious about… if this was a NY company that made pipes, still in
The interesting part came from another user named “LDaneman”. LDaneman, states the following”
“As a former employee and pipemaker for Edwin Wilke Company, I can give you a
little history. The little shop on Madison Avenue was purchased by a Stanley Becker, a jewish NY lawyer. Some pipes were left over from Wilke’s hey-day, . . . I forget the name of the Italian pipemaker who did extra-large art deco shapes.
Through the 80’s the old (80+) tobacconist still blended up on the 4th Floor and I have fond memories of ‘time-traveling’ with him. The 524 blend was better than Dunhill, and the 400 was pretty good as well. The key was an unflavored golden Cavendish and a dark fine cut Cavendish in the 524.
I started a new pipemaking workshop in Philadelphia for Wilke’s concession shop in John Wanamaker’s department store. Our pipes made national news and we shipped tobaccos to European customers. My pipes sold from $65 to $1000 but our main pipemaker was Stephen Johnson. Last I heard Steve worked for Zino Davidoff.
Steve made some sweet smoking pipes and I smoke a few of my own make with the Wilke stamp, but still own a couple by Steve as well.
I was fired under dubious circumstances. The management of Wanamakers hated me since I successfully marketed Eltron razors when they failed, pens, and really hit the roof when I began blending a men’s fragrance.
Wilke in Philly folded less than a year after my departure into the perfume business and the New York shop was sold soon after that. I heard Wilke finally vanished after the buyer was hit with unpaid employee taxes and was bankrupted, but that is just a rumor to me, . . . I don’t know if that is true or not.
Most the Wilke pipes are not especially good, mass-manufactured by a factory whose name escapes me. Unless made by the old Italian fellow (an indented tenon is usually an indication of his make) or by Steve Johnson, . . . well just forget it.
Now, I have no reason to doubt anything that LDanman writes. The pipeda.org information indicates that the location of the Wanamaker’s in Philadelphia occurred in the 1970s and that LDaneman “Set up a new pipe making shop” on Wanamakers mezzanine. This too would likely be during the 1970s. His knowledge of the company is interesting but his jumping around in time, frustrating. The part about the Weber made pipes was particularly interesting as I thought the stem of this pipe looked like a Weber made stem.
The Weber connection is further supported by information again from pipedia.org,
“The firm grew to be one of the giants of the American pipe industry focusing itself in the middle price and quality zone. Trademark: “Weber” in an oval. Beside that Weber – especially in the years after 1950 – was a most important supplier for private label pipes that went to an immense number of pipe shops. Alone in New York, exactly the same pipes were found at Wilke’s, Barclay Rex, Trinity East, Joe Strano’s Northampton Tobacconist in Ridgewood, Queens, Don-Lou in Bensonhurst, Brooklyn… Nearly all pipes for Wilke were unstained and many models, for example the “Wilke Danish Bent”, could hardly deny originating of Weber.” (Weber Pipe Co. – Pipedia)
So, the question remains, “who made this pipe and when?” I honestly do not know. I feel pretty sure of my original thought that this was a Weber made pipe, likely from the 1970 or later. Produced for the E. Wilke company.
The Restoration
As usual the pipe made its way to the workbench and a clean denim piece. I actually undertook the restoration of two pipes during this project. That is not something I really like to do but my schedule has been filled with essential time sucking activities. Okay, I’ve been doing a bit of fishing and have not been at the workbench as much as I should.
The stem required some work before I could put it into the Before and After Extra Strength Deoxidizer solution (deox). This will be called pre-deox and involved; some scraping of calcium/oxidation, filing tooth dents and light sanding with a 400 grit sanding sponge.
The stem was also cleaning out internally with bristle pipe cleaners dipped in 95% ethyl alcohol.
The stem had trouble passing a pipe cleaner through the button so I did work on opening the airway a little bit. I used a tapered piece of an emery board to sand the interior of the airway.
The resulting airway was much better.
The stems of the two project pipes, the E. Wilke and another oval stemmed piece were suspended in deox with pipe cleaners as hangers. They each spent about four hours in the solution.
During this time I continued work on the E. Wilke stummel. The shank was cleaned out using a dental scraper, nylon shank brush, cotton swabs and pipe cleaners with 95% ethyl alcohol.
Once the shank was clean I turned to the tobacco chamber. The PiNet #1 and #2 blades along with the General triangular scraper and the Smokingpipes Low Country Reamer were used.
The below photo shows the results of each tool.
After reaming the chamber was sanded with 220 sandpaper wrapped around a wood dowel. The tobacco chamber showed no signs of charring or heat damage.
Next, the stummel went to the sink where it was scrubbed with undiluted Murphy Oil Soap and a nylon scrub brush. The soap was rinsed with warm water and the stummel dried with a cotton hand towel.
The scrubbing revealed an unsightly charred rim and a dark stain I thought was accumulated grime.
A second scrubbing of the stummel was done with no effect on the supposed grime.
Back at the workbench I got a good look at the two areas of concern. The charred rim would require topping and then some.
The rest of the stummel looked pretty good.
An alcohol wipe confirmed that there was no finish on the stummel.
I took the stummel to the counter where I laid a piece of 320 sandpaper flat on the counter.
Using a figure 8 motion I topped the rim removing the charred wood.
The results of the topping are shown in the photo below.
The charred area below the rim was lightly filed and I attempted to blend the filing to minimize the noticeability of the filing.
The dark streak on the lower right shank was some strange stain on the briar.
I have had good results using a saturated oxalic acid solution to bleach stains from wood and thought it might be useful for both the rim and the shank.
The oxalic acid was applied to the darkened areas with a cotton swab and allowed to sit for 20 minutes.
After the initial 20 minutes I applied more oxalic acid to the entire stummel. This was allowed to sit for another 30 minutes.
After the stummel was scrubbed a third time using Murphy Oil Soap and a copious amount of rinsing the stummel was dried using the cotton hand towel. Once dry the results of the oxalic acid were observed. The stummel looked better but not as good as I had hoped.
The darkened areas had been lightened but they remained darker than the surrounding briar.
I started repairing the blemish on the bottom of the shank. I know E. Wilke was proud of their “no putty” but that pit was unacceptable to me.
I applied brown cyanoacrylate (CA, super glue) to the pit with a fly tying bodkin.
A dental scraper was used as a spoon to scoop a small amount of briar dust and place it on the wet CA.
The back of the dental scraper was used to press the briar dust into the wet CA in the pit.
Additional brown CA was applied to the pit after the dust had been brushed off.
A second application of brown CA was applied once the first had cured.
After the second application had cured and set up, I filed the fill using a small flat file to remove the new fill material and smooth the surface.
The new fill was then sanded with a 400 grit sanding sponge.
I sanded the entire stummel with a 400 sanding sponge followed by a sanding with a 600 sponge. I was looking for additional spots which might require CA filling. I found none.
I figured the best way to conceal the darker areas caused by the charring or staining was to give the stummel a contrast dye. I thought a black undercoat of dye might be the perfect camouflage. I covered the stamp with painters tape hoping this would prevent the dye from dying the stamp area. It didn’t.
The stems were removed from deox and allowed to drip excess solution back into the jar.
The E. Wilke stem was vigorously rubbed with a coarse shop rag to remove both remaining solution and oxidized vulcanite.
The stem was then scrubbed with Soft Scrub cleanser applied to make-up pads. This removed more oxidized vulcanite.
Below you can see the E. Wilke and the other restoration victim. Both stems had been oiled with mineral oil after their Soft Scrub ordeals.
The dye kit was gathered. It consisted of Fiebing’s Black Leather Dye, a cork to keep dye from the tobacco chamber, a lighter and a pipe cleaner as an applicator.
The Fiebing’s Dye was applied and flamed, burning away the alcohol solvent of the dye and fixing it to the briar.
The stummel was then rinsed with 99% isopropyl alcohol and wiped with a paper towel.
Back at the workbench the results of the black dye can be seen. The dye penetrated the softer grained briar more than the harder grain. A light sanding removed the outermost layer of briar revealing lighter and darker areas due to penetration depth.
Below is a photo of the sanded stummel.
The stem and stummel were then sanded with a series of sanding sponges from 400-3500 grit. The stummel was wiped with an alcohol dampened make-up pad between each sponge while the stem was rubbed with mineral oil and wiped with a paper towel between sanding sponges.
The stem and stummel were then worked with micro-mesh pads from 4000-12000. Again stummel wiping with an alcohol make-up pad between micro-mesh pads was done. Between pads the stem was runned with Obsidian Oil and wiped with a paper towel.
The pipe was then taken to the buffer where it received several coats of carnauba wax.
The final step was a hand buffing with a microfiber polishing cloth.
Overall, I am very pleased at how well this E. Wilke pipe turned out. Though it is likely not an example of the highest quality E. Wilke pipe of the company’s heyday, still is a lovely little piece. The contrast stain did a good job of concealing the blemishes that the pipe accumulated over the years of use. The stem polished up nicely and the glossy black accentuated the light and dark grain from the contrast dye. The thick walls and the cheekiness that they provide are even more pronounced with the finished pipe than they were when it arrived and I think it is far more attractive now. The dimensions of the Carlyle Oval Shank Dublin are:
Length: 5.00 in./ 127.00 mm.
Weight: 1.08 oz./ 30.62 g.
Bowl Height: 1.42 in./ 36.07 mm.
Chamber Depth: 1.06 in./ 26.92 mm.
Chamber Diameter: 0.72 in./ 18.29 mm.
Outside Diameter: 1.58 in./ 40.13 mm.
I do hope that you have found something here useful to your own pipe care, maintenance or restorations. If you like this sort of thing, please click the like and subscribe buttons. Thank you for reading the ramblings of an old pipe lover.
Loading…
Below are some photos of the finished E Wilke Squat Apple.
You could call this little pipe a Custom-Bilt knock off. This pipe is stamped SHORT over SNORTER on the left shank. It has that very Custom-Bilt look to it but it is diminutive. It reminds me of Dr. Evil and Mini-Me from the Austin Powers movies.
The term “short snorter” according to Google Is less comic,
“Origin: The tradition began before World War II, with bush pilots in Alaska signing bills as a sign of good luck and a way to remember their travels.
Meaning and Purpose:
“Snort” was slang for a shot of liquor, and “short” meant a smaller amount, so a “short snorter” was a way to remember a small drink or a flight”.
This pipe would certainly be that, a short smoke allowed by a small pipe. Below are some photos taken before I did anything but remove the stinger.
The pipe looks to be in good condition. There were still tobacco remnants in the tobacco chamber. The cake and the lava on the rim suggested the pipe had seen use. The stinger was quite stuck in the stem before I took the above photos. I had to soak the tenon for about 30 minutes and did quite a bit of wiggling of the stinger as I held it between the fold in a piece of leather and pliers. There were a couple of spots which needed to be filled and of course the usual cleaning.
Background
I really have no idea who made this pipe. Searches for “Short Snorter” yielded nothing on both pipedia.org and pipephil.eu. The big Custom-Bilt book, “Individual as a Thumbprint” The Custon-Bilt Pipe Story by William E. Unger also makes no mention of the Short Snorter though it does discuss a marketing scheme where a person could pick up a miniature pipe and a gift certificate for a person. The person could then keep the miniature pipe and exchange the certificate for the pipe that they wanted from the retailer.
I searched Short Snorter in the blog posts of Steve Laug (it’s a rare day when I restore a pipe brand that Steve has not worked with) there I came across a restoration by Dal Stanton, “Short Snorter Imported Briar” (https://rebornpipes.com/tag/short-snorter-pipe/). Dal’s search for information on the Short Snorter was more productive but not by much,
“In the little I found on the internet about the Short Snorter, it is described as a nose burner or as a pocket pipe, but most often with other shapes than the horn. Steve looked up the Short Snorter in the book, Who Made That Pipe, and it indicates that it was made by Weber or Wally Frank. With that information, I looked at old Wally Frank catalogues, but did not see the Short Snorter. I suppose the name is apropos, but I think a lady pipe smoker would give this pipe a look see.” (https://rebornpipes.com/tag/short-snorter-pipe/)
In conclusion the Short Snorter appears to have been made by Weber of Wally Frank after World War Two. I say after WWII because of the IMPORTED BRIAR stamping which was something added to reassure customers that briar was once again used in the pipe.
The Restoration
The restoration began with the stinger taking a dip in a medicine cup of 95% ethyl alcohol and the pipe proper, getting a cleaned piece of denim.
Ithen wiped a bristle pipe cleaner with toothpaste and clamped one end in the vice. I pushed the other end through the stem and buffed the airway with the toothpaste enriched pipe cleaner.
The tooth chatter was filed with a small flat file to remove the dents.
I turned my attention to the stummel. The dental scraper got quite a workout here removing the crunchy caked tar and smoking residues. Alcohol dipped pipe cleaners and cotton swabs were also used.
The reaming was surprisingly productive for such a small pipe.
Once reamed, the interior of the tobacco chamber looked good and showed no signs of heat damage.
Next came the scrubbing of the stummel’s exterior. This was done with undiluted Murphy Oil Soap and a nylon brush. The soap was rinsed with warm water and the stummel dried with a cotton hand towel.
Back at the workbench the stummel was wiped with a make-up pad dipped in 95% ethyl alcohol.
I used the make-up pad to scrub a little bit more on the rim to get rid of the remaining lava.
There were two areas which I thought needed to be filled. One small sand pit where the shank met the bowl. The pit was small and I thought that it would fill with brown cyanoacrylate (CA, super glue).
The other area was on the rin and right side. This area required CA and briar dust to fill the gap on the rim and CA alone on the side.
I allowed the CA to cure and filed the shank fill with a half-round file.
The rim and right side needed to be retextured to match the existing rustication or carvings. I did this with a rotary tool and a small carving bit.
Below you can see where the fills look like a crack. This was only superficial and did not penetrate through the side wall of the bowl.
The re-rusticated carvings looked good as I attempted to match the contours of the original carving.
The rim recarvings were nearly unnoticeable.
The shank was taped with masking tape to protect it from the stem sanding. I wanted the stem and stummel intact for the sanding to avoid any rounding of the joint between the two.
A series of sanding sponges from 40-3500 were used in sequence. Between each sponge I rubbed mineral oil onto the stem and wiped it with a dry paper towel to remove sanding debris.
The stem was then worked with micro-mesh pads 4000-12000 grit. Between each of these pads I applied a small drop of Mark Hoover’s new Hard Rubber Balm, rubbed this onto the stem and wiped the stem with a paper towel.
The stummel then received a coating of Before and After Restoration Balm and was set aside to what I thought would be 15-20 minutes. It turned out to be the next morning.
The next morning I hand buffed the remaining Restoration Balm from the stummel with an inside out athletic sock.
The pipe was then taken to the buffer where it received several coats of carnauba wax on the stem and smooth surfaces of the stummel.
The final step was a hand buffing with a microfiber polishing cloth.
This little pipe was a fun project. I am enjoying practicing with the Dremel tool and improving my carving techniques. The blending of repairs to original rustications is a challenge which I find very enjoyable. This demure darling turned out very nicely. I have a Custom-Bilt with a near identical shape and seeing them side by side is quite amusing. The fills and re-carvings turned out beautifully and are only noticeable under serious scrutiny. The stem polished up very well with the glossy black complimenting the rustic carved rich brown of the stummel. The dimensions of the Short Snorter are:
Length: 3.92 in./ 99.57 mm.
Weight: 0.66 oz./ 18.71 g.
Bowl Height: 1.50 in./ 38.10 mm.
Chamber Depth: 1.09 in./ 27.69 mm.
Chamber Diameter: 0.63 in./ 16.00 mm.
Outside Diameter: 1.12 in./ 28.45 mm.
I do hope that you have found something here useful to your own pipe care, maintenance or restorations. If you like this sort of thing, please click the like and subscribe buttons. Thank you for reading the ramblings of an old pipe lover.
Loading…
Below are some photos of the finished Short Snorter.
I love it when an attractive pipe comes across the bench that is stamped with a rather obscure maker. In this case S. Johnson and SFJ on the stem as well. Pride in workmanship and putting one’s name on a pipe is something that I find interesting. I’d never heard of S. Johnson and I have to say that this pipe was not the focus of purchasing the estate lot which it was featured in. The entire lot looked interesting and I couldn’t believe that I was the only bidder. Below is the original eBay listing photo.
The lot came to me from Ipswich, Massecheutets (dang, I can’t believe I spelled that right the first time) in mid-January of 2025. I guess not everyone gets excited about oxidized broken pipes with one missing a stem. The S. Johnson pipe had a broken acrylic stem and a reverse tenon. The stampings on the pipe were: S. JOHNSON over XXQ offset 8 on the left shank, HANDMADE over U S A on the right shank and SFJ stamped on the stem with a gold paint filling the impressed stamping. Below are some photos of the S. Johnson pipe prior to work. I was trying a white background for the initial photography of this restoration. I am unsure but generally not liking the white. Please feel free to comment.
The issues with this pipe seemed to increase upon close examination. The obvious ones were the chipped mortise and tooth marks on the stem. The plug on the bowl would require some serious investigation regarding the condition of the tobacco chamber but it looked as if it were professionally done. The reason why it was done is the thing which worried me. The exterior of the stummel looked great. I guess I need to focus on the positives and be glad I don’t have to worry about oxidized vulcanite.
Background
I was glad to see that there was information on S. Johnson on both of my “go to” pipe researching sites. I first found him mentioned on pipephil.eu. There I discovered the S. stood for Steve. Below is the pipephil.eu information.
Research stop number two was pipedia.org. Here I found a short entry and have included it in its entirety:
“Steven Johnson made his first pipe at the age of 9, as a friend had accidently dropped his pipe in a stream while fishing. This is according to an article in the Boca Raton News on May 16, 1982. It says further that by the age of 20 he had become a master pipe maker. He worked as the manager of the E. Wilke pipe shop, since 1977 was located in a large department store called John Wanamakers in Philadelphia. For his own pipes he’s reported to have produced 3 pipes a day, 6 days a week. His pipes are rare to find and are marked S. JOHNSON.
Richard Esserman, in an article entitled “Pipe Travels”, wrote of meeting Steve Johnson in 1978 at Wanamaker’s. At the time Johnson made pipes for Wilke’s in a small room right in the middle of the department store. The two became friends, and Esserman comments on one pipe going to the Wilke shop in New York City with an asking price of $500.00, a substantial sum in those days for any pipe.
In “Trial By Fire”, an article in Pipes and Tobaccos magazine by William Serad and Tad Gage, Mr. Serad speaks of Steve Johnson working as the manager of the satellite store in Philadelphia in the early 1970’s, and again offers great compliments to Mr. Johnson’s work.
Mr. Johnson is believed to have moved on from the Philadelphia Wilke’s shop to working for Zino Davidoff.
Markings: No. 1 BROAD STREET, (J.W), MADE IN ENGLAND (round stamping) made in the 1930’s-40’s timeframe reportedly by Comoy’s for the tobacco shop in the John Wanamaker department store in Philadelphia, located at No. 1 BROAD STREET. It’s stamped with the (J.W) logo and the early 1930’s-40’s circular MADE IN ENGLAND country of manufacture stamping. Here’s some info on the stamping from Trademark history: J.W. On Tuesday, April 18, 1933, a U.S. federal trademark registration was filed for NO. 1 BROAD STREET by JOHN WANAMAKER PHILADELPHIA, PHILADELPHIA. The USPTO has given the NO. 1 BROAD STREET trademark serial number of 71336921. Made for them by Comoy’s. The NO. 1 BROAD STREET trademark is filed in the category of Rubber Products . The description provided to the USPTO for NO. 1 BROAD STREET is SMOKING TOBACCO.” (Steven Johnson – Pipedia)
The last paragraph there was pretty much discussing the building that the pipe shops were in. I did not include the images as this blog is already a long one. So, Steven Johnson must have been a pipe making progeny and he got to live the dream of making pipes and working in pipe shops throughout the 1970s. If any of you would like to make this S. Johnson yours for $500, PLEASE say something in the comments. In all seriousness I’ll sell it for far less than $500.
The Restoration
The first step was to poorly focus on the S Johnson while it sat on a cleaned denim piece.
Next came the evaluation of stem banding material. I checked available spent cartridges for the correct size, thinking that one might look cool and the more traditional brass tubing. The diameter needed was .50 inches which coincided nicely with a 300 Winchester Short Magnum that I picked up somewhere.
The rifle case was tarnished but would polish up nicely. The question was, how to bore out the interior to fit the stem. Hmm, good thing I don’t have a lathe (said with extra sarcasm). I do know a great machinist though. I will call him Christian, because that is his name. I have employed the use of Christian’s unique skill set on other restorations here and here, if you are interested. More on Christian in a bit.
The stem had a large chip removed due to a previous break. My thought was to add a “band” to the stem, thus concealing the chipped portion and also filling it with epoxy within the band.
While considering the stem repairs I proceeded on to reaming the tobacco chamber. The tools needed were the PipNet, Smokingpipes Low Country Reamer and the General triangular scraper.
The pipNet with the #2 and #3 blades worked well for the deep chamber but (dramatic pause)
there was a good deal of extra scraping that required the General.
Eventually the chamber looked pretty well reamed. There was charring damage observed within the tobacco chamber. It was not severe but it was an issue which would require attention.
Next, the lava on the rim was addressed.
This was softened with saliva and scraped with a sharp pocket knife.
The stummel was taken to the sink for a scrubbing with undiluted Murphy Oil Soap and a nylon brush. The soap was rinsed with warm water and the stummel dried with a cotton hand towel.
Back at the workbench the stummel was wiped with 95% ethyl alcohol on a make-up pad.
The shank was cleaned out using numerous bristle pipe cleaners dipped in the ethyl alcohol and a nylon shank brush.
I had reached out to Christian to ask when he would be available to assist with this project. The date was February 4. The project was put on hold until February 25 when I could make it to Christian’s new machine shop. Once there I showed him what my thoughts were regarding the band. He immediately thought that the cartridge would make a cooler looking band than the brass tubing or, maybe he relished the greater challenge of the cartridge.
The cartridge was measured and cut using a lathe. The edge was then slightly beveled.
I neglected to photograph the next steps, I know, loser move. I will try to explain them. A boring bar was used on the lathe to bore out the interior of the cartridge giving it an equal inside diameter with a flat bottom. This bottom would be the resting place for the end of the acrylic stem. The outside diameter of the tenon was measured and an appropriate drill bit was selected. The primer pocket was enlarged to .25 inch. The brass was then polished on Christian’s buffer.
Back at home I assembled the stem and fit it to the stemmel. Everything looked like it was coming together nicely.
Below are a couple of photos of the parts at this juncture.
I needed to build up epoxy to replace the chip on the stem. I found a surrogate stem which fit the mortise of the real stem nicely. This was greased with petroleum jelly to avoid the epoxy from sticking.
The surrogate was inserted into the stem. This would prevent the epoxy from getting in the hole meant for the tenon insert. The two part epoxy was mixed and added to the chipped area. I had to continuously rotate the stem for about 15 minutes while the epoxy was setting up.
Once the epoxy had set I removed the surrogate.
It would take the epoxy a full 24 hours to completely harden but the chip had been filled. While the epoxy was still soft I used an exacto knife to trim the edge flush with the original edge.
I could work on the tooth chatter while the epoxy was curing. I cleaned the top and bottom of the bite zone with acetone.
Once cleaned, I used Thin clean cyanoacrylate (CA, super glue) to build up the tooth dents.
This was repeated on the opposite side of the stem.
The CA was allowed to cure then was filed with a small flat file and smoothed with a 400 grit sanding sponge.
Additional applications of This CA were used until the depressions were completely filled.
The airway of the stem was then cleaned using pipe cleaners dipped in 95% ethyl alcohol.
With the epoxy on the stem needing time to completely harden, I returned to working on the stummel. The rim had some charring that I wanted to remove. This was done by lightly topping the pipe.
A piece of 220 sandpaper was laid flat on the counter and the rim sanded using a figure 8 motion. I rotated the stummel in my hand and repeated the sanding a few times.
The topped rim looked much improved.
The next day I couldn’t help but think I was mistaken about the reverse tenon of this stem. I gripped the tenon insert with a jaw-taped pliers and gave it a twist. The tenon insert came out. I felt kind of dumb for not realizing that the tenon of this pipe was completely normal and that the tenon insert was not reverse but that the broken stem had merely released the gluck holding the tenon insert in the stem. DOH!
I used the two drill bits in the above photo to clear and clean the hole in the stem. The brass was roughened up with a piece of 80 grit emery cloth to allow epoxy to better adhere.
The tenon insert was test fitted to the stem. The airway looked very nice and clear.
The tenon insert was roughened up with the emery cloth again to allow better contact with epoxy.
The brass was thoroughly cleaned with acetone. The epoxy was mixed and applied to the tenon insert and to the brass.
The tenon insert was seated into place.
A pipe cleaner was run through the airway from the button out through the tenon insert to clear any epoxy which may have intruded.
The excess epoxy was removed using a cotton swab then was wiped clean with a soft cotton cloth wetted with acetone.
Next came the sanding of the briar. The stamps were both masked with painters tape for their protection.
The tape was cut in slightly irregular shapes to better conceal the lack of sanding immediately around the stamps.
The inner rim was beveled by sanding it with a small wood ball wrapped in 220 sandpaper to mask the slight rim charing.
The exterior of the stummel was sanded with a series of sanding sponges from grits 400-3500. Between each sponge the stummel was wiped with a make-up pad moistened with ethyl alcohol.
The stummel was then worked with micro-mesh pads from 4000-12000 grit. Between each pad the stummel was wiped with an alcohol wetted make-up pad.
The stummel received a coating of Before and After Restoration Balm and was set aside for 15 minutes to allow the balm to work its magic.
The excess balm was wiped away with an inside out athletic sock.
The brass and stem were buffed using white compound on the buffer.
I wanted to revitalize the gold which the stem logo had. I used Run’nBuff Gold Leaf for this. The metallic wax was applied with a fly tying bodkin and buffed with a soft cloth.
The surrounding area was then cleaned of any gold using a cotton swab dipped in acetone.
The pipe then received several coats of carnauba wax with the buffer.
To address the charring of the tobacco chamber, I decided to give the pipe a bowl coating. I applied a light coating of 100% pure maple syrup to the interior with my finger tip. I ran a pipe cleaner up to the inner edge of the chamber via the mortise. This would act as a plug to keep the charcoal dust out of the airway.
A capsule of activated charcoal powder was then dumped into the chamber and placed a piece of painters tape over the rim.
The stummel was shaken for over a minute. The shaking was interrupted by me tapping the stummel on the denim covered workbench from several different sides. The goal was to evenly disperse the carbon powder. The tape was removed and the excess charcoal was dumped in the trash. I then blew air through the shank and avoided the black cloud of dust.
The final step was to hand buff the pipe with a microfiber polishing cloth.
This was a long restoration with several interesting twists. The whole misidentification of the reverse tenon made me feel foolish. I am not sure why the bowl was plugged. The interior of the tobacco chamber showed some light charing but did not show signs of excessive scraping. The plug looks very professionally done with a minimal footprint. The finish on the pipe with the checkering is interesting and something I think of with rifle stocks and not pipes. It does make the 300 Winchester Short Magnum brass more appropriate though.The color of the acrylic stem blends in well with the brass. Overall it turned out as a very large beautiful billiard which will hopefully give someone many more years of enjoyment. The dimensions of the S. Johnson 8 are follows:
Length: 8.76 in./ 222.50 mm.
Weight: 2.27 oz./ 64.36 g.
Bowl Height: 2.74 in./ 69.60 mm. (bowl only) 1.70 in. / 43.18mm (with tube)
Chamber Depth: 2.58 in./ 65.53 mm.
Chamber Diameter: 0.84 in./ 21.34 mm.
Outside Diameter: 1.47 in./ 37.39 mm.
I do hope that you have found something here useful to your own pipe care, maintenance or restorations. If you like this sort of thing, please click the like and subscribe buttons. Thank you for reading the ramblings of an old pipe lover. Oh, I almost forgot. I do not like the white background. Perhaps it’s my lighting but, I find the black better for me and my photography.
Loading…
Below are some photos of the finished S. Johnson 8.
Dr Grabow, a name that introduced many a young pipemen or pipewomen to the hobby of pipe smoking. The accessibility of Dr Grabow pipes, found in every drugstore and in my case, a 7-Eleven, made for easy and affordable acquisition of a first pipe. This would have been in the early 1980s. Throughout the 1970-1980s period I fondly remember many of the older neighbors sporting pipes as they went about their suburban outdoor rituals. When this Dr Grabow Omega came to me as part of an estate pipe lot I was immediately reminded of those memories. My record keeping is poor but I think this was one of 12 pipes which came to me in September of 2024. The poor Omega had been patiently waiting for some workbench time. The pipe was stamped OMEGA over DR GRABOW on the left shank and IMPORTED BRIAR on the right. Below are some photographs of the pipe prior to work done.
This was obviously a seldom smoked pipe. I doubted that more than a couple of bowls of tobacco had burned through this specimen. The rim looked nearly pristine. There was one unsightly fill on the shank which just touched the “DR” stamp. “That might be troublesome to replace”, I thought. The finish was not of the clear coat variety, which made me happy though the oxidation of the vulcanite stem would have to be dealt with. I have restored a couple of Omegas and have found that not all of them used vulcanite as stem material. I wondered if that could be used as an indicator of age. The Omega also had a brand new paper filter in the stem.
Background
Dr Grabow pipes did not all start out as Dr Grabows. Prior to that name they were Linkman’s which was preceded by ML&C (Mary Linkman & Company). I will let the following sites tell the story for those interested in pursuing the history of this venerable pipe maker.
One site that I like to use for Dr Grabow research is a timeline written by Tiki Vegas. If that is a real name, kudos to their parents. The timeline runs from 1953 to 2006. I assume that the 2006 date is when the timeline was published. The timeline is partially interactive and gives a nice graphical representation of various Dr Grabow lines and models. Below is a sample of what the timeline looks like:
In booking for Dr Grabow Omega pipes today, I found them on Amazon so it appears that they remain in production at present. The well pipe description is most likely a kind way to note that the pipe is designed copying the renowned Peterson System. To its credit, the well of the Omega is drilled to approximately ¼ inch or 6 mm. below the draft hole, which would allow for water to condense out of the smoke and accumulate in the well. The stem of the Omega even sports a rounded P-lip style button but with the draft hole proceeding straight through the stem rather than being directed up as a true P-lip should do.
The Restoration
The Omega was placed on a cleaned denim piece to protect the work surface.
I wanted to get the stem into the Before and After Deoxidizer (lovingly referred to as deox from here on) solution quickly as I wanted to finish this project in one night. The stem was lightly sanded with a 400 grit sanding sponge.
A pipe cleaner was inserted into the button to act as a hanger suspending the stem in the deox.
With the stem in deox, I turned my attention to reaming the tobacco chamber. Fortunately I didn’t need very much attention because the chamber was nearly new.
I did use the PipNet #1 blade.
It barely had anything to remove. I was surprised by the fact that the chamber on the Omega was this small. It feels like a much more substantial pipe. It does have very nice thick walls though.
I did a bit of scraping with the General triangular scraper I had ground the tip of this tool round on a grinder. The factory tip was frighteningly sharp.
The tobacco chamber was reamed and looked pretty much like it did before I started.
Sanding it with the 220 sandpaper wrapped around a wood dowel made it look like new. You could even see the chuck marks on the interior from turning the bowl at the factory.
Next came the scrubbing. This was done at the sink with undiluted Murphy Oil Soap and a nylon scrub brush. The soap was rinsed with warm water and the stummel dried with a cotton hand towel.
Back at the workbench, I wiped the exterior and interior with a make-up pad dipped in 95% ethyl alcohol. On the photo below you can see the pinkish hue from the little bit of stain the pad picked up while the brown is from inside the tobacco chamber.
I started picking at the fill on the left shank. It was hard and secure but I didn’t like the look of it.
Soaking it with a cotton swab dipped in acetone softened it up very quickly.
The fly tying bodkin was able to pick the chemically softened old fill out much more easily.
Now for the harder part, replacing the old fill. I used the fly tying bodkin to carefully lay a bead of brown cyanoacrylate (CA, super glue) into the depression.
I then scooped up briar dust on a dental scraper and pressed it into the wet CA and brushed off the excess.
The dry briar dust was then topped with another bead of brown CA. This was allowed to cure for 10 minutes or so until hard. I then filed the new fill smooth with a small flat file and sanded it with a 400 grit sanding sponge.
I topped the fill a third time with thin CA. I applied this by putting a small drop on the bodkin and used it to transfer the CA to the fill.
This was then smoothed with the flat file and sanding sponge again.
I carefully sanded around the stampings trying to blend the sanded area to the stamped area.
This sanding was done on both sides of the shank.
The smooth surfaces were then sanded with a series of sanding sponges from 400-2000 grit. Between each sponge I wiped the stummel with a make-up pad wetted with alcohol.
The smooth areas were then micro-meshed from 4000-12000 with alcohol wiping between the pads.
The stummel then received a coating of Before and After Restoration Balm applied with a baby toothbrush and was allowed to sit for 15 minutes.
The Restoration Balm was wiped from the stummel using an inside out athletic sock to remove excess balm.
Buffing the aluminum collar was nex on the list. I taped off the shank to protect it from buffing with masking tape.
I used the white buffing compound on the dedicated white wheel which is far from white.
The stummel looked very nice. Time to retrieve the stem.
The stem was removed from deox and allowed to drip excess solution back into the jar.
I like to use a coarse shop rag to vigorously rub the remaining deox from the stem. The rough material absorbs the solution and removes more of the oxidized vulcanite.
Below you can see the oxidized vulcanite that comes off with rubbing.
Back at the workbench I used Soft Scrub cleanser on make-up pads to remove more of the oxidized vulcanite. The stem was cleaned out using cotton swabs and pipe cleaners.
After the Soft Scrub I got lazy and tried to just buff the remaining oxidation from the stem. Just like always, it didn’t work. The next three photos show a nice shiny stem with traces of oxidation.
So, back to the sanding sponges… Oh wait, I do have something new to try and tell you about. Mark Hoover, the brains behind the Before and After products, sent me a bottle of Before and After Hard Rubber Balm. I told him that I would try it so, try it I shall. The stem was sanded with sanding sponges 400-3500. Between each pad I rubbed the Hard Rubber Balm onto the stem using my fingertips. I then wiped the excess off with a paper towel. In the past I used mineral oil for this step. The Hard Rubber Balm is more viscous, thicker, than mineral oil. Being a heavier oil, I think that it would vaporize/evaporate more slowly making it preferable to mineral oil for sealing vulcanite away from the oxygen in air. I do not know if there are any antioxidants added to the formulation as there are no ingredients listed on the bottle.
After the sanding I returned the stem to the buffer. I will master using a buffer to remove oxidation if it kills me. I used the white compound and the “white” wheel for the buffing. When finished I wiped the stem with a soft cotton cloth to remove any buffing compound and oiled the stem with the Hard Rubber Balm. It looked much better without the brown haze of oxidized vulcanite.
The pipe was waxed with several coats of carnauba wax at the buffer. I did not buff the carved surfaces as I feared they would trap wax and lead to a buildup of dirt and grime.
The final step was a hand buffing with a microfiber polishing cloth.
I always enjoy working on Dr Grabow pipes. Perhaps it is the history of the brand. This pipe did not disappoint. Yes, it is a factory made pipe but the quality of the drillings and the fit of the parts is excellent. The rustication works well with this shape and the carvings fall in line with the pipe’s curves. The one large flaw in the briar was reworked and turned out as well as could be expected. The vulcanite stem polished up pretty well and contrasts the rustication quite nicely. The dimensions of the Dr Grabow Rusticated Omega are follows:
Length: 5.06 in./ 128.52 mm.
Weight: 1.27 oz./ 36.00 g.
Bowl Height: 1.17 in./ 29.72 mm. (bowl only) 1.70 in. / 43.18mm (with tube)
Chamber Depth: 0.82 in./ 20.83 mm.
Chamber Diameter: 0.85 in./ 21.59 mm.
Outside Diameter: 1.49 in./ 37.85 mm.
I do hope that you have found something here useful to your own pipe care, maintenance or restorations. If you like this sort of thing, please click the like and subscribe buttons. Thank you for reading the ramblings of an old pipe lover.
Loading…
Below are some photos of the finished Dr Grabow Rusticated Omega.
The white whale of the Marxman world resurfaced the other day on eBay. The elusive The Four Hundred. This sighting was of an abused stummel. Some bugger had raided the poor pipe for both it’s stem and 14K gold band. I had vivid mental images of a young man disassembling grand dad’s old pipe to abscond with the band and use it as an engagement ring for a high school sweetheart. I can only hope that it worked and that he and the 20 mm fingered bride-to-be are still together. Yeah, an imagination can be a terrible thing.
Of course, I bid on the stummel and actually won it for less than $40 with shipping. I guess there is a fool born every minute. The stummel travelled from Waynesville, Georgia to the frigid wilds of southeast Nebraska. Upon arrival the stummel appeared as the photos below indicate.
She looked a bit rough, far worse off than the first Four Hundred appeared. Here is a link to that restoration if you are interested. The first Four Hundred was also missing the original stem and band. Coincidence or global conspiracy? Hmm, I do love a good conspiracy theory. Unfortunately, my imagination is all tired out from the previous vivid mental image. This stummel would need a new band and stem. It had numerous areas where the old fills were showing through in a less than attractive fashion. There was an ugly dark stain on the heel, right on the stamp. That would also have to go. Dents and dings from use were also scattered about the briar. The good news was that the stummel appeared to be very structurally sound. The damage was all cosmetic.
Background
Being a proud member of Generation X, also known as a Slacker, I will reuse the background section from the first Marksman The Four Hundred restoration below. Heck, I’ll even give myself credit for the quote.
“According to pipedia.org: “The Four Hundred was Marxman’s best series, characterized by very large pipes. Similarly famous was the Marxman Heirloom Pipes series, with around 80 pieces produced by well-known North American sculptors, such as Jo Davidson, Cecil Howard, Charles Kopp, and RD Lewis, contracted by Bob in 1947. Today these pipes are genuine collector’s items. The series included animal and human figures, selling at extremely high prices for the time.” (https://pipedia.org/wiki/Marxman)
I have restored and blogged about several Marxman pipes over the past year. I will include a few of them here if you are interested in more of the history of the brand.
I do have to add a little bit more information about Robert Marx. While sharing the previously mentioned restoration blog with another Marxman aficionado, they (pipesmagazine.com forum member: telescopes) brought a little known fact to my attention. The legendary Robert Marx created the first slow smoking competition. According to the Club History of the International Association of Pipe Smokers’ Clubs,
“The International Association of Pipe Smokers’ Clubs, Inc. was founded in October of 1949 and incorporated in the State of New York, City of Schenectady, County of Schenectady, on July 15, 1952.
Mr. Robert Marx, founder of the famous Marxman Pipe, was the first man to put on a Pipe Smoking Contest. He owns the world’s most famous pipe, sculpted by Joe Davidson, that is insured for $7,500.” (https://www.iapsc.net/history.html).
Just when I thought that Robert Marx’s marketing genius couldn’t be improved, I learned something new about the guy.
The Restoration
In breaking with tradition I did not first place a denim piece on the workbench. I admit to being rather excited to start this project so much so that I began it before I had even received the gold band from the Vermont Freehand boys (https://vermontfreehand.com/). My first task was to look through the stock of stems to see if I had something that would be a good fit, preferably for as little work as possible. Yeah, I’m honest and lazy. I had an acrylic stem that was a very good fit for the diameter and length. As a bonus the tenon was too large. I felt blessed or lucky and didn’t care which. The stem was also an acrylic. I know the original Marxman stems were vulcanite but as I get older I am really learning the benefits of acrylic stems. They do not have the issues with oxidation and do not require the constant oxidation removal. Yeah, my laziness appears to be increasing.
The fit was nice. There was some misalignment and a very slight gap but I would take care of that by heating the stem, pressing the stem into place and allowing it to cool stating the exact tenon fit as the acrylic cooled.
The slot of this stem needed some work. It was an unused replacement stem but it only had a draft hole bored through and a basic slot cut into the button. I used a Dremel and a circular cutting bit to cut the slot and angle the draft hole more smoothly.
This improved slot was further opened and filed into a “Y” with small files.
With the stem drawing nicely, I turned my attention to the stummel. The reaming tools were gathered.
The tobacco chamber of the Four Hundred was very large and fit the #4 blades of the PipNet easily. I had to press into the sides to get the PipNet to contact them.
There was minimal cake accumulated and what was present was quickly removed.
The tobacco chamber was sanded with 220 sandpaper wrapped around a wood dowel and a piece of sandpaper.
The chamber showed no signs of any heat damage or charring.
The next several photographs show the old fill material used by Marxman at the factory. The fill material is the light colored bits.
The removal of the old fills was a tedious process of softening the fill with acetone and picking it out with a dental scraper and the fly tying bodkin.
There dark stain on the bottom of the stummel was also a feature which I did not want.
I tried soaking the stain with a solution of saturated oxalic acid solution. The solution was applied with a cotton swab.
I allowed the oxalic acid to dry and sit for 30 minutes before rinsing it with copious amounts of water and a light scrubbing.
Once dried the stain had disappeared completely.
The shank cleaning was the next task. This was done with several cotton swabs and bristle pipe cleaners dipped in 95% ethyl alcohol.
see
The acrylic stem was in good shape but I was eager to see how it would look with the cleaned stummel. I used white buffing compound on the buffer with the appropriate white compound wheel.
The shank of the pipe was taped with masking tape to protect it from the buffing.
The acrylic polished up very nicely.
Back at the bench the replacing of the old fills was about to commence. I planned on using brown cyanoacrylate (CA, super glue) and briar dust to fill the gaps in the briar. The CA would be applied with a fly tying bodkin and the briar dust would be pressed into the wet CA. This combination cured almost immediately and could be shaped with a file or sandpaper with subsequent layers building up the depressions.
Below you can see the wet CA applied to a gap.
There were plenty of gaps in this old pipe to be filled. The briar dust was then pressed into the wet CA. This produces the equivalent of a chunky scra on the surface of the briar. I use a brass brush to brush the surface removing the dry briar dust that doesn’t come into contact with the wet CA.
Once all the flaws were filled the texture of the carvings needed to be reestablished. I used a Dremel rotary tool with a small carving bit to re-carve the surface.
I prefer to keep the bit more stationary and move the stummel into the rotating bit. I propped the Dremel up on a piece of 2×4 .
The recarving process is slow and requires eyes that are capable of fine focus, something that my old eyes have trouble with. Below you can see the carving of the texture as it progresses.
Eventually the CAA is reshaped to be similar to the original.
Noticing the great success of the oxalic acid on the old stain, I thought that perhaps the entire stummel would benefit from a light bleaching. I used oxalic acid on the entire stummel.
The wet stummel looked very nice with a coating of oxalic acid. The acid was allowed to dry and sit on the briar for 30 minutes.
Below are a couple of photos of the bleached briar prior to rinsing and scrubbing the oxalic acid from the stummel.
The rinsing was done with copious amounts of water and a Scotch Bright pad that I applied Castile soap to. I figured that the basic nature of the soap would also neutralize any remaining acid during the rinsing. Upon drying the stummel received a coating of Befoer and After Restoration Balm. I was impatient and wanted to see the color of the briar. In insight I should have sanded and micromeshed the briar prior to the balm but impatience got the best of me.
After allowing the Restoration Balm to work its magic for 20 minutes I hand buffed the stummel with an inside out athletic sock to reveal a lovely dark briar.
I couldn’t help myself and had to take the pipe upstairs and into the sunlight for a couple of photographs.
It took 2 weeks for the gold band and a new drill bit to arrive from the Vermont Freehand boys. It was not their fault as the winter weather in the east has been tough this year. Still, it was an excruciating wait.
The band was far too wide for this pipe but it was the only one available in a 20 mm diameter. I seated the band to show how much material I would have to remove. Yes I could have used the entire 20 mm but that would have covered up an unacceptable amount of the Marxman stamp on the left shank.
The band glueing kit was gathered. The plan here was to use acetone to clean the band and shank end of any oils that may be present, slightly rough up the band interiors and shank with sandpaper, and apply a thin coat of J.B. Weld 2 part epoxy to the interior of the band and the shank end and fit the band.
The surfaces were cleaned with acetone and the epoxy thoroughly mixed.
The band was fitted and adjusted. The reason I used epoxy and not CA was to allow me additional time to adjust the fit of the band. CA would have given me seconds to adjust and I wanted to take my time. With everything in place the 24 hour wait began. Sure, the package says that the .B. Weld cures in 15 minutes but that is a soft cure. I wanted everything to be solid. In discussing this project with fellow pipe restorer Donald Cole, he suggested that I used sandpaper to remove the excess band width. His recommendations were the following, “Sandpaper on a flat surface. Like glass.
It’s thin and won’t take long with low grit. Use a figure 8 motion and it’ll keep it even.” (Cole, Donald, Personal communication). That sounded like a very good idea.
When the time came, I started sanding as Donal had suggested. It was working but oh, so slow. My impatience attacked again. I returned to the workbench and selected a flat file. I filed the excess band material caterfull to about 2 mm above the shank. Frequently rotating the stummel to keep the filing reduction even. The below photo shows my filing.
After I filed to about 2 mm I returned to the Donald Cole technique of sanding with the figure 8. I am sure patience is a virtue but I also like my steaks on the rare side of medium rare. Perhaps my impatience is a flaw that extends beyond just pipe restoration. Below is a photo of the sanded band and shank end.
There is is, the trimmed band on the Four Hundred.
And a close up showing the fit.
The smooth surfaces of the stummel were sanded using a series of sanding sponges from 400-250. I neglected to photograph and on that, apologies. The next step was a light coating of Danish oil applied to the stummel. This was rubbed in with a gun cleaning patch as they tend to be lint free.
The stummel was set into my mini bench vice to dry.
After several hours of dry time I worked the stummel with micro-mesh pads in grits from 4000-12000. Between each pad I wiped the stummel with a make-up pad wetted with 95% ethyl alcohol to remove mehsing debris.
The last major step was to apply several coats of carnauba wax. Since the rustications were shallow and general wide I opted to carefully work the wax into the carvings with the buffing wheel. It took quite a while to get into all of the nooks and crannies but I think the result was worth it. The smooth panels took the wax easily as did the stem.
ha
The final step was a hand buffing with a microfiber polishing cloth.
There is it,The Four Hundred by Marxman, number two. I sure would love to see an original that had been taken care of rather than the dilapidated darlings that I have come across. Not that I am complaining. I have thoroughly enjoyed spending time with the two that I’ve acquired. They are both large handfuls. Another interesting thing about the two I have is that one is quite comfortably held in the right hand while the other feels more like it belongs in the right. This Marxman is a beautiful example of a large FourHundred and though it now sports a replacement gold plated band and a replacement acrylic stem it retains all the charm of a Four Hundred. The impressive dimensions of The Four Hundred are:
Length: 5.97 in. / 151.64 mm.
Weight: 3.31 oz./ 93.84 g.
Bowl Height: 2.30 in./ 58.42 mm.
Chamber Depth: 1.84 in./ 46.74 mm.
Chamber Diameter: 0.92 in./ 23.3 mm.
Outside Diameter: 2.39 in./ 60.71 mm. (At it’s widest)
I do hope that you have found something here useful to your own pipe care, maintenance or restorations. If you like this sort of thing, please click the like and subscribe buttons. Thank you for reading the ramblings of an old pipe lover.
Loading…
Below are some photos of the finished Marxman The Four Hundred.
I think my fascination with metal pipes began with Falcons. I always thought they looked cool. As a kid, I remember the next door neighbor, Joe Chase, always smoking a pipe while working on his yard and they were frequently Falcons or Vikings (my memory isn’t too specific). Later in life I tried the Falcon and appreciated the convenience of bowl swapping and easy cleaning. Even later, I started dabbling with restorations and researching the history of various pipes and their makers. This led me to http://www.smokingmetal.co.uk/ when it was run by Tony Pringle. Tony proved to be very helpful in response to my questions via email. Doug Bisbe has taken the reins of the smokingmetal site, with Tony’s retirement from the arena, and is incredibly knowledgeable and helpful in providing information about metal pipes. As for this alluring aluminum darling, it came to me as part of a “grab bag” I asked Steve Laug to assemble for me consisting of metal pipes. I wanted to try improving my skills and techniques working on metal. Steve and his brother, Jeff, enabled this with a fun bunch of metal artifacts, this unmarked specimen included. When the unmarked pipe arrived it was photographed and appeared as below.
Background
How the heck do you research an unmarked metal pipe? Well, fortunately there is a site for that. Unfortunately, it does require you to do a lot of clicking and comparing. The site is http://www.smokingmetal.co.uk/index.html. That is where I started. Now, I admit to having spent a good deal of time here on previous occasions so, I could narrow down the list of things to click. They also have a header with categories to help you find or narrow things down.
I was searching for a metal pipe with a screw through the bowl. So I began clicking on pipes which met those criteria. This led me to the following:
“unknown – MST – 20” Now, you may think the MST is short for Mystery but no. Metal Stem Through is far more likely. The text for this page is as follows as are the three images:
“Plastic bit, bowl that appears to be Bryson, certainly compatible. No markings
Two seen with DANCO boxes, needs further checking though
The above images match the pipe in hand exactly except for the texturing on the bowl. Okay, I had a match. The important part for me in terms of restoration was that I could see how the pipe would be assembled and disassembled. The stem was press fit, the end cap was threaded, the bowl was one piece with the screw and base attached to the wood bowl. This entry also contained a bit about Bryson.
I returned to the A_Z contest index and found the Bryson entry. There, the site listed the Following (highlighting added by me),
“Made by the Briarwood Corporation, Palo Alto, California, the BRYSON has number D120275 under the Bryson name on the pipe stem.
There is a crosshead screw to attach the briar bowl to the stem. The end cap attaches to the mouthpiece by means of a rod through the length of the pipe, in which the air hole is close to the mouth piece.
The stem is of polished duraluminum and hexagonal in cross section
The bowls are unusual in that they are not briar turned on a lathe, but briar wood, ground to a powder and compressed under very high pressure (no glue, heat or plastics are used, just pressure. It is claimed this produces a perfect bowl of aged briar every time with increased porosity. The varnished finish on the smooth bowl however is often very badly crazed. Two bowls, one smoth and one rusticated, were supplied with the new pipe. The bowl retaining screw is ‘locked’ onto the bowl by a gasket and metal collar, enabling rapid replacement of the bowls without the need of a screwdriver
The corn cob bowl, in centre image,is another version, not sure if this was manfactured by Bryson, or a home workshop job
The set here shown was available for $3.50 new, but in what year ? Adverts seen from 1946 magazine
The lower photograph was of a possible derivative on ebay in 2003, although US patent D122042 seems to be this pipe, invented by Max Bressler, Chicago Ill 1940
There are also other derivatives without the Bryson name stamped in the metal and variations on the shape and grooving of the stem
That with Pat Pend under the Bryson name has no grooves forward of the bowl and the front end cap is a larger thread than the other models, including my version with no name 30 April 1940 US patent # D120,275 Inventor Charles Rothman, Cleveland Heights, Ohio, assignor Briarwood Corp, also of Cleveland Ohio at that time”
Well, that explains what I saw completely and adds credence to the provenance of this pipe. Later in the restoration you will see photos of the bowl and can easily make out the particle board looking texture to the bowl due to its composition of pressed briar dust. I believe this pipe to be made by Bryson or an affiliate during World War Two. The style and composition of the briar bowl are in-line with the above description.
The Restoration
The restoration began as with most others, a clean denim piece to protect the work surface. At this point I would like to quote the smokingmetal.co.eu site with a warning regarding working on old metal pipes.
“A word of warning If you are thinking of buying online, be very very careful. Best policy with ‘metals’ is to see an image of the dismantled pipe. Buying otherwise unless desperate for an example can too often result in you ending up with a pipe that may be damaged when you try to dismantle and clean it. Mind you, you may learn how to repair them, but parts are of course getting rarer than hens teeth” (http://www.smokingmetal.co.uk/news.php)
It was at this point that I started to dismantle the Unknown Metal pipe. The stem came loose fairly easily but that is where my progress stopped. I needed to know how this pipe was assembled before I tried to disassemble it. I went upstairs to the computer and started looking through the long list of metal pipe with screw through bowls. I looked through 64 individual pipes before I found the match. The photos showed that the end cap was threaded and that the screw in the bowl was part of the bowl and not just a screw holding the bowl to the aluminum tube.
With that knowledge my plan of attack was fine tuned. I would first ream and clean out the tobacco chamber. This would allow me better access to the screw at the bottom of the chamber. The reaming kit was gathered.
The bowl was rather large in diameter and it accommodate the largest, #4 blade for the PipNet. This pipe had been smoked fairly heavily based upon the amount of cake removed.
It was at this point I realized that something was very different about the “briar” of this bowl. I had not read about the Bryson pressed briar dust bowl at this point. I stopped researching when I found the matching pipe and determined how to disassemble it. The material reminded me of a Medico made Brylon pipe.
Undeterred, I started cleaning out the screw head slots. I scraped with a dental scraper and moistened the screw with 95% ethyl alcohol.
I retrieved my gunsmithing screwdriver bit set. I knew that I wanted a better quality screwdriver as I could tell this screw had been forced and looked slightly damaged.
I chose a flat tipped Phillips head bit of appropriate size. I thought this would allow a better grip on the screw and not force the bit upwards with increased pressure.
I soaked the screw with ethyl alcohol from the bowl as well as around the base of the bowl. With slow even pressure the screw relented. And the entire bowl was removed. The bottom of the bowl was quite corroded and this oxidation was the likely cause for the screw being so tightly stuck.
Below is the corroded base of the bowl with only a light brushing with a brass brush.
Below is the base after a thorough brushing with a brass brush and scrubbing with ethanol soaked cotton swabs.
It was time to visit the sink for the scrubbing. The bowl was scrubbed with undiluted Murphy Oil Soap and a nylon brush. The Soap was rinsed with warm water and dried with a cotton hand towel.
The aluminum tube (tube from here on out) was scrubbed with a Scotchbrite pad and Castile liquid soap on the outside and with a nylon shank brush inside. The tube was rinsed with warm water and dried with a cotton hand towel.
Back at the workbench, the hope was that the soap, water and heat from the scrubbing would soften and get the endcap to loosen slightly. It didn’t. I used a thick piece of leather to protect the end cap from the jaws of the channel lock pliers.
The stem was cleaned out with bristles pipe cleaners and 95% ethyl alcohol.
I took the tube to the buffer to buff and polish the aluminum. While there I spent a little time on the plastic stem and inner tube.
Upon returning to the workbench the bowl had completely dried and I got a good look at the briar. Again, I emphasize that I had not researched the pipe beyond the initial “Unknown – MST – 20” (http://www.smokingmetal.co.uk/pipe.php?page=212) page. I could immediately tell that this was not typical briar. I ran upstairs for some further research.
This is when I came across the research material concerning the Brylon pressed briar bowl materia. Everything clicked in my mind. I knew that from here out I would be very judicious with any kind of solvents. I was unsure how or if they would react with the pressed briar of the bowl. Everything had seemed okay with the soap and scrubbing and with using the ethanol attempting to loosen the screw but I would be more cautious going forward.
Again returning to the workbench, the tube polished up beautifully and the stem looked far better but I was not completely happy with it.
Before I could re-dye the bowl I wanted to repair the two cracks at the bottom of the bowl. I figured that brown cyanoacrylate (CA, super glue) would be the best course of action. The next two photos show crack one and crack 2 on opposite sides of the bowl.
I planned to use the brown CA applied with a fly tying bodkin and work the CA down into the crack.
Below you can see the CA filled crack.
The CA was allowed to cure and was then filed with a small flat file.
On the opposite side the curvature of the cracked area required sanding.
Next came a light topping of the bowl with a piece of sandpaper laid flat on a counter.
The topped bowl was looking better, still slightly out of round. I guessed that to be “normal” for pressed briar bowls.
The bowl would get a single application of Fiebing’s Leather Dye in black. A cork was used to plug the tobacco chamber and act as a handle. The dye would be applied with a folded pipe cleaner and flamed to set the dye and vaporize the alcohol solvents.
Below is the resulting black dyed bowl. The dye applied very similarly to normal briar.
Back at the workbench the bowl was wiped with a slightly ethanol wetted make-up pad then was sanded lightly with a 400 grit sanding sponge. You can see that the sanding revealed the brown of the briar on the ridges of the rustication.
The bowl was then given a coating of Before and After Restoration Balm and set aside for 20 minutes.
The excess Restoration Balm was wiped away with an inside out athletic sock.
I used a dremel rotary tool and a wool polishing bit to lightly polish the bowl screw. I did not want to use any buffing compound in fear of not being able to get it out of the tobacco chamber.
To address my “not happy” with the stem, I used a small flat file to lightly resurface the button and the area immediately below the button on the top and bottom of the stem. This was then sanded with sponges 320-1000.
The stem was then returned to the buffer and buffed with white compound.
This produced a level of finish that I was happy with.
To make it even better, I hand buffed the stem with Before and After Fine followed by the Extra Fine Polish on a soft cotton cloth.
The stem returned to the buffer for several coats of carnauba wax. The ridge tops of the bowl were also waxed with carnauba but I was careful not to apply pressure and to keep the wax out of the rustications.
The final step was a hand buffing with a microfiber polishing cloth.
This was a fun and interesting restoration. Next time I work on a metal pipe of unknown origin, I will definitely do my background research before starting rather than during, twice… This little pipe is adorable. I think the whole thing is pretty amazing, the history, the workmanship, the material used, all made for a fascinating project. I have no idea if it smokes well. I can’t imagine that it would not be, with the wide chamber excellent for English and aromatic blends. I can easily envision the ridges of the aluminum tube being very efficient at radiating heat from the smoke. This would make a very handy little working pipe for the fishing tackle box, garage or for a lawn mowing pipe. It’s small size and light weight are great for an active smoker. The dimensions of the Unknown Aluminum Pipe are as follows:
Length: 5.06 in./ 128.52 mm.
Weight: 1.27 oz./ 36.00 g.
Bowl Height: 1.17 in./ 29.72 mm. (bowl only) 1.70 in. / 43.18mm (with tube)
Chamber Depth: 0.82 in./ 20.83 mm.
Chamber Diameter: 0.85 in./ 21.59 mm.
Outside Diameter: 1.49 in./ 37.85 mm.
I do hope that you have found something here useful to your own pipe care, maintenance or restorations. If you like this sort of thing, please click the like and subscribe buttons. Thank you for reading the ramblings of an old pipe lover.
Loading…
Below are some photos of the finished Unknown Aluminum Pipe.


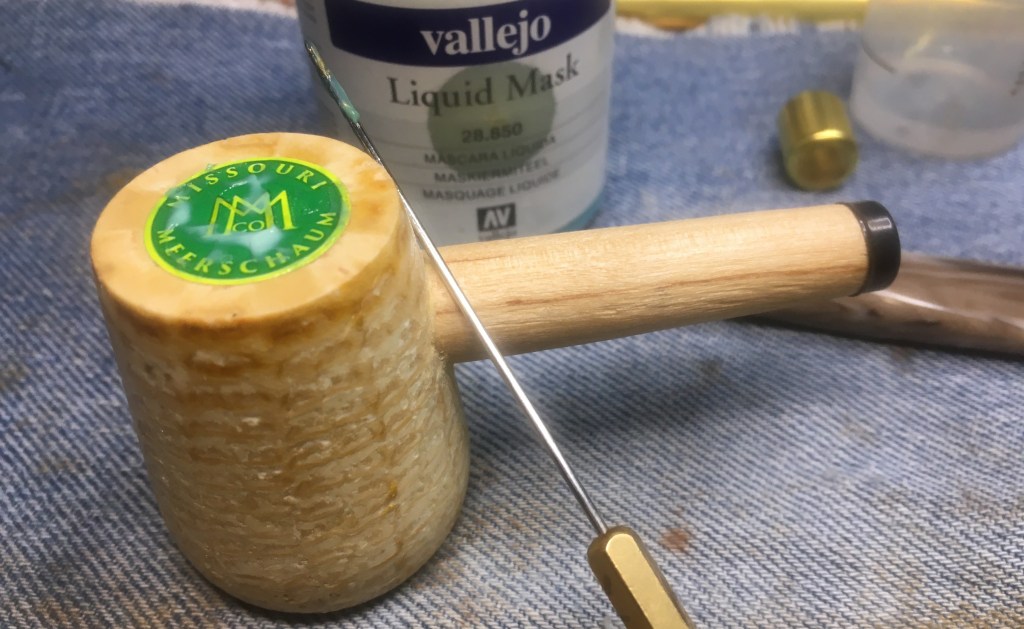


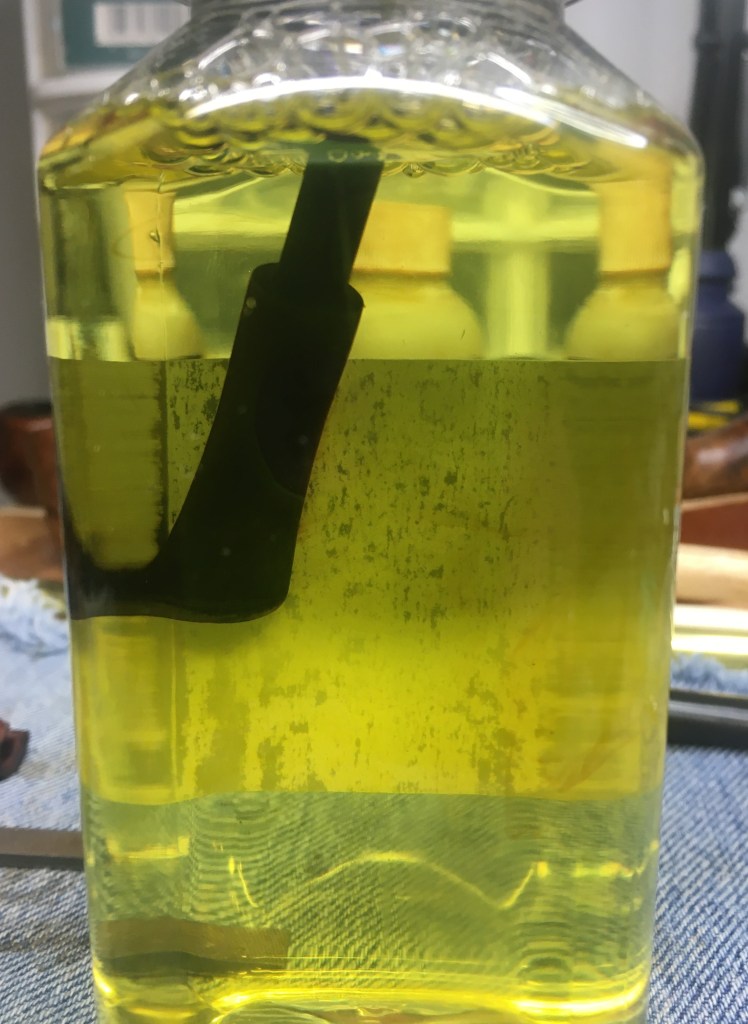


 .
.