
Photographed and written by
John M. Young
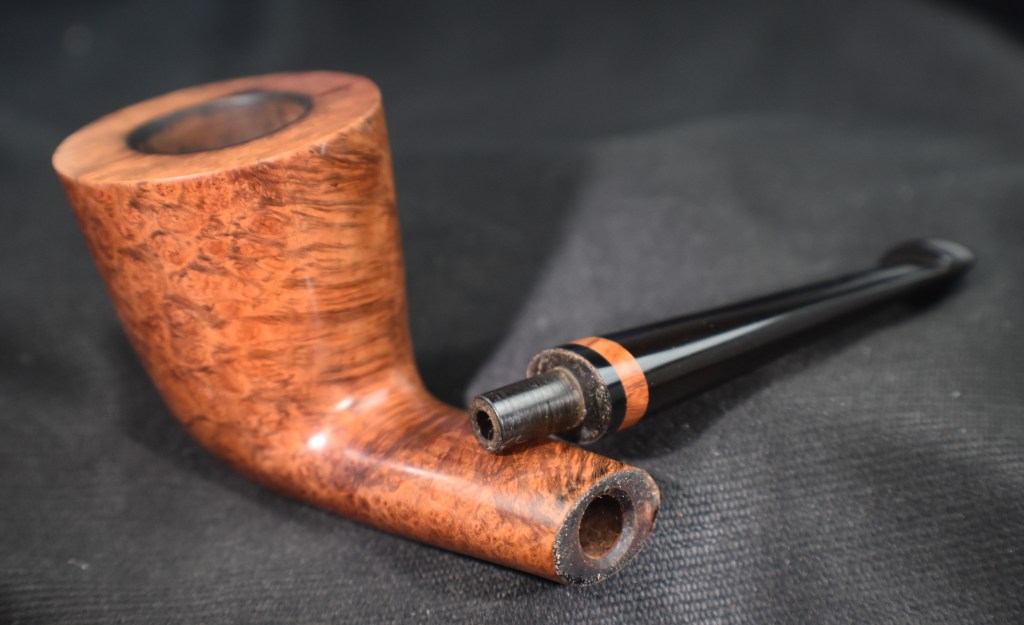
The thing that drew me to this pipe for purchase and restoration was the thick briar wall of the Dublin shape. Recently I have become smitten by thick walled pipes. I know that I live by the phrase, “change is evil and must be destroyed” but this is different. I mean, thick walls are just cool, right? Both literally and figuratively. Well, I saw this multinational beauty, an Italian from Dublin, and had to have it. The auction was won and the pipe made the journey from Cedar Park, Texas all the way to the Northern Time Zone of southeast Nebraska. The stamps on this pipe read: Barontini, in a stylized script over SULTANA on the shank to and KUTTEL over SELECTION with a slightly offset B6 on the shank’s bottom. Below are some photos of the pipe as it appeared before any work was done.


The pipe looked to be in good condition with no obvious damage or evidence of mistreatment. There was of course the expected cake within the bowl, some tooth chatter near the button and oxidation of the stem. Other issues that appeared upon closer examination were the numerous fills and the dreaded clear coat.
Background
In researching the Barontini name, I first visited pipephil.eu for an affirmation of what I expected to be of Italian origin. There was what I had expected, an Italian flag.

(Baro-Bd — Pipes : Logos & Markings). There was no exact match to the stampings but this was obviously the same maker. The stylized signature script was an exact match and the fourth photo from the top had a shape number of B8 and was a very close match to this pipe and the B6 that it wears. The fifth photo from the top middle column, alludes to a briar band and an apparent black acrylic band at the stem shank joint. This also matched the pipe in hand. The stem of my pipe was lacking any of the cool logos of the included Barontinis which saddened me. None of the associated links lead to further information or similarities except for the “L’artigiana” link. Here there was a photo of a pipe which had a similar briar band on the stem.

(L-Lab — Pipes : Logos & Markings)
Next, I turned to pipedia.org for a bit more history on the Barontini company. Not much information was there to be had. I include it here in its entirety:
“In 1890 Turildo Barontini opened a factory for the production of briar. In 1925 his son Bruno began to produce the first pipes. Cesare Barontini, son of Bruno, started direction of the factory in 1955, and still runs it together with his daughters Barbara and Silvia.
Sub-brands & Seconds
(Barontini, Cesare – Pipedia). The “Sub-brand” Aldo Velani, did prove quite interesting:
“”Cesare” is a second brand produced by Cesare Barontini of Livorno / Italy. Cesare Barontini headed the company from 1955 on.
Another Barontini 2nd is named “Aldo Velani“. The name is fiction. Cesare Barontini Pipes are still relatively unknown and under appreciated here in the United States. They do however offer a value rarely matched by some of their more recognized Italian counterparts. Barontini makes very fine pipes, particularly his premium lines. They offer a fine smoking experience at quite a bargain. There are a few brands of Italian pipes on the U.S. market that are hardly known in Italy, as they are made in factories dedicated to the export trade. Aldo Velani is a line imported from Italy by Lane Limited, Dunhill’s distributor. Made mostly in Livorno by Cesare Barontini, one of the best known private-label manufacturers, Aldo Velani pipes are classic shapes with an Italian ‘twist,’ according to Frank Blews, a spokesman for Lane. “Billiards with more ‘ball,’ bulldogs with more ‘jaw,”‘ is the way he characterizes the line. A medium to large pipe specifically developed for American tastes, the finishes use the names of Italian wines – Soave, Novello, Barolo, Refosco – to suggest their colors, and there is a lot of ornamental work.” (Cesare – Pipedia). The phrase “Aldo Velani pipes are classic shapes with an Italian ‘twist,’” strikes me as an apt description of this pipe. I referred to it earlier as a “multinational beauty, an Italian from Dublin”. This sounds like exactly what Barontini is making with their Aldo Velani line – a traditional shape with a signature, Italian, twist.
I could not find any information as to Barontini employing P-lip (Peterson style) buttons on their pipes nor were any shape charts discovered. Perhaps some things are better off left as mysteries. This mysterious Dublin from Italy seems to be an excellent illustration of that idea.
The Restoration
I broke from tradition with this one and opted to not use a stained denim piece over the stained green flannel which underlies the denim. I thought you might like a change. Or, I was too darn lazy to get up and get a piece of denim from 6 feet (2 m) away.

The new-to-me PipNet got to go to work with this one along with the rest of the ream team.

PipNet #3 blades started the process of reaming.

The #4 blades continued and were followed up by the Smokingpipes Low Country reamer and the General triangular scraper. All of them were followed by the 220 sandpaper wrapped around the wood dowel.

The sanded tobacco chamber was taken to bare briar and appeared free of any heat damage. A condition the interior rim was not so lucky to avoid as there was some charing around the edge.

Another view of the interior of the tobacco chamber and the unsightly fill of the rim. Oh, you know that has to go.

And go it did. The old putty was picked out using a fly tying bodkin and a dental scraper. The old putty was surprisingly hard.

So hard, in fact, that I could not get all of it out. I’ll get more of it in a few minutes.

I used saliva and light scraping with a sharp pocket knife to scrape away some of the charred briar around the rim. That helped but the dark ring persisted.

Moving on to cleaning out the airway of the shank was the next task. I used a dental scraper to remove some of the tar and smoking residue then scrubbed the airway with cotton swabs and bristle pipe cleaners dipped in 95% ethyl alcohol.

My acetone in the acetone jar was getting pretty depleted due to use and evaporation. I unfortunately did not have more on hand. I tried to use a make-up pad dipped in the acetone to remove the finish on the stummel.

The finish was old, hard and thick. A trifecta of resistance to removal. I lightly sanded the stummel avoiding the stampings and placed the stummel into the jar to soak.

I had to repeat this twice, once for each end of the stummel since I could not completely submerge it into the remaining acetone.

After two soakings in the acetone the finish began to relent and was mostly removed with some rubbing with a make-up pad dipped in acetone. The stampings remained finish covered due to my unwillingness to sand. I needed fresh acetone but didn’t want to drive into town for a $1.25 bottle of the finish removing elixir. Fortunately A buddy and his son were coming down to go fishing and I asked them to pick up a bottle for me.

The shiny spots all indicated places with finish remaining.

The below photo is of the stamp on the bottom of the shank.

My delivery arrived and a quick fishing trip gave the remaining finish a short reprieve. Later that evening armed with a fresh bottle of acetone the finish was removed. Another benefit of the acetone was that it softened up the fills allowing me to pick the material out far more easily.

And there were quite a few fills to remove.


To refill the pits I used brown cyanoacrylate (CA, super glue) by itself or with briar dust. I wanted to see if I could use layers of CA only on the rim hoping to achieve slightly transparent fills. While on the stummel I applied the CA to the pit and pressed briar dust into the wet CA. In both cases the CA was allowed to cure or dry then it was filed using a small flat file and smoothed with a 400 grit sanding sponge. If needed additional applications were done. The photo below shows application #1 to the rim.

The rim was propped to allow the CA to level and cure on its own.

While the CA was curing I turned my attention to the stem. I neglected to photograph the cleaning of the stem’s airway. This was done with several bristle pipe cleaners dipped in 95% ethyl alcohol. Those tooth marks had to go. I used the small flat file to filed away material and blend the surface. This stem was rather thick feeling between my teeth and I did not feel the need to fill the dents with black CA. After the filing the stem was sanded with a 320 sanding sponge followed by a 400 sponge.

The CA on the rim contracted as it cured and required a 2nd application to the deepest pit. The two smaller fills can be seen in the photo below at 2:00 and 9:00 positions.

The big rim pit needed a third application.

Below you can see the other fills receiving their final sanding.

Once the fills were done, I taped the stamps and began sanding the entire pipe with a series of sanding sponges from 400-3500. Between each sponge I wiped the stummel with a make-up pad moistened with alcohol to remove sanding debris. The stem was rubbed with mineral oil and wiped with a paper towel.

After the final sanding wipe I removed the painters tape and wiped the shank with alcohol to remove any remaining adhesive from the tape. The pipe was then worked with a series of micro-mesh pads in grits 3600-12000. Between each pad I wiped the stummel with a make-up pad moistened with alcohol to remove debris. The stem was rubbed with Obsidian Oil and wiped with a paper towel.

The pipe was then given a coating of Before and After Restoration Balm and allowed to sit for 30 minutes.

The Restoration Balm was removed with an inside out athletic sock. Sorry, I neglected to photo-document this step. The stem was then hand polished using Before and After Fine Polish followed by the Extra Fine Polish. Both compounds were applied by my fingertip and rubbed with a soft cotton cloth.

Overall this Barnotini Sultana Kuttel Selection B6 turned out very nicely. I love the shape and the thick walls. The pipe retained some of the contrast stain, enough that I did not think additional dying was needed. It did lose some of the deeper reddish hues which it had originally. I think the red and the thick clear coat were only used to hide the numerous fills and their absence added to the attractiveness of the briar. Okay, that is pure conjecture but I still think it looks better with a more natural briar than all the red. The vulcanite of the stem polished up nicely. If you are wondering why I did not use any deoxidation products on the stem it is because the filing and sanding were adequate to remove the oxidation without them. The dimensions of the Barnotini Sultana Kuttel Selection B6 are:
- Length: 6.04 in./ 153.42 mm.
- Weight: 1.81 oz./ 51.31 g.
- Bowl Height: 2.07 in./ 52.58 mm.
- Chamber Depth: 1.83 in./ 46.48 mm.
- Chamber Diameter: 0.88 in./ 22.35 mm.
- Outside Diameter: 1.72 in./ 43.69 mm.
I do hope that you have found something here useful to your own pipe care, maintenance or restorations. If you like this sort of thing, please click the like and subscribe buttons. Thank you for reading the ramblings of an old pipe lover.
Below are some photos of the finished Barnotini Sultana Kuttel Selection B6.


