
Photographed and written by
John M. Young
Oh to have both of the pipes in this matched pair. I don’t mean to complain as this was part of an estate lot where I was targeting a single pipe. The target was a Peterson meerschaum Dublin 120. This pipe was just an innocent bystander caught up in the crazed Peterson Pipe Acquisition Disorder (PPAD) that wreaks havoc on my life occasionally. If you are curious regarding the meerschaum pipe here is the link to that restoration. Below is a screenshot from the original eBay listing back on August 4 of 2024. There was a second Kaywoodie but a White Briar is no Matched Grain.

The lot came from Rockmart, Georgia and did have several interesting pipes. Below are some photos of the Matched Grain prior to working on it.


“Free tobacco with the purchase of one chomped on Kaywoodie.” I don’t think that advertising campaign will catch on.


The stummel needed almost nothing except the general lava cleaning, reaming and cleaning, the stem on the other hand… You may have noticed that the stem immediately behind the button had been filed. I did that before I took the above photos. I was thinking about how to reinforce the button for its reconstruction. So in full transparency, there was a little bit of work done to the pipe prior to the above photos.
Background
I am using pipedia.org’s Collector’s Guide to Kaywoodie Pipes to tell the history of the company and the Matched Grain lines as they are far better at it than this lazy writer. “According to Hacker (1), the firm of Kaufmann Bros. & Bondy (KB&B) began producing the Kaywoodie (2) Pipe in 1915. Hacker notes that:
“The company was originally started in 1851 in New York by two brothers named Kaufmann, who sold meerschaums and clays that a third :brother sent them from Vienna. Business thrived and in 1854 the Kaufmanns took in a partner named Bondy. … The three partners retired :in 1898, but their relatives continued on with the firm, which had begun to manufacture their own briar pipes under the KB&B trademark. :In 1915 the Kaywoodie brand was created as a marketing umbrella for a new briar pipe which the KB&B company introduced. …”‘
The “marketing umbrella” mentioned by Hacker included lower grade Kaywoodies that were later marketed under the “Yello-Bole” name. (According to a 1948 Yello-Bole catalog, “Yello-Boles have been on the market since 1933. About 25 millions of these pipes have been sold”). Hacker concludes his history of Kaywoodie Pipes by noting that:
“The KB&B briar pipe brand existed from 1900 until just after World War I (with some overlapping with the Kaywoodie from 1915 — 1917), :and collectors refer to the KB&B as a Kaywoodie transition pipe. During the early years of the 20th century a number of filter systems :were designed by the KB&B firm and incorporated into their Kaywoodie Pipes under the names of Synchro-Stem and Kaywoodie Drinkless3 :filters. During the late 1920’s and throughout the 30’s the Kaywoodie became a highly respected pipe in spite of its filter system (which :was popular among many smokers of the era) primarily due to the fine quality of the straight grain and the flame grain models. :Unfortunately, the hard-to-get-briar years of World War II marked the decline of the Kaywoodie Pipe, a plummet from which it has never :recovered as far as collectors are concerned….”
The pre-Kaywoodie KB&B pipes were marked on the shank with a cloverleaf around KB&B. Some early Kaywoodies had this same marking on the shank, but the practice was dropped some time prior to 1936. Yello-Boles also had KBB in the leaf on the shanks, but did not have the ampersand found on Kaywoodies.
Early (pre-1936) Kaywoodies had an “elongated” white cloverleaf on the bit, a large fitment, and four-digit shape numbers. The 1936 catalog shows a larger, “fuller” leaf, but lists two-digit shape numbers. Sometime between 1936 and 1947, the better pipes were marked on the bits with a black cloverleaf in a white circle. The white cloverleaf continued on the lesser pipes. However, this was not a consistent convention, as pipes of the same grade could have either type of leaf.
The S.M. Frank Co. now owns the Kaywoodie name, but no longer makes pipes. However, Italian made “drugstore” grade Kaywoodies are still being marketed in this country. These Italian-made Kaywoodies have a “whiteoutline” cloverleaf logo.
Pipedia Editor’s Note: Thankfully, Kaywoodies are again being made in the U.S. ”
The following discusses the logos seen on this Matched Grain Kaywoodie:
“Some of the pre-1936 Kaywoodies were stamped (on the shank) with a cloverleaf around KBB. Sometime between 1936 and 1947, the better pipes were marked with a black cloverleaf inside a white dot. However, because many of the pipes in the 1968-69 catalog still show this type of logo, the black-in-white logo merely indicates a “post 1936” vintage.” (https://pipedia.org/wiki/Collector%27s_Guide_to_Kaywoodie_Pipes#A_Partial_Chronology_of_Kaywoodie_Grades,_Shapes_and_Prices_(1936_-_1969))
The Kaywoodie shape 10 has remained very consistent in catalogs since if first appeared in the 1936 catalog as appears from the Collector’s Guide yo Kaywoodie Pipes:
“1936 Kaywoodie Shape Numbers and Descriptions
Shape Number and Description
- 10 — Curved Medium Billiard”
“1947 Kaywoodie Shape Numbers and Descriptions
- 10 — Medium Billiard, Full Bent”
“1955 Kaywoodie Shape Numbers and Descriptions
- 10 — Medium Billiard, Full Bent”
“1968-69 Kaywoodie Shape Numbers and Descriptions
- 10 — Small Full Bent Billiard”
The below Kaywoodie Lines and their dates are clipped from the Guide and are a compilation:
“THE 1947 KAYWOODIE LINE OF PIPES
The Matched Grain first appears in the 1947 catalog. According to the Collector’s Guide or Kaywoodie Pipes: “In addition to these individual pipes, the 1947 catalog shows two- and seven-pipe matched grain sets(5).
- Two-Pipe Matched Grain Setb: $25.00
- Seven-Pipe Matched Grain Setc: $125.00”
“THE 1955 KAYWOODIE LINE OF PIPES
The line-up of pipes in the 1955 catalog (Table 3) was more extensive than in previous years. The catalog presented an expanded line of meerschaum pipes and introduced a 4-pipe set of Matched Grain Pipes, as well as several pipes with “special features”.”
- Matched Grain Set (4-Pipes): $50.00
- Matched Grain Set (7-Pipes): $125.00”
“THE 1968-69 KAYWOODIE LINE OF PIPES
In addition to the two-, five-, and seven-pipe Matched Grain pipe sets listed in Table 4, the 1968-69 catalog introduced the Presentation Pipe. The catalog states that in “Every 8 or 10 thousand briar blocks, we come across a single piece that is as near to perfection as briar can get. This rare find is set aside and turned over to a master pipe craftsman. He lovingly sees this precious briar through each step, until it takes shape as one of the rarest pipes in the century.” The Presentation Pipe was packaged in a walnut grain, velvet lined, leather case. (See Section 3.5 for description of other Kaywoodie Presentation Pipes).”
- Matched Grain Sets:
- 2 Pipesa: $75.00
- 5 Pipes: $175.00
- 7 Pipesa: $250.00”
“Presentation Collection. “The most illustrious collection of pipes ever assembled – the Kaywoodie Presentation Collection. It presents a set of 28 Kaywoodie Matched Grain Pipes . . . pipes as perfectly, flawlessly, magnificently matched as a string of rare Oriental pearls. Over 500,000 blocks of pristine briar must be sorted to find just one such matched collection; hence no more than 12 sets can be produced in any one year. Hand fashioned from tapered bit to burnished bowl, every pipe in this Collection becomes a prized possession. A Carved Headbriar [see note concerning “carved heads” in the discussion of Heirloom pipes, Section 3.4], a Calabash and a Meerschaum complete this Collection of 31 pipes. This precious ensemble is housed in a custom-designed walnut cabinet of distinguished elegance. It contains a tobacco humidor and a handy compartment for pipe smoking utensils. A brass plate, engraved with the recipient’s name, personalizes the presentation” (Price: $2500). The Presentation Collection did not appear in the 1955 catalog, but was apparently introduced shortly thereafter. A “brief” article in the September 17, 1956 issue of Newsweek supports this contention. The article, entitled “Pipe Dream”, contains a photo of the Presentation Collection, which is described as the “costliest pipe set ever marketed in the U.S.” (Lowndes notes that a small (undated) WWII era catalog showed the Presentation Collection in a smaller cabinet with legs that sold for $1000.)”

From all of the above we can be assured that this pipe was indeed part of a set. Most likely it was one of a pair of pipes made between 1947 and 1969. Its companion piece or pieces are lost to time thus reducing the value and importance but not the beauty of the selected briar and the craftsmanship that went into this pipe.
The Restoration
In the beginning there was clean denim. Kind of a Genesis vibe to the resurrection of this lovely pipe.

I started with the stem. It was lightly sanded with a 600 grit sanding sponge to remove the hardened oxidation and surface grime.

Next, the stem had a pipe cleaner inserted into the tenon to act as a hanger and it was submerged into the jar of Before and After Extra Strength Deoxidizer. Here it sat for 4 hours.

The stummel was exorcized of the remnant tobacco.

The ream team was gathered and included the PiNet, Smokingpipes Low Country reaming knife, General triangular scraper and wood dowel wrapped in 220 sandpaper.

The reaming was quickly completed and the bowl sanded to bare briar. This revealed no damage to the interior of the tobacco chamber.

The rim was moistened with saliva and gently scraped with a sharp pocket knife.

The scraped rim looked mostly free of any charring.

I tried a scrub with 95% ethyl alcohol on a make-up pad to assess the finish on the briar. The pad turned a yellow brown indicating that the finish was susceptible to ethyl alcohol.

I took the stummel to the sink for a scrub with undiluted Murphy Oil Soap and a nylon scrub brush. The soap lather turned a yellow brown color with scrubbing. This was rinsed with warm water and the stummel dried with a cotton dish towel.

Back at the workbench the stummel was wiped with a make-up pad with 95% ethyl alcohol and more of the finish was removed. The result was a finish-free stummel with lovely grain.

Next came the shank cleaning. This was done with folded bristle pipe cleaners and cotton swabs both dipped in the ethyl alcohol.

I lightly topped the rim to remove the dottle knocking scars and the light charring on the rim. 220 and 400 grit sandpaper were used.

Below you can see the rim after the topping.

I was anxious to see the briar grain and applied a coat of Before and After Restoration Balm before I sanded or micro-meshed the briar. I know patience is a virtue but I couldn’t wait.

The stem was removed from the Deoxidizer solution after four hours. It was allowed to drip a good deal of the excess solution back into the jar.

My normal coarse shop rags were both in the laundry so an old bathroom face towel was used to buff away the remaining Deoxidizer solution. I’ll see if the oxidized vulcanite is effective at staining white cotton face towels. The stem on the other hand was looking much better.

The stem was cleaned with bristle pipe cleaners and 95% ethyl alcohol.

Make-up pads with Soft Scrub cleanser were used to further remove any remaining surface oxidation.

The below photo shows a clean black stem with quite a bit of pitting from the deoxidizing of the vulcanite. The stem had been oiled with mineral oil to prevent further oxidation.

For the moment you’ve all been waiting for: “How the heck is that stem going to be salvaged?” My imagined plan was to file immediately behind the button and glue two brass pins across the gap. These pins would provide a scaffold for the building up of cyanoacrylate (CA, super glue) and black JB Weld Epoxy. The pins would be completely encased in CA and Epoxy and not be seen while providing rigidity for any future chomping. The thickened rebuilt zone would be the “new button” The old button end would be filed off, shortening the stem by a couple of millimeters. This plan worked brilliantly in my damaged brain but how would it fare in reality? I wasn’t sure but I knew that I’d have a heck of a hard time finding a perfect replacement stem so, this seemed like the best remedy.
Two brass pins were measured and cut to span the gap. The first pin was glued into place using black CA. I allowed the CA to cure on its own and did not use a CA drying accelerator.

I wanted to work on the stem, one side at a time and be able to access the airway to sand and smooth the airway if needed. I made a dam from a piece of plastic lid and thickened the plastic with several layers of Scotch tape. This would be inserted into the airway to prevent the CA and Epoxy from entering where I did not want it.

With the dam inserted I was ready to start layering reinforcements of black CA.

The black CA was applied using a fly tying bodkin. Unfortunately the black CA was slightly transparent. This is why I thought that I would also have to use the JB Weld epoxy. Imagine the brass pin inside the new button and the old button, that you see below, as being filed off.

Below the CA was allowed to cure and the dam removed. Everything was going according to the plan.

After the CA had cured I cut an emery board nail file to fit into the airway. I used this to smooth the interior of the airway. Below is an early photo of the smoothing. You can see that the brass pin is completely encased in CA.

The process was then repeated for the opposite side with the placement of the second pin.

Black CA was used to fill around and encapsulate the brass pin.

To build up material around the new button I used black JB Weld with the addition of very finely ground carbon powder. I wanted to make sure that the epoxy was not even slightly transparent. I emptied a capsule of carbon into the mortar and used the pestle to grind it into a very fine powder.

The two part epoxy was mixed and a small amount of ground carbon powder was added. To keep the epoxy from fouling the airway another plastic dam was used. This time I coated the surface of the dam with Vaseline petroleum jelly to keep the epoxy from adhering to the dam.

The JB Weld label says the product sets up in 15 minutes. I think they meant to say 15 hours. It does set up to the point that it stops flowing in 15 minutes but I usually give the epoxy at least 24 hours before I try to file or sand it.

The next day, I mixed a second batch of epoxy as with the first batch. This was applied to the bottom side of the stem. I propped up the pipe as shown in the photo below.

The below photo shows how the first application of the epoxy looked after 24 hours.

Here is the second application cured for 24 hours.

This photo shows the two applications in profile.

The button was filed to reshape it. Below is the top view of the reshaping.

The bottom view of the reshaping.

Profile of the reshaping.

I taped the shank off to protect it, with masking tape, then sanded the stem with a series of sanding sponges in grits 320-3500. Between each sponge I rubbed the stem with mineral oil and wiped it with a paper towel.

The stem was then micro-meshed with 4000-12000 pads. Between each pad I rubbed the stem with Obsidian Oil and wiped it with a paper towel.

The stummel was worked with micro-mesh pads 3200-12000. Between each pad I wiped the stummel with a make=up pad dipped in 95% ethyl alcohol.

The pipe was taken to the buffer for several coats of carnauba wax. The final step was to hand buff the Matched Grain with a microfiber polishing cloth.
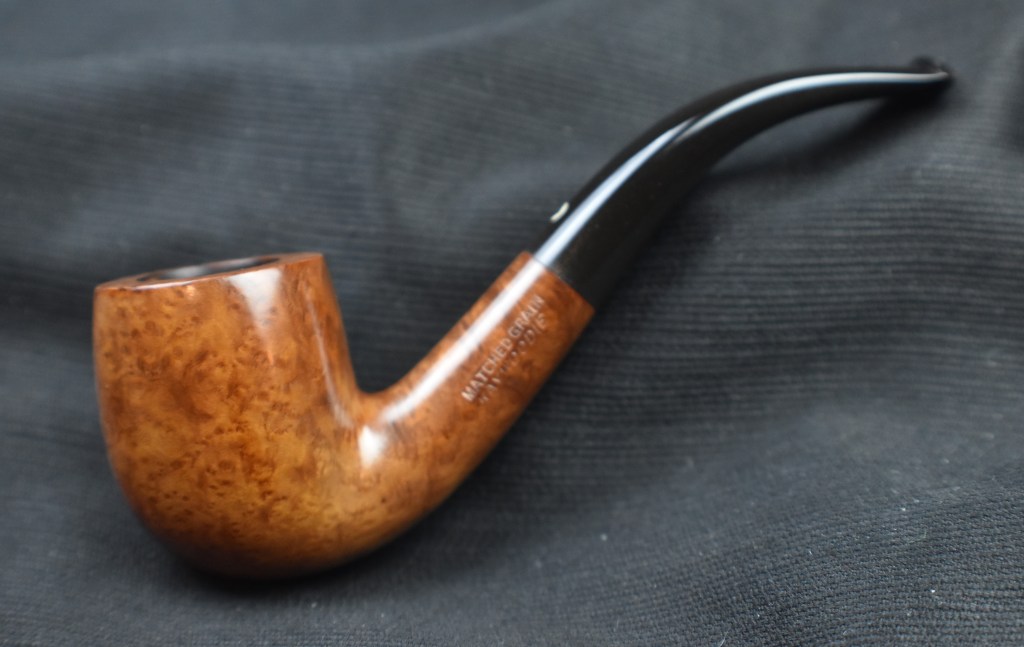
This beautiful Matched Grain Kaywoodie will unfortunately and most likely never again see it’s mate. It’s beauty will have to be appreciated on it’s merits alone. I think the pipe turned out very nicely. The briar is exceptional with outstanding grain and free of any pits or flaws. The stem reconstruction actually went as I imagined it would. That comes as a welcome shock to me. More times than not my imagined plans are dealt a rude awakening by reality. The dimensions of this Matched Grain 10 Bent Billiard are:
- Length: 4.90 in./ 124.46 mm.
- Weight: 1.28 oz./ 36.30g.
- Bowl Height: 1.72 in./ 43.69 mm.
- Chamber Depth: 1.47 in./ 37.39 mm.
- Chamber Diameter: 0.72 in./ 18.03 mm.
- Outside Diameter: 1.39 in./ 35.31 mm.
I do hope that you have found something here useful to your own pipe care, maintenance or restorations. If you like this sort of thing, please click the like and subscribe buttons. Thank you for reading the ramblings of an old pipe lover.
Below are some photos of the finished Matched Grain 10 Bent Billiard.


5 responses to “A Kaywoodie Matched Grain 10 Bent Billiard Restoration”
John, your craftsmanship is awe inspiring. Great job on the stem.
LikeLike
Thank you so much for your compliments.
LikeLike
John, sinceramente impresionante, me entretengo mucho con sus trabajos para un un viejo fumador de pipa de ochenta años sus trabajos son muy educativos y siempre aprendo algo.
Muchas gracias.
LikeLike
Thank you very much for your kind words. I am glad that you find my ramblings educational and helpful. May your days be filled with smokey contemplation.
LikeLiked by 1 person
Muchas gracias por tus buenos deseos y te animo de todo corazón a seguir con tus reparaciones y distendidos comentarios.
La de la “Sea-dog” me parece genial.
LikeLike