
Photographed and written by
John M. Young
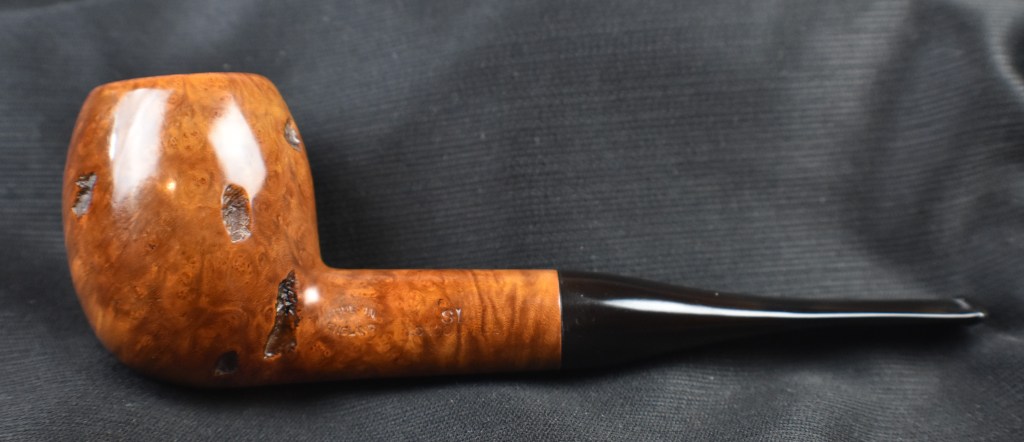
The term”big” doesn’t do this pipe justice. Giant, gargantuan, enormous all seem more fitting. I remember opening the package when it arrived in the mail. I’m pretty sure I said, “good Lord, that’s big.” Have I mentioned that “big” doesn’t do this pipe justice? For such a large pipe it felt remarkably good in my hand, then again, I am a fan of the apple shape. This pipe wore the stamps: MADE IN over ENGLAND in an oval to the left, SL over LONDON MADE all on the left shank. The right shank sported the stampings 52G while the stem bore an Old English script S on a shield. Below are some photos of the pipe prior to work being done.


Background
The stem logo on this pipe says, “I’m a Sasieni”. Well at least a Sasieni’s second…


That is where I started, with Sasieni. Joel Sasieni began building the company in London, England in 1919. I will let Stephen P. Smith, in his pipedia.com entry explain,
“In his book, “The Ultimate Pipe Book”, Richard Carleton Hacker writes American pipe collectors “seem to be more preoccupied with ’smokable’ brand names, of which the most collectible are Dunhill, Barling, Sasieni, and Charatan.” Theodore Justin Gage, the former publisher of the much missed “The Compleat Smoker”, called Sasieni pipes a “fascinating collectible, …representing all that is good about classic English pipe making.” And for good reason: the pipes made by the Sasieni company between the years 1919 and 1979 rank among the very best the London pipe industry had to offer. They featured superb wood, flawless bowls, outstanding smoking qualities, and a styling that was uniquely theirs.
Yet for all that, Sasieni’s are among the most underrated pipes on the collectible market, usually selling for far below their real worth. In this, they offer the astute collector a genuine opportunity, whether he or she is looking for a pipe with potential for appreciation, or simply a great pipe at a reasonable price.
However, in order for the collector to capitalize on this, it is vitally important to realize the Sasieni company changed hands on two occasions, and each owner had different priorities and agendas. Not surprisingly, this was reflected in the quality of the pipes made during these different times. All bore the Sasieni name, and yet they were very different pipes.
It is possible to divide the Sasieni history into three eras, similar to Barling. In fact, throughout this article, I will be referring to “Pre-Transition, Transition, and Post-Transition” Sasieni’s. While this may raise a few eyebrows, I believe it will become clear these classifications are actually quite appropriate.
Therefore, it will also become clear a collector must be able to distinguish between Sasieni’s of different eras, as it is mainly the family made pieces made between 1919 and 1979 which are truly desirable to collectors. The dual purposes of this article, then, are to trace the history of the Sasieni pipe, and to enable collectors to judge, with a reasonable degree of certainty, when the Sasieni in question was made.
A Brief History of the Sasieni Company
There is a great deal of mystery surrounding the Sasieni pipe, owing largely to the fact there is such a paucity of written information about them, as is the case with many collectible pipes. Even the name of the founder has been subject to debate. One respected source says the founder was named “Joel” Sasieni. Another equally respected source says with equal certainty the name was “Joseph” Sasieni. (A third, rather less reliable source once told me “Joel” and “Joseph” were brothers, but I think we can safely dismiss that.) An old Sasieni catalog which I came maddeningly identifies the founder as “J. Sasieni”. However, some research at the U. S. Patent Office conclusively shows that his first name was Joel.
Joel Sasieni apprenticed at Charatan, and moved on to Dunhill, where he eventually rose the position of factory manager. Many men would have been perfectly satisfied with such a position, but not Mr. Sasieni. He opened up his own factory in 1919, believing he could improve on some of Dunhill’s methods. Mr. Sasieni was, if nothing else, an optimist.
Things did not go smoothly for the new firm. The factory burned down almost immediately. Apparently undaunted, Mr. Sasieni simply rebuilt the factory and carried on.” (Sasieni – Pipedia)
Steven Smith’s writing goes on and is well done and informative. I highly recommend reading it if you are a burgeoning Sasieni fan or just interested.
As for this pipe, I could find no reference to the SL stamping. I assumed the 52G was a shape number and indeed a Sasieni shape chart from pipedia.org lists the 52 as a “Hurlington” and matches the shape of this pipe beautifully. I am assuming that the 52G is the Hurlington in a giant form.

(File:Sasieni Pipe Shapes.jpg – Pipedia)
Another Sasieni shape chart states that Sasieni has “160 SHAPES”.

(File:SasieniShapes.jpg – Pipedia). 160 is a remarkable number of shapes for a manufacturer to keep track of much less the carvers employed making those shapes. Remember, this was all long before a quick google search to remind oneself of the dimensions of a particular shape.
The Restoration
The Sasieni found its way to the workbench and a cleanish denim piece. The stem was a very tight fit after the photo shoot. I did not force it back into place as that’s where I planned to start with this restoration, anyway.

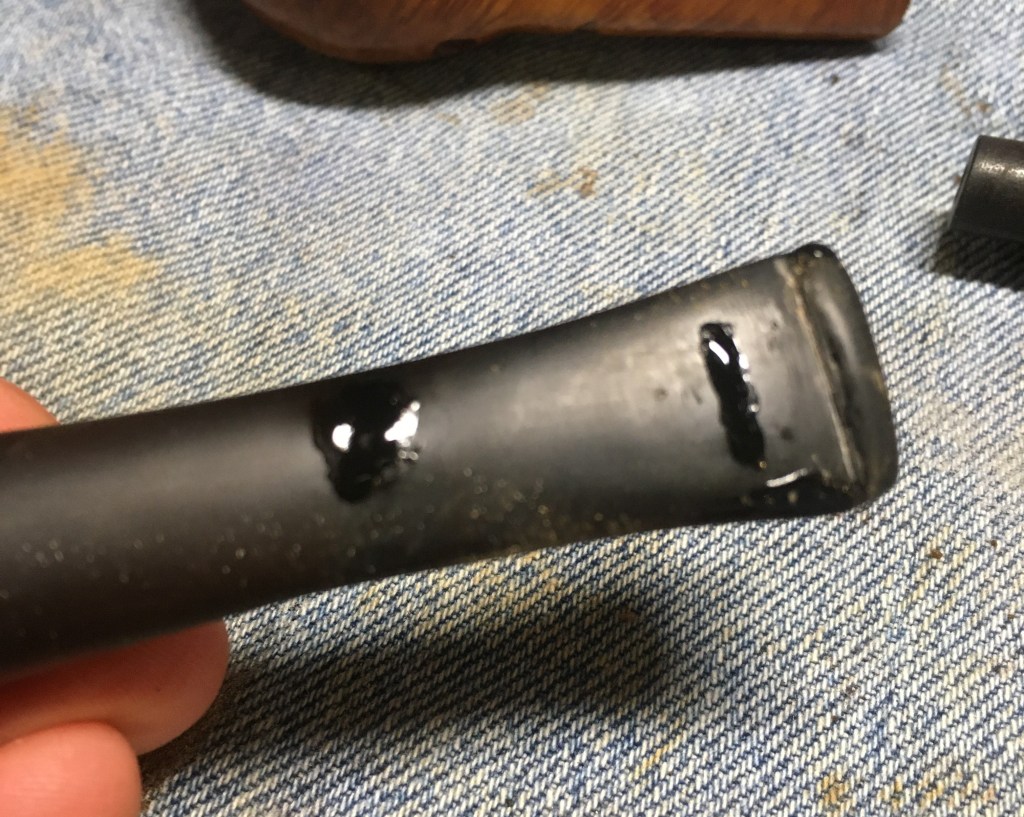
The calcium deposits on the stem were heavy and combined with the also heavy oxidation made for a rather ugly mess. I started by scraping the surface from the stem with a sharp pocket knife.

Once scraped, I buffed the stem with 0000 steel wool.

The airway was cleared of the tars and yuk which had taken up residence there. A good many bristle pipe cleaners and 95% ethyl alcohol were used to clean the airway.

With the inside and outsides cleaned, it was time for the stem to go into deox. That is my term of endearment for Before and After Extra Strength Deoxidizer. I thought this stem would require at least 4 hours of chemical love.

I turned my attention to the stummel. The reaming tools were assembled with the PipNet’s #2 and #3 blades getting used.

The reaming was done mainly with the PipNet.

The Smokingpipes Low Country reaming knife and the General triangular scraper. When the scraping was done the tobacco chamber was sanded to bare briar with 320 sandpaper wrapped around a wood dowel.

The lava on the rim was moistened with saliva and scraped with a sharp pocket knife.

The stummel was then scrubbed with undiluted Murphy Oil Soap and a nylon scrub brush. You can see the grime in the bristle of the brush, below. The soap was rinsed with warm water and the stummel dried with a cotton hand towel.

The Airway of the shank was equally as dirty as the stem’s. I used the Kleen-Reem shank drill tool to drill out the airway. That seemed to have done a great job at scraping. I still used the dental scraper along with several scrubs with the shank brush, bristle pipe cleaners and cotton swabs but the drill removed a large amount of tar from the airway.

The stamps were covered with painters tape to preserve their detail during the sanding.


The stummel was sanded with a series of sanding sponges from 400-3000 grit. Between each sponge I wiped the stummel with a make-up pad moistened with alcohol.

The final sanding sponge was the 3500 grit. This one was allowed to sand under the tape.

The stummel was then worked with micro-mesh pads 4000-12000 grit. Again between each pad I wiped the stummel with alcohol on a make-up pad.

The stummel received a coat of Before and After Restoration Balm and was allowed to sit for 20 minutes.

After 20 minutes the remaining balm was wiped with an inside out athletic sock.

After two hours I removed the stem and used the patented Deox Drip-Under-Matic Mechanical irrigation and Egress System (DDUMMIES) to drip dry the stem.

The stem was wiped with a coarse shop rag. This allows for the excess solution to be absorbed and abbrades some of the oxidized vulcanite at the same time.

The stem’s color looked much better but the wear of the stem and the removal of oxidation showed a much reduced stem. The button had been smoothed almost to oblivion. This was going to take some time to rebuild.


I first painted the stem with a butane light hoping to have the vulcanite rebound a little bit and reduce the tooth dents. This provided minimal effect. The stem was then painted with a coat of black cyanoacrylate (CA, super glue from the end of the button to about 1 ½ inches or 4 cm.

The CA was spritzed with a CA drying accelerator. This speeds the curing time to nearly immediate but does leave a roughened surface.

The rough surface was filed. The low spots remained more glossy and would require additional applications of black CA.

The second application still had some low spots but they were becoming smaller and fewer.


Finally I was down to only two spots for reapplication on both the top and bottom.

The final CA spots were smoothed with the small file and 400 sanding sponge.

The button received its final shaping and shaping.

Unfortunately the faint stem logo was lost with the exposure to the Before and After Extra Strength Deoxidizer Strength.

The stem was sanded with a series of sanding sponges with grits of 400-3500. Between each sponge the stem was rubbed with mineral oil and wiped with a dry paper towel.

The stem was further polished with 4000-1200o micro-mesh pads. I neglected to photograph this process but can state that between the pads the stem was rubbed with Obsidian Oil and wiped with a dry paper towel. The final polishing was done at the buffer with White diamond buffing compound and a clean flannel wheel. The pipe received several coats of carnauba wax with the buffer. A hand buffing with a microfiber polishing cloth was done to further raise the shine of the briar and vulcanite.
I have to admit that this Sasieni Hurington looks very impressive just by the nature of its size. The pipe feels great in the hand which is good, because there is no way that it is comfortable to clench for more than a few seconds. Its length and mass prove to be a physical feat of power lighting which would test the most capable jaw musculature. The briar looks beautiful with the rusticated spots concealing flaws in the piece while adding character. The stem turned out very nicely with hardly any sign of the reconstruction which was done to repair the aged and worn vulcanite. Overall it is a remarkable pipe which, the term “big” hardly does it justice, in case you had forgotten. The dimensions of this Sasieni SL 52G Hurlington are:
- Length: 7.36 in./ 186.94 mm.
- Weight: 2.48 oz./ 70.30g.
- Bowl Height: 2.21 in./ 56.13 mm.
- Chamber Depth: 1.77 in./ 44.96 mm.
- Chamber Diameter: 0.82 in./ 20,82 mm.
- Outside Diameter: 1.80 in./ 46.37 mm.
I do hope that you have found something here useful to your own pipe care, maintenance or restorations. If you like this sort of thing, please click the like and subscribe buttons. Thank you for reading the ramblings of an old pipe lover.
Below are some photos of the finished Sasieni SL 52G Hurlington.


