
Photographed and written by
John M. Young
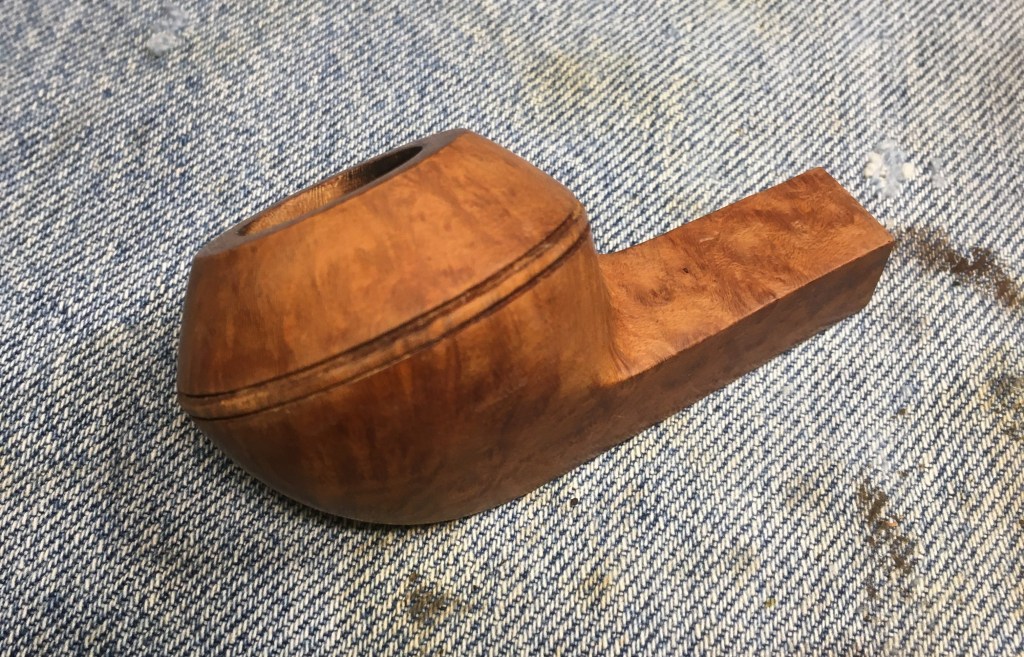
If Vincent van Gogh were to have been a pipe carver this pipe may have been carved to compliment his Starry Night painting. The carved swirls remind me of van Gogh’s famous stars. Maybe that is what struck me about this piece or maybe it was the 14 karat solid gold band. With gold breaking $3500 per ounce, I suppose more folks are going to be hunting for the solid gold work on all kinds of old pieces. This pipe was picked up from an antique dealer in Beverly, Massachusetts last month and got itself bumped up in the queue due it’s amazing carving. Below are some photos of the pipe as it appeared upon arrival before work started.


Pretty cool, right? The bone tenon extension was a real bonus as those typically indicate a higher level of quality and workmanship. The gold band was tarnished. This was weird because gold doesn’t tarnish, perhaps the copper and silver which were added to the gold all settled on the surface (metallurgical humor, there). The pipe was in very good condition and did not look like it would need much more than a thorough cleaning and a bit of stem work, tooth dent removal and better fitting of the tenon with the mortise. Speaking of the stem, it did not appear to be vulcanite but rather a hard plastic. Another weirdism.
Background
I began the research for LHS with pipephil.eu. There I found the following short piece on the company along with many examples of stampings matching the stamping from this pipe.:

LHS — Pipes : Logos & Markings
The next stop on the research train was at pipedia.org. There I found greater detail regarding the company and it’s founders, brothers Ludwig and Hugo Stern.
“Ludwig Stern, a successful pipe manufacturer since 1893 and closing around 1960, reorganized his company along with his brother Hugo Stern, opening a factory in 1911. They named the company L&H Stern Smoking Pipes & Holders. The newly formed company was moved into a six story building on the corner of Pearl and Waters street Brooklyn, NY.
Notes from Geyer’s Stationer
Thoroughly organized in all departments, and housed in a well-lighted and ventilated modern office and manufacturing building, the firm of L&H Stern Inc. is located near the first arch of the Manhattan bridge, near the river and convenient to the Brooklyn bridge, which makes it accessible from all the hotels in the metropolis for visiting buyers. The structure is six stories with a seventeen-foot basement, with light on three sides through prismatic glass windows, the first floor being seven feet above the sidewalk. Light enters the upper floors from all four sides.
L&H Stern is known to every important wholesaler and jobber in the country. LHS manufactures a complete line of briar pipes. Ginmetto wood pipes are also made, as well as Redmanol goods, the man-made amber. The first substitute for amber. Everything, even down to the sterling silver and other metal trimmings are made under one roof.” (LHS – Pipedia).
The pipephil.eu site did have a great set of photographs of the LHS Brooklyn factory and they can be seen below.

(Document: L&H Stern factory — Pipes : Logos & Markings –)

(Document: L&H Stern factory — Pipes : Logos & Markings –)

(Document: L&H Stern factory — Pipes : Logos & Markings –)

(Document: L&H Stern factory — Pipes : Logos & Markings –)
I still find it hard to imagine that New York City was a manufacturing hub. In my mind NYC is a place of offices and apartments housing people all like Jerry Seinfeld, George Costanza, Elain Benes, Cramer and Newman. As you may have guessed, I have never been to NYC.
This Sterncrest 14k. according to the quality guide from pipephil.eu, was LHS’s second highest quality line.

(Document: LHS Grading — Pipes : Logos & Markings –). What would today’s equivalent of $7.50 in 1944 money? According to the US Bureau of Labor Statistics,

(CPI Inflation Calculator). A $138 pipe is not considered to be a “highend” pipe by today’s standards but more in line with a standard Savinelli or Peterson factory made base pipe. The threaded bone tenon and sold gold band lead me to think that the Consumer Price Index may be missing exact relevance or that quality standards of today are much different than that of 1944. If you are curious, I used http://coinapps.com/gold/gram/calculator/ to value the 0.4 g 14K gold band. The below is a screen shot using the gold value as of 4/25/2025:

The Restoration
The Starry Night Sterncrest, the pipe’s new nickname (do you like it?) made it to the workbench and a cleaned denim piece.

I disassembled the pipe. I was slightly surprised with the ease that the bone tenon unscrewed from the stem. Frequently these old bone tenon extensions become fused to their stems and require their destruction to remove.

The bone goes from white to nearly black with smoking. This one was a uniform dark brown.

The shank cleaning was done with 95% ethyl alcohol, cotton swabs, pipe cleaners and a dental scraper.

The reaming tools were gathered.

The PipNet reamer and the #1 and #2 blades did most of the work removing the cake from the tobacco chamber.

The chamber looked good and was then sanded with 220 sandpaper wrapped around a wood dowel.

After sanding to bare briar the chamber was inspected for any damage due to heat or charring. None was observed.

I took the stummel to the sink for a scrubbing with undiluted Murphy Oil Soap and a nylon scrub brush. The soap was rinsed with warm water and the stummel dried with a cotton hand towel.

Returning to the workbench the grooves in the carvings still looked rough as if partly filled with dirt and grime.

The rim also looked like the carvings retained some lava, smoking residue.

The rim was scrubbed with a brass rush dipped in ethyl alcohol and wiped with a make-up pad.

I wiped the stummel with a make-up pad dipped in 95% ethyl alcohol. The pad picked up quite a bit of old stain.

Since the brass brush worked well with the rim, I decided to try scrubbing the carvings with it and ethyl alcohol. The color is not off in the photo below. My fingers were stained with the stain from the stummel. What I had thought was dirt and grime in the grooves was actually accumulated stain.

The carvings looked better after being scrubbed, wiped and allowed dry.


I turned my attention to cleaning the airway of the stem. Again I used ethyl alcohol and bristle pipe cleaners. The stem was surprisingly clean.

The same was done with the bone tenon extension.

I addressed the overly tight fit of the tenon to the mortise by sanding the tenon with a 400 grit sanding sponge.

Once sanded I applied a light coat of petroleum jelly to the tenon and retried the fit.

The fit was great with the appropriate tightness.

I wanted to remove the tarnish from the 14k solid gold band. It was thin and to reduce the risk of bending it I wanted to polish the band on the shank. I wrapped the shank in masking tape to protect the briar from discoloration due to the polishing cloth chemicals.

Cape Cod Metal Polishing Cloths were used to remove the tarnish from the band. I have to comment that the smell of this metal polish is a high point of using it. It has a wonderful aroma.

The band after polishing was returned to a brilliant gold color.

The shank, band included, was rewrapped with masking tape again for its protection from sanding.

Before sanding, I wanted to remove the tooth chatter from the stem. I was leery of using a lighter to “paint” the stem as I was unfamiliar with this type of stem material and did not know how it would react to flame. I opted to just file the chatter with a small flat file.

The area was sanded with 320 and 400 grit sanding sponges.

The stem was then sanded with a series of sanding sponges from 320-350. Between each sponge the stem was rubbed with Obsidian Oil and wiped with a paper towel. After the sanding the stem was taken to the buffer and polished with rouge compound with the rouge wheel then white compound with the white compound wheel.

I removed the masking tape and wiped the shank with a make-up pad dipped in alcohol to remove any traces of adhesive from the tape. The stummel was then given a coating of Before and After Restoration Balm worked into the carvings with a soft fiber tooth brush and allowed to sit for an hour.

The stummel was then hand buffed with an inside out athletic sock to remove excess Restoration Balm.

I applied Before and After Hard Rubber Balm to the bone tenon extension. I am sure that Mark Hoover didn’t intend for his balm to be used on bone but the product works amazingly well at preserving vulcanite stems and I figured that it would work equally as well on bone. I then reassembled the stem.

The stem and stamping surface were given several coats of carnauba wax at the buffer. Apply carnauba to the carving as they were too deep and would likely accumulate a thick wax coating which would then accumulate dirt.

The stummel was waxed with Renaissance Micro-Crystalline Wax with a baby tooth brush and buffed with a clean flannel buffing wheel. The edge of the wheel was used to work excess wax from the deeper carving grooves while still receiving a protective coating. I have to say that I also love the smell of this wax.

The final step was a hand buffing with a microfiber polishing cloth further deepening the shine.
Personally, I think this LHS Sterncrest 14K 39 billiard, AKA: Starry Night Sterncrest, restored very nicely. The swirling carvings are eye-catching and something not seen on modern production pipes. The bone tenon extension is also a link to simpler days. The stem polished up beautifully and both is set apart from the carvings and is accentuated by the gold band. The light weight of this pipe should make it a fine clencher and the sarving are both pleasant to the eyes and provide a great feel in the hand. The dimensions of the LHS Sterncrest 14K 39 billiard are:
Length: 5.68 in./ 144.27 mm.
Weight: 0.95 oz./ 26.93 g.
Bowl Height: 1.54 in./ 39.12 mm.
Chamber Depth: 1.34 in./ 34.04 mm.
Chamber Diameter: 0.76 in./ 17.78 mm.
Outside Diameter: 1.32 in./ 30.48 mm.
I do hope that you have found something here useful to your own pipe care, maintenance or restorations. If you like this sort of thing, please click the like and subscribe buttons. Thank you for reading the ramblings of an old pipe lover.
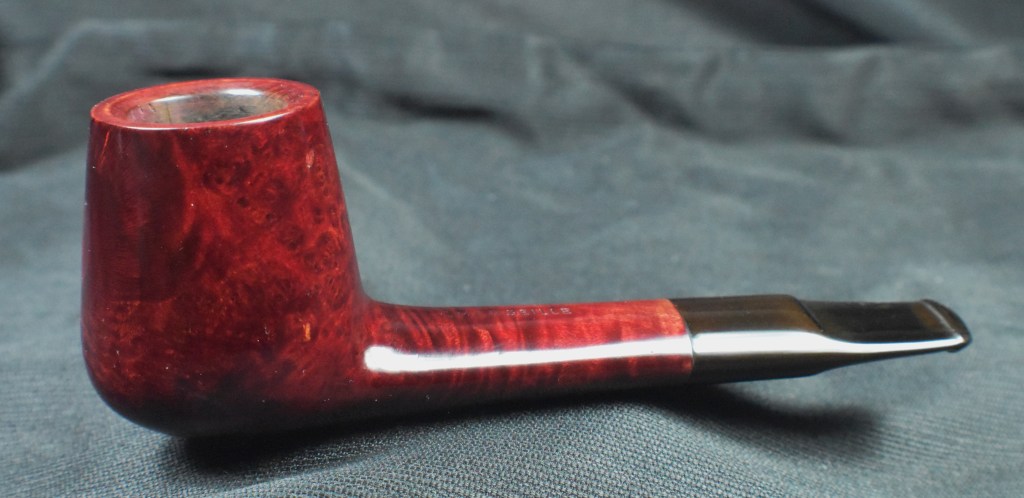
Below are some photos of the finished LHS Sterncrest 14K 39 billiard.


 (
(


 Which, in all honesty, is the same as nothing. The pipe has no country of manufacture (COM) stamp but, if I were a betting man, I’d bet on France. Marseille makes me think of Marsielle Marso but I kind of dislike bringing that up due to the dislike of mimes in general by AMericans. At least in my experience mimes are not appreciated.


 .
.


Leave a comment