I don’t understand how the red in pipes is so difficult to capture in photographs. The oxidation is easy to capture and this stem had plenty of that. The rim was coated in a layer of lava indicating a fair amount of use but the tobacco chamber was pretty clean. Perhaps the previous owner liked to keep the cake to a minimum but was not concerned about rim maintenance. I did not like the look of the clear coat on the pipe and hoped that would be easily removed. Overall this looked like a straightforward restoration.
Background
I can barely say anything about this pipe. Pipedia.org has nothing on Marseille. Pipephil.eu has the following:
Which, in all honesty, is the same as nothing. The pipe has no country of manufacture (COM) stamp but, if I were a betting man, I’d bet on France. Marseille makes me think of Marsielle Marso but I kind of dislike bringing that up due to the dislike of mimes in general by AMericans. At least in my experience mimes are not appreciated.
Smokingpipes.com has two old estate pipe listings. One by Butz-Choquin
Both Butz-Choquin and Chacom are French pipe makers although the lack of any maker’s stamps or COM on the Marseille at hand opens any conclusion I make to pure speculation.
The Restoration
This is the second pipe of the double restoration. The first was the E. Wilke Squashed Apple. If you missed that restoration there is the link. I said in that one that I do not normally like to work on more than one pipe at a time. Anyway, here is the Masrielle situated on a clean denim piece.
I lightly sanded the stem with a 400 grit sanding sponge. I was careful to avoid the stem logo.
Next the tooth marks were filed smooth with a small flat file.
The stemairway was cleaned with 95%ethyl alcohol and pipe cleaners. The button was a little bit constricted so I used a Vermont Freehand Slot Funneling Tool to clean up the slightly off-center drilling. I also used a piece of emery board (fingernail file) to sand the airway at the button.
The stems of both project pipes were suspended in Before and After Extra Strength Deoxidizer (deox). The stems were left in the solution for four hours.
I returned to the stummel and cleaned out the airway within the shank. 95% ethyl alcohol with cotton swabs and a nylon shank brush were the tools of choice here.
Next came the ream team: The PipNet with #2 blades, the Smokingpipes Low Country Reamer and the General triangular scraper with the tip ground off, round were called up for duty.
They all served valiantly with the PipNet doing the lion’s share of the work.
Once sanded Chuck marks within the tobacco chamber could be observed. This told me that the pipe, though used, had not experienced a lot of use.
The stummel made her way to the sink for a scrubbing with undiluted Murphy Oil Soap and a nylon brush. The soap was rinsed with warm water and the stummel dried with a cotton hand towel.
The scrubbing did not remove the lava from the rim as well as I had hoped. Back at the workbench a wipe with ethyl alcohol on a make-up pad barely touched the clear coat and the lava.
The rim required a bit of scraping with a sharp knife. Saliva was applied to soften the deposits on the rim prior to and during the scraping.
It was looking better.
The problem with a good scraping was what it uncovered. The absence of the lava highlighted some dings on the rim. Topping would be my solution to this.
I wondered if wiping the stummel with acetone on a make-up pad would be sufficient to dissolve away the clear coat.
The acetone was working but oh, so slowly.
Light sanding helped etch the coating but it was still a slow process.
I decided to give the stummel a 30 minute bath in acetone.
After 30 minutes the stummel was removed and wiped with another make-up pad.
The shininess of the clear coat was gone and with it most of the red stain.
The four hour deox bath ended and both stems were set up to drip excess deon solution back into the jar.
The Marseille stem was vigorously rubbed with a coarse shop rag to remove both the remaining deox solution and some of the oxidized vulcanite.
The stem was scrubbed with Soft Scrub cleanser on a few make-up pads to remove more of the stubborn oxidized vulcanite.
Both stems were oiled with mineral oil and set aside overnight.
I returned my attention to the stummel. I wanted to try to return it to the reddish brown. I assembled the materials needed to dye the stummel; Dark Red Fiebing’s Leather Dye, a lighter , a wine bottle cork and a pipe cleaner. The cork was to be both a plug, keeping dye out of the tobacco chamber and a handle. The lighter, for flaming the wet dye, allowing the alcohol solvent to burn off and set the dye to the briar and the pipe cleaner as an applicator.
Below is the freshly dyed stummel in red.
The stummel was allowed to air dry another 30 minutes at the workbench.
A second dying was done with mahogany Fiebing’s Leather dye and the same process as with the red dye.
Below is the freshly dyed stummel with mahogany over the red dye.
This too was allowed to dry for 30 minutes before lightly wiping the stummel with a make-up pad wetted with 95% ethyl alcohol.
The stamps were taped with painters tape to protect them during the sanding to come.
The stem and stummel were reconnected and sanded together. A series of sanding sponges in grits of 600-3500 were used. Between each sponge the stummel was wiped with an alcohol dampened make-up pad to remove sanding debris. The stem was rubbed with a light coating of mineral oil and wiped with a paper towel between sanding sponges. You can see in the photo below where I wiped the sponges off on the denim. It not only protects the workbench surface but is a great place to wipe sanding sponges.
The stummel was then worked with micro-mesh pads 4000-12000. The wiping of the stummel with a make-up pad was repeated as was the oiling and wiping of the stem.
The pipe was taken to the buffer for several coats of carnauba wax. The final step was a hand buffing with a microfiber polishing cloth.
I said it before and I say it again, I am developing an appreciation for the oval shank. It is a feature that provides a more robust feel in the hand while retaining a more elegant contour in profile. I am sure the extra briar also provides additional strength for those who are a bit more hard on pipes. The oval shanked volcano of this Marseille restored beautifully. The dye turned out lovely and the factory staining was fairly well mimicked. The stem oxidation was problematic with the loss of the logo disappointing. I admit that I am not finished with this restoration. I am waiting for another brand of stem deoxidizer which a supplier has sent me to try. I want to try it on this stem and report the findings when I have used the product. Stay tuned for updates. Overall I am very pleased at how well this pipe turned out. The dimensions of the Marseille Oval Shank Volcano are:
Length: 5.05 in./ 128.27 mm.
Weight: 1.47 oz./ 41.67 g.
Bowl Height: 1.84 in./ 46.74 mm.
Chamber Depth: 1.47 in./ 37.34 mm.
Chamber Diameter: 0.76 in./ 19.30 mm.
Outside Diameter: 1.56 in./ 39.62 mm.
I do hope that you have found something here useful to your own pipe care, maintenance or restorations. If you like this sort of thing, please click the like and subscribe buttons. Thank you for reading the ramblings of an old pipe lover.
Loading…
Below are some photos of the finished Marseille Oval Shank Volcano.
I will probably catch grief for calling this a squat apple and be corrected by some saying it is a tomato or an author but to my eye, it looks like an apple and to be specific an Cortland Apple sans the anthocyanins and their red. Sorry, my previous life as a chemistry teacher emerged and demanded recognition. This plump little darling caught my eye along with its long shanked Marxman coconspirator. The eBay listing only had two photos, the below is a screenshot of one of them:
Those adorable chubby cheeks demanded that I buy the pair. There was a little bit of drama but I’ll leave that to the blog about the Marxman but after a few days wait, the E. Wilke and Marxman both arrived.
Below are some photos of the pipe prior to working on it.
Yeah, it had some issues but that shape, that amazingly round bowled shape. I was smitten. The stem looked like a Weber that had been left out in the sun. The pipe had obviously been smoked and showed the signs of moderate use, as shown by the charring and lava on the rim. There was also that strange dark streak of the right shank and that truly dreadful fissure on the bottom of the shank but those chubby cheeks could not be denied. I would reclaim this dilapidated doll and make her mine.
Background
E. Wilke stamped on the shank of this pipe refers to Edwin Wilke. According to pipedia.org,
“Edwin Wilke founded Wilke Tobacco in 1872. As the story goes, according to a 1937 New York World-Telegram article, he had no sons, and so he taught his two daughters, Anna and Louisa Wilke, how to make pipes and blend tobacco, and by his death in 1930 they were well versed in both trades, and adamant about only using quality briar. In 1950, when they were the focus of an article in the Sarasota Herald-Tribune, they were the only women pipe makers in the United States, and had sold pipes to Herbert Hoover, Lord Halifax, John Steinbeck and others. The sisters also blended pipe tobacco and repaired pipes. They did not, however, smoke pipes.
Wilke prided itself on “unpainted pipes”, and promised that only Macedonian briar was used, without paint, varnish, plug, or putty of any kind. As of 1950, some of their pipes were selling for up to $100.00, or just under $1,000.00 dollars today. By the release of a 1970 New York Magazine highlight of the shop, that claim had risen to $500.00, or over $3,000.00 today.
The Wilke Pipe Shop was located for decades at 400 Madison Avenue and 48th, in New York City, and in the 1970s opened a satellite store in the famed Wanamaker’s department store in Philadelphia, selling Wilke pipes made by Steven Johnson. In 1983, the brand was purchased by pipe maker Elliott Nachwalter and his wife, Carole Burns. They continued to operate the Madison Avenue store until the early 1990’s, at which point the couple moved to Vermont and Pipeworks & Wilke was born as a mail-order business.
Carole Burns[1] continued blending tobacco in Montpelier, Vermont till July 2017. Now John Brandt looks to continue blending Wilke’s traditional blends and bringing back some of the older blends from the early days to keep the 145 year old brand alive and growing.[2]“ (Wilke – Pipedia)
Now, this pipe did seem to fit a couple of the characteristics from the pipes.org article; it was unvarnished and it did not seem to have any putty filling imperfections in the briar. I cannot speak to the “Macedonian briar” as there is no stamp indicating the origin of the briar. I still think that the stem of this pipe reminds me of Weber made pipes from the same era. In researching further I found an old Google Groups discussion of E. Wile pipes from 2002. Here the user “” started a thread with the following,
“Can anyone give me a brief history about this manufacturer or brand? I
am curious about… if this was a NY company that made pipes, still in
The interesting part came from another user named “LDaneman”. LDaneman, states the following”
“As a former employee and pipemaker for Edwin Wilke Company, I can give you a
little history. The little shop on Madison Avenue was purchased by a Stanley Becker, a jewish NY lawyer. Some pipes were left over from Wilke’s hey-day, . . . I forget the name of the Italian pipemaker who did extra-large art deco shapes.
Through the 80’s the old (80+) tobacconist still blended up on the 4th Floor and I have fond memories of ‘time-traveling’ with him. The 524 blend was better than Dunhill, and the 400 was pretty good as well. The key was an unflavored golden Cavendish and a dark fine cut Cavendish in the 524.
I started a new pipemaking workshop in Philadelphia for Wilke’s concession shop in John Wanamaker’s department store. Our pipes made national news and we shipped tobaccos to European customers. My pipes sold from $65 to $1000 but our main pipemaker was Stephen Johnson. Last I heard Steve worked for Zino Davidoff.
Steve made some sweet smoking pipes and I smoke a few of my own make with the Wilke stamp, but still own a couple by Steve as well.
I was fired under dubious circumstances. The management of Wanamakers hated me since I successfully marketed Eltron razors when they failed, pens, and really hit the roof when I began blending a men’s fragrance.
Wilke in Philly folded less than a year after my departure into the perfume business and the New York shop was sold soon after that. I heard Wilke finally vanished after the buyer was hit with unpaid employee taxes and was bankrupted, but that is just a rumor to me, . . . I don’t know if that is true or not.
Most the Wilke pipes are not especially good, mass-manufactured by a factory whose name escapes me. Unless made by the old Italian fellow (an indented tenon is usually an indication of his make) or by Steve Johnson, . . . well just forget it.
Now, I have no reason to doubt anything that LDanman writes. The pipeda.org information indicates that the location of the Wanamaker’s in Philadelphia occurred in the 1970s and that LDaneman “Set up a new pipe making shop” on Wanamakers mezzanine. This too would likely be during the 1970s. His knowledge of the company is interesting but his jumping around in time, frustrating. The part about the Weber made pipes was particularly interesting as I thought the stem of this pipe looked like a Weber made stem.
The Weber connection is further supported by information again from pipedia.org,
“The firm grew to be one of the giants of the American pipe industry focusing itself in the middle price and quality zone. Trademark: “Weber” in an oval. Beside that Weber – especially in the years after 1950 – was a most important supplier for private label pipes that went to an immense number of pipe shops. Alone in New York, exactly the same pipes were found at Wilke’s, Barclay Rex, Trinity East, Joe Strano’s Northampton Tobacconist in Ridgewood, Queens, Don-Lou in Bensonhurst, Brooklyn… Nearly all pipes for Wilke were unstained and many models, for example the “Wilke Danish Bent”, could hardly deny originating of Weber.” (Weber Pipe Co. – Pipedia)
So, the question remains, “who made this pipe and when?” I honestly do not know. I feel pretty sure of my original thought that this was a Weber made pipe, likely from the 1970 or later. Produced for the E. Wilke company.
The Restoration
As usual the pipe made its way to the workbench and a clean denim piece. I actually undertook the restoration of two pipes during this project. That is not something I really like to do but my schedule has been filled with essential time sucking activities. Okay, I’ve been doing a bit of fishing and have not been at the workbench as much as I should.
The stem required some work before I could put it into the Before and After Extra Strength Deoxidizer solution (deox). This will be called pre-deox and involved; some scraping of calcium/oxidation, filing tooth dents and light sanding with a 400 grit sanding sponge.
The stem was also cleaning out internally with bristle pipe cleaners dipped in 95% ethyl alcohol.
The stem had trouble passing a pipe cleaner through the button so I did work on opening the airway a little bit. I used a tapered piece of an emery board to sand the interior of the airway.
The resulting airway was much better.
The stems of the two project pipes, the E. Wilke and another oval stemmed piece were suspended in deox with pipe cleaners as hangers. They each spent about four hours in the solution.
During this time I continued work on the E. Wilke stummel. The shank was cleaned out using a dental scraper, nylon shank brush, cotton swabs and pipe cleaners with 95% ethyl alcohol.
Once the shank was clean I turned to the tobacco chamber. The PiNet #1 and #2 blades along with the General triangular scraper and the Smokingpipes Low Country Reamer were used.
The below photo shows the results of each tool.
After reaming the chamber was sanded with 220 sandpaper wrapped around a wood dowel. The tobacco chamber showed no signs of charring or heat damage.
Next, the stummel went to the sink where it was scrubbed with undiluted Murphy Oil Soap and a nylon scrub brush. The soap was rinsed with warm water and the stummel dried with a cotton hand towel.
The scrubbing revealed an unsightly charred rim and a dark stain I thought was accumulated grime.
A second scrubbing of the stummel was done with no effect on the supposed grime.
Back at the workbench I got a good look at the two areas of concern. The charred rim would require topping and then some.
The rest of the stummel looked pretty good.
An alcohol wipe confirmed that there was no finish on the stummel.
I took the stummel to the counter where I laid a piece of 320 sandpaper flat on the counter.
Using a figure 8 motion I topped the rim removing the charred wood.
The results of the topping are shown in the photo below.
The charred area below the rim was lightly filed and I attempted to blend the filing to minimize the noticeability of the filing.
The dark streak on the lower right shank was some strange stain on the briar.
I have had good results using a saturated oxalic acid solution to bleach stains from wood and thought it might be useful for both the rim and the shank.
The oxalic acid was applied to the darkened areas with a cotton swab and allowed to sit for 20 minutes.
After the initial 20 minutes I applied more oxalic acid to the entire stummel. This was allowed to sit for another 30 minutes.
After the stummel was scrubbed a third time using Murphy Oil Soap and a copious amount of rinsing the stummel was dried using the cotton hand towel. Once dry the results of the oxalic acid were observed. The stummel looked better but not as good as I had hoped.
The darkened areas had been lightened but they remained darker than the surrounding briar.
I started repairing the blemish on the bottom of the shank. I know E. Wilke was proud of their “no putty” but that pit was unacceptable to me.
I applied brown cyanoacrylate (CA, super glue) to the pit with a fly tying bodkin.
A dental scraper was used as a spoon to scoop a small amount of briar dust and place it on the wet CA.
The back of the dental scraper was used to press the briar dust into the wet CA in the pit.
Additional brown CA was applied to the pit after the dust had been brushed off.
A second application of brown CA was applied once the first had cured.
After the second application had cured and set up, I filed the fill using a small flat file to remove the new fill material and smooth the surface.
The new fill was then sanded with a 400 grit sanding sponge.
I sanded the entire stummel with a 400 sanding sponge followed by a sanding with a 600 sponge. I was looking for additional spots which might require CA filling. I found none.
I figured the best way to conceal the darker areas caused by the charring or staining was to give the stummel a contrast dye. I thought a black undercoat of dye might be the perfect camouflage. I covered the stamp with painters tape hoping this would prevent the dye from dying the stamp area. It didn’t.
The stems were removed from deox and allowed to drip excess solution back into the jar.
The E. Wilke stem was vigorously rubbed with a coarse shop rag to remove both remaining solution and oxidized vulcanite.
The stem was then scrubbed with Soft Scrub cleanser applied to make-up pads. This removed more oxidized vulcanite.
Below you can see the E. Wilke and the other restoration victim. Both stems had been oiled with mineral oil after their Soft Scrub ordeals.
The dye kit was gathered. It consisted of Fiebing’s Black Leather Dye, a cork to keep dye from the tobacco chamber, a lighter and a pipe cleaner as an applicator.
The Fiebing’s Dye was applied and flamed, burning away the alcohol solvent of the dye and fixing it to the briar.
The stummel was then rinsed with 99% isopropyl alcohol and wiped with a paper towel.
Back at the workbench the results of the black dye can be seen. The dye penetrated the softer grained briar more than the harder grain. A light sanding removed the outermost layer of briar revealing lighter and darker areas due to penetration depth.
Below is a photo of the sanded stummel.
The stem and stummel were then sanded with a series of sanding sponges from 400-3500 grit. The stummel was wiped with an alcohol dampened make-up pad between each sponge while the stem was rubbed with mineral oil and wiped with a paper towel between sanding sponges.
The stem and stummel were then worked with micro-mesh pads from 4000-12000. Again stummel wiping with an alcohol make-up pad between micro-mesh pads was done. Between pads the stem was runned with Obsidian Oil and wiped with a paper towel.
The pipe was then taken to the buffer where it received several coats of carnauba wax.
The final step was a hand buffing with a microfiber polishing cloth.
Overall, I am very pleased at how well this E. Wilke pipe turned out. Though it is likely not an example of the highest quality E. Wilke pipe of the company’s heyday, still is a lovely little piece. The contrast stain did a good job of concealing the blemishes that the pipe accumulated over the years of use. The stem polished up nicely and the glossy black accentuated the light and dark grain from the contrast dye. The thick walls and the cheekiness that they provide are even more pronounced with the finished pipe than they were when it arrived and I think it is far more attractive now. The dimensions of the Carlyle Oval Shank Dublin are:
Length: 5.00 in./ 127.00 mm.
Weight: 1.08 oz./ 30.62 g.
Bowl Height: 1.42 in./ 36.07 mm.
Chamber Depth: 1.06 in./ 26.92 mm.
Chamber Diameter: 0.72 in./ 18.29 mm.
Outside Diameter: 1.58 in./ 40.13 mm.
I do hope that you have found something here useful to your own pipe care, maintenance or restorations. If you like this sort of thing, please click the like and subscribe buttons. Thank you for reading the ramblings of an old pipe lover.
Loading…
Below are some photos of the finished E Wilke Squat Apple.
This brings me to the bad news, the bad news is that it is a Comoy’s. I suppose I should explain, Comoy’s is really a collaboration between the Chapuis and Comoy’s families and centered in two locations, the Saint-Claude region in France and London, England. There are many names involved over a 150 year period. The various people are related and moved between countries over the years. This is why I said, “The bad news”. It is because I find this all confusing.
In a nutshell Henri Comoy was from the Sainte-Claude region. As many folks did, he followed his father as a wood turner. He ends up married and living in London, making pipes from briar. His wife’s sister provides the connection to the Chapuis name. His wife’s sister, Fanny Beausire was married to Charles Pierre Chapuis, a Swiss watchmaker. They had seven children, three of which are important to this story; Charles Chapuis dies leaving the children partially orphaned, Emile (21 years old when Charles dies), Louis (19) and Charles (15). Louis and Charles are adopted by their Aunt Anna, Henri Comoy’s wife, and moved to London. Here they are taught the Comoy family business of pipe making alongside Henri and Anna’s two biological children, Paul and Adrien Comoy. The four boys, Louis Chapuis, Charles Chapuis, Paul Comoy and Adrien Comoy are treated equally regarding inheritance within the business.
This leads to the start of the start of the company. “H. Comoy & Co. Ltd was established in 1914. It was a partnership between Henri, his sons Adrien and Paul and his nephews Louis and Charles.” (Comoy’s – Pipedia) By 1921 the company expands to the United States. Now the adopted brothers remain in contact with the older Emile. He is in the pipe business as well selling pipes wholesale in Paris, according to the pipedia.org article. In the early 1922 Emile, Louis and Charles started another company, Chapuis-Comoy, in Saint-Claude. This company serves the French market for briar pipes. I know, this nutshell is becoming larger and larger. Old man Henri Comoy died in 1924 and within 5 years H. Comoy & Co. Ltd became part of Cardogan Investments Ltd. In 1928 the two pairs of brothers created Chacom in Saint-Claude. Now Chacom can have the French and European market while Comoy’s deals with England and the US. Here is where things get weird, both companies use the same shape charts thus all the overlap in Comoy’s and Chacom shapes.
As pipedia explains, “In 1929, H. Comoy Co. Ltd became part of Cadogan Investments Ltd, created by the Oppenheimer Group, which at that time already owned a number of very important and well-known brands such as Maréchal & Ruchon (GBD), Civic & Co Ltd, BBB de Frankau, Sina, Verguet Frères, Orlik and Loewe.” (Comoy’s – Pipedia). Comoys are apparently allowed to manage their own business affairs and continue with business as usual. Of course there is an “UNTIL” coming. Comoys was left alone until the 1980s when Cardogan took over and quality went downhill.
Chacom had their ups and downs as well, with mergers with La Bruyere in 1932. Then the war, the recovery, the reassertion or market share, the regaining of their own name Chacon from Le Bruyere and eventual integration with Ropp. For the much longer version please see some of the following links:
Hopefully this all kind of explains why CARLYLE from the pipephil.eu photos is an English maker while the pipe is sporting a country of manufacture (COM) stamp clearly saying FRANCE. I told you it was confusing…
The Restoration
After all that background it’s good to get back to the easy stuff, for me anyway – the restoring. The Carlyle began the procedure with a clean denim piece on the workbench.
The airway of the stem was cleaned with bristle pipe cleaners and 95% ethyl alcohol.
The stem was then lightly sanded with a 500 grit sanding sponge and a pipe cleaner was inserted into the tenon to act as a hanger for suspending the stem in Before and After Extra Strength Deoxidizer solution (hereafter called deox).
The stem was immersed in deox for two hours.
The reaming tools were gathered.
The PipNet and the #1 blade was only used to clear the bottom of the tobacco chamber as this chamber was quite conically bored. The #2 blade did most of the work reaming the chamber. The Smoingpipes Low Country Reamer and the General triangular scraper were used for some light clean-up work. The chamber was then sanded with 220 sandpaper wrapped around a wood dowel.
The tobacco chamber showed no signs of heat damage or charring.
Another view of the chamber, below.
Scrubbing with undiluted Murphy Oil Soap and a nylon brush came next. The soap was rinsed with warm water and the stummel dried with a cotton hand towel.
Returning to the workbench the stummel was wiped with 95% ethyl alcohol on a couple of make-up pads. This removed some of the finish and stain.
I then wiped the stummel with acetone on new make-up pads. This removed more of the clear coat finish and more stain.
With the clear coat removed, I started picking the old fill material from the largest of the three fills. Additional acetone was used to soften the old fill material for picking with a fly tying bodkin.
There was one other large fill at the front of the bowl. This too was picked out.
The airway of the shank was cleaned using a dental scraper, bristle pipe cleaners and cotton swabs along with a healthy dose of 95% ethyl alcohol.
The stummel was then lightly sanded to reveal any additional areas where old fills may have been hiding.
The depth of the front fill was minimal and was filled with brown cyanoacrylate (CA, super glue).
The two pits on the right side were deeper. These were filled with brown CA applied into the pit with a fly tying bodkin.
Briar dust was then scooped with a dental scraper and a small pile placed on top of the wet CA. The back of the dental scraper was used to press the dust into the CA filled depression.
The briar dust cured almost immediately with the briar dust. The resulting fill was then filed with a small flat file.
The front fill received a second coat of brown CA. and was filed after it had cured.
The new fills had slightly lighter areas around them from the filing. I wanted to blend the color to match the existing stain.
I first used a Cherry Furniture Touch-up Marker and allowed the stain to dry. The area was lightly wiped with a make-up pad moistened with 95% ethyl alcohol.
The color was close but not close enough. I used the Mahogany marker over the area, allowed it to dry and re-wiped with the alcohol. I was happy with the results of the second stain.
The stamp was taped with painters tape for protection from the sanding.
After two hours, the stem was allowed out of deox. The drip-dry-o-matic (patent pending) was deployed to allow excess solution to join it’s jarred brethren.
I used a coarse shop rag to vigorously rub the remaining deox solution from the stem. This removes some of the oxidized vulcanite from the surface.
Back at the workbench I used Soft Scrub cleanser on make-up pads. This removed a great deal of the oxidized vulcanite.
And, some more.
The COM stamp and the “maybe” logo were taped with painters tape to protect them from sanding.
Ready for sanding.
The stem and stummel were sanded intact to avoid the rounding of the edges of each part. A series of sanding sponges from 400-3500 grit. Between each sponge I wiped the stummel with a make-up pad moistened with alcohol. The stem was rubbed with mineral oil and wiped with a paper towel.
The painters tape was removed and wiped with alcohol to remove any adhesive remaining. The pipe was worked with micro-mesh pads from 4000-12000. Again, between each pad I wiped the stummel and stem between each pad as with the sanding sponges except in place of mineral oil I used Obsidian Oil.
The stummel received a coating of Before and After Restoration Balm. The balm was allowed to stay on the stummel for 15 minutes.
The remaining Restoration Balm was wiped from the stummel using an inside out athletic sock.
The pipe was then taken to the buffer where the pipe was given several coats of carnauba wax.
The final step was a hand buffing with a microfiber polishing cloth.
I am developing a new appreciation for the oval shank. It is a feature that provides a more robust feel in the hand while retaining a more elegant contour in profile. I am sure the extra briar also provides additional strength for those who are a bit more hard on pipes. This oval shank Carlyle Dublin restored in beautiful fashion. The briar grain grain is lovely and the factory staining was preserved. The stem lost the oxidation without losing the FRANCE stamp though I would have liked to see the factory fresh top stem logo but that appears to have been lost years ago to wear and buffing. Overall I am very pleased at how well this pipe turned out. The dimensions of the Carlyle Oval Shank Dublin are:
Length: 5.43 in./ 99.57 mm.
Weight: 1.20 oz./ 18.71 g.
Bowl Height: 1.84 in./ 38.10 mm.
Chamber Depth: 1.57 in./ 27.69 mm.
Chamber Diameter: 0.74 in./ 16.00 mm.
Outside Diameter: 1.35 in./ 28.45 mm.
I do hope that you have found something here useful to your own pipe care, maintenance or restorations. If you like this sort of thing, please click the like and subscribe buttons. Thank you for reading the ramblings of an old pipe lover.
Loading…
Below are some photos of the finished Carlyle Oval Shank Dublin.
You could call this little pipe a Custom-Bilt knock off. This pipe is stamped SHORT over SNORTER on the left shank. It has that very Custom-Bilt look to it but it is diminutive. It reminds me of Dr. Evil and Mini-Me from the Austin Powers movies.
The term “short snorter” according to Google Is less comic,
“Origin: The tradition began before World War II, with bush pilots in Alaska signing bills as a sign of good luck and a way to remember their travels.
Meaning and Purpose:
“Snort” was slang for a shot of liquor, and “short” meant a smaller amount, so a “short snorter” was a way to remember a small drink or a flight”.
This pipe would certainly be that, a short smoke allowed by a small pipe. Below are some photos taken before I did anything but remove the stinger.
The pipe looks to be in good condition. There were still tobacco remnants in the tobacco chamber. The cake and the lava on the rim suggested the pipe had seen use. The stinger was quite stuck in the stem before I took the above photos. I had to soak the tenon for about 30 minutes and did quite a bit of wiggling of the stinger as I held it between the fold in a piece of leather and pliers. There were a couple of spots which needed to be filled and of course the usual cleaning.
Background
I really have no idea who made this pipe. Searches for “Short Snorter” yielded nothing on both pipedia.org and pipephil.eu. The big Custom-Bilt book, “Individual as a Thumbprint” The Custon-Bilt Pipe Story by William E. Unger also makes no mention of the Short Snorter though it does discuss a marketing scheme where a person could pick up a miniature pipe and a gift certificate for a person. The person could then keep the miniature pipe and exchange the certificate for the pipe that they wanted from the retailer.
I searched Short Snorter in the blog posts of Steve Laug (it’s a rare day when I restore a pipe brand that Steve has not worked with) there I came across a restoration by Dal Stanton, “Short Snorter Imported Briar” (https://rebornpipes.com/tag/short-snorter-pipe/). Dal’s search for information on the Short Snorter was more productive but not by much,
“In the little I found on the internet about the Short Snorter, it is described as a nose burner or as a pocket pipe, but most often with other shapes than the horn. Steve looked up the Short Snorter in the book, Who Made That Pipe, and it indicates that it was made by Weber or Wally Frank. With that information, I looked at old Wally Frank catalogues, but did not see the Short Snorter. I suppose the name is apropos, but I think a lady pipe smoker would give this pipe a look see.” (https://rebornpipes.com/tag/short-snorter-pipe/)
In conclusion the Short Snorter appears to have been made by Weber of Wally Frank after World War Two. I say after WWII because of the IMPORTED BRIAR stamping which was something added to reassure customers that briar was once again used in the pipe.
The Restoration
The restoration began with the stinger taking a dip in a medicine cup of 95% ethyl alcohol and the pipe proper, getting a cleaned piece of denim.
Ithen wiped a bristle pipe cleaner with toothpaste and clamped one end in the vice. I pushed the other end through the stem and buffed the airway with the toothpaste enriched pipe cleaner.
The tooth chatter was filed with a small flat file to remove the dents.
I turned my attention to the stummel. The dental scraper got quite a workout here removing the crunchy caked tar and smoking residues. Alcohol dipped pipe cleaners and cotton swabs were also used.
The reaming was surprisingly productive for such a small pipe.
Once reamed, the interior of the tobacco chamber looked good and showed no signs of heat damage.
Next came the scrubbing of the stummel’s exterior. This was done with undiluted Murphy Oil Soap and a nylon brush. The soap was rinsed with warm water and the stummel dried with a cotton hand towel.
Back at the workbench the stummel was wiped with a make-up pad dipped in 95% ethyl alcohol.
I used the make-up pad to scrub a little bit more on the rim to get rid of the remaining lava.
There were two areas which I thought needed to be filled. One small sand pit where the shank met the bowl. The pit was small and I thought that it would fill with brown cyanoacrylate (CA, super glue).
The other area was on the rin and right side. This area required CA and briar dust to fill the gap on the rim and CA alone on the side.
I allowed the CA to cure and filed the shank fill with a half-round file.
The rim and right side needed to be retextured to match the existing rustication or carvings. I did this with a rotary tool and a small carving bit.
Below you can see where the fills look like a crack. This was only superficial and did not penetrate through the side wall of the bowl.
The re-rusticated carvings looked good as I attempted to match the contours of the original carving.
The rim recarvings were nearly unnoticeable.
The shank was taped with masking tape to protect it from the stem sanding. I wanted the stem and stummel intact for the sanding to avoid any rounding of the joint between the two.
A series of sanding sponges from 40-3500 were used in sequence. Between each sponge I rubbed mineral oil onto the stem and wiped it with a dry paper towel to remove sanding debris.
The stem was then worked with micro-mesh pads 4000-12000 grit. Between each of these pads I applied a small drop of Mark Hoover’s new Hard Rubber Balm, rubbed this onto the stem and wiped the stem with a paper towel.
The stummel then received a coating of Before and After Restoration Balm and was set aside to what I thought would be 15-20 minutes. It turned out to be the next morning.
The next morning I hand buffed the remaining Restoration Balm from the stummel with an inside out athletic sock.
The pipe was then taken to the buffer where it received several coats of carnauba wax on the stem and smooth surfaces of the stummel.
The final step was a hand buffing with a microfiber polishing cloth.
This little pipe was a fun project. I am enjoying practicing with the Dremel tool and improving my carving techniques. The blending of repairs to original rustications is a challenge which I find very enjoyable. This demure darling turned out very nicely. I have a Custom-Bilt with a near identical shape and seeing them side by side is quite amusing. The fills and re-carvings turned out beautifully and are only noticeable under serious scrutiny. The stem polished up very well with the glossy black complimenting the rustic carved rich brown of the stummel. The dimensions of the Short Snorter are:
Length: 3.92 in./ 99.57 mm.
Weight: 0.66 oz./ 18.71 g.
Bowl Height: 1.50 in./ 38.10 mm.
Chamber Depth: 1.09 in./ 27.69 mm.
Chamber Diameter: 0.63 in./ 16.00 mm.
Outside Diameter: 1.12 in./ 28.45 mm.
I do hope that you have found something here useful to your own pipe care, maintenance or restorations. If you like this sort of thing, please click the like and subscribe buttons. Thank you for reading the ramblings of an old pipe lover.
Loading…
Below are some photos of the finished Short Snorter.
I have said it before and I’ll say it again, “I blame Sascha Mertens for my Denicotea fascination.” Sascha is a pipeman from Germany and has become one of the few people that I communicate with on a near daily basis. When I asked him what shape this Denicotea is, he replied “Quaterbendzublin danish Style!
This thing is absolutely danish! Reminds me of an old Stanwell….” Hmm, “Quarterbendzublin”. That looks more like some Mayan word than anything I was familiar with but, I completely see what he was saying. I think I’ll just use the “072” though.
The previous owner was apparently not aware that they were not supposed to have a cake build-up in a meerschaum lined pipe or that wiping off the rim after a smoke is a possibility. Thus started the list of things to address with this restoration. There was one ugly fill on the left side of the shank that would have to be removed. The oxidation of the vulcanite would have to go. I was not sure how well the rim would clean-up, nor exactly what to do with the meerschaum part of the rim. Oh well, it will all get sorted out.
Background
Fortunately, for me, I have done a few Denicotea restorations. This makes the writing of this section easy. I can just recycle research from previous blogs. Yeah, I’m a Generation X slacker.
“Pipedia.org has a short article on Denicotea. I will include it here in its entirety:
“Willy Heineberg founded the company Denicotea in 1932 and began manufacturing and selling smoking accessories such as filters, filter inserts, cigarette holders and pipes.[1] The company headquarters was initially in Cologne, but was relocated to Bergisch Gladbach after the Second World War.[2]
Denicotea is actually the name of a silica gel filter, cigarette holders and care products for pipes and cigarette holders.
I still find it a bit confusing as Denicotea seems to be a company[3] and a brand as well which is operated by COMPOSING-STUDIO GmbH[4].
Brands
Adsorba
Adsorba is a fantasy series of pipes produced by Luigi Crugnola for the German market.
Aldo Morelli
Aldo Morelli is a fictional name. The brand Aldo Morelli has been registered for Denicotea on February 26th, 1992.[5]
Stefan Petzuch points out this brand appears to have similarities to the Mauro Cateni pipe brand, in particular they are both fictional Italian brands by German companies, and both have the “HAND CUT” imprint on the stem as seen bellow. This may connect the Aldo Morelli brand to Gebr. Heinemann KG in Hamburg, who had registered the Mauro Cateni brand. Or perhaps there is a connection between Denicotea and Gebr. Heinemann KG, or perhaps these pipe brands simply used “Hand Cut” stems from the same source.” (Denicotea – Pipedia)
Interesting and weird are the two qualifiers that come to mind in reading that. The four makers mentioned in the article; Luigi Crgnola, Cesare Barontini, Gig and Molina are all Italian pipe manufacturers. Where does the MADE IN ENGLAND stamp on the example on pipephil.eu or the stamp on the pipe I purchased come in, I cannot say. I can say that I am not the first person to have little success researching the origins of Denicotea pipes. Dal Stanton, who is far more diligent in his background research than I, had a French made Denicotea. He traced its origins to the St. Claude area but not to a specific maker. Dal’s blog was posted on Steve Laug’s rebornpipes.com site. Here is the link to Dal Stanton’s blog post: https://rebornpipes.com/2016/09/29/nice-find-in-plovdiv-bulgaria-denicotea-deluxe-curling-bruyere-extra/”
Now for this Denicotea 072 or as my German accomplice calls it, a “Quaterbendzublin danish Style!”, the world may never know where, when or by whom this pipe was made. I wonder if the added mystique adds to the smoking pleasure?
The Restoration
Dang, that’s a good looking pipe. Even all dirty and sitting on a cleaned piece of denim at the workbench.
I started by lightly sanding the surface oxidation from the stem. I’m not sure what to call the mortise attachment piece of vulcanite that is glued to the shank. Maybe stem one, the below and stem 2 the attached?
The stem was skewered with a pipe cleaner to act as a hanger in the Before and After Extra Strength Deoxidizer (deox) and suspended in the solution.
Since this is a meerschaum lined pipe I relied on the Smoingpipes Low Country Reamer and the General triangular scraper for the reaming this very conical tobacco chamber.
Oh how I wish that someone had explained to the previous owner that meers could be washed out with warm water after a smoke and that cake is not a good nor necessary thing. Oh well, the scraping continued.
After the scraping and a bit of work with a 410 gauge brass bore brush, I used cotton swabs dipped in alcohol to clean the remaining cake from the meerschaum.
The lava on the rim was softened with saliva and scraped with a sharp pocket knife.
I cleaned the airway of the shank with several bristle pipe cleaners dipped in 95% ethyl alcohol. Cotton swabs also dipped were used to clean out the mortise.
The stummel was taken to the sink where it was scrubbed with undiluted Murphy Oil Soap and a nylon brush. The soap was rinsed with warm water and the stumel was dried with a cotton hand towel.
Back at the workbench the stummel was wiped with an alcohol wetted make-up pad. Once the alcohol had evaporated I wrapped the briar shank with masking tape to protect it from the sanding of the vulcanite part of the shank.
I wanted to preserve the logo as much as possible so a piece of Scotch tape was cut and placed over the logo. This proved tricky to sand as I didn’t want to round the edges where the vulcanite would meet the stem. I decided to give the rim top a beeswax coating to protect it from future lava and make the meerschaum more resistant to wear. I heated a small glass jar of beeswax in a pan of water on the stove top. This allows the liquid beeswax to remain liquid longer as the hot water allows the wax to cool more slowly.
The tobacco chamber was plugged with a cork. I picked up an assortment of different sized corks from Amazon and that has been much easier whenever I need to plug a chamber.
The meerschaum was heated with a heat gun then painted with liquid beeswax.
The beeswax cooled quickly and was then heated again with the heat gun. The cork remained in place. As the beeswax was remelted excess dripped off the stummel and was caught by a strategically placed tin.
The cork was removed and the rim was wiped with a clean dry paper towel.
Below is a photo of the newly rewaxed rim back at the workbench. Please ignore the photobombing S. Johnson pipe in the background.
The stem had been soaking in deox for a little over two hours. I removed it and let it drip excess solution back into the jar.
The stem was then vigorously rubbed on a coarse shop rag to rid it of remaining deox solution and some of the oxidized vulcanite.
Next the deox within the stem was cleaned out. Apparently I didn’t clean the stem prior to the deox dip. Darn old people…
The stem, both parts, were sanded with a series of sanding sponges from 320-3500 grit. Between each sponge I used Mark Hooovers new product, Hard Rubber Balm (HRB) rubbed on with my fingers and wiped off with a clean dry paper towel. Mark sent me a sample of the HRB and asked me to try it and give my impressions. So here they are, the HRB is thicker or more viscous than mineral oil. As such it tends to fold the sanding sponges more than mineral oil. A more careful wiping of the HRB from the stem with a paper towel lessens this. The fouled sponges are easily cleaned with a little bit of alcohol rubbed on with a finger tip then wiping them off on the denim surface protecting cloth. The HRB excels as a coating of stems after they have been restored. Since it is a heavier or thicker oil it should evaporate more slowly from the vulcanite. I really like how HRB works for preserving stems. How well it lasts over time is still undiscovered as I have only been using it for a couple of weeks but it looks like it is a solid competitor of Obsidian Oil and should actually last longer based on it’s properties.
The stems were then worked with micro-mesh pads in grits from 4000-12000. Again the HRB was rubbed on and wiped off between pads.
The stem was then taken to the buffer where I buffed it with white buffing compound on the dedicated white wheel.
The buffing compound was wiped from the stem and I cleaned the logo area with alcohol. I used a white acrylic modeling paint to repaint the depressions of the logo stamp.
The entire pipe was returned to the buffer where it was given several coats of carnauba wax.
The final step was a hand buffing of the pipe with a microfiber polishing cloth.
I think this Denicotea Quaterbendzublin Danish Style!, hmm, I just can’t do that. I think this Denicotea 072 turned out beautifully. The visual appeal is very much to my liking. The light weight along with the bend make it a very comfortable pipe to clench and the longer stem keeps the smoke out of my eyes. Though not uncomfortable in hand the pipe does not fit into my hand as well as many others. The rustications add character and seem perfect for the shape with the briar grain on the right side matching the lines of the rim. The stem polished up very well with its high gloss black accentuating the rustic mahogany of the briar. The dimensions of the Denicotea 072 are follows:
Length: 5.06 in./ 128.52 mm.
Weight: 1.42 oz./ 40.26 g.
Bowl Height 2.00 in./ 50.80 mm.
Chamber Depth: 1.60 in./ 40.64 mm.
Chamber Diameter: 0.67 in./ 17.02 mm.
Outside Diameter: 1.68 in./ 42.67 mm.
I do hope that you have found something here useful to your own pipe care, maintenance or restorations. If you like this sort of thing, please click the like and subscribe buttons. Thank you for reading the ramblings of an old pipe lover. This one is going in the personal collection.
Loading…
Below are some photos of the finished Denicotea 072.
Dr Grabow, a name that introduced many a young pipemen or pipewomen to the hobby of pipe smoking. The accessibility of Dr Grabow pipes, found in every drugstore and in my case, a 7-Eleven, made for easy and affordable acquisition of a first pipe. This would have been in the early 1980s. Throughout the 1970-1980s period I fondly remember many of the older neighbors sporting pipes as they went about their suburban outdoor rituals. When this Dr Grabow Omega came to me as part of an estate pipe lot I was immediately reminded of those memories. My record keeping is poor but I think this was one of 12 pipes which came to me in September of 2024. The poor Omega had been patiently waiting for some workbench time. The pipe was stamped OMEGA over DR GRABOW on the left shank and IMPORTED BRIAR on the right. Below are some photographs of the pipe prior to work done.
This was obviously a seldom smoked pipe. I doubted that more than a couple of bowls of tobacco had burned through this specimen. The rim looked nearly pristine. There was one unsightly fill on the shank which just touched the “DR” stamp. “That might be troublesome to replace”, I thought. The finish was not of the clear coat variety, which made me happy though the oxidation of the vulcanite stem would have to be dealt with. I have restored a couple of Omegas and have found that not all of them used vulcanite as stem material. I wondered if that could be used as an indicator of age. The Omega also had a brand new paper filter in the stem.
Background
Dr Grabow pipes did not all start out as Dr Grabows. Prior to that name they were Linkman’s which was preceded by ML&C (Mary Linkman & Company). I will let the following sites tell the story for those interested in pursuing the history of this venerable pipe maker.
One site that I like to use for Dr Grabow research is a timeline written by Tiki Vegas. If that is a real name, kudos to their parents. The timeline runs from 1953 to 2006. I assume that the 2006 date is when the timeline was published. The timeline is partially interactive and gives a nice graphical representation of various Dr Grabow lines and models. Below is a sample of what the timeline looks like:
In booking for Dr Grabow Omega pipes today, I found them on Amazon so it appears that they remain in production at present. The well pipe description is most likely a kind way to note that the pipe is designed copying the renowned Peterson System. To its credit, the well of the Omega is drilled to approximately ¼ inch or 6 mm. below the draft hole, which would allow for water to condense out of the smoke and accumulate in the well. The stem of the Omega even sports a rounded P-lip style button but with the draft hole proceeding straight through the stem rather than being directed up as a true P-lip should do.
The Restoration
The Omega was placed on a cleaned denim piece to protect the work surface.
I wanted to get the stem into the Before and After Deoxidizer (lovingly referred to as deox from here on) solution quickly as I wanted to finish this project in one night. The stem was lightly sanded with a 400 grit sanding sponge.
A pipe cleaner was inserted into the button to act as a hanger suspending the stem in the deox.
With the stem in deox, I turned my attention to reaming the tobacco chamber. Fortunately I didn’t need very much attention because the chamber was nearly new.
I did use the PipNet #1 blade.
It barely had anything to remove. I was surprised by the fact that the chamber on the Omega was this small. It feels like a much more substantial pipe. It does have very nice thick walls though.
I did a bit of scraping with the General triangular scraper I had ground the tip of this tool round on a grinder. The factory tip was frighteningly sharp.
The tobacco chamber was reamed and looked pretty much like it did before I started.
Sanding it with the 220 sandpaper wrapped around a wood dowel made it look like new. You could even see the chuck marks on the interior from turning the bowl at the factory.
Next came the scrubbing. This was done at the sink with undiluted Murphy Oil Soap and a nylon scrub brush. The soap was rinsed with warm water and the stummel dried with a cotton hand towel.
Back at the workbench, I wiped the exterior and interior with a make-up pad dipped in 95% ethyl alcohol. On the photo below you can see the pinkish hue from the little bit of stain the pad picked up while the brown is from inside the tobacco chamber.
I started picking at the fill on the left shank. It was hard and secure but I didn’t like the look of it.
Soaking it with a cotton swab dipped in acetone softened it up very quickly.
The fly tying bodkin was able to pick the chemically softened old fill out much more easily.
Now for the harder part, replacing the old fill. I used the fly tying bodkin to carefully lay a bead of brown cyanoacrylate (CA, super glue) into the depression.
I then scooped up briar dust on a dental scraper and pressed it into the wet CA and brushed off the excess.
The dry briar dust was then topped with another bead of brown CA. This was allowed to cure for 10 minutes or so until hard. I then filed the new fill smooth with a small flat file and sanded it with a 400 grit sanding sponge.
I topped the fill a third time with thin CA. I applied this by putting a small drop on the bodkin and used it to transfer the CA to the fill.
This was then smoothed with the flat file and sanding sponge again.
I carefully sanded around the stampings trying to blend the sanded area to the stamped area.
This sanding was done on both sides of the shank.
The smooth surfaces were then sanded with a series of sanding sponges from 400-2000 grit. Between each sponge I wiped the stummel with a make-up pad wetted with alcohol.
The smooth areas were then micro-meshed from 4000-12000 with alcohol wiping between the pads.
The stummel then received a coating of Before and After Restoration Balm applied with a baby toothbrush and was allowed to sit for 15 minutes.
The Restoration Balm was wiped from the stummel using an inside out athletic sock to remove excess balm.
Buffing the aluminum collar was nex on the list. I taped off the shank to protect it from buffing with masking tape.
I used the white buffing compound on the dedicated white wheel which is far from white.
The stummel looked very nice. Time to retrieve the stem.
The stem was removed from deox and allowed to drip excess solution back into the jar.
I like to use a coarse shop rag to vigorously rub the remaining deox from the stem. The rough material absorbs the solution and removes more of the oxidized vulcanite.
Below you can see the oxidized vulcanite that comes off with rubbing.
Back at the workbench I used Soft Scrub cleanser on make-up pads to remove more of the oxidized vulcanite. The stem was cleaned out using cotton swabs and pipe cleaners.
After the Soft Scrub I got lazy and tried to just buff the remaining oxidation from the stem. Just like always, it didn’t work. The next three photos show a nice shiny stem with traces of oxidation.
So, back to the sanding sponges… Oh wait, I do have something new to try and tell you about. Mark Hoover, the brains behind the Before and After products, sent me a bottle of Before and After Hard Rubber Balm. I told him that I would try it so, try it I shall. The stem was sanded with sanding sponges 400-3500. Between each pad I rubbed the Hard Rubber Balm onto the stem using my fingertips. I then wiped the excess off with a paper towel. In the past I used mineral oil for this step. The Hard Rubber Balm is more viscous, thicker, than mineral oil. Being a heavier oil, I think that it would vaporize/evaporate more slowly making it preferable to mineral oil for sealing vulcanite away from the oxygen in air. I do not know if there are any antioxidants added to the formulation as there are no ingredients listed on the bottle.
After the sanding I returned the stem to the buffer. I will master using a buffer to remove oxidation if it kills me. I used the white compound and the “white” wheel for the buffing. When finished I wiped the stem with a soft cotton cloth to remove any buffing compound and oiled the stem with the Hard Rubber Balm. It looked much better without the brown haze of oxidized vulcanite.
The pipe was waxed with several coats of carnauba wax at the buffer. I did not buff the carved surfaces as I feared they would trap wax and lead to a buildup of dirt and grime.
The final step was a hand buffing with a microfiber polishing cloth.
I always enjoy working on Dr Grabow pipes. Perhaps it is the history of the brand. This pipe did not disappoint. Yes, it is a factory made pipe but the quality of the drillings and the fit of the parts is excellent. The rustication works well with this shape and the carvings fall in line with the pipe’s curves. The one large flaw in the briar was reworked and turned out as well as could be expected. The vulcanite stem polished up pretty well and contrasts the rustication quite nicely. The dimensions of the Dr Grabow Rusticated Omega are follows:
Length: 5.06 in./ 128.52 mm.
Weight: 1.27 oz./ 36.00 g.
Bowl Height: 1.17 in./ 29.72 mm. (bowl only) 1.70 in. / 43.18mm (with tube)
Chamber Depth: 0.82 in./ 20.83 mm.
Chamber Diameter: 0.85 in./ 21.59 mm.
Outside Diameter: 1.49 in./ 37.85 mm.
I do hope that you have found something here useful to your own pipe care, maintenance or restorations. If you like this sort of thing, please click the like and subscribe buttons. Thank you for reading the ramblings of an old pipe lover.
Loading…
Below are some photos of the finished Dr Grabow Rusticated Omega.
I think my fascination with metal pipes began with Falcons. I always thought they looked cool. As a kid, I remember the next door neighbor, Joe Chase, always smoking a pipe while working on his yard and they were frequently Falcons or Vikings (my memory isn’t too specific). Later in life I tried the Falcon and appreciated the convenience of bowl swapping and easy cleaning. Even later, I started dabbling with restorations and researching the history of various pipes and their makers. This led me to http://www.smokingmetal.co.uk/ when it was run by Tony Pringle. Tony proved to be very helpful in response to my questions via email. Doug Bisbe has taken the reins of the smokingmetal site, with Tony’s retirement from the arena, and is incredibly knowledgeable and helpful in providing information about metal pipes. As for this alluring aluminum darling, it came to me as part of a “grab bag” I asked Steve Laug to assemble for me consisting of metal pipes. I wanted to try improving my skills and techniques working on metal. Steve and his brother, Jeff, enabled this with a fun bunch of metal artifacts, this unmarked specimen included. When the unmarked pipe arrived it was photographed and appeared as below.
Background
How the heck do you research an unmarked metal pipe? Well, fortunately there is a site for that. Unfortunately, it does require you to do a lot of clicking and comparing. The site is http://www.smokingmetal.co.uk/index.html. That is where I started. Now, I admit to having spent a good deal of time here on previous occasions so, I could narrow down the list of things to click. They also have a header with categories to help you find or narrow things down.
I was searching for a metal pipe with a screw through the bowl. So I began clicking on pipes which met those criteria. This led me to the following:
“unknown – MST – 20” Now, you may think the MST is short for Mystery but no. Metal Stem Through is far more likely. The text for this page is as follows as are the three images:
“Plastic bit, bowl that appears to be Bryson, certainly compatible. No markings
Two seen with DANCO boxes, needs further checking though
The above images match the pipe in hand exactly except for the texturing on the bowl. Okay, I had a match. The important part for me in terms of restoration was that I could see how the pipe would be assembled and disassembled. The stem was press fit, the end cap was threaded, the bowl was one piece with the screw and base attached to the wood bowl. This entry also contained a bit about Bryson.
I returned to the A_Z contest index and found the Bryson entry. There, the site listed the Following (highlighting added by me),
“Made by the Briarwood Corporation, Palo Alto, California, the BRYSON has number D120275 under the Bryson name on the pipe stem.
There is a crosshead screw to attach the briar bowl to the stem. The end cap attaches to the mouthpiece by means of a rod through the length of the pipe, in which the air hole is close to the mouth piece.
The stem is of polished duraluminum and hexagonal in cross section
The bowls are unusual in that they are not briar turned on a lathe, but briar wood, ground to a powder and compressed under very high pressure (no glue, heat or plastics are used, just pressure. It is claimed this produces a perfect bowl of aged briar every time with increased porosity. The varnished finish on the smooth bowl however is often very badly crazed. Two bowls, one smoth and one rusticated, were supplied with the new pipe. The bowl retaining screw is ‘locked’ onto the bowl by a gasket and metal collar, enabling rapid replacement of the bowls without the need of a screwdriver
The corn cob bowl, in centre image,is another version, not sure if this was manfactured by Bryson, or a home workshop job
The set here shown was available for $3.50 new, but in what year ? Adverts seen from 1946 magazine
The lower photograph was of a possible derivative on ebay in 2003, although US patent D122042 seems to be this pipe, invented by Max Bressler, Chicago Ill 1940
There are also other derivatives without the Bryson name stamped in the metal and variations on the shape and grooving of the stem
That with Pat Pend under the Bryson name has no grooves forward of the bowl and the front end cap is a larger thread than the other models, including my version with no name 30 April 1940 US patent # D120,275 Inventor Charles Rothman, Cleveland Heights, Ohio, assignor Briarwood Corp, also of Cleveland Ohio at that time”
Well, that explains what I saw completely and adds credence to the provenance of this pipe. Later in the restoration you will see photos of the bowl and can easily make out the particle board looking texture to the bowl due to its composition of pressed briar dust. I believe this pipe to be made by Bryson or an affiliate during World War Two. The style and composition of the briar bowl are in-line with the above description.
The Restoration
The restoration began as with most others, a clean denim piece to protect the work surface. At this point I would like to quote the smokingmetal.co.eu site with a warning regarding working on old metal pipes.
“A word of warning If you are thinking of buying online, be very very careful. Best policy with ‘metals’ is to see an image of the dismantled pipe. Buying otherwise unless desperate for an example can too often result in you ending up with a pipe that may be damaged when you try to dismantle and clean it. Mind you, you may learn how to repair them, but parts are of course getting rarer than hens teeth” (http://www.smokingmetal.co.uk/news.php)
It was at this point that I started to dismantle the Unknown Metal pipe. The stem came loose fairly easily but that is where my progress stopped. I needed to know how this pipe was assembled before I tried to disassemble it. I went upstairs to the computer and started looking through the long list of metal pipe with screw through bowls. I looked through 64 individual pipes before I found the match. The photos showed that the end cap was threaded and that the screw in the bowl was part of the bowl and not just a screw holding the bowl to the aluminum tube.
With that knowledge my plan of attack was fine tuned. I would first ream and clean out the tobacco chamber. This would allow me better access to the screw at the bottom of the chamber. The reaming kit was gathered.
The bowl was rather large in diameter and it accommodate the largest, #4 blade for the PipNet. This pipe had been smoked fairly heavily based upon the amount of cake removed.
It was at this point I realized that something was very different about the “briar” of this bowl. I had not read about the Bryson pressed briar dust bowl at this point. I stopped researching when I found the matching pipe and determined how to disassemble it. The material reminded me of a Medico made Brylon pipe.
Undeterred, I started cleaning out the screw head slots. I scraped with a dental scraper and moistened the screw with 95% ethyl alcohol.
I retrieved my gunsmithing screwdriver bit set. I knew that I wanted a better quality screwdriver as I could tell this screw had been forced and looked slightly damaged.
I chose a flat tipped Phillips head bit of appropriate size. I thought this would allow a better grip on the screw and not force the bit upwards with increased pressure.
I soaked the screw with ethyl alcohol from the bowl as well as around the base of the bowl. With slow even pressure the screw relented. And the entire bowl was removed. The bottom of the bowl was quite corroded and this oxidation was the likely cause for the screw being so tightly stuck.
Below is the corroded base of the bowl with only a light brushing with a brass brush.
Below is the base after a thorough brushing with a brass brush and scrubbing with ethanol soaked cotton swabs.
It was time to visit the sink for the scrubbing. The bowl was scrubbed with undiluted Murphy Oil Soap and a nylon brush. The Soap was rinsed with warm water and dried with a cotton hand towel.
The aluminum tube (tube from here on out) was scrubbed with a Scotchbrite pad and Castile liquid soap on the outside and with a nylon shank brush inside. The tube was rinsed with warm water and dried with a cotton hand towel.
Back at the workbench, the hope was that the soap, water and heat from the scrubbing would soften and get the endcap to loosen slightly. It didn’t. I used a thick piece of leather to protect the end cap from the jaws of the channel lock pliers.
The stem was cleaned out with bristles pipe cleaners and 95% ethyl alcohol.
I took the tube to the buffer to buff and polish the aluminum. While there I spent a little time on the plastic stem and inner tube.
Upon returning to the workbench the bowl had completely dried and I got a good look at the briar. Again, I emphasize that I had not researched the pipe beyond the initial “Unknown – MST – 20” (http://www.smokingmetal.co.uk/pipe.php?page=212) page. I could immediately tell that this was not typical briar. I ran upstairs for some further research.
This is when I came across the research material concerning the Brylon pressed briar bowl materia. Everything clicked in my mind. I knew that from here out I would be very judicious with any kind of solvents. I was unsure how or if they would react with the pressed briar of the bowl. Everything had seemed okay with the soap and scrubbing and with using the ethanol attempting to loosen the screw but I would be more cautious going forward.
Again returning to the workbench, the tube polished up beautifully and the stem looked far better but I was not completely happy with it.
Before I could re-dye the bowl I wanted to repair the two cracks at the bottom of the bowl. I figured that brown cyanoacrylate (CA, super glue) would be the best course of action. The next two photos show crack one and crack 2 on opposite sides of the bowl.
I planned to use the brown CA applied with a fly tying bodkin and work the CA down into the crack.
Below you can see the CA filled crack.
The CA was allowed to cure and was then filed with a small flat file.
On the opposite side the curvature of the cracked area required sanding.
Next came a light topping of the bowl with a piece of sandpaper laid flat on a counter.
The topped bowl was looking better, still slightly out of round. I guessed that to be “normal” for pressed briar bowls.
The bowl would get a single application of Fiebing’s Leather Dye in black. A cork was used to plug the tobacco chamber and act as a handle. The dye would be applied with a folded pipe cleaner and flamed to set the dye and vaporize the alcohol solvents.
Below is the resulting black dyed bowl. The dye applied very similarly to normal briar.
Back at the workbench the bowl was wiped with a slightly ethanol wetted make-up pad then was sanded lightly with a 400 grit sanding sponge. You can see that the sanding revealed the brown of the briar on the ridges of the rustication.
The bowl was then given a coating of Before and After Restoration Balm and set aside for 20 minutes.
The excess Restoration Balm was wiped away with an inside out athletic sock.
I used a dremel rotary tool and a wool polishing bit to lightly polish the bowl screw. I did not want to use any buffing compound in fear of not being able to get it out of the tobacco chamber.
To address my “not happy” with the stem, I used a small flat file to lightly resurface the button and the area immediately below the button on the top and bottom of the stem. This was then sanded with sponges 320-1000.
The stem was then returned to the buffer and buffed with white compound.
This produced a level of finish that I was happy with.
To make it even better, I hand buffed the stem with Before and After Fine followed by the Extra Fine Polish on a soft cotton cloth.
The stem returned to the buffer for several coats of carnauba wax. The ridge tops of the bowl were also waxed with carnauba but I was careful not to apply pressure and to keep the wax out of the rustications.
The final step was a hand buffing with a microfiber polishing cloth.
This was a fun and interesting restoration. Next time I work on a metal pipe of unknown origin, I will definitely do my background research before starting rather than during, twice… This little pipe is adorable. I think the whole thing is pretty amazing, the history, the workmanship, the material used, all made for a fascinating project. I have no idea if it smokes well. I can’t imagine that it would not be, with the wide chamber excellent for English and aromatic blends. I can easily envision the ridges of the aluminum tube being very efficient at radiating heat from the smoke. This would make a very handy little working pipe for the fishing tackle box, garage or for a lawn mowing pipe. It’s small size and light weight are great for an active smoker. The dimensions of the Unknown Aluminum Pipe are as follows:
Length: 5.06 in./ 128.52 mm.
Weight: 1.27 oz./ 36.00 g.
Bowl Height: 1.17 in./ 29.72 mm. (bowl only) 1.70 in. / 43.18mm (with tube)
Chamber Depth: 0.82 in./ 20.83 mm.
Chamber Diameter: 0.85 in./ 21.59 mm.
Outside Diameter: 1.49 in./ 37.85 mm.
I do hope that you have found something here useful to your own pipe care, maintenance or restorations. If you like this sort of thing, please click the like and subscribe buttons. Thank you for reading the ramblings of an old pipe lover.
Loading…
Below are some photos of the finished Unknown Aluminum Pipe.
As a child of the 1970s I grew up with the series The Six Million Dollar Man. For those who never heard of this, it was a TV series where an astronaut crashes his ship and is badly damaged. He is rebuilt using “bionic” parts allowing him superhuman abilities. During the title sequence a narrator explains, “”We can rebuild him. We have the technology. We can make him better than he was. Better . . . stronger . . . faster.” For some reason this line kept going through my head during this restoration. Given the “faster” doesn’t work but the other two, most definitely. The pipe was one of 13 pipes won in an eBay auction from Germany. I was hoping to acquire some lesser known makers or lines of pipes to the US market.
The shape of this pipe is a tough one for me, it is a dainty pipe with a curved bowl. Is it a bent tulip, a chimney, a billiard? Heck, I don’t know, I’ll just use the 8497 stamped on the shank to identify the shape. As for the other stamps there was “Spitfire” in a flowing cursive script and GENUINE over BRIAR as a circle on the underside of the shank. Below is a screenshot of this pipe from the original eBay listing. It shows a repaired stem from a break, a chipped shank end and a good deal of excess glue, perhaps a failed clenching experience while mowing the lawn.
Below are some photos of the Spitfire before work had begun. Well, that is not entirely true. The break was held together by the glue until I tried to remove the stem. The stem was quite stuck. Unaware of my incredible strength, the glue broke while I tried to free the stem. Umm, there may have been a slight exaggeration there about my strength. The stem remained stuck within the shank piece as seen in the photos below.
Ok, you can see there are some issues here that will have to be addressed; the stem stuck in the broken shank and the broken shank being the greatest. The lesser issues include general dirtiness, stem oxidation, excess glue removal, tobacco chamber reaming and other typical restoration stuff. This is going to be a fun project.
Background
The first place that I searched was pipephil.eu for the name “Spitfire”. There I found the following:
(Sn-Ss — Pipes: Logos & Markings). Here you can see the same script style in the “Spitfire” stamping. The GENUINE BRIAR stamp is not represented but the four digit shape number is present. There is also a slight difference in the logo coloration of the bottom image from pipephil.eu. The bullseye shown is more indicative of the colors used by the British Spitfire fighter aircraft in World War Two.
I assume that the blue coloration of the logo in this Spitfire had merely faded over the years.
The next search site was pipedia.org. There “Spitfire” resulted in:
(Italian Pipe Brands & Makers R – S – Pipedia). The Lorenzo link took me to a nice bit on the history of the predecessors of and the formation of Lorenzo Pipes in 1969. Also, there was the following quote specific to the Spitfire line:
“A somewhat more bargain series was given its own brand name: Spitfire. Spitfires displayed 1:1 transferred Lorenzo models (mainly for 9mm filter) as well as smaller, more classically shaped pipes. These were also extremely popular.” (Lorenzo – Pipedia). The store takes a more tragic turn in 1983,
“In 1983 Lorenzo Tagliabue came to bitter grief: his little daughter, the only child, died of cancer. He lost all interest in the business and retired still in 1983, leaving no heirs who wished to continue the business. Lorenzo Pipes was licensed for and continued for a shorter period by Comoy’s of London (Cadogan / Oppenheimer Group). Then Lorenzo Pipes almost disappeared and Lorenzo Tagliabue passed away in 1987.
But this wasn’t the end. In 1988 Riccardo Aliverti and his wife Gabriella purchased all rights to the Lorenzo trademark from the Tagliabue family and production of the renown Lorenzo Pipes resumed.
The Aliverti family is involved in pipemaking since Romolo Aliverti, the father of the current owners, joined the Lana Brothers in 1920. He later reached the rank of technical director. No wonder that his son Riccardo showed an interest in pipe making. Riccardo began learning the pipemaking trade in 1954 at the age of fourteen under his father’s watchful eyes and succeeded him as technical director upon his father’s retirement in 1973.
Today the third generation of the Aliverti family is working for the company. Massimo Aliverti, Riccardo’s son, has been with the company as sales director since 1991. He works closely with his father and knows all phases of production. Massimo has established a broad customer base for Lorenzo around the world.
As far as the informations are reliable, Lorenzo’s better lines (One Star, Two Star, Three Star, Moscato, Spumante and the Grand Canadian) are made in Italy while the cheaper ones (New Era – Riesling, New Era – Poggio, Angera, Angera Satinato, Cadry, Churchwarden, Filtro, Arena, Cadore, Sport PS and Garden) are made in Albania by Tomori to benefit from the rich deposit of briar in Albania.
The website of Lorenzo’s American distributor SMS Pipes gives a good impression of today’s Lorenzo Pipes. SMS also offers a wide range of Meers.” (Lorenzo – Pipedia).
I think that it is safe to say that this pipe was made in Italy by Lorenzo most likely between the early 1970s-1983.
The Restoration
Breaking a pipe is seldom fun and breaking one while removing a stem is less fun than that. I suppose I could take some consolation in the fact that it had already been broken and the attempted repair was what had actually broken. Regardless, the pipe made it to the workbench. I immediately dropped the shank piece and tenon end into a small medicine cup with 95% ethyl alcohol. Apologies for not photographing that step. The alcohol worked quickly in freeing the stem from the broken piece of shank. The below photo has the broken piece of shank pressed in place though not glued, for the photograph.
I began with reaming the tobacco chamber. I thought the PipNet and the #1 blade would be narrow enough for this petit chamber. It was for the first 1- 1.5 cm then the chamber tapered.
I used a Tsuge reaming tool for this narrow chamber. This was followed up with the General triangular scraper.
I remember picking up the Tsuge tool after my first PipNet set lost the #1 blade to breakage. The chamber was then sanded with 220 and 320 sandpaper wrapped around a wood dowel and a Sharpie marker, respectively. There was no damage from heat or charring in the chamber but there were a couple of places where the chamber had experienced small dings, likely from previous clumsy reaming/scraping.
The shank was cleaned with cotton swabs and bristle pipe cleaners dipped in 95% ethyl alcohol.
The stummel was then taken to the sink for a scrubbing with undiluted Murphy Oil Soap and both a nylon brush and a brass wire brush. The soap was rinsed with warm water and the stummel dried with a cotton hand towel.
Back at the workbench the stummel was wiped with 95% ethyl alcohol on a make-up pad. This removed some stain from the briar.
The plan to repair the shank was this:
Glue a ¼ inch or 6.5 mm brass tube into the mortise well past the break.
Glue the broken shank end into place.
Fill the seams with cyanoacrylate (CA, super glue) and briar dust.
Recarve the rustication and redye the shank.
The mortise of the Spitfire was drilled at ¼ inch or 6.5 mm. I needed to deepen the mortise to implement my fix. I used a Brad Point Drill Bits 1/4-Inch Hex Shank Stubby Drill Bit in a screwdriver handle to extend the mortise approximately 1.4 inch (6.5 mm) past the furthest edge of the break.
The brass tube was slid into position to test the fit. So far, so good.
The pieces of briar refused to align precisely. Bah! Hmm, there was a layer of glue from the previous fix on the briar which kept the broken pieces from aligning correctly.
I began soaking the broken edges with acetone to soften the old glue.
While the glue was soft I worked it with a nylon brush. This helped peel the edges of the glue from the briar. The acetone would evaporate quickly so I had to soften and scrub quickly. Eventually the glue was removed.
The brass tubing was cut to length using a tubing or pipe cutter.
The brass tube was scratched up with 80 grit emery paper to increase the surface area for the glue to adhere to. The tube was pressed into place without the broken shank piece and Thin CA was allowed to seep into the joint. The broken shank piece was slid over the brass tube and situated correctly. Additional Thin CA was applied to these seams. The two pieces of briar were then clamped and allowed to cure.
As the CA was curing I began cutting the tenon to fit into the brass tube. This required the use of the VermontFreehand Adjustable Tenon Turning Tool. I made several cutts adjusting the cutter very slightly (approximately 1/8th turn of the adjustment screw). I feared taking too much material off and shattering the thin tenon. Once the tenon was close to the right size I began filing the new tenon and smoothing it with 400 grit sandpaper.
When the CA that set, I used a countersink bit to hand bevel the inner edge of the mortise.
The stem was pressed into place and the fit was not too bad. I had to file the top of the stem to fit the shank. This was done by wrapping the shank with a layer of masking tape and filing the stem with a small flat file. The lower edge of the joint would have to wait until I had the chip filled before I could fit it to the stem.
Since the seam where the two shank pieces joined was adjacent to the stamps care had to be taken to keep from damaging the stamp. I applied brown CA with the tip of a fly tying bodkin to the seam. Briar dust was then pressed into the wet CA. The briar dust caused the CA to cure almost immediately. The excess dust was brushed off with a brass brush. This was repeated to fill the seam in very small increments.
The same process was used on the carved surface seams.
To fill the chipped shank end, I applied a bead of brown CA to the area that I wanted filled. This wet CA was then pressed into the box of briar dust. The excess dust was brushed off with a nylon brush and another thin layer of CA was applied. This wet CA was again pressed into the briar dust. Once the chip in the shank end was filled with CA and briar dust the end was filed with a small flat file. The final fill was topped with a coating of Thin CA to seal the layers of brown CA and briar dust.
At this point I was getting impatient to get a look at the finished pipe. I opted to try buffing the stem’s oxidation into submission. In hindsight, this was a mistake. I describe it here so that you can avoid being as dumb as me.
I wrapped the shank with masking tape to protect it from the buffing.
Using a rouge compound I buffed the stem until I thought I’d removed the oxidation.
The problem was, the stem looked shiny but shiny brown. I wanted shiny black. I wetted a few make-up pads with Soft Scrub cleanser and scrubbed the stem. They removed a great deal of oxidation.
“Okay, I’ll quit being in a hurry and do it right,” I said to myself. I suspended the stem into the Before and After Extra Strength Deoxidizer (I refer to this as deox). It was allowed to soak overnight.
The next day I removed the stem and allowed it to drip excess solution back into the jar.
I like to scrub the remaining deox from the stem with vigorous use of a coarse shop rag.
The coarse texture of the rag absorbs the solution and removes more of the oxidized rubber as can be seen below.
The stem was certainly looking more black this time. There remained brown areas especially on the top side of the stem. I sanded the stem with a series of sanding sponges from 400-1000 grit. The zone immediately (1 cm) below the button was filed using the small flat file and further sanded. Once sanded I returned to the buffer and buffed the stem with white compound.
Pleased with the stem, I turned my attention to recarving the rustications on top of the fills. I used the Dremel rotary tool and a sharp carving bit.
I tried to keep the lines pretty much the same but to carve through the fill material. I very much wanted to eliminate any shiny CA spots.
The newly carved textures looked good but their color was off when compared to the rest of the shank.
I used a Mahogany Furniture Touch-up Marker to re-stain the briar to match the existing color.
Not bad.
Not bad, at all.
The stummel was given a coat of Before and After Restoration Balm, applied with a baby toothbrush and allowed to sit for 20 minutes.
20 Minutes later the Restoration Balm was hand buffed from the stummel using an inside out athletic sock.
The baby toothbrush was cleaned using 95% ethyl alcohol. Renaissance Micro-Crystalline Wax was applied to the stummel using the baby toothbrush. I applied two coats of wax allowing 10 minutes between coats.
The stummel was taken to the buffer where it was buffed using a clean flannel wheel. While there I applied several coats of carnauba wax to the stem and the stampings on the underside of the shank.
To address those two rough spots from previous reaming/scraping inside the tobacco chamber, I opted to use a maple syrup and charcoal bowl coating. I applied a very thin coating of syrup to the chamber using a cotton swab.
I then used a capsule of Activated Charcoal dumped into the chamber. Oh, note the pipe cleaner in the shank. This keeps the charcoal from getting into the airway. I covered the rim with a piece of masking tape and vigorously shook the stummel for several seconds to distribute the charcoal powder evenly onto the wet syrup.
After removing the tape, dumping the excess charcoal and giving the stem a good blow, don’t draw in, you’ll get a mouthful of charcoal. The final step was a hand buffing done with a microfiber polishing cloth.
This was a long and troublesome restoration. Little things like; not having the ¼ inch brass tubing and waiting for it to arrive, the old glue removal, fitting the brass reinforcement tube, cutting the tenon, and being dumb and skipping steps, made the whole process last for many days. In the end, I think the pipe turned out well. Yeah, like the pipedia.org article says, “A somewhat more bargain series”, it is a cheaper pipe. I enjoy the challenge of returning a pipe like this to working condition. The re-carvings turned out very nicely as did the re-staining. I think you would be hard pressed to notice the break repair if you could not see the seam on the smooth stamp surface. The stem also did polish up fairly well. The brass reinforcement will certainly add strength to the pipe and should keep it from having another break. It is still a dainty little pipe which would probably be a great addition to someone who loves Virginia flake tobacco in a tall narrow bowl. The dimensions of the Lorenzo Spitfire Bent Billiard 849 are as follows:
Length: 5.37 in./ 136.40 mm.
Weight: 0.87 oz./ 24.66 g.
Bowl Height: 2.02 in./ 51.31 mm.
Chamber Depth: 1.75 in./ 44.45 mm.
Chamber Diameter: 0.61 in./ 15.49 mm.
Outside Diameter: 1.24 in./ 31.50 mm.
I do hope that you have found something here useful to your own pipe care, maintenance or restorations. If you like this sort of thing, please click the like and subscribe buttons. Thank you for reading the ramblings of an old pipe lover.
Loading…
Below are some photos of the finished Lorenzo Spitfire Bent Billiard 8497.
I had heard of and smoked a good amount of Mac Baren tobacco. A Mac Baren pipe though, was new to me. This pipe was part of an estate lot which I won from Eschweiler, Germany. The lot consisted of 13 pipes and what I was hoping for was pipes that were a bit more uncommon here in the United States. A Mac Baren certainly met that criterion. The pipe was stamped MAC BAREN over EXTRA with the “”MA” and the “E” being quite faint. To the right was a slightly smaller stamp MADE IN over DENMARK and a 02. There was also a logo on the stem which I could make out what appeared to be two animals flanking something adorned with a crown. Unfortunately the logo was worn, faint or both. The below photos were taken prior to having done any work on the pipe.
Background
This was an interesting “Background” section because I was initially befuddled (far from unusual). The traditional “go to” site, pipedia.org, had no information on Mac Baren pipes. The source for logos, pipephi.eu did have a similar entry for Mac Baren though.
I was able to screenshot a good image of the Mac Baren logo though. Hmm, I think I’ll have to try the gold leaf on that logo when it is time to freshen it.
(Pagina non trovata | Mac Baren Tobacco Company). Apparently the purchase of Mac Baren by Scandia Tobacco Group had also ended the support of their website. All was not lost though, there was a second link leading to Georg Jensen. This link was followed to the following entry at pipedia.org:
“The Georg Jensen pipe factory was founded by Per Georg Jensen and his wife in 1954, in Kopenhagen, Denmark. Since the 80s the company is under the management of his daughter Lis, and his son with the same name, Per Georg Jensen. The company manufactured around 2,000 factory pipes per year. Among the top of the line pipes are hand carved special editions and free hands.
Top of the Line models of Georg Jensen have vulcanite or ebonite stems, factory pipes usually have acrylic stems.
Factory pipes (in increasing quality) were marked:
Danish Sand Achat / Amber Red Flame / Red Skin Sunrise / Orange extra / Starline Contrast / Bicolour / Harmon Excellent / Masterpiece
Pipes were commonly marked (in increasing quality) with: MODEL + MODEL NUMBER + “Made in Denmark”, GJ stamp in red on the stem. MODEL NUMBER + “Georg Jensen” in italic or fancy font.
Extremely rare and collectible freehands were marked with:
“Straight Grain”, and a number that discerns the grading from 1 (lowest) to 13 (highest).
Special edition pipes were marked with: MODEL + MODEL NUMBER + “Handmade in Denmark” + GJ stamp in white on the stem.
The factory closed down in 2001 when Per Georg Jensen (jr) became “Tobacco Professor” for MacBaren Tobacco house.
You might also enjoy listening to Brian Levine’s interview with Georg on the Pipes Magazine Radio Show
No direct link was given herebut inferences or assumptions could be made. The only problem with those is the old saying, “when you assume you make an ass of you and me”. Not having trouble being called an ass but wanting to provide readers with as correct of information as I can, I turned to my European expert, Sascha Mertens. Sascha was hit with a message via Facebook and asked what he knew about Mac Baren pipes. I included a few phone photos as well. Below is the response from Sascha:
“I sent the Pictures of the MB pipe to Danny. Maybe he can tell a bit more about the pipe itself but it seems they were only produced for Switzerland.” (Mertens, Sascha. Personal communication).
Sascha also sent me two photos of letters describing the negotiations of making the Mac Barens pipes. I attempted to enhance the photos of the documents for clarity they are seen below:
Armed with the above information I feel secure in dating the Mac Baren Extra 02 as a pipe made by George Jensen in the mid 1970s for the Swiss market. The dates from the above documents would place the production after June 28, 1973.
Now, I often ask myself, “how did this pipe get to me?” Well remember back in the introduction when I said this Mac Baren was part of a German estate lot? Here is a photo of the eBay listing with the Mac Baren circled:
Apparently that is how old pipes move across international borders. Some old retired pipe restorer wants something a little bit different so he wins an auction from Germany and Boom, foreign pipes magically appear far from their homes.
The Restoration
The Mac Baren made it to the workbench and a freshly laundered denim piece.
I started working on the stem. I removed the old filter and wondered how much filtering a tiny little filter like that could do. Obviously something because it was stained with residue. The stem was cleaned out with bristle pipe cleaners dipped in 95% ethyl alcohol.
Another pipe cleaner was inserted into the tenon to act as a hanger for suspending the stem in Before and After Extra Strength Deoxidizer (referred to as deox). I planned on leaving it in the solution for 6 hours.
The reaming tools were gathered. The PipNet and #1 blade seemed to be the best fit for the reaming of the tobacco chamber.
I quickly realized that the conical boring of the chamber was better matched with the shape of the Kleen-Reen reaming tool and the Smokingpipes Low Country Reamer. The small amount of cake was scraped free by these trusty three.
The interior of the chamber was sanded with 220 sandpaper wrapped around a wood dowel.
The stummel was taken to the sink for a scrubbing with undiluted Murphy Oil Soap and a nylon brush. This was repeated a second time with additional Murphy’s and a brass wire brush. The soap was rinsed with warm water and the stummel dried with a cotton hand towel.
Back at the workbench the stummel looked much better without the years of accumulated grime.
The airway of the shank was cleaned out using alcohol dipped cotton swabs and more bristle pipe cleaners.
The stummel was given a coating of Before and After Restoration Balm and allowed to sit for a couple of hours.
After 6 hours the stem was removed from deox and allowed to drip the excess solution back into the jar.
Below is the still wet with deox stem ready for a vigorous rubbing with a coarse shop rag.
I like the coarse shop rag for removing the remaining solution and for rubbing off some of the oxidized rubber that the solution loosens from the stem.
Back at the workbench, the stem looked far better but some pitting was now obvious from the removed oxidation.
Make-up pads drizzled with Soft Scrub cleanser were used to scrub the stem and remove more of the oxidation.
The stem was then reattached to the stummel and masked to protect the shank during buffing. Attaching the stem to the stummel keeps the joint from being rounded during the buffing or sanding process. After the buffing the stem looked much better but there were still areas of brown oxidation showing. Especially near the button.
I used a small flat file to file the area below the button for about 1-1.5 cm. This was then sanded with a series of sanding sponges 320-1000 grit. After sanding I returned to the buffer.
The filing and sanding was buffed with white compound on the dedicated white buffing wheel. Below you can see the results.
I used Rub’nBuff Gold Leaf Wax Metal Finish in an attempt to restore the stem logo. The logo had been faint originally and the deox and buffing had not helped matter. Though I had been very careful around the logo with both. The wax was applied using a fly tying bodkin and worked into the stamped logo. Like the name of the product says, I rubbed and buffed using a gentle hand and a soft cloth.
The stem was then hand buffed with Before and After Fine Polish on a soft cloth.
After the Fine Polish I did the same with Before and After Extra Fine Polish.
The stummel received a coat of Renaissance Micro-Crystalline Wax via baby toothbrush. This was allowed to air dry for 10 minutes and was hand buffed with a soft cloth. I repeated the application with a second coat and 10 minute dry time. The second coat was lightly buffed at the buffer with a clean flannel wheel.
The stem received several coats of carnauba wax while at the buffer. The final step was a hand buffing done with a microfiber polishing cloth.
The dimensions of the Mac Baren Extra 02 areas follows:
Length: 5.16 in./ 131.06 mm.
Weight: 1.24 oz./ 35.15 g.
Bowl Height: 1.55 in./ 39.37 mm.
Chamber Depth: 1.24 in./ 31.50 mm.
Chamber Diameter: 0.67 in./ 17.02 mm.
Outside Diameter: 1.55 in./ 39.37 mm.
I do hope that you have found something here useful to your own pipe care, maintenance or restorations. If you like this sort of thing, please click the like and subscribe buttons. Thank you for reading the ramblings of an old pipe lover.
Loading…
Below are some photos of the finished Mac Baren Extra 02.
I cannot say that I have had a lot of experience with Bari pipes. I can say that they have a look all their own and this one adds a Danish flare to what I’d call a bent billiard shape. I am sure there is a pretty pipe under the years of accumulated dust and grime and the stem most likely is not supposed to be that unique two tone pea green on top. This Bari came all the way from Eschweiler, Germany with an estate lot. I was hoping for some pipesthat were a bit less common to the States and was not disappointed. The Bari had a stamped and painted BARI on the stem but I couldn’t be certain of the paint color. On the underside of the shank there was a smooth area stamped with BARI over DE LUXE next to that is MADE IN over DENMARK and offset to the right a 710 (assumed to be a shape number). Below are some photos of the Bari prior to work.
Hmm, I do not think that this two tone stem is part of the original design. The oxidation of the stem appears to be the greatest area in need of restoration with the rest of the pipe just needing a good cleaning and a bit of refinishing.
Background
Not being well versed in the history of Bari pipes, I turned first to pipedia.
“Bari Piber was founded by Viggo Nielsen in Kolding around the turn of 1950/51. Viggo’s sons Kai Nielsen and Jørgen Nielsen both grew into their father’s business from a very young age and worked there till 1975.
Bari had very successfully adapted the new Danish Design that had been started mainly by Stanwell for it’s own models. When Viggo Nielsen sold Bari in 1978 to Joh. Wilh. von Eicken GmbH in Hamburg Bari counted 33 employees.
From 1978 to 1993 Åge Bogelund and Helmer Thomsen headed Bari’s pipeproduction. Thomson bought the company in 1993 re-naming it to Bari Piber Helmer Thomsen. The workshop moved to more convenient buildings in Vejen. Bogelund, who created very respectable freehands of his own during the time at Bari got lost somehow after 1993.
Bari’s basic conception fundamentally stayed the same for decades: series pipes pre-worked by machines and carefully finished by hand. Thus no spectacular highgrades but solid, reliable every day’s companions.
The most famous series are the smooth “Classic Diamond” and the blasted “Wiking”.” (Bari – Pipedia)
The entry in pipedia.org looked like a pretty good Google translate entry with some non-standard English wordsmithing. It did give me an idea as to the age of the pipe though.
Next I searched pipephil.eu for Bari logos. Here I screen captured the below image:
The Bari made it onto a freshly laundered piece of denim on the workbench. Upon removing the stem I saw a brand new 3mm filter emerging from the stem. “Huh, never tried one of those”, I thought.
I began this project with the stem since that was the part which seemed to be in the greatest need of attention. It was cleaned out with bristle pipe cleaners dipped in 95% ethyl alcohol. The surface was lightly sanded with 400 grit sandpaper and a pipe cleaner was inserted into the tenon to act as a hanger.
The stem was suspended in Before and After Extra Strength Deoxidizer overnight. I refer to this as deox, kind of like detox for alcoholics or drug users (it makes me smile).
Before I gave the stummel a scrub I wanted to see if there was some kind of a clear coat finish applied. I thought the smooth underside of the shank looked too glossy for no finish. I wiped the stummel with 95% ethyl alcohol on a make-up pad. The pad immediately picked up stain. Yay, no finish to remove just a very nicely sanded and stained piece of briar.
The stummel was taken to the sink for its scrubbing. This was done with undiluted Murphy Oil Soap and a nylon brush. The soap was rinsed with warm water and the stummel dried with a cotton hand towel.
Back at the workbench I wiped the stummel with alcohol wetted make-up pads. I was amazed at how much stain came off.
The team was gathered.
The #1 and #2 blades of the PipNet did most of the work but the Kleen-Reem was used to ream the bottom of the tobacco chamber as it was bored with a more tapered bit than the PipNet blades.
The final scraping was done with the General triangular scraper. I had ground the sharpened factory tip off the General and it was perfect for getting the bottom of the chambers done.
The interior of the chamber was sanded with 220 sandpaper wrapped around a wood dowel. The chamber showed no evidence of any heat damage or charring.
The next day, I removed the stem from deox and allowed the excess solution to drip back into the jar.
I laid the stem onto a coarse shop rag. I like the coarse rag for vigorously rubbing the stem after deox to remove the remaining solution and some of the oxidized rubber that was loosened by the deox.
Below you can see a good deal of removed oxidized material on the rag.
Back at the workbench the stem looked much better, well more black, though the surface now showed light pitting from the removal of the oxidized vulcanite.
I used make-up pads drizzled with Soft Scrub cleanser to rub the stem surface. This removed more of the oxidized rubber.
I tried hand buffing the stem with Before and After Fine Polish. In a conversation I had with the inventor of the Before and After products, Mark Hoover, he mentioned that this was his preferred technique.
The Fine Polish did improve the condition of the stem but I think I am too impatient for Mark’s technique. I masked off the logo, mounted the stem to the shank and masked off the shank. I was going to use the buffer and see if I could get rid of the remaining oxidation.
At the buffer I used the dedicated rouge wheel and compound.
The buffing worked wonders but there remained brown areas which I was not happy with. The worst was immediately below the button. I tried sanding with 320 and 400 grit sanding sponges.
The brown persisted. I then brought out the big gun – a small flat file. The area below the button was filed on both top and bottom.
This was then resanded with the 320 and 400 sanding sponges then rebuffed. Finally I was happy with the appearance of the stem.
The shank was cleaned with 95% ethyl alcohol, cotton swabs and bristle pipe cleaners.
Once the deoxidation process was completed I could see that the BARI logo was a gold looking paint. I decided to use Rub’nBuff Gold Leaf on it.
The Run’nBuff was applied with a fly tying bodkin and worked into the impressions.
The slightly dried gold leaf was then rubbed and buffed by hand. A little bit of the metallic gold was still present but I knew that the imminent Fine and Extra Fine Polish would remove that.
The stem was then hand buffed with Before and After Fine Polish on a soft cotton cloth.
The stem received a similar hand polishing with Before and After Extra Fine Polish.
I opted to use Renaissance Micro-Crystalline Wax rather than carnauba since some of the rustications from the sandblast were deep enough that I thought the carnauba would just accumulate too much in the pores. The Renaissance was applied with a baby toothbrush, allowed to dry for 10 minutes then buffed with a clean buffing wheel on the buffer. While at the buffer I applied several coats of carnauba wax to the stem and the smooth surface on the underside of the shank.
The final step was a hand buffing with a microfiber polishing cloth.
This Bari De Luxe 710 turned out beautifully. The stem, which I had my doubts about, restored very nicely and now has a glorious high gloss black finish returned to it. The sandblast of the briar is just lovely and delicate, fitting perfectly to the delicate curves of the stem and shank. Normally I like a slightly more robust pipe but the dimensions of this Bari fit well in hand and clenching it is easy and comfortable. The texture also feels very good. What more can you ask for from a pipe that looks as good as it feels? The dimensions of the Bari De Luxe 710 are:
Length: 5.75 in./ 146.05 mm.
Weight: 1.35 oz./ 38.27 g.
Bowl Height: 1.88 in./ 47.75 mm.
Chamber Depth: 1.58 in./ 40.13 mm.
Chamber Diameter: 0.72 in./ 13.17 mm.
Outside Diameter: 1.39 in./ 35.31 mm.
I do hope that you have found something here useful to your own pipe care, maintenance or restorations. If you like this sort of thing, please click the like and subscribe buttons. Thank you for reading the ramblings of an old pipe lover.
Loading…
Below are some photos of the finished Bari De Luxe 710.
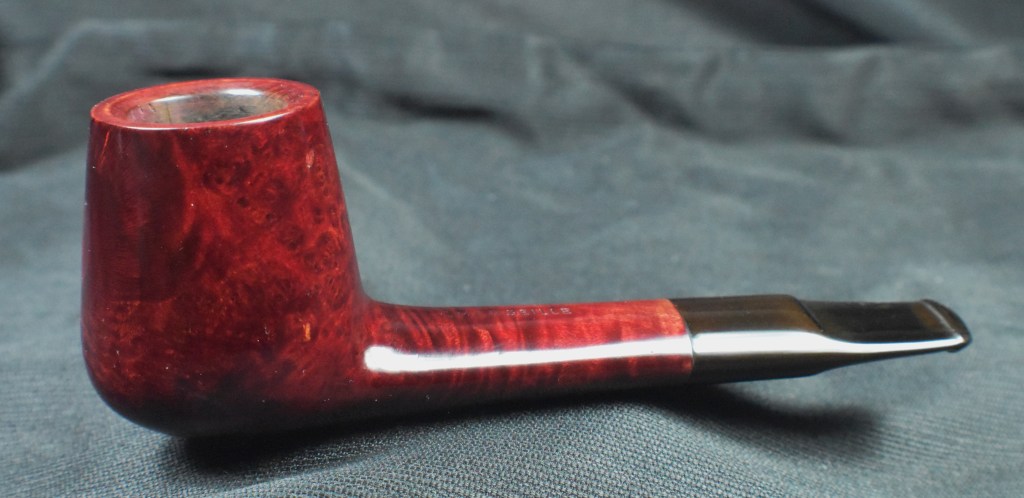


 .
.


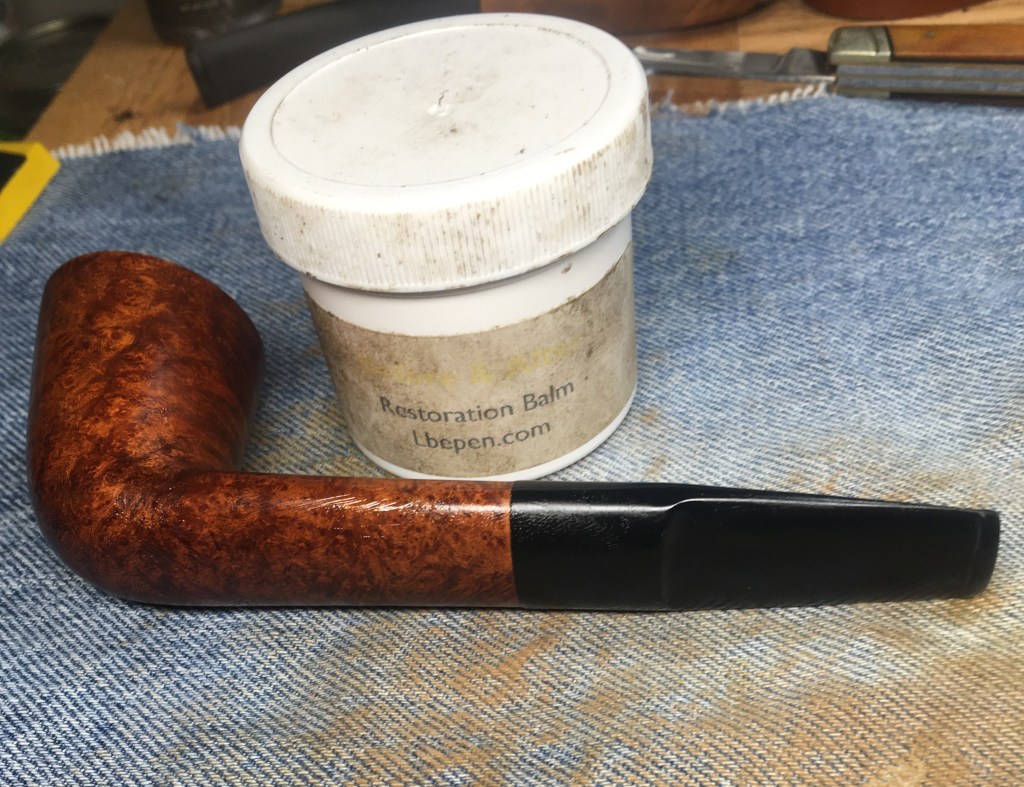


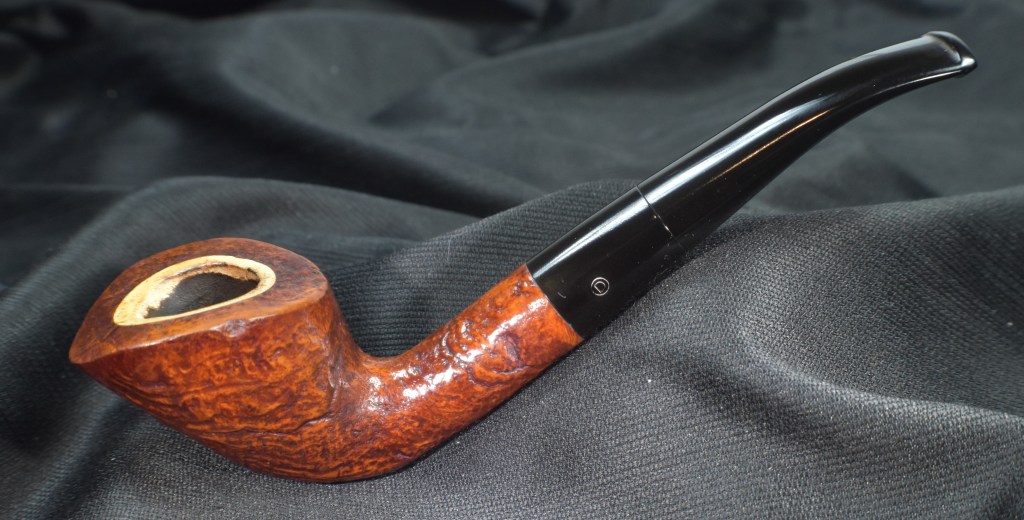


 (
(