

Photographed and written by
John M. Young
Christmas is in the rearview mirror and fading away quickly. This pipe made me think of the 1964 Rudolph the Red-Nosed Reindeer and the Isle of Misfit Toys or, in this case Misfit Pipes. I couldn’t tell for sure what the model was because it had been, shortened? The size was smaller in shape, more like a Peterson System Standard 314 or 317. Looking at the stampings I was a bit surprised to see a faint PETERSON’s arched over an even more faint DUBLIN with a definitive 3. The opposite side had the real flummoxer: There, a 3000 appeared to be stamped.
Below are some photos of the Peterson 3000 before work was done. There are more than usual to document the poor condition.


“Doctor Young to the ER stat!” Wait a minute, I have no cool title like that and can’t claim one. My dad had a PhD, not me. “Medic!”, okay, I can work with that. This pipe was certainly in need of some kind of intervention. The oxidation on the stem looked terminal. The stummel looked as if it had been shortened with a chainsaw or some other homicidal garden implement. The shank had two cracks under the ferrule that small children could fall into. The cake in the bowl would be enough to serve a medium sized wedding party. The lava flow on the rim made Mount Kilauea look wimpy. Even without all my excessively dramatic exaggeration, the pipe was one hurting unit. This would not be one of those relaxing restorations.
Background
For those who would like more information on Peterson pipes, I’ll start with a bit I have said before:
“For a great history Mark Irwin and Gary Marlburg’s book is a must read for a Pete Geek.

(Available at https://www.smokingpipes.com/accessories/books/moreinfo.cfm?product_id=471478) Given the price is a bit high but worth every penny for a Peterson aficionado.
The next site is pipedia.org’s History of Peterson by Jim Lilley (Peterson – Pipedia)
Lastly the pipephil.eu site for all things logo: Peterson: historical pipes — Pipes: Logos & Markings (pipephil.eu) They also have a few other links to things like the Peterson timeline and P-lip information.”
Now for the pipe in hand. PETERSON over Dublin 3 indicates this is an older pipe. According to Irwin,
“3RD Quality or Third Grade (the later Standard System) was issued with a “3” stamped under the Patent stampand a domed-nickel mount. Like the 2nd Quality, it was only available with the AB- or A-molded mouthpieces.
The numbers on the 2nd and 3rd Quality pipes would appear either within a small circle or not, and would continue well into the 1930s.” (Irwin, Mark and Malmberg, Gary (2018). The Peterson Pipe The Story of Kapp & Peterson, First edition, second printing 2021. Briar Books Press, Canada. p. 119).
In a personal email with Mark Irwin concerning this pipe, I sent him these three photos and asked him “What have I got?”


His response was the following: “Doesn’t that 2nd number look like an “8” to you? But a “3800”? Nothing I can think of. Notice it’s a Grade 3—after the “Peterson’s /over/Dublin3”. That in itself is unusual, along with the nickel-mount marks. Notice also how very long the ferrule is. And the “B” or tapered stem. The Grade 3 in that “Dublin3” with everything else leads me to believe this is a very early pipe—easily IFS or maybe EIRE.” (Irwin, personal communication).
To clarify some of the Pete Geek-speak:
*Mouthpiece or stem staples of Peterson pipes as from the 1937 catalog. I believe Mark meant the AB stem.

(https://petersonpipenotes.org/tag/peterson-system-mouthpiece/)
*IFS stands for Irish Free State. This was a country of manufacture (COM) stamp used from 1922-1937.
*ERIE was a COM stamp used from 1938-1948.
Staying with the stem in an attempt to gain a better grasp of the approximate date of manufacture I focused on the tenon. Notice in the photo from the 1937 catalog, above, that the end of the tenon has a distinct taper. This was a feature of Charles Peterson’s initial design.

(https://petersonpipenotes.org/tag/peterson-system-mouthpiece/)
Irwin states the following in the same Peterson Pipe Notes entry with photos, “The first change in the molded vulcanite System mouthpieces apparently occurred later on in the Éire era, as documented by this unsmoked mouthpiece which can be accurately dated to 1937–45:”

(https://petersonpipenotes.org/tag/peterson-system-mouthpiece/). Notice the distinct step down from the push fit taper to the end of the tenon. The taper is no longer present. This is the same style of tenon as the Peterson Dublin 3 3000 pipe in hand. The below photo is of the 3000’s tenon.

Using the dates from the stem information the pipe could be dated from 1938 to present. Considering the stamping information stating that the Dublin 3 was used “Well into the 30s” that would eliminate from 1940-present. These two pieces together make for an argument that the pip is from the late 1930s. It also would coincide with Mark Irwin’s observation, “easily IFS or maybe EIRE.”
Now for the four digit shape number. This is not unheard of in Peterson pipes. Steve Laug discussed pipes sold in Canada which sported four digit shape numbers in a blog titled: Restoring the second Antique Collectible Find – a GT&Co Peterson’s System Standard 1307. GT&C being the tobacconist Genin, Trudeau and Company, Montreal, Quebec. He states in the blog, “My theory is that GT&C added this to aid them in warranty work, so they’d know the pipe was bought on Canadian soil.” (https://rebornpipes.com/2024/05/05/restoring-the-second-antique-collectible-find-a-gtco-petersons-system-standard-1307/). The Canadian 1307 had the same shape and dimensions as a normal 307, the 1 apparently was used to denote the sale of the pipe by GT&T.
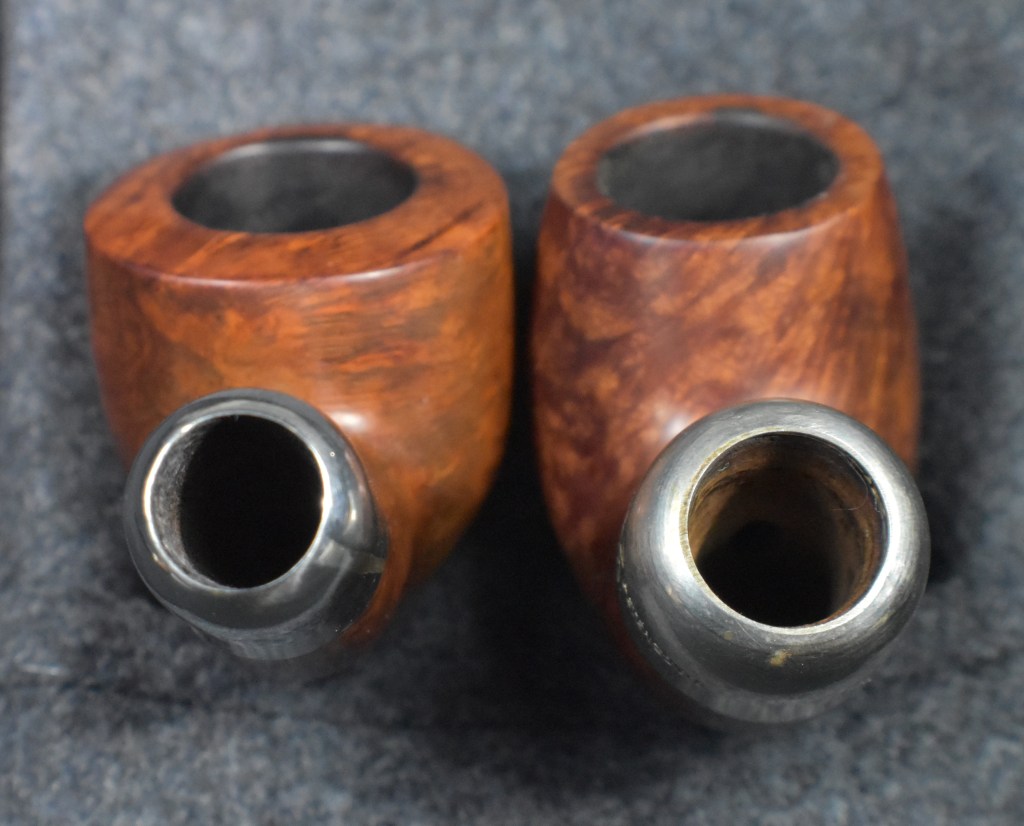
The 3000 worn by this pipe is an anomaly. Even if my interpretation were to be changed to Mark Irwin’s observation of a 3800, it would still not match any pipe in Peterson’s production history. When comparing this pipe to contemporary Petersons in my collection the much narrower shank of the 3000 is obvious.

Above are a COM England 317 (top left), a System 0 (top right)with no shape number but it’s a 317 and the 3000.

Above are a Peterson System 0 and the 3000. Notice the narrow shank of the 3000.
The bowl dimensions are nearly identical to the 317 or a 12 ½ that I have. The shank is narrow to the point that it would be nigh impossible for this pipe to have been drilled as a System pipe at all.
Guess what. It is not drilled as a System pipe. That does explain the absence of the PATENT under the PETERSON’S stamp, doesn’t it?

So, there we have it. An 87 year old Mysterious Peterson Dublin 3000. I wish I could say, “I’m glad that’s settled”. I can’t nor can I explain why the top quarter inch was cut from the stummel. At least that one I can imagine was due to a severely charred top. The shape, however, is a mystery.
The Restoration
The beginning is always so easy. Lay down a freshly laundered piece of denim. That was about the last easy thing that this pipe allowed for.

Okay, another exaggeration, the collar came off pretty easily.

The collar was placed in a medicine cup and covered with 95% ethyl alcohol. The airway of the stem then received numerous tapered bristle pipe cleaners dipped in the alcohol. The photo shows a nice progression from not-so-clean to much better.

The exterior of the stem was then worked over with 0000 steel wool in preparation of the imminent deoxidation bath.

I used Before and After Extra Strength Deoxidizer (deox) to soften the oxidized exterior of the stem. A Pipe cleaner was inserted into the tenon to act as a hanger to suspend the stem in the solution.

For the condition of this stem, I thought that 4 hours, minimum, would be required.

The collar was removed from the ethyl alcohol. I tried to clean the hardened glue with a cotton swab from the inside of the collar. I think the alcohol just made the glue angry. I then placed it into another cup and covered it with acetone.

The stummel was next up. The reaming tools were assembled. The PipNet, General triangular scraper, Smokingpipes Low Country Reamer and the 220 sandpaper wrapped wood dowel were readied.

The PipNet with #2 blades did the majority of the work.

The bowl, however, was the sizes of the 2 and 3 blades. The #2 blades did great until it couldn’t reach across the bowl. The #3 was just too big.

This required scraping with the General and Smokingpipes blades.

The tobacco chamber was sanded with the 220 sandpaper on a stick. The chamber appeared free of any damage. This surprised me a bit. I thought that surely a pipe used as much as this would have some damage.

It did have plenty of over damage though. I moistened the lava with saliva, Then scraped some of the glue from the shank end while the saliva soaked a bit. The rim was then scraped with a sharp pocket knife.

I tried running the Kleen-Reem shank drill through the draft hole from the shank into the tobacco chamber but it was too large in diameter. Instead I used a 3/32 inch drill bit. This removed some of the accumulated smoking residue. While looking down the mortise I was struck by the complete lack of a reservoir. This was certainly not drilled as a Peterson System pipe.

I used several tapered bristle pipe cleaners to further clean the draft hole first the narrow tips then the thicker ends. The shank itself was not cleaned at this time. All that was just from the draft hole leading to the wider bored shank/mortise.

I took the stummel to the sink for a scrub with undiluted Murphy Oil Soap and a nylon brush. In the photo below the filthy nature of the stummel came bee gauged. The soap was rinsed with warm water and the stummel dried with a cotton hand towel.

A second scrubbing with undiluted Murphy’s and the nylon brush were done and still more grime was removed. The stummel was rinsed and dried a second time. Notice the brush color in the two photos – it is the same brush.

Back at the workbench the stummel was looking clearer. I wiped it with a make-up pad dipped in 95% ethyl alcohol.

The glue on the shank end resisted the alcohol so a second make-up pad was wetted with acetone. The stummel was wiped and additional time spent on cleaning the shank end.

It was time to work on the shank, proper. “Yikes!”, came to mind after the first couple of cotton swabs dipped in alcohol. The shank was scraped with a dental scraper and scrubbed with more cotton swabs. I concluded with, “this shank is going to need a cotton and alcohol treatment” to help soften the smoking residues in there.

I switched gears and started to file the rim top to minimize the cut-off marks where the bowl top had been removed. A large and small file were used to accomplish this. I stopped at about where the below photo shows out of not wanting to remove any more bowl height.

To address the shank cracks, I knew I needed to drill holes at their terminal end to keep the cracks from progressing. I used a 2 mm drill bit for this.

Terminal hole one.

Terminal hole 2.

I needed a medicine cup to set the stummel on while the cotton alcohol treatment was doing its thing so, I removed the collar from its cup. The acetone had softened the remaining glue nicely.

The tobacco chamber, draft hole and shank were stuffed with cotton. I used a disposable pipette to add about 10 ml of 95% ethyl alcohol to the bowl and shank.

Alcohol was added until the cotton was saturated. The alcohol would evaporate overnight and hopefully pull a large amount of the smoking resiue with it depositing it into the cotton.

After about 4 hours the stem was removed from the Before and After deox and allowed to drip excess solution back into the jar.

I used a coarse shop rag to vigorously rub the stem, absorbing the remaining solution and removing some of the oxidized vulcanite.

At the workbench the stem was further scrubbed with several make-up pds sprinkled with Soft Scrub cleanser. The amount of oxidized material they were removing was amazing.

Even after all the scrubbing and cleanser, the stem looked as if little had been done to it. Back into deox. I left the stem in there overnight

The following day, I again removed the stem from deox. Back onto the coarse shop rag.

More vigorous rubbing produced a stained shop rag. Well the oxidized material is coming off, I thought.

At the workbench another round of Soft Scrub drizzled make-up pads did their thing and removed more of the oxidized vulcanite.

The cramping hands needed a break so I removed the cotton from the stummel. It came out stained with tar and yuck.

The cleaning of the shank went much better after the cotton and alcohol treatment.

It was time to reconstruct, fill the cracks and re-glue the collar. I opted to use JB Weld 2 part epoxy for this task. The epoxy was mixed according to product directions. The glue was applied to the crack filling them then additional glue spread around the shank end. The collar was slipped into position. Acetone dipped cotton swabs were used to wipe away any excess epoxy.

To keep the epoxy in the cracks I applied a thin coating of petroleum jelly to the tenon. This was inserted into the mortise and forced the epoxy to stay where I wanted it.

After about 30 minutes of curingI began to work on filling the flaws or pits on the stummel. Along the rim, I used brown cyanoacrylate (CA, super glue) to fill the shallow depressions. This was spritzed with a CA drying accelerator.

The pits on the stummel were deeper and required CA and briar dust. The CA was applied into the pit with a fly tying bodkin and briar dust was pressed into the wet CA. The fills were then filed with a small flat file then sanded with a 400 grit sanding sponge.

The stamps on both sides of the stummel were covered with masking tape to protect them from sanding. The stem and stummel were sanded with a sequence of sanding sponges from 400-3500. Between each sponge I wiped the stummel with a make-up pad dampened with alcohol. The stem was rubbed with mineral oil and wiped with a paper towel.

The stem and stummel were then worked with micro-mesh pads in grits of 4000-12000. Again the stummel was wiped with an alcohol wetted make-up pad between micro-mesh pads while the stem was rubbed with Obsidian Oil and wiped with a paper towel.

The stem was then polished with Before and After Fine and Extra Fine Polish on a soft cotton cloth.

The stummel was coated with Before and After Restoration Balm and allowed to sit overnight. This is longer than I would normally allow but it was time for bed.

The next day, the Restoration Balm was wiped from the stummel using an inside out athletic sock.

The pipe was taken to the buffer for several coats of carnauba wax.

After waxing the pipe was hand polished with a microfiber polishing cloth.
I still do not know what to think of this Peterson Dublin 3 3000. I Feel funny calling it a 3000 as that never appears to be something that Peterson made yet, here is it. It is not a System pipe though it’s shaped like one and has a P-lip yet, here it is. It is not intact, as it is missing what I think is about ¼ inch of top yet, here it is. It has a collar like nothing I’ve ever seen yet, here it is. I can say that it is a pretty little pipe and I much prefer the AB taper stem over the saddle. I guess I’ll just have to keep it and take it fishing once global warming eliminates the hard water situation brought on by winter.
The dimensions of the Peterson 3000 (?) are:
Length: 5.33 in./ 135.38 mm.
- Weight: 1.10 oz./ 31.19 g.
- Bowl Height: 1.43 in./ 36.32 mm.
- Chamber Depth: 1.08 in./ 27.43 mm.
- Chamber Diameter: 0.60 in./ 17.53 mm. (Conically bored diameter is at the top)
- Outside Diameter: 1.32 in./ 33.53 mm.
I do hope that you have found something here useful to your own pipe care, maintenance or restorations. If you like this sort of thing, please click the like and subscribe buttons. Thank you for reading the ramblings of an old pipe lover.
Below are some photos of the finished Peterson 3000 (if that is what it really is) pipe.


I was not really pleased with the level of polish on the collar so it went back under the buffer with some white jeweler’s rouge, which is really a silly name as it is white not rouge. Anyway here is what it looked like after the extra buffing:


