

Photographed and written by
John M. Young
This beaten and battered chubby panel Rhodesian didn’t just speak to me when I first saw it, it yelled. I couldn’t resist the shape and had to bid. The fact that I won such a chunky piece of briar for such a small price made the bidding even more rewarding. The only stamp indicating any maker is the word COUNTRY within a rectangle on the left shank. No country of manufacture, though for some reason it strikes me as French though the stockiness of the shank would make any Peterson a bit jealous. The pipe came from Israel and was apparently shipped via sailing ship to the US or perhaps by row boat as the shipping time allowed my beard to grow significantly longer during its voyage. Below are some photos of the ppe upon arrival.


Definitely some very interesting features here. The sheer number of fills to be picked and refilled was a bit daunting. The removal of the old finish was a must. The corked mortise might be salvageable. The stem was heavily oxidized and would need significant time in an authorized deox facility, Is the Betty Ford Center still operating? This looked to be a fun restoration.
Background
The “go to” sources at the start of researching a pipe are pipephil.eu and pipedia.org. Both sites had no information on the COUNTRY. Disappointed but not defeated, I tried searching through Comoy’s, Chacom and GBD shape charts for a matching shape. Again, disappointment. Still undeterred, I tried a Google search of “Chubby panel Rhodesian pipe”. I scanned through the images which resulted and came across one from a restoration Dal Stanton did “Recommissioning a Classic Pocket Pipe: A Fun Sport Horn Stem Sculpted Stubby Paneled Tomato” (https://rebornpipes.com/2019/07/30/recommissioning-a-classic-pocket-pipe-a-fun-sport-horn-stem-sculpted-stubby-paneled-tomato/). This blog was posted on Steve Laug’s https://rebornpipes.com/ site. Now, the pipe which Dal worked on had a similar shape. It was a far different pipe; in scale, texture, stem material, banding and it was stamped which allowed him some idea of the maker. The one think that caught my eye was the tenon:

(Photo used with permission of the author – personal communication. Originally published at(https://rebornpipes.com/2019/07/30/recommissioning-a-classic-pocket-pipe-a-fun-sport-horn-stem-sculpted-stubby-paneled-tomato/))
The tenon of my Country had the tenon’s stinger intact, Dal’s version was stinger-less. Nonetheless the similarities of the aluminum tenon were undeniable. There was one other significant similarity between these two pipes – the cork mortise. Unfortunately Dal was unable to determine the maker of his pipe and he is a far better and more diligent researcher than I. He did conclude that his pipe was of French origin. This conclusion reaffirmed my feeling about the origin of the Country in hand.
I was now less undeterred (is that deterred or de turd? It is a French pipe after all). I reached out to Steve Laug who is always helpful with his vast experience and encyclopedic memory. I sent him some photos and asked if he could tell me anything about pipes with similar shapes or with tenons like this. Steve mentioned that he too thought the Country looked like a GBD or a Comoy’s product. He then sent me a link to one of his blogs: Reuniting an older Ropp Panel 062 Rhodesian with its original stem
I will include a photo of Steve’s Ropp Panel 062 Rhodesian.

Now, if you use your imagination and give that shank a bend it would be a near perfect match for the Country. I’m sure that your inquiring mind wanted to know what the tenon of this Ropp pipe looked like.

Similar to the Country but not as close of a match as the tenon from the Dal Stanton pipe.
And that, dear reader, is where I left the background for this pipe. It is a chubby panel bent Rhodesian. Likely made in France quite a while ago, judging by the level of oxidation of the stem and the aluminum stinger which pretty much went out of style by the 1970s. Dal Stanton implies that these pipes may be older than what I think, “The presence of the cork could possibly add more weight to this Sport having some vintage to it. Cork was often used on older pipes to grip the tenon” (Stanton, Dal. https://rebornpipes.com/2019/07/30/recommissioning-a-classic-pocket-pipe-a-fun-sport-horn-stem-sculpted-stubby-paneled-tomato/).
The Restoration
The below two photos show the Country intact and with the stem removed on her new temporary denim bed.


You may notice that I obtained a replacement for my PipNet. I finally found an older version with the opaque plastic rather than the newer version with the transparent amber plastic. I once again have all four blade sizes for my PipNet. The PipNet was joined by the Smokingpipes Low Country Reamer, General triangular scraper and wooden dowel wrapped in 220 sandpaper. Also known as the Ream Team.

The PipNet did most of the work in removing the cake as well as removing a bit of briar from the tobacco chamber. I did not examine or feel the inside of the chamber, prior to the reaming, for rough surfaces from a poorly drilled chamber.

After the reaming and sanding the interior of the tobacco chamber was bare briar and free of any heat damage.

I started cleaning the shank airway. As you can see by the very darkly stained cotton swabs in the photo the shank was quite filthy. I used 95% ethyl alcohol and dipped the swabs in the alcohol. I examined the mortise and found the cork “gasket” for lack of a better term had a worn front edge and looked ragged.

I continued trying to clean behind the cork and scrape the tars from the airway using a dental scraper. 3-4 ml of ethyl alcohol were poured into the tobacco chamber and the airway was scrubbed with a nylon shank brush. The excess alcohol was then poured into a medicine cup. The airway was then scrubbed with alcohol dipped cotton swabs.

This cycle of scraping, alcohol scrubbing, cotton swab scrubbing was repeated. I seemed to be making little progress.

Avoiding the cork was making the whole airway cleaning more difficult. I started to experiment with making a new cork gasket. I was thinkin that I could remove the old beat-up cork, clean the airway then insert the new cork. I found a suitable cork from an assortment of corks that I had. I drilled a 3 mm hole through the center of the cork.

I gradually used larger bits to enlarge the hole.

Once it was large enough for the aluminum tenon I started thinking about how to cut the excess cork away.

Razor blades seemed like the best answer. The first couple of slices thinning the cork went well. My fingers were cramping a bit so I decided to remove the old cork and give my fingers a rest from holding the cork and the razor blade.

The old cork was scraped from the shank and the mortise was sanded with 320 sand paper wrapped around a rat tail file.

I returned to cleaning or attempting to clean the airway. It was much easier to do without having to work around the cork.

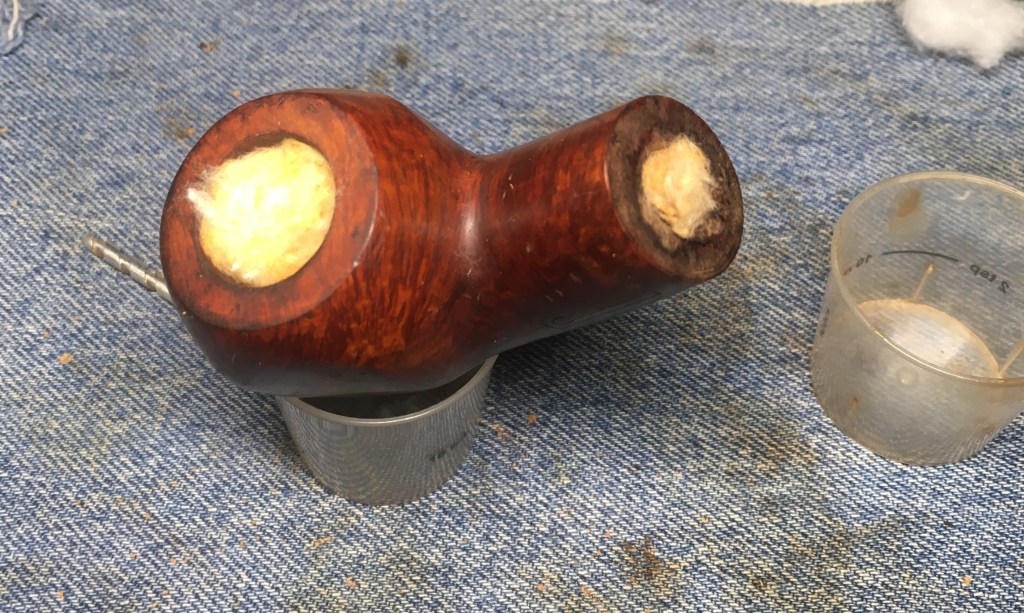
I thought that a cotton alcohol treatment would do this pipe a world of good. I packed the tobacco chamber and the airway with cotton.

I then added 95% ethyl alcohol via a disposable pipette until the cotton was saturated. The stummel was placed on a medicine cup at an angle which allowed the alcohol level of both ends to be level. The alcohol would evaporate overnight and pull the tars from the briar depositing them in the cotton as it evaporated.

I then began cleaning the stem airway. This too was a filthy tar ridden mess. Numerous bristle pipe cleaners dipped in ethyl alcohol were used.

Once cleaned, I took the stem to the jar full of Before and after Extra Strength Deoxidizer or as I like to call it – deox. The stem had a pipe cleaner inserted into the tenon. I did not want the aluminum to be submerged into the solution and the pipe cleaner acted as a hanger. I planned on leaving the stem in deox overnight.

The next day both the stem and stummel were waiting and ready for more restorative love.
I started with the stummel by removing the cotton then cleaning the airway with alcohol dipped cotton swabs. The results were great, only taking a few swabs to clear the remaining tar.

Next, the stem was removed from deox and allowed to drip off the excess solution.

I placed the still damp stem on a coarse shop rag to absorb and hand buff some of the loosened oxidation from the vulcanite.

The below photo shows the results of the hand buffing with the coarse rag.

The stem was returned to the workbench looking much better without the oxidized rubber.

I then proceeded to scrub the stem with several make-up pads drizzled with Soft Scrub cleanser. This slightly abrasive cleanser removes the oxidized rubber. As the oxidation is removed the color of the pads indicate when the has been removed.

I then took the stummel to the sink for a scrub with undiluted Murphy Oil Soap and a nylon scrub brush. The soap was rinsed with warm water and the stummel dried with a cotton hand towel.

The stummel looked much better but this clean briar showed the large number of fill which would require attention.


I wanted to remove the existing finish from the briar. I first tried 95% ethyl alcohol on a make-up pad to dissolve the finish. It kind of worked but not very well.

Next, I tried acetone on a make-up pad. That worked better but still the results were very slow and elbow grease intensive.

I placed the stummel into a jar filled with acetone and let the solvent work on the finish for 30 minutes.

30 Minutes later the stummel was again wiped with an acetone dipped make-up pad. This time the finish and stain were being removed.

There remained a few shiny spots where the finish was not completely removed. I planned on dealing with them as the stummel was sanded. TO sand the stummel I wanted the stem and stummel to be connected to avoid the rounding of the joints between the two pieces. I had not returned to the cork mortise so instead I wrapped the aluminum tenon with masking tape to thicken it and secure a tight fit of the stem to the stummel.

The area around the stam was very carefully sanded to avoid the stamp. The old fills were made even more obvious as I did the initial sanding. The old fill material was picked out using a fly tying bodkin and a dental scraper.

The plan was to place a drop of brown cyanoacrylate (CA, super glue) into the pit then add briar dust to the pit and press the dust into the CA with the back of the dental scraper. The CA and the dust would compine filling the pit and curing quickly.

In the photo below you can see the new fills looking like scabs. The briar dust that comes in contact with the CA takes on a very dark color while the non-CA-contact dust remains light.

The light spots were filed smooth using a small flat file. The resulting dark spots indicate new fills of the old pits.


I was not happy with the fit of the masking taped tenon and feared that I would round the edges of the joints. It was time to finish the cork work. First I tried to unscrew the aluminum tenon from the stem. I was not sure if it was threaded or if it was glued. I turned without much trouble using a channel lock pliers with the jaws well covered in painters tape. Once freed the filthy threads were cleaned with a rather large number of cotton swabs dipped in 95% ethyl alcohol.

The next few photos illustrate how reality attacks my well made plans quickly rendering them into refuse.
Plan #1 Use an existing small cork, drill out a hole for the aluminum tenon and trim the sides of the cork leaving a hollow cylinder, tube of cork, which would be inserted into the mortise. This plan met with FAILURE several times as I could not cut the cork thin enough with a razor blade to make the cork tube.
Plan #2 Use a set of cork hole borers (seen below) to cut the cylinder of cork. FAILURE
Plan #3 Use the cork hole borers to cut a cylinder of synthetic “cork”. FAILURE


Finally, I thought to keep things simple. Use the razor blade and carefully slice a thin piece of natural cork, measure the length of the cork rolled into a cylinder and trim it to length. Insert this into the mortise. If it works, glue it in place.

It worked. Below you can see the results before the cork was glued in place or the end trimmed.

Once it was trimmed and glued (and allowed to dry) into place the stem was inserted and tah-da. The tenon compressed the cork and the fit was nice and snug.

Below is a photo of the trimmed and glued cork.

That done, I could finally get to sanding the stem and stummel together. Before I could do that I had a couple of fills which needed a finesse touch around the stamping. This was done with careful application of CA and briar dust. And even more careful filing and sanding.

The pipe was finally sanded with a series of sanding sponges from 320-3500 grit. Between each sponge the stummel was wiped with a make-up pad moistened with alcohol to remove sanding debris. The stem was rubbed with mineral oil and wiped with a dry paper towel.

The pipe was then worked with 4000-12000 micro-mesh pads. Between each pad the stummel was wiped with a make-up pad moistened with alcohol while the stem was rubbed with Obsidian Oil and wiped with a paper towel.

The pipe was then given liberal coating of Before and After Restoration Balm. This product is amazing at rejuvenating the briar and makes the vulcanite look great too.

The Restoration Balm was allowed to sit and work its magic for 20 minutes. After the timer beeped, the excess balm was wiped off using an inside out athletic sock.

The pipe was then taken to the buffer for a polishing with Blue Diamond buffing compound. The residual compound was wiped off with a paper towel lightly wetted with 99% Isopropyl alcohol then the pipe received several coats of carnauba wax.

The final steps were to take the pipe to the buffer where the stem and stummel were buffed with Blue Diamond compound. The pipe then received several coats of carnauba wax and a final hand buffing with a microfiber polishing cloth.
I think this Country Panel Bent Rhodesian restored beautifully. I still love the shape even with all of its fills and blemishes. The pipe clenches well and feels much lighter than the over 2 ounces (62 g) that it actually weighs in at. The stem is still a bit thick feeling in the mouth but filing down would have altered the shape too much, in my opinion. The original stain was preserved and reminds me of an antique gun stock. The vulcanite deoxidized amazingly well and stands out gloriously as a contrast to the briar. Overall, I am very happy with this mysterious beauty.
The dimensions of this Country Panel Bent Rhodesian are:
- Length: 4.96 in./ 125.98 mm.
- Weight: 2.19 oz./ 62.09 g.
- Bowl Height: 1.70 in./ 43.18 mm.
- Chamber Depth: 1.24 in./ 31.50 mm.
- Chamber Diameter: 0.71 in./ 18.03 mm.
- Outside Diameter: 1.54 in./ 39.12 mm.
I do hope that you have found something here useful to your own pipe care, maintenance or restorations. If you like this sort of thing, please click the like and subscribe buttons. Thank you for reading the ramblings of an old pipe lover.
Below are some photos of the finished Country Panel Bent Rhodesian.


One response to “A Country Panel Bent Rhodesian Restoration”
[…] (https://scimansays1787.com/2024/11/26/a-country-panel-bent-rhodesian-restoration/) […]
LikeLike