
Photographed and written by
John M. Young
The story of the Ugly Duckling seems to come to my mind when I think of Peterson Irish Seconds. Though in the case of this pipe it’s more like an ugly duckling that got chewed on by a snapping turtle down at the pond.


Well, this looks like it might be another tough restoration. The reason this pipe didn’t make it as a “real” Peterson might have been the deeper than normal blastings at the front left of the pipe. In a couple of places the briar looks like the blasting cut deeper into the briar. I am no expert on Peterson quality control but that did seem suspect. As for what I planned to do was the following: A thorough cleaning of the pipe inside and out, a refinishing of the briar, and a rebuilding of the stem. This rebuilding would allow me to try to weld vulcanite kind of like I welded acrylic on a previous restoration (A Commissioned Stanwell 32 Button Repair – acrylic welding – NebraskaPeteGeek).
Background
Being a rather typical member of Generation-X, sometimes called lazy slackers, I will refer you to what I wrote about Peterson Irish Seconds in a previous blog,
I cannot begin to describe the history nor impact of the Peterson pipe company. I can tell you what I think is the best source of information on the subjects and that is Mark Irwin and Gary Malmberg’s book, The Peterson Pipe The Story of Kapp & Peterson. According to the authors,Peterson’s seconds are as follows,
“Seconds Peterson seconds are pipes of all shapes with briar flaws deemed unacceptable for ordinary models and sold at reduced prices, sometimes unstained, fit with fishtail or round button mouthpieces. Since the early 1990s they have only been available in Ireland. Occasionally they are described in Peterson catalogs under different names, and documented specimens have various stampings. In roughly chronological order these include:
Stamped arched KAPP & over straight PETERSON”S over arched DUMMIES An early specimen preserved at the Peterson museum with this stamp has a round-button mouthpiece.
IRISH FREE STATE stamp (1922-37) COM stamp with no brand or model name. Documented with or without nickel bands.
System Reject (1968-) Noted first in the Price List for January 1968 as being available in all six system shapes. Also found in the ‘80 Peterson-Glass Price List.
Erica System Reject (1987-98)Noted in two US distributor catalogs. Fishtail mouthpiece, unstamped nickel band, with COM of MADE IN THE over REP. IRELAND or with no COM.
Irish Seconds (1982-98) Classic Range shapes stamped with no brand name , fishtail mouthpiece, in unstained, black rustic or dark brown finishes, no band. (Irwin, Mark and Malmberg, Gary (2018). The Peterson Pipe The Story of Kapp & Peterson, First edition, second printing 2021. Briar Books Press, Canada. p312).
Mark also writes a weekly blog titled Peterson Pipe Notes. If you have not already subscribed I highly recommend it. It will be one of the best $0 purchases you can make and is a vault of information on all things Peterson and various other topics. I am not just saying that because Mark has posted a few of my restorations either. His blog concerning the Irish Seconds is very well researched, written and can be found here: https://petersonpipenotes.org/tag/irish-seconds/. (Young, John. An Irish Seconds Oom Paul (Peterson 02) Restoration – NebraskaPeteGeek).
As for this pipe, I believe it to be a Peterson 312 shape. The dimensions and shape match the 312 Bent Billiard. According to the official Peterson website,
“One of our largest and most robust variations on the classic, this bent Billiard offers a generous fire hole with thick insulating walls, as well as a more tubular transition and muscular shank that capture our House Style. Though bold and substantial, its half-bend lends it a natural impression when clenched in the teeth.” (Peterson Pipes: System Standard Heritage (312) P-Lip).
The shank is drilled with a reservoir making me think that the pipe was not intended as an Irish Seconds but as a 312 but it just didn’t make the quality control cut after the blast. That is all conjecture on my part though.
The Restoration
As much as I do not like to work on more than one pipe at a time, due to old brain issues, I did indeed do these two pipes simultaneously.

Stem cleaning was the first priority as I wanted to get this stem into the Briarville’s oxidation remover solution. I was looking forward to trying the vulcanite welding.

The exterior was lightly rubbed with 0000 steel wool to remove the outermost oxidation.

The stem then was placed into the Briarville Pipe Stem Oxidation Remover, or Deox, as I like to call it. I planned to leave it in the solution overnight.

I then turned to gathering the ream team.

The PipNet’s #1 and #2 blades did most of the work with the General triangular scraper doing clean-up.

The rim had lava deposits, but with its rusticated rim, it would be tough to scrape clean.

The scraping of the rim, once softened with a bit of saliva, was partially productive.

The tobacco chamber was sanded with 320 sandpaper wrapped around a wood dowel. The sanding revealed the briar and no damage due to heat.

No damage is always welcome.

Next came the cleaning of the air way within the shank. This was more difficult. Peterson pipes with their reservoirs are frequently difficult to clean. I do wish that their owners would have taken a few minutes to swab out the reservoir with a tissue or napkin as recommended, but I too have neglected to do this after a smoke. The airway was cleaned with a dental scraper, nylon shank brush, bristle pipe cleaners and cotton swabs all doused with liberal amounts of 99% ethyl alcohol.

The stummel was then taken to the sink for a scrub with a nylon brush and Murphy Oil Soap, undiluted. The soap was rinsed with warm water and the stummel dried with a cotton hand towel.

The deeper parts of the sandblast and the rim did not look like they were as clean as I would have liked so a second scrub was done with a brass brush and the Murphy’s. The rinsing and drying remained the same.

Back at the workbench the stummel was wiped with a make-up pad dipped in 99% ethyl alcohol. This did remove some of the black stain from the briar.

Still not happy with the cleanliness of the airway, I thought maybe a cotton and alcohol treatment would soften and draw out remaining tars from the briar.

The bowl, airway and shank were stuffed with cotton. The cotton was then saturated with about 10 ml of 95% ethyl alcohol and allowed to sit overnight. With the stem and stummel both soaking overnight with their treatments, I called it a night.

Remember I said that I was working on two pipes at the same time? Well, I continued the next morning. The cotton had done its job of absorbing the tars dissolved by the alcohol as it did its job of dissolving the tars and moving them to the cotton as it evaporated.

The cotton was removed.

I then cleaned the airway as before and was pleased that it took little effort.

The stem was retrieved from deox and placed on a coarse shop rag where it was rubbed vigorously. This helped remove some of the oxidation loosened by the deox solution.

The stem was filed and sanded exposing a cleaned surface to work with.

The same filing and sanding was done to the underside.

I cut a “dam” from a plastic lid to fit into the slot and block off the airway from unwanted welding material.

Below you can see the airway filled with the dam.

I selected a vulcanite stem from my extras.

The surface material was filed and sanded from the stem to expose clean fresh vulcanite.

I tried melting the vulcanite with a soldering iron, as I had successfully done with the acrylic. It did not work. I then tried to heat the vulcanite with a heat gun to soften it before using the soldering iron. This too met with failure.

All that it did was to make the surface of the vulcanite surface get rough, as if it were bubbling up. I could not get any material to melt off the stem for use as welding material for the Peterson’s stem.

Plan B began to form in my Multiple Sclerosis damaged brain. What if I cut a piece of vulcanite from an existing stem and welded it in place with rubberized cyanoacrylate (CA, super glue)? Hmm, the damaged brain thought this might work. I set off to find an appropriate donor stem. The donor’s button was removed with a cut-off tool with the dremel rotary tool. This also gave me a feel for cutting vulcanite.

I measured and drew out the piece which I wanted the donor to donate.

Except for a small chip off the donor piece where I tried to hold it in a forceps, it looked good and fit well. Okay, there was actually a lot of trimming and shaping with the dremel.

The Bob Smith rubberized CA was the glue of choice.

The CA was applied to the seam around the donor piece. The dam would hopefully keep the CA from dripping into the airway. Also from previous experiences the CA does not stick to this plastic.

After about 30 minutes I couldn’t wait anymore so I spritzed the CA with a drying accelerator. This hardened up the CA in moments. The plastic dam was pulled free.

I filed the repair with a small flat file and checked the airway. Everything was going according to the imagined plan.

A second application of black CA was applied to fill and blend the repair. I also added a line of CA to the back side of the button to re-establish its shape.

The underside of the stem was also coated with a thin layer of CA to fill the multitude of dents caused by the snapping turtle attack.

After the CA had cured it was again filed and sanded with 320 and 400 grit sanding sponges. The repair looked better than I had thought it would.

The underside was also filed and sanded.

WIth the stem issues resolved, I turned my attention to the refinishing of the briar. This pipe had some serious wear issues. The black stain had been worn away completely from the left rear side of the stummel.

I used Fiebing’s black Leather Dye diluted about 50% with ethyl alcohol.

I initially thought to just apply the dye to the areas where the finish had been worn away but as I did this I realized that blending the old and new finishes would be impossible. The best solution was to apply the black dye to the whole stummel.

Well, the whole stummel minus the lighter shank end. The dye was flamed with a lighter to burn off remaining alcohol and to help set the dye into the briar. After the flaming I wiped the surface with a make-up pad wetted with ethyl alcohol. I was not concerned with the dye drying because I wanted to remove the dye from the high spots of the blast. The lower spots would dry on their own accord.

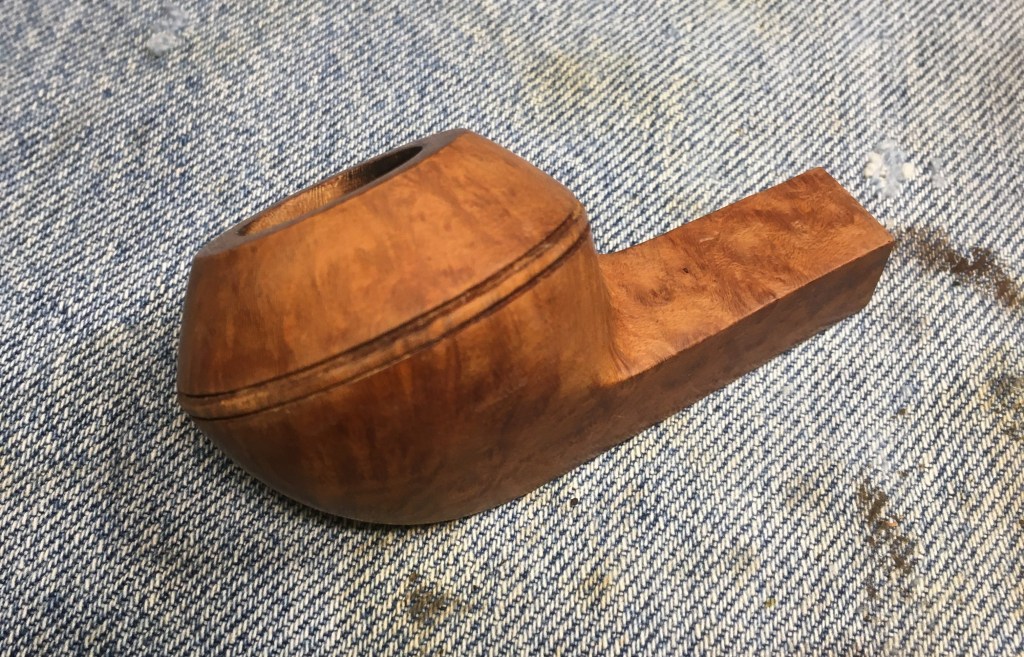
After the stummel had dried, I lightly sanded the high spots and contours with a 400 grit sanding sponge.

This light sanding removed the black dyed briar from the surface revealing the lighter briar underneath.

The worn briar of the left side of the stummel looked much better.

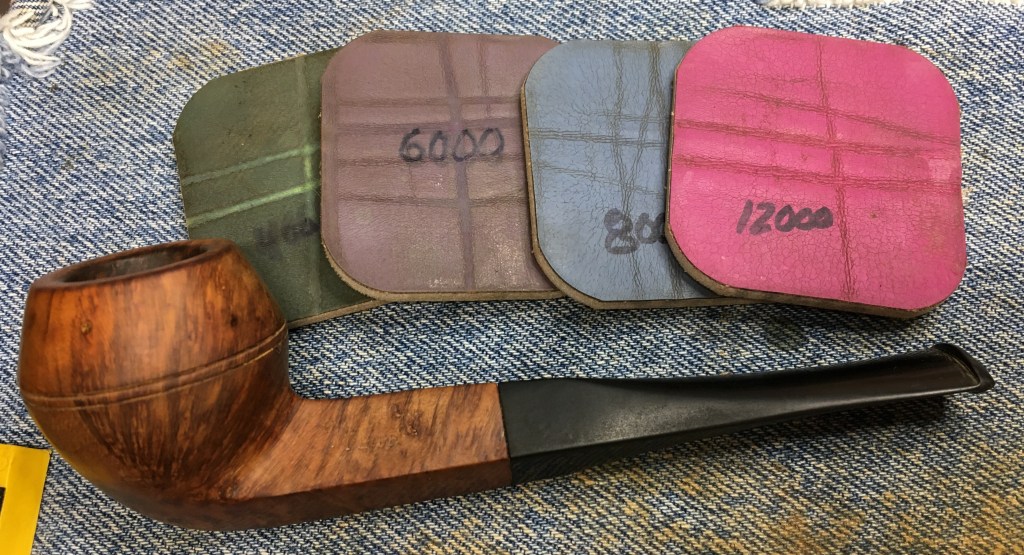
The stem was then sanded with a series of sanding sponges. I did not worry about taping the shank as the sanding there would improve the lightening of the briar at the shank end. Between each sponge I rubbed the stem with mineral oil and wiped it with a dry paper towel.

The sanding continued through the finest grit sanding sponge, 3500. The oiling and wiping also continued between sponges.

I buffed the stem with white buffing compound to further polish the vulcanite.

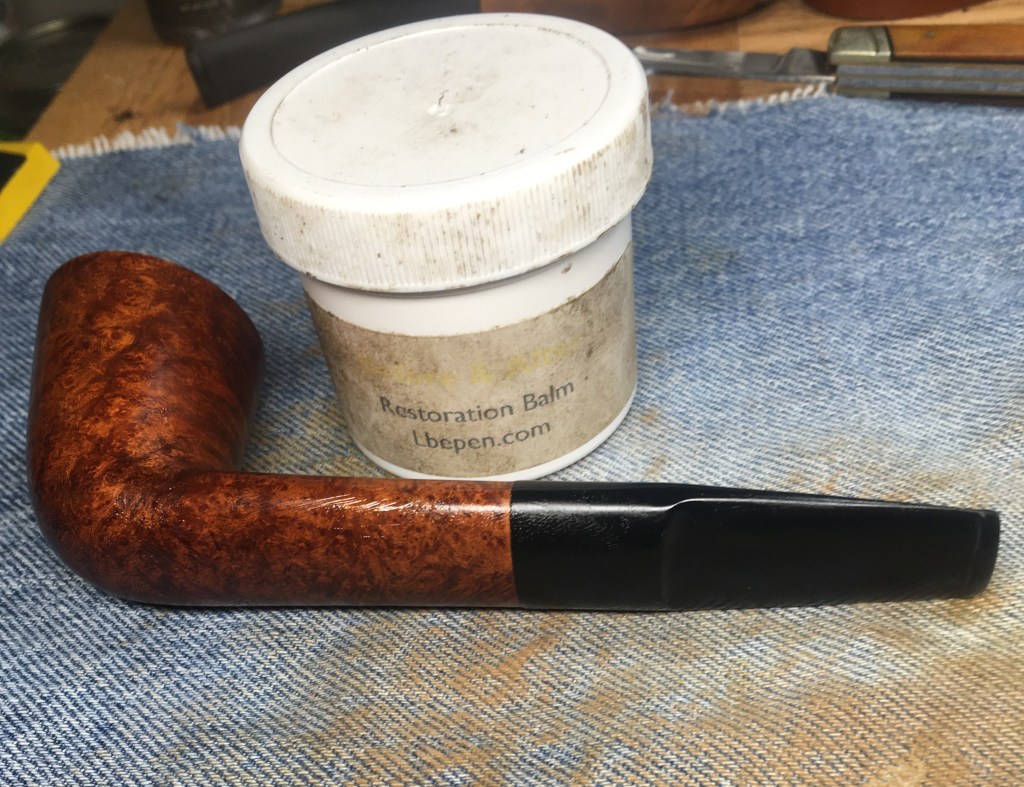
The stummel was coated with a layer of Before and After Restoration Balm and allowed to sit for 30 minutes.

The remaining Restoration Balm was hand rubbed with an inside out athletic sock to remove the excess.

The stem was waxed with several coats of carnauba wax applied with the buffer.

I did not want to wax the stummel with carnauba due to the deeper recesses of the blast. I opted to use Renaissance Micro-Crystaline Wax. This product was applied with a baby toothbrush.

I used a shoe buffing pad to hand polish the Renaissance.

As a further buffing attempt, I used shoe buffing brushes to work the wax and raise the shine.

The final touch was to hand buff the entire pipe with a microfiber polishing cloth.
My struggle to repair the damage caused by the snapping turtle attack on this poor Peterson was complete. Overall I think it turned out very nicely. Given, I will probably not sell this specimen as the stem repair was a technique that I have not tried before and have not tested sufficiently. I was disappointed by my failure to weld the damage with vulcanite but will probably do more research and attempt it again. The stem did polish-up very well and looks dramatically better than it did. I am sure the repair will hold and should be strong enough to combat the forces of extended clenching. The refinishing of the stummel also turned out very nicely. The definite deep blast is a feature that I really like the look of. Though this may have been the reason for this pipe being classified as an Irish Second. The dimensions of this Peterson Irish Seconds Bent Billiard are:
Length: 5.50 in./ 139.70 mm.
Weight: 1.83 oz./ 51.88 g.
Bowl Height: 1.75 in./ 44.45 mm.
Chamber Depth: 1.54 in./ 39.12 mm.
Chamber Diameter: 0.72 in./ 18.29 mm.
Outside Diameter: 1.32 in./ 33.53 mm.
I do hope that you have found something here useful to your own pipe care, maintenance or restorations. If you like this sort of thing, please click the like and subscribe buttons. Thank you for reading the ramblings of an old pipe lover.
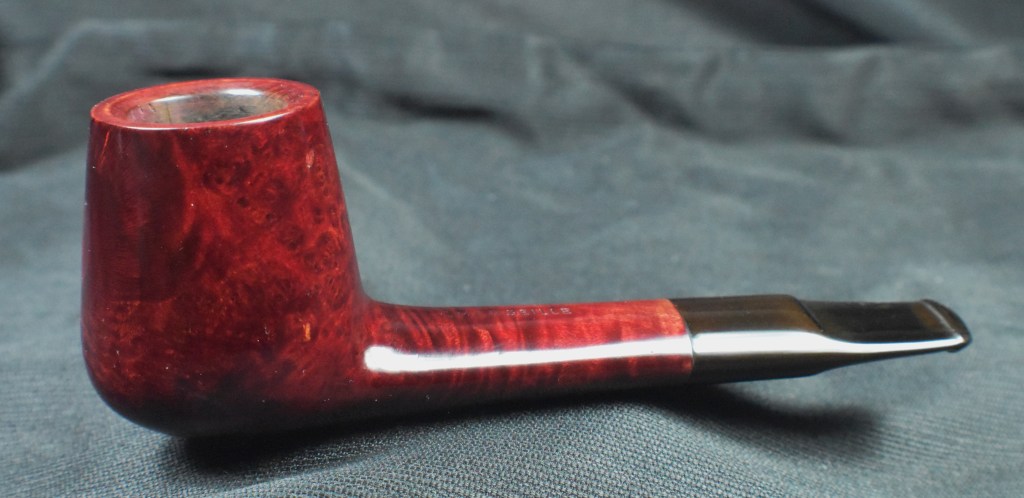
Below are some photos of the finished Peterson Irish Seconds Bent Billiard.


 Which, in all honesty, is the same as nothing. The pipe has no country of manufacture (COM) stamp but, if I were a betting man, I’d bet on France. Marseille makes me think of Marsielle Marso but I kind of dislike bringing that up due to the dislike of mimes in general by AMericans. At least in my experience mimes are not appreciated.


 .
.


 (
(


