Photographed and written by
John M. Young
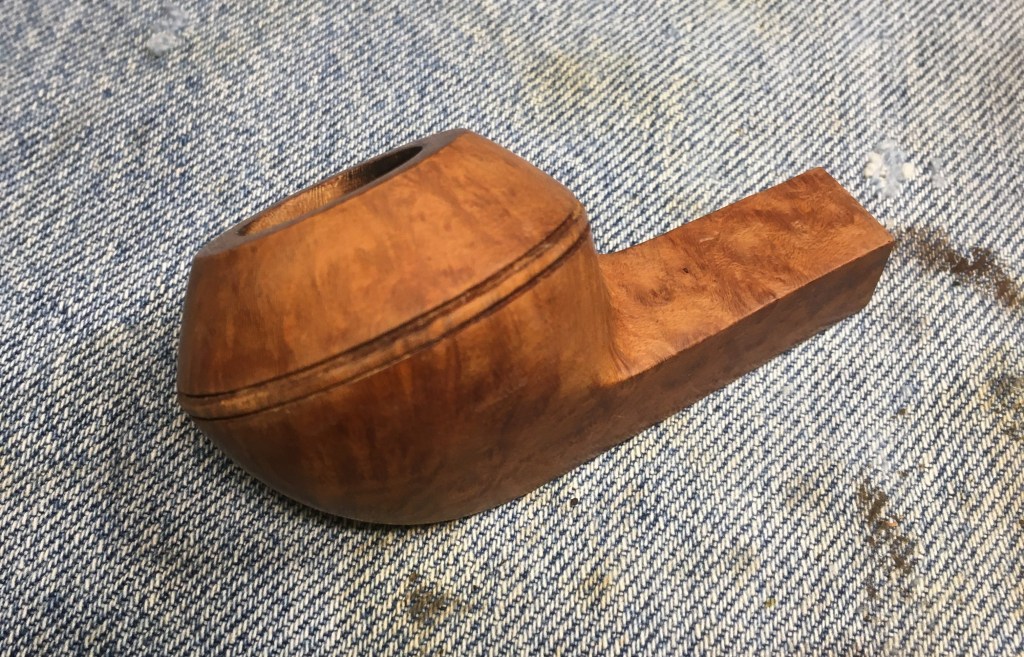
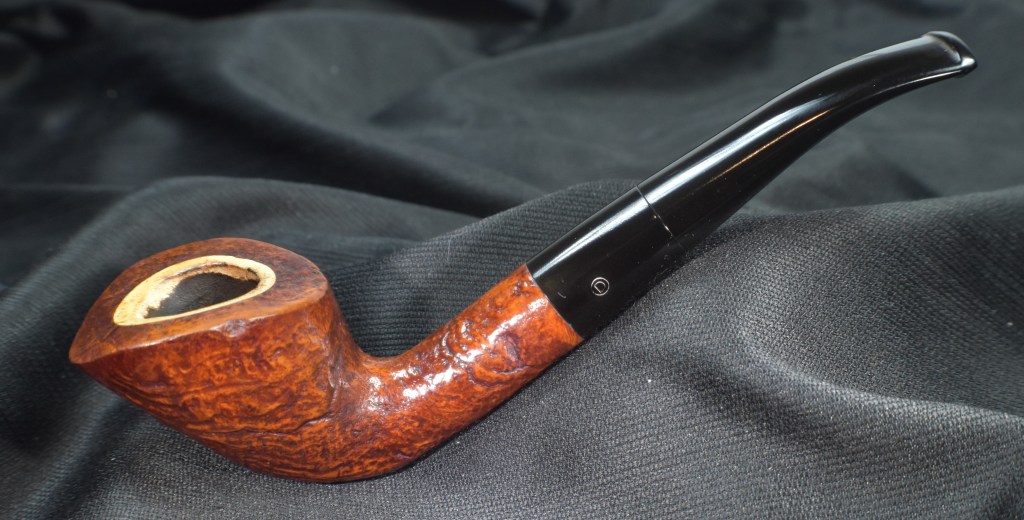
You know when you see something and the little voice in your head says, “Wait! There’s something peculiar about that”? That is exactly what happened when I was perusing eBay and saw this pipe. I can’t recall if it was the photo or the header, “James J Fox Made in Dublin Ireland Pipe” that caught my eye but one of them gave me a temporary case of whiplash. Now, we all know what a pipe made in Dublin actually means but what is this James J Fox stamp? A distant relative of Wileward Ethelbert Coyote, perhaps? (Wile E. Coyote for those non-cartoon-culture savvy). Even with less than stellar photographs, I knew I had to lay hands on this lass. The button was clicked, money sent and the pipe arrived. Well, it was a bit slower than that but you get the idea. Upon arrival, I got a good look at the stampings. Top left, Fox over Special in a flowing script. This one was faint, not worn, just faint. The top right shank had MADE IN DUBLIN over IRELAND. Again the stamp was faint but only in the middle top portion. Almost as if the stamp was not flat. The final stamp was on the lower left face of the shank and it read, JAMES J FOX over DUBLIN LONDON. The photos below show the pipe as it appeared before any work was done.


This looked like it would be a straightforward restoration with no real obstacles. Yeah, the stem was oxidized and there was some weird stain on the front left of the bowl but the stem fit was great and the rim indicated that the previous owner took care of this pipe or hadn’t used it extensively.
Background
I went directly to the James J. Fox website as the start of the background search. Here it states the following:
“We have been trading in fine tobacco and smokers’ accessories from 19 St James’s Street since 1787 and our customers have included discriminating smokers from all walks of life – from commoners to kings. Among them have been Sir Winston Churchill, Oscar Wilde, British and Foreign Royalty, the officer’s mess of famous British regiments, and the leading lights of the stage, film, sport, tv, radio, music and literature.
Our world famous tobacco business started with Robert Lewis, who began trading fine tobacco in St James’s Street in 1787. James J Fox was formed in Dublin in 1881 and opened its first tobacco shop in London in 1947. Fox acquired the business of Robert Lewis on 14 September 1992, uniting two of the most respected names in the cigar world. Both companies now trade as JJ Fox (St James’s) Ltd and run the cigar departments of Harrods and Selfridges.” and about their founder, Frederic James Fox (1913-1990) “Born in 1913, Frederic (Freddie) was the fourth of five children and the youngest of James Fox’s three sons.He found himself in charge of the family business, a single cigar shop on Dublin’s Grafton Street, after the untimely death of his two brothers. Stanley Fox was shot dead by armed thieves thought to be members of the IRA in 1926, while Ronald (Biffy) was missing in action over the Dutch coast in 1942 during an RAF mine laying mission. Freddie, not content with just one shop, took the business from strength to strength. He established a successful import and wholesale business in Ireland alongside the world’s first Duty Free outlet which expanded the retail cigar business into London. He developed numerous brands including Punch Nectares, Bolivar Amado, Hoyo Royal Hunt and La Corona Policromia, and established the Astor Tobacco Company. His enterprising nature also saw Freddie acquire and develop a successful import and wholesale business in the Channel Islands; and he oversaw the origin of the business’s entry into the property markets, developing several high profile office buildings in St Helier, Jersey including Sir Walter Raleigh House on the Esplanade. Freddie Fox died in 1990. He is still sorely missed by his family, friends and colleagues from the cigar industry. Were he to be asked to comment on his career achievements, he might say :
“Not bad for a beginner.” We would agree.” (Heritage | Welcome to the History of James J. Fox)
For a far more complete history of the James J, Fox shops and their history I will refer to Mark Irwi’s Peterson Pipe Notes blog, 157. The James Fox – Peterson Small Batch Lines: An Interview with Yiorgos Manesis (157. The James Fox – Peterson Small Batch Lines: An Interview with Yiorgos Manesis – Peterson Pipe Notes). Yiorgos Manesis says in Irwins blog, “They used to make their own pipes here, a small factory for a few years. It didn’t last long, and only two or three people worked there. I don’t know if they were turning bowls, or just getting bowls and finishing them here. They were involved in all parts of the tobacco business—they were making pipes, hand-blending their own pipe tobaccos. And Freddie Fox, who was Robert and Stuart Fox’s [the 5th generation owners] grandfather, was a very intelligent, savvy man.” (157. The James Fox – Peterson Small Batch Lines: An Interview with Yiorgos Manesis – Peterson Pipe Notes). Now is this pipe one of those made by Fox?
I sent some photos to Mark Irwin asking him what he thought of this pipe soon after it arrived. His response was, “Boy oh boy! Isn’t this COOL? Does it look like the Peterson 493 shape to you? It pretty much does to me. These James Fox / Peterson pipes are really scarce. Yes, please let me know when you run the blog post, as I want to point everyone out to it as well as include at least one of these photos to help them get to your blog.” (Mark Irwin, personal email). I cannot say that I was terribly familiar with the 493 shape so that is where I went hunting.
Mark’s Peterson Pipe Notes provided me with two wonderful posts describing the development of Peterson’s bulldog shapes. Blogs 388 (1891-1919) and 390 (1920-1947) detail the development of shaps during the years in parentheses.
“Two years after hostilities ended and bringing our survey of the IFS and Éire eras to its conclusion is the fullest flowering of bulldogs in K&P’s history, before or since: the distributor’s catalog c. 1947. Three squat bulldogs, the 493, 494 and 495, all reintroducing the “Cad” name. The 170 / 175 and 150 /155 don’t appear to be different shapes, but merely different stems—one saddle, one bent.”

(https://petersonpipenotes.org/390-a-visual-history-of-petersons-bulldog-shapes-part-2-from-the-end-of-the-patent-through-the-irish-free-state-and-eire-eras/ highlight added by me). In examining the James J. Fox and comparing it to the 493 from the diagram above the shape looked very similar. Mark appeared correct but one thing which struck me was the saddle stem. The 493 looks to have a saddle that tapers slightly from the shank towards the button.This narrowing is completely absent in the Fox Special, if anything the Fos pipe has a reverse taper. Using my micrometer I checked the width at the shank, 0.72 (18.4 mm) inches and at the opposite end of the saddle, .74 inches (18.8 mm). This is far from definitive proof that the pipe was made in the short lived James J. Fox shop but it does make me say, “Hmmm.”
Though lacking a shape number, the Fox Special must be regarded with some suspicion. Mark thought it looked like a Peterson 493, and I concur with estimated measurements from the shape charts the dimensions do fit nicely. The 493 shape existed through the 1970s as evidenced in a chart and description, “This shape chart from Associated Imports point-of-sale brochure leUS pipe smokers know what shapes they might expect in non-System pipes. Note several rare, currently sought-after shapes by collectors: the XL02, XL999, XL493s, 124 and 120F.” on page 170 of The Peterson Pipe The Story of Kapp Peterson (Irwin, Mark and Malmberg, Gary. Briar Works Press. 2018, First Edition, second printing 2021. Printed in Canada).
In 1983 Peterson published a point-of-sale catalog, the Peterson-Glass catalog. I can find no reference to the 493 shape in this catalog, with only the 80S,150 and 999 bulldog or Rhodesian shapes remaining. (petersonpipenotes.org/wp-content/uploads/2024/12/Peterson-Glass-Catalog-1978-79-PETERSON-PIPE-NOTES.ORG_.pdfpetersonpipenotes.org/wp-content/uploads/2024/12/Peterson-Glass-Catalog-1978-79-PETERSON-PIPE-NOTES.ORG_.pdf)
The final thing I’ll mention here is a listing of a Peterson 493 from the Estates section of smokingpipes.com:


(https://www.smokingpipes.com/pipes/estate/ireland/moreinfo.cfm?product_id=239789)
So, we are left with little but supposition, assumptions and conjecture, three great words, but hardly a definitive date of birth nor maker for this lovely pipe. Ath the end of this blog I show the measured dimensions of the Fox Special. If you compare the dimensions of this pipe to the listing of a Peterson 493 from smokingpipes.com there remains little doubt of this pipe’s heritage.
The Restoration
As usual the pipe was introduced to the workbench with a cleaned denim piece. I say cleaned because though laundered, stains aplenty remained.

I began with a quick prep of the stem for a bath in Briarville’s Pipe Stem Oxidation Remover. This product was sent to me by Richard Messineo of Briarville to try. Again I wish to thank Richard for the chance to test this product. The stem was lightly sanded with a 400 grit sanding sponge.

I then cleaned the airway with bristle pipe cleaners dipped in 95% ethyl alcohol.

The stem was submerged in the Briarville solution. The label instructions say 2-24 hours. I allowed this stem 13 hours of exposure.

In the meantime I began reaming the tobacco chamber.The tools of choice were the PipNet, Smoingpipes Low Country Reamer and the General triangular scraper (with the tip ground round).

The number 3 blades of the PipNet did the lion’s share of the work with the General coming in for clean-up.

The tobacco chamber was sanded with 220 sandpaper scraped around a wood dowel. The chamber appeared free of any heat damage or charring.

Next came the cleaning of the airway. This was done with numerous cotton swabs and bristle pipe cleaners both dipped in 95% ethyl alcohol as well as some scraping with a dental scraper.

The stummel was taken to the sink for a scrubbing with undiluted Murphy Oil Soap and a nylon brush. The soap was rinsed with warm water and the stummel dried with a cotton hand towel.

Back at the workbench the stummel looked better but the stain at the front right remained.

A wipe with 95% ethyl alcohol on amake-up pad removed a bit of color, probably old wax and stain.

The stain persisted.

As a remede, I thought maybe oxalic acid would bleach the stain.

I used a saturated solution of oxalic acid applied with a cotton swab on the stain. The swab assumed an orangish color.

After the oxalic acid had sat for 30 minutes I returned the stummel to the sink for another scrub with Murphy Oil Soap. I figured the basic nature of the soap and copious rinsing would neutralize the acid and rinse any remnants. Once dry the stummel appeared as below. The stain was vanquished.
The next day I returned to the stem. The Briarville Pipe Stem Oxidation Remover is getting darker in color. I am not sure how many stems this product is able to treat. I think this was number 3 or 4.

The stem was removed and was vigorously rubbed with a coarse shop rag. Below you can see that some of the oxidized vulcanite was removed onto the rag.

The stem looked much better.

I scrubbed the stem with Soft Scrub cleanser on make-up pads to remove more of the oxidized vulcanite.

The stem was then coated with another product, Before and After Hard Rubber Balm. This product was sent to me from Mark Hoover to try. Thank you, Mark. I really like this balm for treating vulcanite stems after they have been restored. It is more viscous than Obsidian Oil and I think it lasts longer than Obsidian Oil in protecting polished stems.

In preparing the stummel for sanding, I covered the stampings with masking tape. I prefer to cut slightly irregular pieces of tape for this as they do not give as blocky a look to the unsanded areas under the tape.


The stummel and stem were united during the sanding to avoid rounding the joint between the two materials at their seam. The sanding was done with a series of sanding sponges in grits of 400-3500. Between each sponge the briar was wiped with a make-up pad dipped in alcohol to remove sanding debris. The stem was rubbed with mineral oil and wiped with a dry paper towel between sponges.

The tape was removed and the pipe micro-meshed with pads 4000-12000. The above between pad wiping was done as with the sanding except I used Obsidian Oil rather than mineral oil.

The stem was polished with Before and After Fine followed by Extra Fine Polish.

Each was applied by finger then hand buffed using a soft cotton cloth.

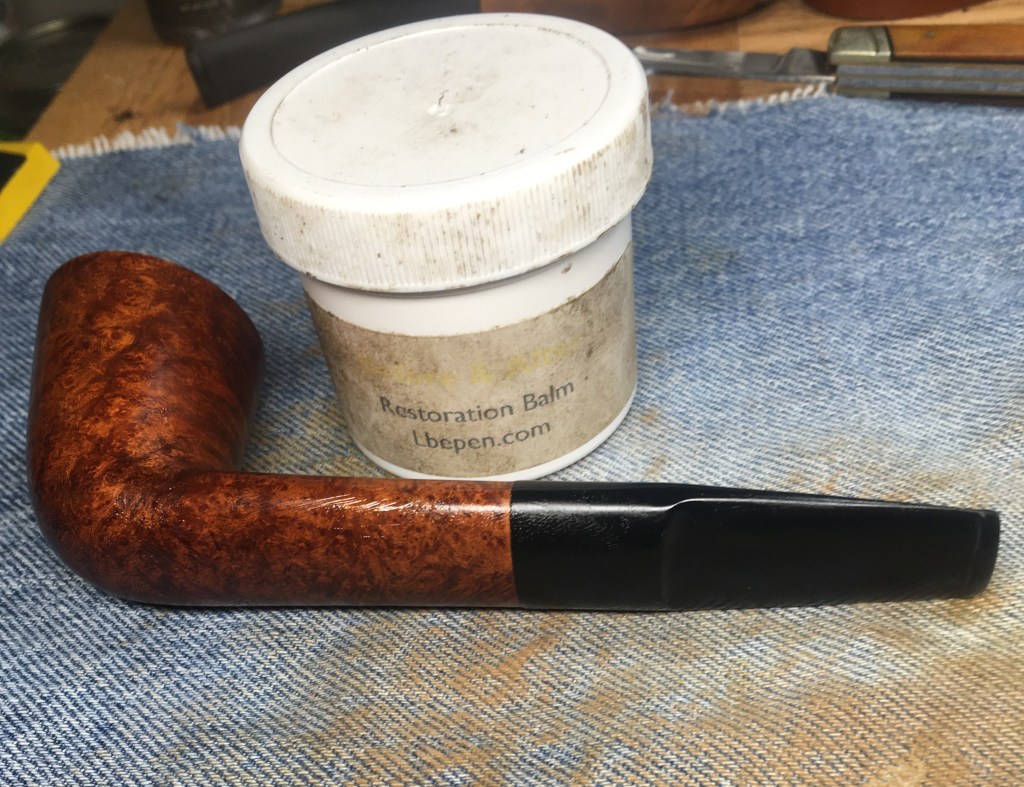
The stummel was then covered with a liberal coat of Before and After Restoration Balm. I let the balm work its magic for 20 minutes.

The excess balm was hand buffed with an inside out athletic sock to remove it and reveal the revived briar grain.

The pipe was then taken to the buffer for several coats of carnauba wax. I used a fly tying bodkin to remove the xa deposits from the beading around the rim. The final step was a hand buffing with a microfiber polishing cloth further deepening the shine.
I think this Fox Special turned out very well. This stained spot and stem were the two areas I was most concerned about, both turned out exceptionally well. The high gloss black vulcanite really accentuates and contrasts the briar grain. The condition of the rim makes the pipe look like it is a brand new specimen rather than a restored old beauty. The stampings, though faint, can all be made out and add to the mystery of this pipe provenance. Peterson product or not, it is a beautiful Irish Lass.
The dimensions of the James J. Fox, Fox Special are:
Length: 5.77 in./ 144.53 mm.
Weight: 1.30 oz./ 51.60 g.
Bowl Height: 1.55 in./ 45.97 mm.
Chamber Depth: 1.24 in./ 39.37 mm.
Chamber Diameter: 0.73 in./ 20.32 mm.
Outside Diameter: 1.78 in./ 42.16 mm.
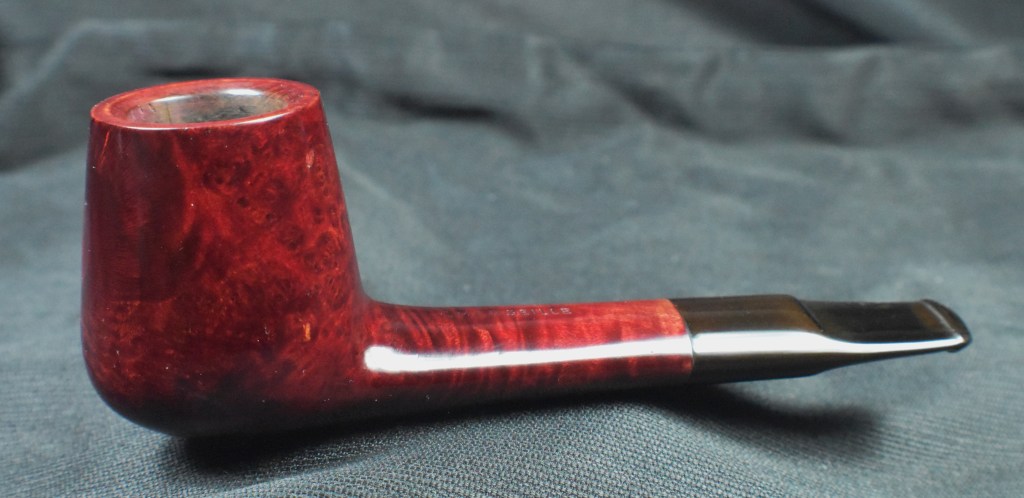
Below is an image of a Peterson 493 estate pipe:

(the above image is taken from https://www.smokingpipes.com/pipes/estate/ireland/moreinfo.cfm?product_id=239789).
I do hope that you have found something here useful to your own pipe care, maintenance or restorations. If you like this sort of thing, please click the like and subscribe buttons. Thank you for reading the ramblings of an old pipe lover.
Below are some photos of the finished Royal Guard 522.


 (
(


 Which, in all honesty, is the same as nothing. The pipe has no country of manufacture (COM) stamp but, if I were a betting man, I’d bet on France. Marseille makes me think of Marsielle Marso but I kind of dislike bringing that up due to the dislike of mimes in general by AMericans. At least in my experience mimes are not appreciated.


 .
.


 (
(