
Photographed and written by
John M. Young
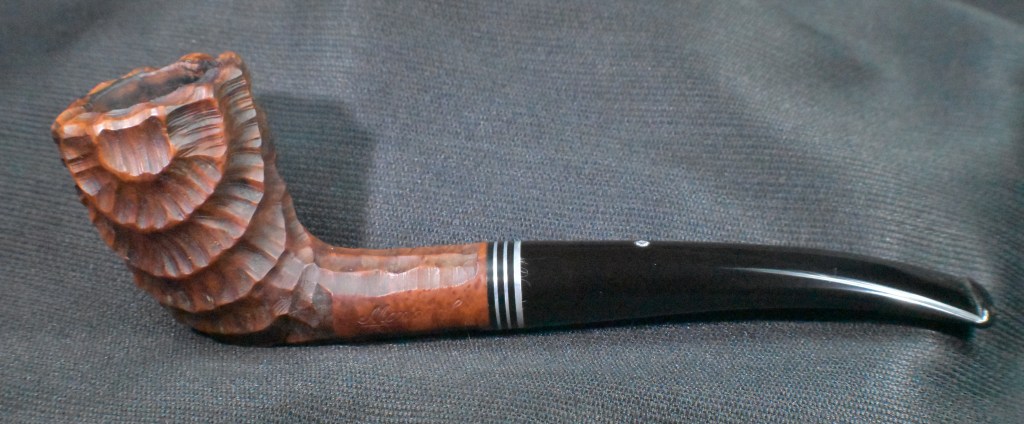
The next contestant on the program comes to us from Denmark and goes by the name, “Frasorteret”. This pipe was part of an estate lot that looked interesting from the initial photograph. I picked it up back in January of this year.


Yikes! Well first, it seems to need a stem. The shank spacer or ferrule is quite oxidized so that’ll require some problem solving. Then there is that monstrous fill on the back left. The typical reaming and cleaning will be done as well. Not an easy restoration but it should make for an interesting pipe.
Background
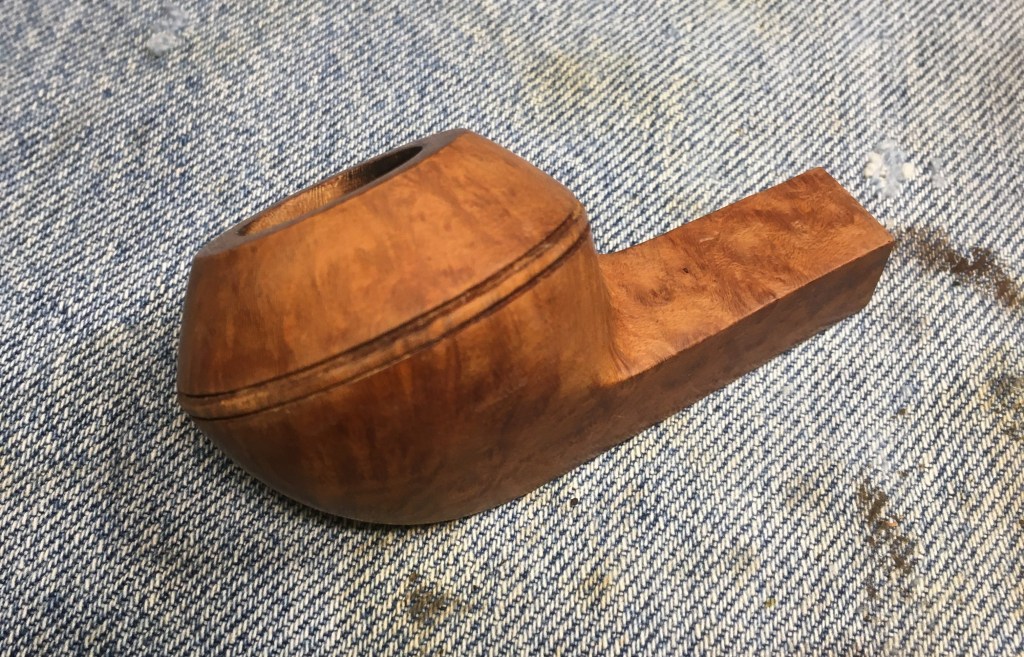
I have restored a Frasorteret before but it was long before I started blogging about restorations. Here are the left and right sides of that pipe:


I thought I needed to have more than one Freehand pipe and that one struck my fancy. Here we are 3 or more years later and again I thought I needed to have more Freehand pipes. With the first Frasorteret I assumed the carved areas were for artistic expression and for great hand feel.
I researched Frasorteret first at pipephil.eu and found the following.

(Fr-Fz — Pipes : Logos & Markings). Preben Holm was a name that I had heard of though I admit to not being very familiar with his work or history. The next search on Frasorteret was on pipedia.org. I found the next sentence interesting because in my mind the Danes didn’t produce lower quality pieces of anything.
“The Frasorteret line of pipes were made by Preben Holm and were nearly identical to his normal line of pipes but for fills and pits and the like. The pipes were stamped “Frasorteret Made in Denmark.” (Frasorteret – Pipedia)
Hmm, apparently my preconceived notions about European craftsmanship is as flawed as this briar. The pipe in hand certainly had “fills and pits and the like.” Pits the size of Luxemburg.
I continued with the pipedia.org entry and found the below in the words of Preben Holm himself, I’ll include it in its entirety.
“The Story of my Firm
by Preben Holm
Already at an early age I became interested in pipes and in pipesmoking. After school I worked as an errand-boy in my father’s shop which was a provision shop with 3 departments, one dealing with pipes and tobacco, one dealing with wine, and another one selling magazines and cigarettes etc. When starting as an errand-boy I was 12-13 years old, and it did not last any length of time before the pipe department roused my curiosity, and it was there I spent my time when there were no goods to be delivered. My father was somewhat mean, and he only paid me a sixth of what I could earn somewhere else, but this, I think, was very sound. On the other hand I earned a lot of good tips, and this money I saved carefully and deposited it in the bank. Though at that time I did not know what I should save the money for it proved to be very important later on, because this became my “initial capital” in the pipetrade.

Early Preben Holm (Late 1960’s?) Courtesy, Dennis Dreyer Collection
My father was altogether a very wise man, and one of the things he did, and which I appreciate to-day, was to prohibit the smoking of cigarettes, but on the other hand he did not mind my smoking the pipe already at the age of 13 – 14. When I was 14 years old I got tired of going to school, very much to everybody’s amazement, as it was considered a matter of course that I should study in order to acquire a superior education. However, I was very tired of school, and therefore I asked my father to be allowed to leave the school. No doubt he was rather disappointed, but he did not want to force me into anything, and we agreed that I should begin a commercial training in his business. It was, especially to begin with, a mixed job as some hours each day I still worked as an errand-boy at the same time receiving a good training within the retail trade. Part of that education was that I had to go to a commercial school where I, no doubt, learned things by which I benefited later on.
The wine department I found very exciting, and I began to read thick books about wine, especially red wine, however, it was still the pipe department in which I was most interested. I was myself a very active pipesmoker, and both the pipes and the tobacco interested me very much, and it was not long before I practically was in charge of the pipe-department. I found that very exciting, and already at the age of 14 I managed the purchase of pipes and tobacco. Most likely I was not always popular with the sellers of pipes who considered me too critical, but I thought that necessary in order to live up to the confidence our customers of pipes gradually placed in me.
I remember that my father considered me to be a bit crazy when I began to buy tobacco for myself that was three times the price of the common Danish made quality, but I really thought that it was worth the money. Before long I also made my father accept the idea to include a very large selection of the better tobaccos, most of them made in England, into our assortment, and it did not take a long time before we had one of the largest selections in Copenhagen.
It is not allowed in Denmark to sell tobacco by weight, but I had the idea that the customers should have a chance to see what they were buying. Therefore I wrote a big book describing in it each single brand, attaching a small plastic bag of the tobacco. It was a great success. There also belonged a small repair shop to the pipe department, and very soon I took over the repairs.
In the meantime I had grown 15 years old, and my interest in pipes increases more and more. During some time an elderly gentleman, who himself made hand-carved pipes, had visited the shop and wanted to sell the pipes. Of course I was very fascinated by him. After I had talked with him a few times he asked me whether I had any money. I had after all my saved tips-money in total 1.400,00kr., and he said that this would be sufficient to buy the necessary machinery so that I could start making my own pipes. He was very helpful with he purchase of machines, and he made also the special tools that were required. I was allowed to mount the machines in a small room in my father’s cellar.
The room was only 1/2 m2 (13 1/2 square feet), and conditions were thus rather limited. The first Bruyere-blocks I bought from that nice gentleman, and I was now ready to start my own experiments. That was done after working-hours in my father’s shop, and I experimented in my small work-shop until 11:30 p.m. Then I had to finish, because I had to get up and open my father’s shop the next morning. On June 5th, 1963 11 days before my 16th birthday, the moment had come when I sold the first pipes to my father for sale in his shop. I then approached the big pipe shop Pipe-Dan that is situated in the city of Copenhagen, and that sells a lot to the tourists.

Pipe-Dan believed in a chance for the pipes I made, and he was prepared to buy 20 – 30 pipes each week. He was to judge the pipes and fix the prices. Now I became very busy and got some friends to come and help me in the evenings for a reasonable payment. I then taught them the more rough work so I myself got more time to occupy myself with the molding and finishing. In that way a couple of years went by, and one fine day I had finished my commercial education. I was now able to devote myself to the manufacture of pipes all day long as well as during the evenings and weekends. 18 years old I employed my first journeyman, and we made gradually 50 – 60 pipes a week which I continued mainly to sell to Pipe-Dan.
Then came the time when I had to serve my time as a soldier. I kept my journeyman who in the meantime had become quite skilful, and for the rest I went the long way home from the barracks every time there was an opportunity. I had now got a larger and better work-shop, but that did cost money and, as already mentioned, Pipe-Dan fixed the prices of the pipes, and the tendency was, I suppose, the more pipes we made the lower the prices. One day during my military service I realized that I was unable to keep my journeyman, and therefore had to sack him. That was not very pleasant.
One day while making the rather traditional hand-carved pipes as we had to in order to come by some money, I took a fancy to make something completely untraditional at that time. From the very beginning I had only worked with the finest Bruyere that could be provided, and on the whole it all had very pretty grain patterns, and that gave me the idea to try something novel. Contrary to what was done so far I started to form some of the pipes according to the grain pattern, and out of this I got some quite particular models. Thus having experimented a little while I had a very smart specimen, at least I thought so. At that time I received about 30,00kr. for a pipe from Pipe-Dan, and I remember that I first went and showed my father this special pipe. He was very impressed, but when I told him that I wanted to go to Pipe-Dan and ask 500,00 kr. for it he seemed not really to believe me. Anyway, I did it. Pipe-Dan studied the pipe and said. “By Jove, it is nice to see something novel”. He paid the 500,00 kr. and told me that I was welcome to make some more of them. However, there was naturally a limited market for pipes at such a price, and it was not long before he could not buy any more of them. Anyway, I continued to make them in addition to the ordinary hand-carved ones. I began also to let the raw bark-top be part of the design.

Courtesy, Doug Valitchka
When I was called up for military service I had 18 pieces of these pipes which I was unable to sell. Therefore I left them in my father’s shop. One day when I returned home there was big news. An American, called Lon Schwartz had been calling. Lon Schwartz was making a purchase trip for his retail shop in St. Thomas, the Virgin Islands, USA. When he saw the 18 pipes he was very enthusiastic about them and bought them on the spot, placing at the same time orders for everything I could make against being entrusted with the monopoly in the entire U.S.A. When my military service came to an end there was a lot to do. I could now afford to engage a journeyman, and very soon another one, and gradually we established quite a nice production.
I then got the idea that it would be fun to see where all the pipes were sold, and therefore I decided to travel to St. Thomas. St.Thomas is indeed a tourist island, visited by tourists from all over America, and it was these tourists who bought my pipes in Lon Schwartz’ shop. During my first visit I stayed in the shop for 2-3 weeks and had ample opportunities of talking with pipe-smokers from everywhere in America. That really gave me a lot of impulse. Then I returned home and continued working with the new inspiration. That was repeated 3 times within the first year’s cooperation with Lon. I could simply not have had any better starting point, because the taste changes quite a lot from one place in the U.S.A. to another, but here came, as mentioned, pipe-smokers from all the States. It was wonderful to feel how something one oneself enjoyed making really was accepted.” (Holm, Preben – Pipedia)
The Restoration
The poor stemless stummel made its way to the workbench and a cleaned denim piece.

The reaming tools were gathered.

PipeNet blades #2 and #3 did most of the work with the General triangular scraper just doing a bit of clean-up.

The reamed tobacco chamber looked good but sanding would tell the tale better.

The sanding of the chamber showed briar in great condition and no signs of heat damage.

The shank cleaning was done with bristle pipe cleaners, cotton swabs and a nylon shank brush. All of these were frequently dipped in 95% ethyl alcohol. There was some scraping done with a dental scraper but due to the narrow draft hole this was rather ineffective.

Once the shank was cleaned I took the stummel to the sink for a scrubbing with undiluted Murphys Oil Soap and a brass brush. The soap was rinsed with warm water and the stummel dried with a cotton hand towel.

The large fill, yeah I said LARGE, har the old fill material picked out with a fly tying bodkin. This was the largest fill I think I had ever seen. What to do about it filled my head.

I thought about my other Frasorteret and the quote from pipedia.org, “but for fills and pits and the like.” (Frasorteret – Pipedia).

I wondered if those carvings were not just there for artistic expression but instead, there to remove flawed briar. I thought that I could carve away the pit, smoothing the briar to make an artistic smooth thumb hold on this pipe.

I got out a carving bit and equipped it onto the Dremel rotary tool.

I have a whole set of the carving bits and had only used one or two of them.

I carved and smoothed the flawed briar expanding the carving and removing the jagged edges of the pit. I did expose more pits as I went. You can see two more dark spots in the photo below, one high right and the other low left.

I tried to make the carving feel good for my thumb.

I feared that I had removed too much material but I had tried to only remove the pitted briar.

The carfing was then smoothed with sanding sponges. The shank extension was sanded during this time as well. I did not think that I could not use either the Before and After Extra Strength Deoxidizer or the Briarville Pipe Stem Oxidation Remover on the vulcanite shank extension without staining the briar of the shank. Instead I wrapped the shank briar with masking tape and sanded the vulcanite with a series of sanding sponges from 320-3500 grits. Between each sponge the briar was wiped with an alcohol wetted make-up pad and the vulcanite was rubbed with mineral oil and wiped with a paper towel.

I measured the mortise diameter with a micrometer.

Looking through my stock of potential replacement stems I came across one that looked about right for this pipe. The tenon was slightly larger than the mortise.

I sanded with an emery board and sanding sponges to reduce the tenon diameter.

Below you can see how the new stem looked once the tenon was fitted to the Frasorteret.

After the shank extension was sanded and the stem fitted, I took the stummel to the buffer for a polish with rouge compound.

The vulcanite looked pretty darn good. I proceeded to give it a couple of coats of carnauba wax while I was at the buffer.

I also waxed the new stem after giving it a light buff.

The stummel received a liberal coating of Before and After Restoration Balm applied with a baby tooth brush. The briar was allowed to sit, soaking in the goodness of the balm, for 30 minutes.

An athletic sock, inside out, was used to remove and hand buff the excess Restoration Balm from the stummel.

The pipe was in the home stretch and really looked good.

I opted to go with Renaissance Micro-Crystalline Wax as the final coating for the briar as the rustications were a bit too deep for carnauba waxing. The Renaissance wax was applied with a cleaned baby toothbrush.

The stummel was hand buffed with a soft cotton cloth. The waxing and hand buffing was repeated for a second coat..

I decided to go with a bowl coating for no reason other than aesthetics and to make my fingers sticky. I used 100% pure maple syrup to lightly coat the tobacco chamber.

A capsule of activated charcoal was opened and dumped into the chamber.

I covered the opening to the chamber with painters tape and plugged the draft hole with a pipe cleaner.

The stummel was then shaken vigorously, rotated and tapped with a wood block several times to evenly disperse the charcoal powder. The tape was removed and the excess charcoal dumped. I removed the pipe cleaner and gave the mouthpiece a hard blow to clear any remaining loose dust.

The final step was a hand buffing with a microfiber polishing cloth further improving the shine.
This Frasorteret freehand is a beautiful pipe for both the eyes and the hand. Well left hand, anyway. For those who hold a pipe with their right hand while smoking, sorry. The pipe is both too heavy and too long to be a comfortable chencher. Overall I am pleased with how my attempt to mask the heavily pitted surface turned out. I’ll be the first to admit that I do not like thin walled pipes and I did have to thin the wall significantly to remove the enormous pit present. The replacement stem looks like it was meant for this pipe and it matched the existing vulcanite shank extension very well. Overall I am happy with how this one turned out especially for my first try at carving like this. The dimensions of the Frasorteret Freehand are:
Length: 7.15 in./ 181.61 mm.
Weight: 2.53 oz./ 71.73 g.
Bowl Height: 2.17 in./ 55.12 mm.
Chamber Depth: 1.95 in./ 49.53 mm.
Chamber Diameter: 0.89 in./ 22.61 mm.
Outside Diameter: 2.22 in./ 56.39 mm.
I do hope that you have found something here useful to your own pipe care, maintenance or restorations. If you like this sort of thing, please click the like and subscribe buttons. Thank you for reading the ramblings of an old pipe lover.
Below are some photos of the finished Frasorteret Freehand.


 (
(


 (
(


 Which, in all honesty, is the same as nothing. The pipe has no country of manufacture (COM) stamp but, if I were a betting man, I’d bet on France. Marseille makes me think of Marsielle Marso but I kind of dislike bringing that up due to the dislike of mimes in general by AMericans. At least in my experience mimes are not appreciated.


 .
.


Leave a comment