This brings me to the bad news, the bad news is that it is a Comoy’s. I suppose I should explain, Comoy’s is really a collaboration between the Chapuis and Comoy’s families and centered in two locations, the Saint-Claude region in France and London, England. There are many names involved over a 150 year period. The various people are related and moved between countries over the years. This is why I said, “The bad news”. It is because I find this all confusing.
In a nutshell Henri Comoy was from the Sainte-Claude region. As many folks did, he followed his father as a wood turner. He ends up married and living in London, making pipes from briar. His wife’s sister provides the connection to the Chapuis name. His wife’s sister, Fanny Beausire was married to Charles Pierre Chapuis, a Swiss watchmaker. They had seven children, three of which are important to this story; Charles Chapuis dies leaving the children partially orphaned, Emile (21 years old when Charles dies), Louis (19) and Charles (15). Louis and Charles are adopted by their Aunt Anna, Henri Comoy’s wife, and moved to London. Here they are taught the Comoy family business of pipe making alongside Henri and Anna’s two biological children, Paul and Adrien Comoy. The four boys, Louis Chapuis, Charles Chapuis, Paul Comoy and Adrien Comoy are treated equally regarding inheritance within the business.
This leads to the start of the start of the company. “H. Comoy & Co. Ltd was established in 1914. It was a partnership between Henri, his sons Adrien and Paul and his nephews Louis and Charles.” (Comoy’s – Pipedia) By 1921 the company expands to the United States. Now the adopted brothers remain in contact with the older Emile. He is in the pipe business as well selling pipes wholesale in Paris, according to the pipedia.org article. In the early 1922 Emile, Louis and Charles started another company, Chapuis-Comoy, in Saint-Claude. This company serves the French market for briar pipes. I know, this nutshell is becoming larger and larger. Old man Henri Comoy died in 1924 and within 5 years H. Comoy & Co. Ltd became part of Cardogan Investments Ltd. In 1928 the two pairs of brothers created Chacom in Saint-Claude. Now Chacom can have the French and European market while Comoy’s deals with England and the US. Here is where things get weird, both companies use the same shape charts thus all the overlap in Comoy’s and Chacom shapes.
As pipedia explains, “In 1929, H. Comoy Co. Ltd became part of Cadogan Investments Ltd, created by the Oppenheimer Group, which at that time already owned a number of very important and well-known brands such as Maréchal & Ruchon (GBD), Civic & Co Ltd, BBB de Frankau, Sina, Verguet Frères, Orlik and Loewe.” (Comoy’s – Pipedia). Comoys are apparently allowed to manage their own business affairs and continue with business as usual. Of course there is an “UNTIL” coming. Comoys was left alone until the 1980s when Cardogan took over and quality went downhill.
Chacom had their ups and downs as well, with mergers with La Bruyere in 1932. Then the war, the recovery, the reassertion or market share, the regaining of their own name Chacon from Le Bruyere and eventual integration with Ropp. For the much longer version please see some of the following links:
Hopefully this all kind of explains why CARLYLE from the pipephil.eu photos is an English maker while the pipe is sporting a country of manufacture (COM) stamp clearly saying FRANCE. I told you it was confusing…
The Restoration
After all that background it’s good to get back to the easy stuff, for me anyway – the restoring. The Carlyle began the procedure with a clean denim piece on the workbench.
The airway of the stem was cleaned with bristle pipe cleaners and 95% ethyl alcohol.
The stem was then lightly sanded with a 500 grit sanding sponge and a pipe cleaner was inserted into the tenon to act as a hanger for suspending the stem in Before and After Extra Strength Deoxidizer solution (hereafter called deox).
The stem was immersed in deox for two hours.
The reaming tools were gathered.
The PipNet and the #1 blade was only used to clear the bottom of the tobacco chamber as this chamber was quite conically bored. The #2 blade did most of the work reaming the chamber. The Smoingpipes Low Country Reamer and the General triangular scraper were used for some light clean-up work. The chamber was then sanded with 220 sandpaper wrapped around a wood dowel.
The tobacco chamber showed no signs of heat damage or charring.
Another view of the chamber, below.
Scrubbing with undiluted Murphy Oil Soap and a nylon brush came next. The soap was rinsed with warm water and the stummel dried with a cotton hand towel.
Returning to the workbench the stummel was wiped with 95% ethyl alcohol on a couple of make-up pads. This removed some of the finish and stain.
I then wiped the stummel with acetone on new make-up pads. This removed more of the clear coat finish and more stain.
With the clear coat removed, I started picking the old fill material from the largest of the three fills. Additional acetone was used to soften the old fill material for picking with a fly tying bodkin.
There was one other large fill at the front of the bowl. This too was picked out.
The airway of the shank was cleaned using a dental scraper, bristle pipe cleaners and cotton swabs along with a healthy dose of 95% ethyl alcohol.
The stummel was then lightly sanded to reveal any additional areas where old fills may have been hiding.
The depth of the front fill was minimal and was filled with brown cyanoacrylate (CA, super glue).
The two pits on the right side were deeper. These were filled with brown CA applied into the pit with a fly tying bodkin.
Briar dust was then scooped with a dental scraper and a small pile placed on top of the wet CA. The back of the dental scraper was used to press the dust into the CA filled depression.
The briar dust cured almost immediately with the briar dust. The resulting fill was then filed with a small flat file.
The front fill received a second coat of brown CA. and was filed after it had cured.
The new fills had slightly lighter areas around them from the filing. I wanted to blend the color to match the existing stain.
I first used a Cherry Furniture Touch-up Marker and allowed the stain to dry. The area was lightly wiped with a make-up pad moistened with 95% ethyl alcohol.
The color was close but not close enough. I used the Mahogany marker over the area, allowed it to dry and re-wiped with the alcohol. I was happy with the results of the second stain.
The stamp was taped with painters tape for protection from the sanding.
After two hours, the stem was allowed out of deox. The drip-dry-o-matic (patent pending) was deployed to allow excess solution to join it’s jarred brethren.
I used a coarse shop rag to vigorously rub the remaining deox solution from the stem. This removes some of the oxidized vulcanite from the surface.
Back at the workbench I used Soft Scrub cleanser on make-up pads. This removed a great deal of the oxidized vulcanite.
And, some more.
The COM stamp and the “maybe” logo were taped with painters tape to protect them from sanding.
Ready for sanding.
The stem and stummel were sanded intact to avoid the rounding of the edges of each part. A series of sanding sponges from 400-3500 grit. Between each sponge I wiped the stummel with a make-up pad moistened with alcohol. The stem was rubbed with mineral oil and wiped with a paper towel.
The painters tape was removed and wiped with alcohol to remove any adhesive remaining. The pipe was worked with micro-mesh pads from 4000-12000. Again, between each pad I wiped the stummel and stem between each pad as with the sanding sponges except in place of mineral oil I used Obsidian Oil.
The stummel received a coating of Before and After Restoration Balm. The balm was allowed to stay on the stummel for 15 minutes.
The remaining Restoration Balm was wiped from the stummel using an inside out athletic sock.
The pipe was then taken to the buffer where the pipe was given several coats of carnauba wax.
The final step was a hand buffing with a microfiber polishing cloth.
I am developing a new appreciation for the oval shank. It is a feature that provides a more robust feel in the hand while retaining a more elegant contour in profile. I am sure the extra briar also provides additional strength for those who are a bit more hard on pipes. This oval shank Carlyle Dublin restored in beautiful fashion. The briar grain grain is lovely and the factory staining was preserved. The stem lost the oxidation without losing the FRANCE stamp though I would have liked to see the factory fresh top stem logo but that appears to have been lost years ago to wear and buffing. Overall I am very pleased at how well this pipe turned out. The dimensions of the Carlyle Oval Shank Dublin are:
Length: 5.43 in./ 99.57 mm.
Weight: 1.20 oz./ 18.71 g.
Bowl Height: 1.84 in./ 38.10 mm.
Chamber Depth: 1.57 in./ 27.69 mm.
Chamber Diameter: 0.74 in./ 16.00 mm.
Outside Diameter: 1.35 in./ 28.45 mm.
I do hope that you have found something here useful to your own pipe care, maintenance or restorations. If you like this sort of thing, please click the like and subscribe buttons. Thank you for reading the ramblings of an old pipe lover.
Loading…
Below are some photos of the finished Carlyle Oval Shank Dublin.
Dr Grabow, a name that introduced many a young pipemen or pipewomen to the hobby of pipe smoking. The accessibility of Dr Grabow pipes, found in every drugstore and in my case, a 7-Eleven, made for easy and affordable acquisition of a first pipe. This would have been in the early 1980s. Throughout the 1970-1980s period I fondly remember many of the older neighbors sporting pipes as they went about their suburban outdoor rituals. When this Dr Grabow Omega came to me as part of an estate pipe lot I was immediately reminded of those memories. My record keeping is poor but I think this was one of 12 pipes which came to me in September of 2024. The poor Omega had been patiently waiting for some workbench time. The pipe was stamped OMEGA over DR GRABOW on the left shank and IMPORTED BRIAR on the right. Below are some photographs of the pipe prior to work done.
This was obviously a seldom smoked pipe. I doubted that more than a couple of bowls of tobacco had burned through this specimen. The rim looked nearly pristine. There was one unsightly fill on the shank which just touched the “DR” stamp. “That might be troublesome to replace”, I thought. The finish was not of the clear coat variety, which made me happy though the oxidation of the vulcanite stem would have to be dealt with. I have restored a couple of Omegas and have found that not all of them used vulcanite as stem material. I wondered if that could be used as an indicator of age. The Omega also had a brand new paper filter in the stem.
Background
Dr Grabow pipes did not all start out as Dr Grabows. Prior to that name they were Linkman’s which was preceded by ML&C (Mary Linkman & Company). I will let the following sites tell the story for those interested in pursuing the history of this venerable pipe maker.
One site that I like to use for Dr Grabow research is a timeline written by Tiki Vegas. If that is a real name, kudos to their parents. The timeline runs from 1953 to 2006. I assume that the 2006 date is when the timeline was published. The timeline is partially interactive and gives a nice graphical representation of various Dr Grabow lines and models. Below is a sample of what the timeline looks like:
In booking for Dr Grabow Omega pipes today, I found them on Amazon so it appears that they remain in production at present. The well pipe description is most likely a kind way to note that the pipe is designed copying the renowned Peterson System. To its credit, the well of the Omega is drilled to approximately ¼ inch or 6 mm. below the draft hole, which would allow for water to condense out of the smoke and accumulate in the well. The stem of the Omega even sports a rounded P-lip style button but with the draft hole proceeding straight through the stem rather than being directed up as a true P-lip should do.
The Restoration
The Omega was placed on a cleaned denim piece to protect the work surface.
I wanted to get the stem into the Before and After Deoxidizer (lovingly referred to as deox from here on) solution quickly as I wanted to finish this project in one night. The stem was lightly sanded with a 400 grit sanding sponge.
A pipe cleaner was inserted into the button to act as a hanger suspending the stem in the deox.
With the stem in deox, I turned my attention to reaming the tobacco chamber. Fortunately I didn’t need very much attention because the chamber was nearly new.
I did use the PipNet #1 blade.
It barely had anything to remove. I was surprised by the fact that the chamber on the Omega was this small. It feels like a much more substantial pipe. It does have very nice thick walls though.
I did a bit of scraping with the General triangular scraper I had ground the tip of this tool round on a grinder. The factory tip was frighteningly sharp.
The tobacco chamber was reamed and looked pretty much like it did before I started.
Sanding it with the 220 sandpaper wrapped around a wood dowel made it look like new. You could even see the chuck marks on the interior from turning the bowl at the factory.
Next came the scrubbing. This was done at the sink with undiluted Murphy Oil Soap and a nylon scrub brush. The soap was rinsed with warm water and the stummel dried with a cotton hand towel.
Back at the workbench, I wiped the exterior and interior with a make-up pad dipped in 95% ethyl alcohol. On the photo below you can see the pinkish hue from the little bit of stain the pad picked up while the brown is from inside the tobacco chamber.
I started picking at the fill on the left shank. It was hard and secure but I didn’t like the look of it.
Soaking it with a cotton swab dipped in acetone softened it up very quickly.
The fly tying bodkin was able to pick the chemically softened old fill out much more easily.
Now for the harder part, replacing the old fill. I used the fly tying bodkin to carefully lay a bead of brown cyanoacrylate (CA, super glue) into the depression.
I then scooped up briar dust on a dental scraper and pressed it into the wet CA and brushed off the excess.
The dry briar dust was then topped with another bead of brown CA. This was allowed to cure for 10 minutes or so until hard. I then filed the new fill smooth with a small flat file and sanded it with a 400 grit sanding sponge.
I topped the fill a third time with thin CA. I applied this by putting a small drop on the bodkin and used it to transfer the CA to the fill.
This was then smoothed with the flat file and sanding sponge again.
I carefully sanded around the stampings trying to blend the sanded area to the stamped area.
This sanding was done on both sides of the shank.
The smooth surfaces were then sanded with a series of sanding sponges from 400-2000 grit. Between each sponge I wiped the stummel with a make-up pad wetted with alcohol.
The smooth areas were then micro-meshed from 4000-12000 with alcohol wiping between the pads.
The stummel then received a coating of Before and After Restoration Balm applied with a baby toothbrush and was allowed to sit for 15 minutes.
The Restoration Balm was wiped from the stummel using an inside out athletic sock to remove excess balm.
Buffing the aluminum collar was nex on the list. I taped off the shank to protect it from buffing with masking tape.
I used the white buffing compound on the dedicated white wheel which is far from white.
The stummel looked very nice. Time to retrieve the stem.
The stem was removed from deox and allowed to drip excess solution back into the jar.
I like to use a coarse shop rag to vigorously rub the remaining deox from the stem. The rough material absorbs the solution and removes more of the oxidized vulcanite.
Below you can see the oxidized vulcanite that comes off with rubbing.
Back at the workbench I used Soft Scrub cleanser on make-up pads to remove more of the oxidized vulcanite. The stem was cleaned out using cotton swabs and pipe cleaners.
After the Soft Scrub I got lazy and tried to just buff the remaining oxidation from the stem. Just like always, it didn’t work. The next three photos show a nice shiny stem with traces of oxidation.
So, back to the sanding sponges… Oh wait, I do have something new to try and tell you about. Mark Hoover, the brains behind the Before and After products, sent me a bottle of Before and After Hard Rubber Balm. I told him that I would try it so, try it I shall. The stem was sanded with sanding sponges 400-3500. Between each pad I rubbed the Hard Rubber Balm onto the stem using my fingertips. I then wiped the excess off with a paper towel. In the past I used mineral oil for this step. The Hard Rubber Balm is more viscous, thicker, than mineral oil. Being a heavier oil, I think that it would vaporize/evaporate more slowly making it preferable to mineral oil for sealing vulcanite away from the oxygen in air. I do not know if there are any antioxidants added to the formulation as there are no ingredients listed on the bottle.
After the sanding I returned the stem to the buffer. I will master using a buffer to remove oxidation if it kills me. I used the white compound and the “white” wheel for the buffing. When finished I wiped the stem with a soft cotton cloth to remove any buffing compound and oiled the stem with the Hard Rubber Balm. It looked much better without the brown haze of oxidized vulcanite.
The pipe was waxed with several coats of carnauba wax at the buffer. I did not buff the carved surfaces as I feared they would trap wax and lead to a buildup of dirt and grime.
The final step was a hand buffing with a microfiber polishing cloth.
I always enjoy working on Dr Grabow pipes. Perhaps it is the history of the brand. This pipe did not disappoint. Yes, it is a factory made pipe but the quality of the drillings and the fit of the parts is excellent. The rustication works well with this shape and the carvings fall in line with the pipe’s curves. The one large flaw in the briar was reworked and turned out as well as could be expected. The vulcanite stem polished up pretty well and contrasts the rustication quite nicely. The dimensions of the Dr Grabow Rusticated Omega are follows:
Length: 5.06 in./ 128.52 mm.
Weight: 1.27 oz./ 36.00 g.
Bowl Height: 1.17 in./ 29.72 mm. (bowl only) 1.70 in. / 43.18mm (with tube)
Chamber Depth: 0.82 in./ 20.83 mm.
Chamber Diameter: 0.85 in./ 21.59 mm.
Outside Diameter: 1.49 in./ 37.85 mm.
I do hope that you have found something here useful to your own pipe care, maintenance or restorations. If you like this sort of thing, please click the like and subscribe buttons. Thank you for reading the ramblings of an old pipe lover.
Loading…
Below are some photos of the finished Dr Grabow Rusticated Omega.
As a child of the 1970s I grew up with the series The Six Million Dollar Man. For those who never heard of this, it was a TV series where an astronaut crashes his ship and is badly damaged. He is rebuilt using “bionic” parts allowing him superhuman abilities. During the title sequence a narrator explains, “”We can rebuild him. We have the technology. We can make him better than he was. Better . . . stronger . . . faster.” For some reason this line kept going through my head during this restoration. Given the “faster” doesn’t work but the other two, most definitely. The pipe was one of 13 pipes won in an eBay auction from Germany. I was hoping to acquire some lesser known makers or lines of pipes to the US market.
The shape of this pipe is a tough one for me, it is a dainty pipe with a curved bowl. Is it a bent tulip, a chimney, a billiard? Heck, I don’t know, I’ll just use the 8497 stamped on the shank to identify the shape. As for the other stamps there was “Spitfire” in a flowing cursive script and GENUINE over BRIAR as a circle on the underside of the shank. Below is a screenshot of this pipe from the original eBay listing. It shows a repaired stem from a break, a chipped shank end and a good deal of excess glue, perhaps a failed clenching experience while mowing the lawn.
Below are some photos of the Spitfire before work had begun. Well, that is not entirely true. The break was held together by the glue until I tried to remove the stem. The stem was quite stuck. Unaware of my incredible strength, the glue broke while I tried to free the stem. Umm, there may have been a slight exaggeration there about my strength. The stem remained stuck within the shank piece as seen in the photos below.
Ok, you can see there are some issues here that will have to be addressed; the stem stuck in the broken shank and the broken shank being the greatest. The lesser issues include general dirtiness, stem oxidation, excess glue removal, tobacco chamber reaming and other typical restoration stuff. This is going to be a fun project.
Background
The first place that I searched was pipephil.eu for the name “Spitfire”. There I found the following:
(Sn-Ss — Pipes: Logos & Markings). Here you can see the same script style in the “Spitfire” stamping. The GENUINE BRIAR stamp is not represented but the four digit shape number is present. There is also a slight difference in the logo coloration of the bottom image from pipephil.eu. The bullseye shown is more indicative of the colors used by the British Spitfire fighter aircraft in World War Two.
I assume that the blue coloration of the logo in this Spitfire had merely faded over the years.
The next search site was pipedia.org. There “Spitfire” resulted in:
(Italian Pipe Brands & Makers R – S – Pipedia). The Lorenzo link took me to a nice bit on the history of the predecessors of and the formation of Lorenzo Pipes in 1969. Also, there was the following quote specific to the Spitfire line:
“A somewhat more bargain series was given its own brand name: Spitfire. Spitfires displayed 1:1 transferred Lorenzo models (mainly for 9mm filter) as well as smaller, more classically shaped pipes. These were also extremely popular.” (Lorenzo – Pipedia). The store takes a more tragic turn in 1983,
“In 1983 Lorenzo Tagliabue came to bitter grief: his little daughter, the only child, died of cancer. He lost all interest in the business and retired still in 1983, leaving no heirs who wished to continue the business. Lorenzo Pipes was licensed for and continued for a shorter period by Comoy’s of London (Cadogan / Oppenheimer Group). Then Lorenzo Pipes almost disappeared and Lorenzo Tagliabue passed away in 1987.
But this wasn’t the end. In 1988 Riccardo Aliverti and his wife Gabriella purchased all rights to the Lorenzo trademark from the Tagliabue family and production of the renown Lorenzo Pipes resumed.
The Aliverti family is involved in pipemaking since Romolo Aliverti, the father of the current owners, joined the Lana Brothers in 1920. He later reached the rank of technical director. No wonder that his son Riccardo showed an interest in pipe making. Riccardo began learning the pipemaking trade in 1954 at the age of fourteen under his father’s watchful eyes and succeeded him as technical director upon his father’s retirement in 1973.
Today the third generation of the Aliverti family is working for the company. Massimo Aliverti, Riccardo’s son, has been with the company as sales director since 1991. He works closely with his father and knows all phases of production. Massimo has established a broad customer base for Lorenzo around the world.
As far as the informations are reliable, Lorenzo’s better lines (One Star, Two Star, Three Star, Moscato, Spumante and the Grand Canadian) are made in Italy while the cheaper ones (New Era – Riesling, New Era – Poggio, Angera, Angera Satinato, Cadry, Churchwarden, Filtro, Arena, Cadore, Sport PS and Garden) are made in Albania by Tomori to benefit from the rich deposit of briar in Albania.
The website of Lorenzo’s American distributor SMS Pipes gives a good impression of today’s Lorenzo Pipes. SMS also offers a wide range of Meers.” (Lorenzo – Pipedia).
I think that it is safe to say that this pipe was made in Italy by Lorenzo most likely between the early 1970s-1983.
The Restoration
Breaking a pipe is seldom fun and breaking one while removing a stem is less fun than that. I suppose I could take some consolation in the fact that it had already been broken and the attempted repair was what had actually broken. Regardless, the pipe made it to the workbench. I immediately dropped the shank piece and tenon end into a small medicine cup with 95% ethyl alcohol. Apologies for not photographing that step. The alcohol worked quickly in freeing the stem from the broken piece of shank. The below photo has the broken piece of shank pressed in place though not glued, for the photograph.
I began with reaming the tobacco chamber. I thought the PipNet and the #1 blade would be narrow enough for this petit chamber. It was for the first 1- 1.5 cm then the chamber tapered.
I used a Tsuge reaming tool for this narrow chamber. This was followed up with the General triangular scraper.
I remember picking up the Tsuge tool after my first PipNet set lost the #1 blade to breakage. The chamber was then sanded with 220 and 320 sandpaper wrapped around a wood dowel and a Sharpie marker, respectively. There was no damage from heat or charring in the chamber but there were a couple of places where the chamber had experienced small dings, likely from previous clumsy reaming/scraping.
The shank was cleaned with cotton swabs and bristle pipe cleaners dipped in 95% ethyl alcohol.
The stummel was then taken to the sink for a scrubbing with undiluted Murphy Oil Soap and both a nylon brush and a brass wire brush. The soap was rinsed with warm water and the stummel dried with a cotton hand towel.
Back at the workbench the stummel was wiped with 95% ethyl alcohol on a make-up pad. This removed some stain from the briar.
The plan to repair the shank was this:
Glue a ¼ inch or 6.5 mm brass tube into the mortise well past the break.
Glue the broken shank end into place.
Fill the seams with cyanoacrylate (CA, super glue) and briar dust.
Recarve the rustication and redye the shank.
The mortise of the Spitfire was drilled at ¼ inch or 6.5 mm. I needed to deepen the mortise to implement my fix. I used a Brad Point Drill Bits 1/4-Inch Hex Shank Stubby Drill Bit in a screwdriver handle to extend the mortise approximately 1.4 inch (6.5 mm) past the furthest edge of the break.
The brass tube was slid into position to test the fit. So far, so good.
The pieces of briar refused to align precisely. Bah! Hmm, there was a layer of glue from the previous fix on the briar which kept the broken pieces from aligning correctly.
I began soaking the broken edges with acetone to soften the old glue.
While the glue was soft I worked it with a nylon brush. This helped peel the edges of the glue from the briar. The acetone would evaporate quickly so I had to soften and scrub quickly. Eventually the glue was removed.
The brass tubing was cut to length using a tubing or pipe cutter.
The brass tube was scratched up with 80 grit emery paper to increase the surface area for the glue to adhere to. The tube was pressed into place without the broken shank piece and Thin CA was allowed to seep into the joint. The broken shank piece was slid over the brass tube and situated correctly. Additional Thin CA was applied to these seams. The two pieces of briar were then clamped and allowed to cure.
As the CA was curing I began cutting the tenon to fit into the brass tube. This required the use of the VermontFreehand Adjustable Tenon Turning Tool. I made several cutts adjusting the cutter very slightly (approximately 1/8th turn of the adjustment screw). I feared taking too much material off and shattering the thin tenon. Once the tenon was close to the right size I began filing the new tenon and smoothing it with 400 grit sandpaper.
When the CA that set, I used a countersink bit to hand bevel the inner edge of the mortise.
The stem was pressed into place and the fit was not too bad. I had to file the top of the stem to fit the shank. This was done by wrapping the shank with a layer of masking tape and filing the stem with a small flat file. The lower edge of the joint would have to wait until I had the chip filled before I could fit it to the stem.
Since the seam where the two shank pieces joined was adjacent to the stamps care had to be taken to keep from damaging the stamp. I applied brown CA with the tip of a fly tying bodkin to the seam. Briar dust was then pressed into the wet CA. The briar dust caused the CA to cure almost immediately. The excess dust was brushed off with a brass brush. This was repeated to fill the seam in very small increments.
The same process was used on the carved surface seams.
To fill the chipped shank end, I applied a bead of brown CA to the area that I wanted filled. This wet CA was then pressed into the box of briar dust. The excess dust was brushed off with a nylon brush and another thin layer of CA was applied. This wet CA was again pressed into the briar dust. Once the chip in the shank end was filled with CA and briar dust the end was filed with a small flat file. The final fill was topped with a coating of Thin CA to seal the layers of brown CA and briar dust.
At this point I was getting impatient to get a look at the finished pipe. I opted to try buffing the stem’s oxidation into submission. In hindsight, this was a mistake. I describe it here so that you can avoid being as dumb as me.
I wrapped the shank with masking tape to protect it from the buffing.
Using a rouge compound I buffed the stem until I thought I’d removed the oxidation.
The problem was, the stem looked shiny but shiny brown. I wanted shiny black. I wetted a few make-up pads with Soft Scrub cleanser and scrubbed the stem. They removed a great deal of oxidation.
“Okay, I’ll quit being in a hurry and do it right,” I said to myself. I suspended the stem into the Before and After Extra Strength Deoxidizer (I refer to this as deox). It was allowed to soak overnight.
The next day I removed the stem and allowed it to drip excess solution back into the jar.
I like to scrub the remaining deox from the stem with vigorous use of a coarse shop rag.
The coarse texture of the rag absorbs the solution and removes more of the oxidized rubber as can be seen below.
The stem was certainly looking more black this time. There remained brown areas especially on the top side of the stem. I sanded the stem with a series of sanding sponges from 400-1000 grit. The zone immediately (1 cm) below the button was filed using the small flat file and further sanded. Once sanded I returned to the buffer and buffed the stem with white compound.
Pleased with the stem, I turned my attention to recarving the rustications on top of the fills. I used the Dremel rotary tool and a sharp carving bit.
I tried to keep the lines pretty much the same but to carve through the fill material. I very much wanted to eliminate any shiny CA spots.
The newly carved textures looked good but their color was off when compared to the rest of the shank.
I used a Mahogany Furniture Touch-up Marker to re-stain the briar to match the existing color.
Not bad.
Not bad, at all.
The stummel was given a coat of Before and After Restoration Balm, applied with a baby toothbrush and allowed to sit for 20 minutes.
20 Minutes later the Restoration Balm was hand buffed from the stummel using an inside out athletic sock.
The baby toothbrush was cleaned using 95% ethyl alcohol. Renaissance Micro-Crystalline Wax was applied to the stummel using the baby toothbrush. I applied two coats of wax allowing 10 minutes between coats.
The stummel was taken to the buffer where it was buffed using a clean flannel wheel. While there I applied several coats of carnauba wax to the stem and the stampings on the underside of the shank.
To address those two rough spots from previous reaming/scraping inside the tobacco chamber, I opted to use a maple syrup and charcoal bowl coating. I applied a very thin coating of syrup to the chamber using a cotton swab.
I then used a capsule of Activated Charcoal dumped into the chamber. Oh, note the pipe cleaner in the shank. This keeps the charcoal from getting into the airway. I covered the rim with a piece of masking tape and vigorously shook the stummel for several seconds to distribute the charcoal powder evenly onto the wet syrup.
After removing the tape, dumping the excess charcoal and giving the stem a good blow, don’t draw in, you’ll get a mouthful of charcoal. The final step was a hand buffing done with a microfiber polishing cloth.
This was a long and troublesome restoration. Little things like; not having the ¼ inch brass tubing and waiting for it to arrive, the old glue removal, fitting the brass reinforcement tube, cutting the tenon, and being dumb and skipping steps, made the whole process last for many days. In the end, I think the pipe turned out well. Yeah, like the pipedia.org article says, “A somewhat more bargain series”, it is a cheaper pipe. I enjoy the challenge of returning a pipe like this to working condition. The re-carvings turned out very nicely as did the re-staining. I think you would be hard pressed to notice the break repair if you could not see the seam on the smooth stamp surface. The stem also did polish up fairly well. The brass reinforcement will certainly add strength to the pipe and should keep it from having another break. It is still a dainty little pipe which would probably be a great addition to someone who loves Virginia flake tobacco in a tall narrow bowl. The dimensions of the Lorenzo Spitfire Bent Billiard 849 are as follows:
Length: 5.37 in./ 136.40 mm.
Weight: 0.87 oz./ 24.66 g.
Bowl Height: 2.02 in./ 51.31 mm.
Chamber Depth: 1.75 in./ 44.45 mm.
Chamber Diameter: 0.61 in./ 15.49 mm.
Outside Diameter: 1.24 in./ 31.50 mm.
I do hope that you have found something here useful to your own pipe care, maintenance or restorations. If you like this sort of thing, please click the like and subscribe buttons. Thank you for reading the ramblings of an old pipe lover.
Loading…
Below are some photos of the finished Lorenzo Spitfire Bent Billiard 8497.
I have always thought that rooting for the underdog was an American characteristic. This is probably a very flawed thought as I am an American and the vast majority of my life experiences are with other Americans. Given, I taught English as a Second Language (ESL) science in a large urban school and had students from many different countries. The fact remains that most of my life was spent with American culture and Americans. Well, it turns out that psychologists have studied this rooting for the underdog and actually have theories for it. One article I read, Decision Affect Theory: Emotional Reactions to the Outcomes of Risky Options, by Barbara A. Mellers, Alan Schwartz, Katty Ho and Ilana Ritov found that;
“Emotional responses also depend on probabilities and unobtained outcomes. Unexpected outcomes have greater emotional impact than expected outcomes” (https://www.jstor.org/stable/40063228). So what does all this nonsense have to do with a pipe? The subject of this restoration is a terribly beaten up Peterson Donegal Rocky which I thought to be barely salvageable. In other words, this poor Pete was a major underdog. Below are some photos of the Donegal Rocky prior to work done:
I think you can see what I mean by an underdog. This pipe was a mess. The rim was severely charred and had extensive lava deposits on the remaining rim. There also appeared to be lava on the mortise. The rustications were filled with dirt and grime. The tobacco chamber still had tobacco in its cake constricted chamber. The stem was oxidized, calcium deposited and chewed on. The stem also wouldn’t correctly seat. All of these factors made me consider just depositing the old pipe in the trash then I thought why not root for the underdog and see what I could do with what I had.
Background
In a previous restoration blog I used the following: “As much as I love the history of the Kapp and Peterson company and Peterson pipes, I will not get into that other than give you resources to read the history for yourself. I will delve into the Dunmore, or Dunmoor line of pipes at greater depth.
For a great history Mark Irwin and Gary Marlburg’s book is a must read for a Pete Geek.
Now to the stuff regarding this pipe: A Peterson Dunmore. I refer to Mark Irwin again here and his blog, Peterson Pipe Notes. I can wholeheartedly recommend the free at
https://petersonpipenotes.org/ Yes, you will get emails but only for things like the weekly blog post and occasional Peterson pipe drops (like the Peterson Pipe Notes Pipe of the Year) or offers for cool Pete Geek merchandise.
I recently acquired for study an amazing NOS (new/old stock) Donegal Rocky 01s with its box, sleeve and brochure. Hallmarked with a Celtic lower-case n for 1979, it’s a first-year release of this marvelous ‘short dutch’ bowl shape and convenient reason to take a look back at the long history of Peterson’s iconic “Donegal Rocky” line.
The “Donegal Rocky” (in quotation marks), released in 1945 or so, was Kapp & Peterson’s first rusticated line. Not that K&P hadn’t rusticated pipes previously, they just that they hadn’t devoted an entire line to rustication. And they were apparently proud of it, because they gave it a sterling mount along with a black finish and white-stamped P on the mouthpiece.
It was part of K&P’s “Product Line,” what I call gateway pipes and others might call an entry-level pipe, as you can see in this shape chart from the 1945 catalog. Like the Shamrock (European version) and “K,” it was originally a fishtail line.
For nearly thirty years, from 1947 until 1975, the line continued uninterrupted, black rusticated finish with fishtail mouthpiece and sterling band.
from the 1976 Associated Imports Point-of-Sale Brochure
Then in 1976, just a year out from their Centennial celebration, Peterson (in an expansive mood) pushed the Donegal up a notch, giving the line a P-Lip. The 1976 engraving doesn’t show it, but you can just glimpse a new, deeper rustication in the (still black) 1978 Associated Imports chart:
This rustication was done by a carver in Dublin, Paddy Larrigan told me this past June in Sallynoggin. The artisan did all of Peterson’s fantastic rustications from the period: the classic “Pebble Rustics,” the early Sherlock Holmes rustics, the Bond Street of Oxford Premier Systems, and the sterling-band P-Lip Donegals.
And that’s where this 1979 01s comes in handy, because we can see with much greater clarity the rustication as well as the details of a “Donegal Rocky” at its pinnacle of engineering and finish:
It’s worth remarking concerning the removable stinger. This spike-ended aluminum tube is easily removed, leaving the P-Lip mouthpiece strictly a graduated-bore regulation affair.
If I were more dedicated, I’d smoke this pipe a few dozen times with and without the stinger and give you a report on what purpose it serves. I wonder if the craftsmen at the factory installed the stinger to approximate the effect of the older bone tenon extensions routinely attached to Classic Range Dublin & London, Classic and Premier lines? With or without the stinger, the pipe smoker should enjoy the benefits of the “Sub-System,” which I talk about at length in The Peterson Pipe. As it is, I’ll leave that to someone else, and happily report their findings.*
Here’s the COM stamp, showing Peterson’s love of quotation marks (seen also in the “SPORTS” line) as well as a closer look at the stain and rustication technique:
Sometime between 1978 and 1980 the sterling band was dropped to a nickel band and the P-Lip abandoned in favor of the Donegal’s traditional fishtail, all of which may (or may not) indicate a lessening in the quality of the rustication.
Seen above from the 1981 Mark Twain brochure, the sterling band resurfaced, this time with the line’s first change in stain color to what some of us have in our rotations or remember: the contrast brown over black (seen in the dutch 339 hallmarked for ’81 below). The catalogs indicate some fluctuation from sterling to nickel bands on through the Late Republic era (1969-90) into the Dublin era (1991-2018), with the sterling being used (as happens so often with Peterson lines) in conjunction with a P-Lip in the 1997 catalog, but also in that year available with a nickel band and fishtail.
The dublin 120 seen above is from ’94, and as you can see, while the rustication technique is nearly identical to that of the ’81 dutch billiard, the stain color has changed for a third time to burgundy-over-black, which seems to have been the standard during most of the early Dublin era.
Sometime near the beginning of this century the Donegal was down-graded again to its original “Product” or gateway status by a nickel band and fishtail mouthpiece as seen in this B7, and while the stain remains the same, it looks less craggy:
Things would grow steadily worse in the following years, however, as the gawdawful pineapple rustication took hold, so that by around 2010 the Donegal was reduced to the etchings seen on this B39:
With the return of in-house rustication earlier this year, things are looking up for the Donegal, at least just a little, as you can see in this current 80s:
The finish and the rustication are, so nearly as I can tell, identical with that used on current rusticated SH pipes, so that’s something, right? I don’t think I’d call it a Rocky anymore, but at least it still has a vulcanite mouthpiece, a plus.
As for the future of the line—or the name—I couldn’t hazard any guesses. In the ideal Peterson of my imagination, the line would assume the craggiest crags, sharp textures and brilliant obsidian finish of the last batch of Rosslare Rusticated pipes, along with—of course—a vulcanite P-Lip. In the meantime, just to have it around, as one of the bedrock Peterson lines for almost 75 years, will do.
Thanks go out to Mark again. Now, as for this Donegal Rock; the rustication and the color fit the late 1990s-2010, pre-”gawdawful pineapple” phase. The quote describing it best is “Sometime near the beginning of this century the Donegal was down-graded again to its original “Product” or gateway status by a nickel band and fishtail mouthpiece as seen in this B7, and while the stain remains the same, it looks less craggy:” This included the burgundy-over-black dye, the nickel band and the fishtail mouthpiece. The rustication is difficult to describe due to the worn nature of the pipe but it is definitely of a hand carved nature and not that of machine made look. Overall, I guesstimate this pipe to be from the 1990s-early 2000s. This makes it a more recent pipe but one that has seen a great amount of use and abuse.
The Restoration
Vivid mental images of how this pipe might turn out filled my head as I placed it on the clean denim piece.
I began with an initial sanding of the stem to remove the surface oxidation. TO maintain the crisp edges of the stem I wanted to keep it attached so the shank was wrapped in masking tape, protecting it from the sanding.
Once sanded, I removed the stem and examined the tenon. The below photo doesn’t do the layer of grime justice. The tenon was encrusted with smoking residue and tar.
I used a sharp pocket knife to scrape the end of the tenon and started cleaning it with a 95% ethyl alcohol dipped bristle pipe cleaner.
Several additional alcohol dipped pipe cleaners and a good deal of nylon brush scrubbing the stem airway was clean.
A pipe cleaner was inserted into the tenon to act as a hanger suspending the stem in Before and After Extra Strength Deoxidizer (lovingly referred to as deox).
The edge of the mortise was as crusty as the tenon had been. I have seen thick lava deposits on a rim but not on a rim this bad before. I softened the crust with saliva and let it soak for a couple of minutes and scraped the surface with a sharp pocket knife.
I gathered the reaming kit; PipNet, Smokingpipes Low Country Reamer and General triangular scraper.
I initially thought that one the #2 and #3 blades of the PipNet would be needed. Wrong. The #4 blade was also put to work.
After the #4 blade there was still scraping to be done with the General.
The tobacco chamber was sanded with 220 sandpaper to bare briar. There was some slight charring of the interior of the chamber. This was not severe and I thought that a bowl coating would suffice to protect the briar.
Next came the shank cleaning. I began with scraping the walls of the mortise with a dental scraper. The scrapings were thick and filled with cotton fluff from pipe cleaners. Well, I assumed that was the source of the cotton even though this pipe looked like it had never seen a cleaning nor a pipe cleaner.
The stummel was taken to the sink for a scrub with undiluted Murphy Oil Soap and a nylon scrub brush. The amount of grime scrubbed from the stummel was impressive. The soap was rinsed with warm water and the stumel dried with a cotton hand towel.
Looking at the freshly scrubbed and dried stummel I could see quite a bit of grime remaining on the mortise, within the rustications and on the rim. Another scrubbing was done with undiluted Murphy’s and a brass brush. The rinsing and drying were done as before.
Back at the workbench the stummel was wiped with a make-up pad dipped in 95% ethyl alcohol. The alcohol lifted a red dye from the briar.
The scrubbing revealed the damage to the rim much more clearly.
Possible remedies came to mind. Plan A – was to cut a wedge of briar from another pipe. I had one of nearly equal chamber diameter.
This idea would glue the edge onto the existing rim, fill the seams with cyanoacrylate and briar dust, shape the wedge to match the lines of the 999 shape, carve the new briar to match the pattern of the existing briar then dye the stummel. This plan would produce a finished product that was a true restoration. The plan was also drought with issues. My greatest concern was with the gluing of new briar to the old briar. I thought that I could pin this briar patch in place to make it more secure. This plan sounded like it would take many hours of tedious work, though fun.
Plan B – cut the rim on both sides to match. This would give the stummel a forward canted look. The new rim would require re-texturing. This plan also completely changes the original shape of the pipe and would make this a salvage rather than a restoration. This plan would only take a fraction of the time of the previous plan as well.
I went with Plan B. If this worked it would produce a fine working pipe, one that would be perfect for knocking around while changing the oil in the truck, fishing or doing yard work and I’m lazy.
I used a Dremel with an abrasive sided cutoff wheel to cut the non-charred side of the stummel.
I tried to match both sides and used the abrasive side of the wheel to flatten the rim.
This did accentuate the out-of-round tobacco chamber. I then started cleaning the shank with numerous cotton swabs dipped in ethyl alcohol and more scraping with the dental scraper.
The draft hole was scrubbed with a nylon brush and numerous bristle pipe cleaners.
The tars of the airway were persistent and I thought maybe an alcohol cotton treatment would better soften and remove them. The tobacco chamber and shank were stuffed with cotton and 95% ethyl alcohol was added with a pipette until the cotton was saturated.
Below is a photo of the saturated cotton. This was allowed to evaporate overnight. As the alcohol evaporated it would hopefully dissolve some of the tar and deposit it into the cotton thus removing it from the walls of the airway.
The stem sat in deox for 4 hours. I removed the stem and allowed it to drip some of the excess solution back into the jar.
Below you can see the stem on a coarse cotton shop rag.
The shop rag was used to vigorously rub the remaining solution from the stem. This rubbing removed the solution and a good deal of oxidized vulcanite.
I then scrubbed the stem with several cotton make-up pads sprinkled with Soft Scrub cleanser. The below photo shows a general progression of reduced oxidized rubber removal. The stem looked much better. I had talked to Doug Bisbee of dk Metal Pipes (https://www.dkmetalpipes.com/dkmetalpipe) earlier in the week. Doug does amazing work restoring Kirsten pipes. We discussed how he restores the vulcanite stems using only a buffer rather than the sanding and micro-meshing that I had always used. I thought this would be a good time to attempt a similar technique with my existing equipment. Doug uses Airway buffing wheels rather than the felt wheels I have. I have not invested in these wheels yet but am considering trying them out. An issue is that I would need to get a new ¾-1 horsepower variable speed buffer as well as the wheels to properly use them.
Using what I already have I worked the stem with my buffer and the red abrasive.
I followed this with the white compound on the dedicated white wheel and produced a nice finish on the stem.
The next morning I returned to the stummel. The cotton was stained with smoking residue removed from the briar.
The cotton was removed and I continued cleaning the airway/mortise with alcohol dipped cotton swabs. This process started out similarly to the day before but quickly improved dramatically. The discoloration of the cotton swabs below show that the remaining tars were much more easily removed after the alcohol and cotton treatment.
The bristle pipe cleaners in the draft hole showed a similar result.
I used a couple different carving bits in the Dremel rotary tool to get the texture to match the Donegal Rocky rustication.
It was time to try matching the Peterson dye. I thought that I would start with a black undercoat topped with a dark red. Fiebing’s Leather Dye was the product of choice. Folded pipe cleaners acted as my applicators while a wine cork wrapped in several coats of masking tape provided a plug to keep the dye from the tobacco chamber and a handle.
The black Fiebing’s was applied and flamed with a lighter.
The black was wiped with a paper towel and allowed to dry for about 10 minutes. It was then taken to the buffer and buffed from the highspots.
The remaining buffing compound was wiped from the stummel using an alcohol wetted make-up pad. Below is a photo of the black dyed , buffed and wiped stummel.
Next, the stummel was dyed with the dark red Fiebing’s.
This was flamed and allowed to dry for an hour.
The pipe was starting to look more finished.
I wrapped the shank with masking tape to protect it during the nickel band polishing. The band was polished at the buffer with white compound.
The stem looked good but I wanted it to really look good. I hand buffed it with Before and After Fine Polish on a soft cotton rag.
The Fine Polish was followed by the Before and After Extra Fine Polish buffed by hand with the same but a clean spot with the same soft cotton cloth.
For the bowl coating I used maple syrup applied with my fingertip to the interior of the bowl. Before starting a thick pipe cleaner was inserted into the draft hole to keep the syrup and carbon out of the hole. Once the syrup was applied I opened a capsule of carbon powder and dumped it into the bowl. The bowl was covered with a 2 inch wide piece of painters tape and shaken vigorously for several seconds to distribute the carbon powder.
The tape was removed and the remaining powder dumped. Below is a photo of the new bowl coating.
The bowl coating would take a couple days to dry completely. The rustications of this pipe were worn fairly smooth with use. This allowed me to use the buffer to apply several coats of carnauba wax to the stummel and to the stem. The final step was to hand buff the pipe with a microfiber polishing cloth.
This is not my first Peterson Donegal Rocky restoration but it was the first time I attempted a white background for the before and after photos. I am still learning camera settings and photo editing for the white. Feel free to comment on background preferences. As for the pipe, I think it turned out about as well as it could have. I like the craggy appearance and feel of the pipe and the rim re-rustication. The 999 shape is a favorite of mine. The burgundy and black contrast stain does come close to matching the original dye and I think it still works . I was quite happy with the oxidation removal from the stem and the black vulcanite polished up nicely. The nickel band looks bright and well polished. I am sure this will be a great smoking pipe but will have to wait a couple of days for the coat coating to thoroughly dry. The dimensions of the Peterson Donegal Rocky 999 areas follows:
Length: 5.66 in./ 143.76 mm.
Weight: 1.58 oz./ 44.79 g.
Bowl Height: 1.42 in./ 36.07 mm.
Chamber Depth: 1.17 in./ 29.72 mm.
Chamber Diameter: 0.90 in./ 22.86 mm.
Outside Diameter: 1.65 in./ 41.91 mm.
I do hope that you have found something here useful to your own pipe care, maintenance or restorations. If you like this sort of thing, please click the like and subscribe buttons. Thank you for reading the ramblings of an old pipe lover.
Loading…
Below are some photos of the finished Peterson Donegal Rocky 999.
A volcano in Nebraska? Well the Lewis and Clark Expeditiondid come across a portion of a bluff along the Missouri River which had volcanic-like characteristics,
“On August 24, 1804, Clark explored a distinctive “180 or 190 feet high” bluff along the side of the Missouri River. He wrote, “Those Bluffs appear to have been laterly on fire, and at this time is too hot for a man to bear his hand in the earth at any debth, gret appearance of Coal. An emence quantity of Cabalt or a Cristolised Substance which answers its discription is on the face of the Bluff.” Ordway further elaborated that the bluff “had a Sulpheras Smell”.
Following Lewis and Clark, later fur traders and travelers frequently noticed dense smoke and fire in this region. In 1839, French explorer J. N. Nicollet attempted to prove that these phenomena were not of volcanic origin. He theorized that the decomposition of beds of iron pyrites in contact with water resulted in a heat capable of igniting other combustible materials. Still, by the late 1800s the bluff was known as the Ionia Volcano. It was named after the nearby town of Ionia, established in 1856. In 1878, a flooded Missouri River undermined the bluffs and a large section of the “volcano” fell into the river. The same flood heavily damaged the town of Ionia, which was later completely abandoned.” (https://www.nps.gov/places/ionia-volcano.htm)
This pipe also appears to have volcano-like characteristics and judging by its condition, it may be better tossed into a volcano as a sacrifice. But wait, I can make it usable. This pipe came as part of an estate lot from a ways south of here in Falls City, Nebraska.
The pipes were all in pretty rough condition and looked like they had spent considerable time in some barn of storage shed. Below are some photos of the Stone Age Volcano as it looked upon arrival.
The pipe stem was severely oxidized, to the point where I wondered if it could be salvaged. The stummel had a thick clear coating that was fading in places and would have to be removed. The briar itself, showed little grain or character and was a sickly yellow-tan. I thought, “well, it must have been a pretty good smoking pipe since it looked quite well used.”
Background
A search of both pipephil.eu and pipedia.org turned up nothing for Stone Age. I thought this strange because when you search for Stone Age on eBay there were five listed. Of the few that I looked at, a couple had stamps like this pipe, below is one.
All of them seemed to be Danish inspired freehands. This led me to believe that they were likely imported by the likes of a Mastercraft or Wally Frank. Importers that historically do not have good records. They were also likely to have been made during the heyday of pipe smoking and modeled after the Danish styling and produced for the 1970s American market. Given the above is all conjecture on my part and does not intend to speak ill of any carver or importer of these pipes.
The Restoration
This sun bleached oxidized volcano started with a clean denim piece to protect the work surface from the horrors sure to come.
I started with the stem as it looks like it would require a prolonged stay in the deox hotel, also known as Before and After Extra Strength Deoxidizer. In preparation of the deox, I first sanded and steel wooled the stem to remove the worst of the surface oxidation.
Next I cleaned the airway with bristle pipe cleaners dipped in 95% ethyl alcohol.
The stem then made its entrance into the Before and After Extra Strength Deoxidizer. A pipe cleaner was inserted into the tenon to act as a hanger, suspending the stem in the solution.
Back at the workbench the tobacco chamber was reamed to remove the accumulated cake.
The PipNet did most of the work removing the cake. The Smokingpipes Low Country Reamer and the General triangular scraper saw some and the chamber was sanded with 220 sandpaper wrapped around a wood dowel. The chamber appeared free of any damage.
The shank airway was fairly dirty and was cleaned out with a Kleen-Reem shank drill, dental scraper, folded bristle pipe cleaners and cotton swabs along with a good amount of 95% ethyl alcohol.
The stummel was taken to the sink for a scrubbing with undiluted Murphy Oil Soap and a nylon brush. The soap was rinsed with warm water and the stummel dried with a cotton hand towel.
At the workbench the stummel was wiped with a make-up pad dipped in 95% ethyl alcohol. The alcohol had little to no effect on the clear coat finish. I then tried acetone, this too met with little result but the finish was softened by the acetone. I submerged the stummel into a jar of acetone topping the jar off with fresh acetone and let the stummel sit in there for an hour.
After the hour, the stummel was removed and rubbed with acetone soaked make-up pads. Apologies for neglecting to photograph this part. The clear coat was very stubborn and difficult to remove even after the hour long acetone bath. I eventually resorted to a coarse sanding sponge/block.
The next day the stem was removed from deox and allowed to drip excess solution back into the jar.
It appeared much better than when it entered.
Vigorous rubbing with a cotton rag removed the remaining solution and some of the surface oxidation.
Back at the benchI sanded the stem with a series of sanding sponges in grits of 400-3500. Between each sponge I rubbed mineral oil onto the stem and wiped it with a paper towel. I then used several applications of Before and After Fine Polish on a soft cotton cloth. This seemed to have removed the last of the oxidation.
The stummel had been sanded with 220-400 grit sanding sponges, maily to remove the finish but also removing scratches. I didn’t want to sand any finer as dye is not absorbed as well with very fine sanding. I decided to try to use a contrast dye to bring out the briar grain better. I wanted to use a black dye as the base. I prepped the area by covering it with a paper towel. Fiebing’s black Leather Dye would be the dye. A cork was used to pluck the tobacco chamber. A folded pipe cleaner would be my applicator and a lighter would be used to flame the wet dye, burning off the alcohol solvent and setting the dye into the briar.
Below is a poorly focused photo of the stummel with its new black coating.
After it had dried for about 30 minutes I took the stummel to the buffer and used rouge compound to buff away the black dyed outer surface.
This left me with a stummel which was still too dark for the look I wanted. I returned to the workbench and sanded away the outer surface. The black dye penetrated the softer grain more deeply than the harder grain. By sanding the outer surface I accentuated the grain leaving the softer wood darker than the harder wood.
Next came a second round of dye, this time with a diluted Mahogany. The Mahogany dye was diluted by about ½ with 99% isopropyl alcohol. The dye was applied with a cotton swab and flamed as before with the black dye.
The resulting dye-ed stummel was allowed to dry for about an hour then sanded with a series of sanding sponges from 400-3500 grit. Between each sponge the stummel was wiped with an alcohol dampened make-up pad. After the sanding the stummel received a coating of Before and After Restoration Balm and allowed to sit for 20 minutes.
The stummel was wiped with an inside out athletic sock to remove any remaining Restoration Balm.
The pipe was then taken to the buffer where several coats of carnauba wax were applied to the stem and stummel. The final step was a hand buffing with a microfiber polishing cloth.
I have to admit that I am not a fan of the volcano shape nor do I like fancy stems. I do like a plateau top and shank end but I doubt these are actual plateau, merely carved versions. I can say that I was quite pleased with the results of the contrast dying. That brought out grain that I never thought would have been possible with this pipe. The stem did polish up nicely and does look good with this volcano. Overall it is a great improvement of how the pipe appeared before and I hope that it will bring someone hours of enjoyment in the future. The dimensions of the Stone Age Volcano are:
Length: 5.33 in./ 135.38 mm.
Weight: 1.10 oz./ 31.19 g.
Bowl Height: 1.43 in./ 36.32 mm.
Chamber Depth: 1.08 in./ 27.43 mm.
Chamber Diameter: 0.60 in./ 17.53 mm. (Conically bored diameter is at the top)
Outside Diameter: 1.32 in./ 33.53 mm.
I do hope that you have found something here useful to your own pipe care, maintenance or restorations. If you like this sort of thing, please click the like and subscribe buttons. Thank you for reading the ramblings of an old pipe lover.
Loading…
Below are some photos of the finished Stone Age Volcano pipe.
Christmas is in the rearview mirror and fading away quickly. This pipe made me think of the 1964 Rudolph the Red-Nosed Reindeer and the Isle of Misfit Toys or, in this case Misfit Pipes. I couldn’t tell for sure what the model was because it had been, shortened? The size was smaller in shape, more like a Peterson System Standard 314 or 317. Looking at the stampings I was a bit surprised to see a faint PETERSON’s arched over an even more faint DUBLIN with a definitive 3. The opposite side had the real flummoxer: There, a 3000 appeared to be stamped.
Below are some photos of the Peterson 3000 before work was done. There are more than usual to document the poor condition.
“Doctor Young to the ER stat!” Wait a minute, I have no cool title like that and can’t claim one. My dad had a PhD, not me. “Medic!”, okay, I can work with that. This pipe was certainly in need of some kind of intervention. The oxidation on the stem looked terminal. The stummel looked as if it had been shortened with a chainsaw or some other homicidal garden implement. The shank had two cracks under the ferrule that small children could fall into. The cake in the bowl would be enough to serve a medium sized wedding party. The lava flow on the rim made Mount Kilauea look wimpy. Even without all my excessively dramatic exaggeration, the pipe was one hurting unit. This would not be one of those relaxing restorations.
Background
For those who would like more information on Peterson pipes, I’ll start with a bit I have said before:
“For a great history Mark Irwin and Gary Marlburg’s book is a must read for a Pete Geek.
Now for the pipe in hand. PETERSON over Dublin 3 indicates this is an older pipe. According to Irwin,
“3RD Quality or Third Grade (the later Standard System) was issued with a “3” stamped under the Patent stampand a domed-nickel mount. Like the 2nd Quality, it was only available with the AB- or A-molded mouthpieces.
The numbers on the 2nd and 3rd Quality pipes would appear either within a small circle or not, and would continue well into the 1930s.” (Irwin, Mark and Malmberg, Gary (2018). The Peterson Pipe The Story of Kapp & Peterson, First edition, second printing 2021. Briar Books Press, Canada. p. 119).
In a personal email with Mark Irwin concerning this pipe, I sent him these three photos and asked him “What have I got?”
His response was the following: “Doesn’t that 2nd number look like an “8” to you? But a “3800”? Nothing I can think of. Notice it’s a Grade 3—after the “Peterson’s /over/Dublin3”. That in itself is unusual, along with the nickel-mount marks. Notice also how very long the ferrule is. And the “B” or tapered stem. The Grade 3 in that “Dublin3” with everything else leads me to believe this is a very early pipe—easily IFS or maybe EIRE.” (Irwin, personal communication).
To clarify some of the Pete Geek-speak:
*Mouthpiece or stem staples of Peterson pipes as from the 1937 catalog. I believe Mark meant the AB stem.
*IFS stands for Irish Free State. This was a country of manufacture (COM) stamp used from 1922-1937.
*ERIE was a COM stamp used from 1938-1948.
Staying with the stem in an attempt to gain a better grasp of the approximate date of manufacture I focused on the tenon. Notice in the photo from the 1937 catalog, above, that the end of the tenon has a distinct taper. This was a feature of Charles Peterson’s initial design.
Irwin states the following in the same Peterson Pipe Notes entry with photos, “The first change in the molded vulcanite System mouthpieces apparently occurred later on in the Éire era, as documented by this unsmoked mouthpiece which can be accurately dated to 1937–45:”
(https://petersonpipenotes.org/tag/peterson-system-mouthpiece/). Notice the distinct step down from the push fit taper to the end of the tenon. The taper is no longer present. This is the same style of tenon as the Peterson Dublin 3 3000 pipe in hand. The below photo is of the 3000’s tenon.
Using the dates from the stem information the pipe could be dated from 1938 to present. Considering the stamping information stating that the Dublin 3 was used “Well into the 30s” that would eliminate from 1940-present. These two pieces together make for an argument that the pip is from the late 1930s. It also would coincide with Mark Irwin’s observation, “easily IFS or maybe EIRE.”
The 3000 worn by this pipe is an anomaly. Even if my interpretation were to be changed to Mark Irwin’s observation of a 3800, it would still not match any pipe in Peterson’s production history. When comparing this pipe to contemporary Petersons in my collection the much narrower shank of the 3000 is obvious.
Above are a COM England 317 (top left), a System 0 (top right)with no shape number but it’s a 317 and the 3000.
Above are a Peterson System 0 and the 3000. Notice the narrow shank of the 3000.
The bowl dimensions are nearly identical to the 317 or a 12 ½ that I have. The shank is narrow to the point that it would be nigh impossible for this pipe to have been drilled as a System pipe at all.
Guess what. It is not drilled as a System pipe. That does explain the absence of the PATENT under the PETERSON’S stamp, doesn’t it?
So, there we have it. An 87 year old Mysterious Peterson Dublin 3000. I wish I could say, “I’m glad that’s settled”. I can’t nor can I explain why the top quarter inch was cut from the stummel. At least that one I can imagine was due to a severely charred top. The shape, however, is a mystery.
The Restoration
The beginning is always so easy. Lay down a freshly laundered piece of denim. That was about the last easy thing that this pipe allowed for.
Okay, another exaggeration, the collar came off pretty easily.
The collar was placed in a medicine cup and covered with 95% ethyl alcohol. The airway of the stem then received numerous tapered bristle pipe cleaners dipped in the alcohol. The photo shows a nice progression from not-so-clean to much better.
The exterior of the stem was then worked over with 0000 steel wool in preparation of the imminent deoxidation bath.
I used Before and After Extra Strength Deoxidizer (deox) to soften the oxidized exterior of the stem. A Pipe cleaner was inserted into the tenon to act as a hanger to suspend the stem in the solution.
For the condition of this stem, I thought that 4 hours, minimum, would be required.
The collar was removed from the ethyl alcohol. I tried to clean the hardened glue with a cotton swab from the inside of the collar. I think the alcohol just made the glue angry. I then placed it into another cup and covered it with acetone.
The stummel was next up. The reaming tools were assembled. The PipNet, General triangular scraper, Smokingpipes Low Country Reamer and the 220 sandpaper wrapped wood dowel were readied.
The PipNet with #2 blades did the majority of the work.
The bowl, however, was the sizes of the 2 and 3 blades. The #2 blades did great until it couldn’t reach across the bowl. The #3 was just too big.
This required scraping with the General and Smokingpipes blades.
The tobacco chamber was sanded with the 220 sandpaper on a stick. The chamber appeared free of any damage. This surprised me a bit. I thought that surely a pipe used as much as this would have some damage.
It did have plenty of over damage though. I moistened the lava with saliva, Then scraped some of the glue from the shank end while the saliva soaked a bit. The rim was then scraped with a sharp pocket knife.
I tried running the Kleen-Reem shank drill through the draft hole from the shank into the tobacco chamber but it was too large in diameter. Instead I used a 3/32 inch drill bit. This removed some of the accumulated smoking residue. While looking down the mortise I was struck by the complete lack of a reservoir. This was certainly not drilled as a Peterson System pipe.
I used several tapered bristle pipe cleaners to further clean the draft hole first the narrow tips then the thicker ends. The shank itself was not cleaned at this time. All that was just from the draft hole leading to the wider bored shank/mortise.
I took the stummel to the sink for a scrub with undiluted Murphy Oil Soap and a nylon brush. In the photo below the filthy nature of the stummel came bee gauged. The soap was rinsed with warm water and the stummel dried with a cotton hand towel.
A second scrubbing with undiluted Murphy’s and the nylon brush were done and still more grime was removed. The stummel was rinsed and dried a second time. Notice the brush color in the two photos – it is the same brush.
Back at the workbench the stummel was looking clearer. I wiped it with a make-up pad dipped in 95% ethyl alcohol.
The glue on the shank end resisted the alcohol so a second make-up pad was wetted with acetone. The stummel was wiped and additional time spent on cleaning the shank end.
It was time to work on the shank, proper. “Yikes!”, came to mind after the first couple of cotton swabs dipped in alcohol. The shank was scraped with a dental scraper and scrubbed with more cotton swabs. I concluded with, “this shank is going to need a cotton and alcohol treatment” to help soften the smoking residues in there.
I switched gears and started to file the rim top to minimize the cut-off marks where the bowl top had been removed. A large and small file were used to accomplish this. I stopped at about where the below photo shows out of not wanting to remove any more bowl height.
To address the shank cracks, I knew I needed to drill holes at their terminal end to keep the cracks from progressing. I used a 2 mm drill bit for this.
Terminal hole one.
Terminal hole 2.
I needed a medicine cup to set the stummel on while the cotton alcohol treatment was doing its thing so, I removed the collar from its cup. The acetone had softened the remaining glue nicely.
The tobacco chamber, draft hole and shank were stuffed with cotton. I used a disposable pipette to add about 10 ml of 95% ethyl alcohol to the bowl and shank.
Alcohol was added until the cotton was saturated. The alcohol would evaporate overnight and hopefully pull a large amount of the smoking resiue with it depositing it into the cotton.
After about 4 hours the stem was removed from the Before and After deox and allowed to drip excess solution back into the jar.
I used a coarse shop rag to vigorously rub the stem, absorbing the remaining solution and removing some of the oxidized vulcanite.
At the workbench the stem was further scrubbed with several make-up pds sprinkled with Soft Scrub cleanser. The amount of oxidized material they were removing was amazing.
Even after all the scrubbing and cleanser, the stem looked as if little had been done to it. Back into deox. I left the stem in there overnight
The following day, I again removed the stem from deox. Back onto the coarse shop rag.
More vigorous rubbing produced a stained shop rag. Well the oxidized material is coming off, I thought.
At the workbench another round of Soft Scrub drizzled make-up pads did their thing and removed more of the oxidized vulcanite.
The cramping hands needed a break so I removed the cotton from the stummel. It came out stained with tar and yuck.
The cleaning of the shank went much better after the cotton and alcohol treatment.
It was time to reconstruct, fill the cracks and re-glue the collar. I opted to use JB Weld 2 part epoxy for this task. The epoxy was mixed according to product directions. The glue was applied to the crack filling them then additional glue spread around the shank end. The collar was slipped into position. Acetone dipped cotton swabs were used to wipe away any excess epoxy.
To keep the epoxy in the cracks I applied a thin coating of petroleum jelly to the tenon. This was inserted into the mortise and forced the epoxy to stay where I wanted it.
After about 30 minutes of curingI began to work on filling the flaws or pits on the stummel. Along the rim, I used brown cyanoacrylate (CA, super glue) to fill the shallow depressions. This was spritzed with a CA drying accelerator.
The pits on the stummel were deeper and required CA and briar dust. The CA was applied into the pit with a fly tying bodkin and briar dust was pressed into the wet CA. The fills were then filed with a small flat file then sanded with a 400 grit sanding sponge.
The stamps on both sides of the stummel were covered with masking tape to protect them from sanding. The stem and stummel were sanded with a sequence of sanding sponges from 400-3500. Between each sponge I wiped the stummel with a make-up pad dampened with alcohol. The stem was rubbed with mineral oil and wiped with a paper towel.
The stem and stummel were then worked with micro-mesh pads in grits of 4000-12000. Again the stummel was wiped with an alcohol wetted make-up pad between micro-mesh pads while the stem was rubbed with Obsidian Oil and wiped with a paper towel.
The stem was then polished with Before and After Fine and Extra Fine Polish on a soft cotton cloth.
The stummel was coated with Before and After Restoration Balm and allowed to sit overnight. This is longer than I would normally allow but it was time for bed.
The next day, the Restoration Balm was wiped from the stummel using an inside out athletic sock.
The pipe was taken to the buffer for several coats of carnauba wax.
After waxing the pipe was hand polished with a microfiber polishing cloth.
I still do not know what to think of this Peterson Dublin 3 3000. I Feel funny calling it a 3000 as that never appears to be something that Peterson made yet, here is it. It is not a System pipe though it’s shaped like one and has a P-lip yet, here it is. It is not intact, as it is missing what I think is about ¼ inch of top yet, here it is. It has a collar like nothing I’ve ever seen yet, here it is. I can say that it is a pretty little pipe and I much prefer the AB taper stem over the saddle. I guess I’ll just have to keep it and take it fishing once global warming eliminates the hard water situation brought on by winter.
The dimensions of the Peterson 3000 (?) are:
Length: 5.33 in./ 135.38 mm.
Weight: 1.10 oz./ 31.19 g.
Bowl Height: 1.43 in./ 36.32 mm.
Chamber Depth: 1.08 in./ 27.43 mm.
Chamber Diameter: 0.60 in./ 17.53 mm. (Conically bored diameter is at the top)
Outside Diameter: 1.32 in./ 33.53 mm.
I do hope that you have found something here useful to your own pipe care, maintenance or restorations. If you like this sort of thing, please click the like and subscribe buttons. Thank you for reading the ramblings of an old pipe lover.
Loading…
Below are some photos of the finished Peterson 3000 (if that is what it really is) pipe.
I was not really pleased with the level of polish on the collar so it went back under the buffer with some white jeweler’s rouge, which is really a silly name as it is white not rouge. Anyway here is what it looked like after the extra buffing:
I have been wanting to practice my skills with horn and bone lately. Unfortunately, both materials are slightly more difficult to find nowadays. How could I resist this Mokin prince that popped up on eBay in early December of 2023? I saw the seller was from France and wondered how in the heck shipping was only $6? When the auction was won with only a $7 dollar bid I felt like I’d like a jackpot. A weird aluminum stinger (I like weird), horn stem, pretty grain, great shape, unfamiliar maker, great price, what wasn’t to like? Well, it took a couple of weeks to arrive, got to love the delayed gratification but, arrive it did. The pipe was stamped MOKIN within a circle over RESERVE on the left shank. The right shank had the number 7706. The stem was stamped with a white painted MOKIN circled. This stem logo looked to be embedded into the horn and painted. I found that interesting, not knowing much about the properties of horn. Here are some photographs of the pipe as it appeared before any work:
Now, I cannot say that I am a “green” or “sustainability” minded guy though, I have kept an active compost pile since 1998. That is more due to me being too cheap to buy someone else’s dirt for the garden. I find the idea of natural-ish materials for pipes is interesting. This pipe did not look like it would require a tremendous amount of work. Sure, a good cleaning, reaming, stem restoration but, overall it looked good.
Background
I have restored a couple of French pipes with similar aluminum tenons over the past year: A Country Panel Bent Rhodesian Restoration and A Super Majestic System V.D. Billiard Restoration. All three of these pipes have a cork lined mortise. I pondered the reasoning behind such a mortise and tenon. All I could come up with is that the heating and cooling of the aluminum tenon created greater expansion than the expansion of the shank’s briar. To allow for this the maker used a cork liner to absorb the aluminum expanding without stressing the briar. Well, that is thought anyway. For whatever reason it would certainly have been a labor intensive structure and was surely more costly than just a standard mortise and tenon. After thinking about this I turned to researching the maker – Mokin.
I began with a search for Mokin at pipephil.eu, the usual stop for all things logos. Here I found the following:
(Ml-Moq — Pipes: Logos & Markings). That diagram really made me want to find a “Neverbreak” pipe and restore it. Refocusing on the pipe at hand and attempting to subdue my attention deficit hyperactivity disorder (ADHD) I thought back to the other French makers who employed the cork lined mortise. The small French flag, in the upper right, helped confirm my French connection but was far from definitive.
Next, I turned to pipedia.org and searched Mokin. No results came up. I tried “Neverbreak”, “HPF”, “Brevete” and “SGDG”. Only Brevete returned a lead.
well, it was not much to go on and it looked like a stretch but, follow it, I did. The link was to a French pipe maker LMB. The only text was the following and it appears roughly translated from French to English: “From Les Pipiers Français — Histoire et Tradition. Gilbert Guyot
LMB in 1911, rue du Mont-Thabor, assures that “his systeme is recommend by the Medical profession, the efficient only one positively imbouchable, condensing 38 % of nicotine, getting clean avtomatiquement, and approve by the Societe d’ Hygiene of France”. He adapts the conduit in plexiglass transparent has the modern pipe by 1960.” (LMB – Pipedia). The photos from the pipedia.org site were interesting and the brochure dates were from the correct era, whichI suspected the pipe was made (1911-1930s). I will include some of these images below.
Above images of brochures and pipe are from (LMB – Pipedia).
Nothing from the LMB information looked like it pertained to this pipe other than the intricate nature of the aluminum stinger.
The research on this pipe was looking to be limited. I tried a general Google search for “Mokin tobacco pipes” and came across a listing from a Worthpoint auction with no photographs and one restoration of a Mokin Corsair pipe by Anthony Cook on Steve Laug’s rebornpipes.com (https://rebornpipes.com/tag/mokin-corsaire-pipe/). The restoration by Mr. Cook was nice but lacked any historical information on the maker. It did however show a photograph of the logo for affirmation of the logos and stampings of the pipe. The Corsair pipe also sported a bone stem and had a 4 digit number.
All of this leads me to the conclusion that this lovely Mokin prince was the product of a French maker prior to World War Two. If you have any additional information pertaining to the brand please feel free to include it in the comments.
The Restoration
This little round bottomed mademoiselle made her way to the bench and received a cleaned denim piece.
The first task was relieving the stem of its stinger. I quickly discovered that it was threaded. The threads were held fairly tightly with smoking residue and aluminum oxidation.
The stinger was placed in a medicine cup with 1bout 10 ml of ethyl alcohol. The alcohol was also used to dip bristle pipe cleaners for cleaning the stem airway.
After cleaning the interior of the stem I started to removed the tooth chatter with a small flat file. This slightly reduced the horn around the dents.
The same process was repeated on both top and bottom.
The filed areas were lightly sanded with 320 and 400 grit sanding sponges and the aluminum stinger was cleaned.
I used brown cyanoacrylate (CA, super glue) to fill the dents in the horn stem. The drying.curing of the CA was sped up with the use of a CA accelerator. The spots were filed and sanded smooth with a 400 sanding sponge
I then turned my attention to the reaming of the tobacco chamber. The PipNet, Smokingpipes Low Country Reamer and General triangular scraper were used to remove the light cake from the chamber.
The chamber appeared free of any damage due to heat.
The stummel was then taken to the sink for a scrubbing with undiluted Murphy Oil Soap and a nylon scrub brush. The soap was rinsed with warm water and the stummel dried with a cotton hand towel.
Returning to the workbench, the stummel was wiped with a make-up pad wetted with 95% ethyl alcohol. Little color came off on the pad. There did appear to be some type of finish remaining on the stummel.
I wetted another make-up pad with acetone and repeated the wiping. This time more color was removed.
A light sanding of the stummel and another wipe with acetone removed the remaining finish.
The only remaining finish was around the stamping. I avoided this area with the sanding but you can see it in the photo below.
Next came the removal of the old fills. There were a few scattered around the stummel.
The old fills were picked out using a fly tying bodkin.
The plan was to apply a small drop of brown CA with the bodkin, press sone briar dust into the wet CAthe sand the new fill with a sanding sponge. Topping of the new fill would be done with another dab of CA, if needed.
Below is a photo of the new fill prior to sanding.
With the fills redone, I taped over the stamps on both sides of the shank and the stem with masking tape. I wanted a tape that was thinner than painter’s tape and tried to cut it as close to the stampings as possible.
Before sanding I wanted to clean the stummel airway. I started with cotton swabs dipped in 95% ethyl alcohol , bristle pipe cleaners and a shank brush..
The cork shank liner made accessing the airway slightly problematic. I did not want to get too aggressive with the cleaning in fear of damaging the cork. I have successfully replaced a cork lining but it is a rather tedious process which I hoped to avoid.
I thought that a cotton alcohol treatment would be a less vigorous way to soften and remove the smoking residues from the airway. Instead of packing the airway with cotton I folded a fluffy pipe cleaner 3 times. This filled the airway nicely.
The bowl was stuffed with cotton as usual.
Using a pipette, I saturated the cotton and pipe cleaner with 95% ethyl alcohol.
A little bit of overflow showed that the cotton was saturated. The alcohol was allowed to sit and evaporate overnight.
The next day the alcohol had dissolved the smoking residues which inturn had migrated into the cotton/pipe cleaner as the alcohol evaporated.
The cotton and pipe cleaner were removed.
The cleaning proceeded while the residues were hopefully still softened by the presence of the alcohol. There was still a good deal of yuck (that is the highly technical term for accumulated smoking residue used by highly trained pipe restorers) remaining in the airway. Many cotton swabs, some scraping with a dental scraper, some scrubbing with a folded bristle pipe cleaner, some more scrubbing with a shank brush… Well, you get the idea.
With all the scrubbing I feared that the cork lining may have suffered some catastrophic trauma. I tried to seat the stem and assess the damage. It fit fairly tight and sealed well. Yay, no sign of impending cork replacement was needed.
The sanding of the stem and stummel together proceeded. A sequence of sanding sponges in grits from 400-3500 was done with the pipe wiped with a make-up pad wetted with alcohol between each sponge to remove sanding debris.
The pipe was then worked with a sequence of micro-mesh pads 4000-12000. The wiping between pads was done as with the sanding sponges.
The pipe, both stem and stummel, were then coated with Before and After Restoration Balm and let alone for about 8 hours. Normally I only leave them for 20 minutes or so but I had errands and stuff to do.
Upon returning to the workbench, I wiped the pipe with an inside out athletic sock to remove the remaining Restoration Balm.
The stem was then polished using Before and After Fine and Extra Fine Polish. The polish was applied and hand rubbed with a soft cotton cloth.
The last steps were to apply several coats of carnauba wax with the buffer followed by a hand buffing with a microfiber cloth.
I was very pleased with how well this restoration went. The shape is becoming a favorite and the horn stem just makes it more attractive. Kind of like this was the original cumberland before the Dunhill boys made a synthetic version. The briar grain is attractive and the stem is both visually attractive and feels great while clenching. The pipe smokes very well, yeah, I think I’ll keep this one in the collection unless someone else really wants it. Don’t worry, I’ll clean it up again for you. The dimensions of the Alpha Calabash are:
Length: 5.47 in./ 138.94 mm.
Weight: 1.29 oz./ 36.57 g.
Bowl Height: 1.37 in./ 34.80 mm.
Chamber Depth: 1.20 in./ 30.48 mm.
Chamber Diameter: 0.69 in./ 17.53 mm. (Conically bored diameter is at the top)
Outside Diameter: 1.57 in./ 39.88 mm.
I do hope that you have found something here useful to your own pipe care, maintenance or restorations. If you like this sort of thing, please click the like and subscribe buttons. Thank you for reading the ramblings of an old pipe lover.
Whenever I read about a pipe with a cult-like following I get interested, “what is it that all those people know, that I don’t”. Maybe it is the fear of being left out or just a general need for ignorance mitigation. Either way, I am drawn to finding out what it is that I have been missing. It was that way with Kirsten pipes, for me. I had read about them, seen people discuss their virtues on Facebook groups, and watched many auctions sell for what I considered high prices. Like the old codger tobacco blends, they must be good or they would have never lasted this long. I finally came across a Kirsten as part of an estate lot. This pipe wore the stamps Kirsten in a scroll type script on the left shank and PATS & PATS PEND with an M offset towards the stem. Below are some photographs of the Kirsten before any work had begun.
This pipe’s greatest issue was the oxidation of the stem. The aluminum was in great shape, needing only some buffing. The interior probably would require a good cleaning but it didn’t appear too bad. The bowl was in fine shape with little cake build-up and only moderate lava flow on the rim.
Background
The story of the Kirsten pipe begins with the inventor, Frederick K. Kirsten. According to wikipedia, the greatest source of information and spoken of with disdain by my sister the librarian, “Frederick Kurt Kirsten (born Kurt Friederich Johannes Kirsten, March 13, 1885 – November 19, 1952) was an American professor, engineer and inventor.[1]
Kirsten was born in Germany and immigrated to the United States in 1902. He graduated from University of Washington in 1909 and later taught there as a professor of aeronautical engineering. During his life he was granted numerous patents on a wide variety of subjects.[2] Among his inventions were the Kirsten pipe [3] (a tobacco pipe), and the Kirsten-Boeing propeller (a cycloidal propeller ).[4] The Kirsten Wind Tunnel at University of Washington was promoted by and named after him.[5]“ (https://en.wikipedia.org/wiki/Frederick_Kirsten). I understand why librarians are so critical of wikipedia.org, the notion of people being able to openly edit entries without verifying content can be problematic for scholarly writing. It nevertheless is a wonderful source for general knowledge.
Turning to a more trustworthy though questionably objective source, the Kirsten Pipe Company website. Here is a short description of the founder and inventor:
“Professor Kirsten
It is by no means merely puffery to say that Professor Frederick K. Kirsten was a genuine American original. He first sailed to this country in 1902, as a cabin boy from Hamburg, Germany. After successfully rounding the Horn and eluding the Shanghai gangs of the West Coast, he navigated the educational system at the University of Washington to become a Professor of Aeronautical Engineering. Here, his inventive spirit took wing. He created the world-famous Kirsten Wind Tunnel, Air-washing equipment for factories, an air-cooled Utopian Bed, and, most notably, a revolutionary propeller which enables boats to stop and turn on a dime. Today, in the same waters where he jumped ship almost 100 years ago, ocean-going vessels are landed by sturdy tugs driven by Kirsten cycloidal propellers, piloted by equally sturdy captains smoking cool Kirsten pipes.
Rightly called the coolest pipe in the world, this latter innovation came about when a doctor advised Professor Kirsten to switch from cigarettes. He quickly dreamed up a way to trap the moisture, tars and tongue-biting acids which attack the users of briar pipes. After 80 years and counting, Kirsten pipes are still produced by the Kirsten family, faithfully following the basic designs of this father of invention.”
The next source comes to us from the University of Washington, where Professor Kirsten was a staff member. Here too the information may have a slightly romanticized bent, it is still a fun and informative read and gives examples of his contributions in science and the university.
“The Inventive Mind
Frederick Kirsten — 1915-1951
I am a research man.
Frederick Kirsten
Fredrick Kristen explaining one of his inventions. (aa.washington.edu)
Frederick Kurt Kirsten was one of the founders of the UW Department of Aeronautics. He earned the first patent awarded to a UW faculty member. He was the public face of UW engineering for three decades, tirelessly promoting technology as the future’s greatest hope.
Born in Germany, Kirsten graduated from the UW in 1909 with a bachelor’s degree in electrical engineering. He was immediately hired by an industrial firm and by 1913, was supervising construction of the underground electrical service at MIT. Recruited back to UW, he agreed in 1920 to teach the entire curriculum of the new Department of Aeronautics: aerodynamics, airplane design, and propulsion.
On December 1, 1921, Kirsten filed the first patent awarded to a member of the UW faculty. He and William Boeing went into business together as the Kirsten-Boeing Engineering Company to develop Kirsten’s invention – the cycloidal propeller, first for aircraft and then for boats. He obtained a $290,000 grant from the Guggenheim Foundation to build the UW aeronautical engineering laboratory in 1926, and led the campaign to finance a state-of-the-art wind tunnel in 1936.
Kristen Wind Tunnel – February 1939
The team lowers an experimental Kirsten cycloidal propeller boat for testing. (Kirsten Collection. University Archives. Special Collections, UW Libraries)
Kirsten was confident and stubborn; his designs were based more on trial and error than on analysis. Endlessly inventive, he never gave up the quixotic effort to perfect the cycloidal propeller, and patented more than two dozen other inventions, including the Kirsten pipe, air-raid sirens, fire extinguishers, neon lights, and air cleaners.” (https://www.washington.edu/innovation/the-inventive-mind/)
“It’s variations like this that give some of the Kirstens extra individuality. There is one pipe, a Generation 1.5, that shows up occasionally and has an entirely different valve than any others. It is a pipe that I have never seen in old Kirsten catalogs or brochures. In addition to the different shaped valve, which has an “O” ring while the mouthpiece does not, the pipe has a flat top with no bowl basin on top of the radiator tube. It usually has the Kirsten script logo but never a model letter on it. It is a short, straight pipe.
Kirstens are kept track of by their model numbers. The following table is an attempt generation by and shape to provide some guide to Kirstens and their genesis:
1st Generation No O rings – stamped “Pat. Appl. For” and “Pats. & Pats. Pending”
Straights
Companion First edition in rough finish.
S Standard 1st generation with full-length cooling fins
M Medium
L Large
A Aristocrat Extra large 1st generation
1.5 Generation O rings either valve or mouthpiece, none on other end – stamped “Pat. Pending” and “Pats. & Pats. Pending” some with “Made in U.S.A.”
Straights
K Companion
M Medium
L Large
Other Transition Models
Thrifty Nice early model with black offset valve that works in reverse – O ring on valve, none on stem … takes same mouthpiece as No Letter/No Name model
No Letter/No Name Unmarked short pipe w/different valve and O ring, no O ring on stem
2nd Generation O rings – Stamped “Pat. & Pats. Pending” and “Made in U.S.A.”
Straights
K Companion
G Gem
S Sportsman
SX Sportsman Brass
M Mariner
MB Mariner Black
L Lancer
Quarter-Bents
A Aladdin
V Vagabond
CX Cavalier Brass
T Tyrolean
Full bents
W Westerner
B Beau Geste
P Premier
F Firesider
3rd Generation O ring current models stamped “Made in U.S.A.”
The next piece of information here is the original patent drawing from 1938. I will include the link to the PDF of the patent for those interested in reading that as well here: 1499073238500980922-02200237
()1499073238500980922-02200237. The diagram above is quite detailed and can be further explained by the writings within the patent documentation found in the PDF. For ease of understanding, I refer to a much simpler diagram of the Kirsten pipe from pipedia.org. Here we can see the four main parts of the Kirsten pipe; the imported briar bowl, the valve, the Kirsten “Radiator Stem” and the vulcanite mouthpiece. It could be argued that the screw holding the bowl to the stem is a fifth part.
Using the information from the pipedia.org article:
“It was determined that the ‘PAT APPLIED FOR” stamp was only used for a couple of years so I concluded that those pipes were probably produced in 1936 and were produced until 1938 and the ones stamped “PATS & PATS PENDING” were most probably made from around 1938 until about 1958” (https://pipedia.org/wiki/Kirsten_Pipe_Company),
“1st Generation No O rings – stamped “Pat. Appl. For” and “Pats. & Pats. Pending”
Straights
Companion First edition in rough finish.
S Standard 1st generation with full-length cooling fins
I can safely conclude that this pipe is consistent with a Generation 1 thus produced between 1938-1958.
The Restoration
The restoration began with a clean denim piece on the workbench.
The bowl was drilled with a pronounced taper so the only tools used would be the General triangular scraper and the Smokingpipes Low Country Reamer. Of course the sandpaper wrapped wood dowel would join for the bowl sanding.
The light cake was quickly removed.
The bowl was sanded to bare briar and showed no signs of heat damage.
The lava on the rim was obvious and I hoped that it did not conceal any underlying charing.
A moistening with saliva and scraping with a sharp pocket knife removed most of the lave
The bowl screw was removed and further cleaned with 95% ethyl alcohol dipped cotton swabs.
The bowl was taken to the sink for scrubbing with a nylon brush and undiluted Murphy Oil Soap. The soap was rinsed with warm water and the bowl dried with a cotton hand towel.
Back at the workbench the bowl looked clear of finish and grime.
I wiped the surface with a make-up pad dipped in 95% ethyl alcohol, which removed a bit of dye from the briar.
I started cleaning the aluminum parts with the valve. This piece looked fairly clean until I saw the inside. Here it was coated with black hardened smoking residue. The outside cleaned-up quickly with an alcohol dipped make-up pad.
The valve was placed in a medicine cup with 95% ethyl alcohol.
A few minutes later the alcohol had begun to dissolve the residue inside the valve.
Several cotton swabs were required to clear the residue along with a small piece of 0000 steel wool also wetted with alcohol.
The valve was eventually cleaned of the hardened yuck.
The body of the pipe or, “Radiator Stem” as Kirsten nomenclature called it, was also quite dirty with dried hardened smoking residue. Here a nylon scrub brush dipped in the ethyl alcohol and a bunch of folded over bristle pipe cleaners were used to clear the radiator stem.
The piece of 0000 steel wool was also wetted with ethyl alcohol and pushed back and forth through the stem.
The mouthpiece consisted of the vulcanite bit and an aluminum rod. The two were molded together and the aluminum exterior was cleaned with the alcohol wetted steel wool while the interior and vulcanite were cleaned with alcohol dipped pipe cleaners from the button end. was cleaned
The vulcanite was initially sanded with 320 and 400 grit sanding sponges.
A pipe cleaner was threaded through the draft holes and made into a hanger which suspended the vulcanite portion of the mouthpiece into the Before And After Extra Strength Deoxidizer solution.
Below is a side view of the mouthpiece suspension hanger.
After 4 hours in the solution the mouthpiece was removed and vigorously rubbed with a coarse shop rag to absorb excess solution and remove oxidized rubber.
Back at the bench, the vulcanite was worked with Soft Scrub cleanser applied to a make-up pad and rubbed aggressively. The mouthpiece was then worked with a series of sanding sponges from 400-3500 grit. Between each sponge I rubbed the stem with mineral oil and wiped it with a paper towel. I failed to photograph these steps.
The stampings on the aluminum were covered with strips of masking tape to preserve them from the buffer.
The radiator stem, valve and mouthpiece were then taken to the buffer and worked with the rouge compound.
The bowl was micro-meshed with pads 4000-12000. Between each pad I wiped the bowl with an alcohol moistened make-up pad to remove debris.
The bowl was coated with Before and After Restoration Balm and allowed to sit for 20 minutes.
I hand buffed the aluminum with a Cape Cod Polish Cloth. I absolutely love the smell of this product. It almost makes polishing silver bands on a pipe enjoyable.
The Restoration Balm was wiped from the bowl using an inside out athletic sock.
The stem still had areas of brown that I was not happy with. Mark Hoover, creator of the Before and After products, told me that he will give tough to clean stems a second dip in the Extra Strength Deoxidizer for 45 minutes. I tried it, and I left the mouthpiece in for a bit over an hour. Removed it and did the coarse rag rubbing.
Mark said that he just uses the Before and After Fine Polish hand rubbed with a piece of t-shirt material. I tried that, as well.
Under normal room lighting the stem looked nice. When I placed it under the bright photo lights the stem looked like the below photos.
I was about to claim defeat with this stem. Then I decided that two dips in deox and all of the sanding and micro-meshing could not be for naught. Those damned brown smudges had to go. I took the pipe back down to the workbench and started filing the oxidized vulcanite from the stem. This was an extreme measure for an extremely cool looking pipe.
Focusing on just the areas that had brown oxidation proved difficult so nearly the whole mouthpiece was eventually touched with the files.
For the curved area at the saddle a rounded file was used.
All this filing did mean that the entire sanding process would need to be repeated. And it was from grit 320-3500 to the mineral oil rubbing and paper towel wiping.
I micro-meshed with the 4000-12000 pads. Betweeneach pad the mouthpiece was rubbed with Obsidian Oil and wiped with a paper towel.
The Before and After Fine Polish was used again with a soft cotton cloth and was followed by the hand polishing with Before and After Extra Fine Polish. The pipe was then taken to the buffer for several coats of carnauba wax to the mouthpiece and high spots on the bowl. The pipe was hand buffed with a microfiber polishing cloth as a final step.
I have to admit to being smitten by this old pipe. Having seen them only in photos and wondering about them for so long, I finally got to lay hands on one. I was impressed by the simplicity yet ingenuity of the design. I tried smoking the pipe shortly after finishing it and it performed very well. The Radiator Stem absorbed the heat from the smoke and dissipated the heat quickly, living up to the “radiator” name. The stem did indeed trap condensation and I was impressed with the amount of liquid collected. Cleaning was fairly easy with a disassembly and washing with soap and water. I appreciate the aesthetic of the aluminum and how it is set off from the black of the mouthpiece yet it retains the old school look of briar with the briar bowl. Overall a lovely old pipe that performs as advertised. The dimensions of the Kirsten are:
Length: 5.43 in./ 137.92 mm.
Weight: 1.22 oz./ 34.59 g.
Bowl Height: 1.06 in./ 26.92 mm.
Chamber Depth: 0.85 in./ 21.59 mm.
Chamber Diameter: 0.80 in./ 20.32 mm. (Conically bored diameter is at the top)
Outside Diameter: 1.48 in./ 37.59 mm.
I do hope that you have found something here useful to your own pipe care, maintenance or restorations. If you like this sort of thing, please click the like and subscribe buttons. Thank you for reading the ramblings of an old pipe lover.
Loading…
Below are some photos of the completed Kirsten pipe.
I like big pipes. No, it’s not the first line from a Sir Mix-a-lot parody. I can’t say I like to smoke them but I love the way they feel in my hand. The word substantial comes to mind. I also like the general hand warming powers they emit – it is winter. Anyway, this pipe has all of those characteristics. Well, maybe not the emitting heat one. I haven’t smoked this pipe but I’m sure it would excel at it. I am not sure sure when this bountiful beauty arrived due to my less than good record keeping but it has been patiently waiting in the queue for some time. The pipe is stamped with a winged crown over BARONET over BRUYERE. Offset to the right is 906EX over ITALY. Below are some photographs of the pipe as it appeared prior to receiving any work.
For comparison purposes I photographed her with a Peterson of more standard size.
The Baronet was in need of a good deal of attention. The outer surfaces had the expected dirt and grime associated with a well used pipe. The tobacco chamber needed to be reamed and inspected for any heat damage. The airway is nearly always expected to be yuck filled. The stem on this pipe seemed to be the most in need of attention. Previous experience with Savinelli pipes lead me to expect the oxidation removal from this stem would be troublesome along with some reconstruction of the button.
Background
Baronet is not a brand nor line which I had heard of. The stampings did look very familiar though. I first went to pipephil.eu, there I found Baronet without any trouble.
The stampings on the Baronet in hand looked remarkably similar to the top two photos from pipephil.eu. I could not make out any stamping on the stem but that could just be to the state of heavy oxidation on the rubber. The crown of both photos lacked the wings which I thought were quite apparent on this Baronet.
Next I searched for “Baronet” on pipedia.org. There I also found a result immediately though not what I was expecting.
“The following pipe, marked Baronet with *** underneath, perhaps a grading system, was made in Denmark. Baronet is also a Savinelli Sub-brand, as well as a GBD brand. This one being made in Denmark, is apparently a different brand altogether.”
Example and details, courtesy Doug Valitchka
(Baronet – Pipedia). The same name, similar shape, similar rustication but from a country of manufacture which was not supported by stamp evidence. Again the reference to Savinelli existed, so that is where I went next. The link from the above entry led me to the following.
Savinelli made sub-brands, seconds & order productions
(Savinelli – Pipedia). The above list continues for quite a few more names. A total of 114, I counted. Baronet is number 5 on the list. Savinelli is a prolific producer of pipes, I’d say. This is wonderful if you are in need of a Savinelli pipe as the number of options is truly amazing and can fit nearly any style or budget. From a research perspective it is not so wonderful. Finding detailed information on an individual name is daunting.
I tried my luck at searching via Google for “Savinelli Baronet”. I thought, “this will never work” and was quickly proven wrong. The first result was the following:
(https://www.smokingpipes.com/smokingpipesblog/single.cfm/post/our-favorite-savinelli-shapes). Perhaps the pipe was so big that the inclusion on the chart would have made it aesthetically unpleasing to the eye. Okay, I completely made that up. What was certain was that this was a pipe made by Savinelli, It was darn big and received the EX suffix due to that and that it was probably made in the 1970-80s based solely on the amount of oxidation on the stem.
The Restoration
The Baronet made her way to the workbench. I wondered about the word, “Baronet”, isn’t Baroness the correct feminine. I had to search for that. According to AI Google: “”Baron” and “baroness” are the correct terms, with “baroness” being the female equivalent of “baron”; “baronet” is a separate, lower ranking title in the British nobility system, where a baronet is addressed as “Sir” and a female baronet as “Dame”.” I learned something new.
The ream team was gathered and given a rousing, morale lifting speech.
The PipNet with it’s #2 blades lead the assault against the cake.
The #3 blades followed and served the cake a rounding defeat. The tobacco chamber was sanded to bare briar and proved most unphotogenic (kind of like photographing a black hole) but it showed no signs of heat damage.
Next came the cleaning of the stem.
The outside of the stem was far worse than the airway. A few 95% ethanol dipped bristle pipe cleaners and the interior was clean.
The exterior of the stem was lightly sanded with a 320 grit sanding sponge to remove the worst of the surface oxidation and the tooth dents were lightly filed.
A pipe cleaner was slipped into the tenn to act as a hanger and the stem was introduced to the Before and After Extra Strength Deoxidizer. It spent 6 hours in the solution.
The next task was dealing with the airway of the shank. The Kleen-Reem shank drill helped clear out a good deal of the tar but many cotton swabs, bristle pipe cleaners, and alcohol/nylon shank brush scrubs were required to exorcize the tar demons from the shank.
The lava flows on the rim were a concern. Lava on a rusticated rim can be problematic to remove without altering the rim. I thought maybe it could be removed during the stummel scrub.
The scrub was carried out at the sink with undiluted Murphy Oil Soap and a nylon scrub brush.
I spent extra time working the rim with the scrub brush.
The soap was rinsed with warm water and the stummel dried with a cotton hand towel. I was not pleased with the resulting scrub. The rim, especially, was still fouled with lava. I decided on a second scrub but with a brash brush. This removed more grime.
Back at the workbench the rim looked better but still not great.
The stummel was definitely clean but now showed serious signs of wear with missing finish.
I decided to file the rim and work towards a generally smooth finish but with spots with rustication.
I like what I saw.
The inner rim was beveled using a 2 inch round plumbing cap wrapped with 220 sandpaper. The outer rim was filed to a matching bevel.
The rim and bevels were sanded with a series of sanding sponges. I really liked the look of the smooth rim with a few spots of rustication.
Now to restore that black dye to the stummel while preserving the non-rusticated areas. I opted to use a product intended for use in the painting of miniatures for gaming – Vallejo Liquid Mask. The Liquid Mask applies as a thick liquid and dries clear. It is a rubber-like product which can be rolled or peeled off without damaging the covered surface.
I applied it to the rim, stamp area and shank end and allowed it to dry.
The stummel was taken to the kitchenette and an area was prepped for dying. This required a paper towel covered surface, Fiebing’s black Leather Dye and folded pipe cleaner applicator and a lighter. Oh, and a cork for the tobacco chamber opening which stops dye from entering the chamber and provides a handle.
The dye was applied and flamed with the lighter. This flaming fixes the dye to the briar and burns off the alcohol solvent of the dye.
A second coating was applied and flamed.
The result was a nice fresh black finish. This was allowed to dry for an hour.
The mask was rolled from the surface. It did a finance job of keeping the black dye from affecting the underlying briar, as seen in the photos below.
While the dye was drying, I removed the stem from the Deoxidizer and allowed excess solution to drip back into the jar.
The remaining solution was absorbed by a coarse shop rag during a vigorous rubbing of the stem. This removed some of the newly loosened deoxidized rubber.
The stem was looking better but I could still see areas of brown.
The stem was worked with make-up pads drizzled with Soft Scrub cleanser. This stem had a great deal of oxidation and it seemed to have worked its way deep into the vulcanite.
Below is a poorly focused shot of the tooth chatter that remained after filing and sanding the area..
I was still unhappy with the oxidation removal after sanding the stem. Back into the Before and After Deoxidizer for another hour. The drip dry and rubbing with the coarse shop rag followed. After round two there was still some slight browning. I hoped that the subsequent sanding and micro-meshing would remove this.
The tooth chatter area on both the top and the bottom of the stem were given a coating of black cyanoacrylate (CA, super glue). This was spritzed with a CA drying accelerator.
I must have been getting tired of working on this stem as I failed to take many photos. The cured CA was filed then sanded smooth. The stem was then sanded with a series of sanding sponges from grit 400–3500. Between each sponge the stem was rubbed with mineral oil and wiped with a dry paper towel.
The sanding was followed by a series of micro-mesh pads 4000-12000. Between each pad the stem was rubbed with Obsidian Oil and wiped with a paper towel.
There still remained areas of light browning from oxidation. I had chatted with Mark Hoover, the creator of the Before and After products, about how he uses the Before and After Extra Strength Deoxidizer. He said that he usually gives the stem a 4 hour soak followed by a buffing with a recycled t-shirt where he rubs hard. This was then followed by Before and After Fine Polish hand rubbed with t-shirt material. I figured I would give that a try. Many applications and a great deal of rubbing did indeed reduce the browning significantly.
The stummel was waxed using Renaissance Micro-Crystalline Wax applied with a baby toothbrush. The waz was allowed to dry for a few minutes and was taken to the buffer and buffed with a clean flannel wheel.
The stem received several coats of carnauba wax. The entire pipe was then hand buffed with a microfiber polishing cloth.
I am impressed by several parts of this pipe. It is a very large specimen with great hand feel and very ample bowl size. I love the shape with its massive yet graceful look. The black rustication works nicely with the areas of smooth lighter colored briar. I am also impressed by what a pain if the arse it was to get the stem looking acceptable. I can’t say that I am happy with the deoxidizing of the stem but I am calling it quits. In normal room lighting the stem looks great. Bright lighting however, allows the areas of brown oxidation to shine through. I was defeated by this stem and called it done. The dimensions of the Baronet 906EX are:
Length: 6.14 in./ 155.96 mm.
Weight: 2,43 oz./ 68.89 g.
Bowl Height: 2.67 in./ 67.82 mm.
Chamber Depth: 2.17 in./ 55.12 mm.
Chamber Diameter: 0.81 in./ 20.57 mm.
Outside Diameter: 1.62 in./ 40.89 mm.
I do hope That you have found someThing here useful to your own pipe care,
or restorations. If you like this sort of thing, please click the like and subscribe buttons. Thank you for reading the ramblings of an old pipe lover.
Loading…
Below are some photos of the completed Baronet 906EX pipe.
Orlik pipes have never really been an acquisition nor restoration target of mine. I’m not sure if that is due to the intimidating wig wearing judge on their advertisements or the fact that they don’t show up in estate lots as commonly. I’m going to go with the intimidating judge and my disregard for authority figures. Yeah right, you know it’s because they were a higher quality pipe that didn’t show up in the cheapo estate lots. This wonderfully shaped bent, what I’d call an apple, is robust yet graceful. It wasn’t the target of the lot but it did grab my attention and move forward in the queue solely based on its good looks. The pipe is stamped ORLIK CAPITAN ofer MADE IN ENGLAND on the left with the only stamp on the right being a B9. I assumed this to be a shape number. Below are some photos of the Orlik Captain before work started.
The most obvious issue was the amount of oxidation on the stem. The rest of the pipe looked to be in great shape.
Background
Being generally unfamiliar with Orlik pipes is a curable affliction. I have only restored a couple of Orliks and this one shares little in common with the others. I turned first to pipedia.org. The entry had a very brief history of the brand which I include here,
“In 1899, a pipe manufacturer was founded in London, Bond Street, by Louis Orlik. L. Orlik Ltd. started to produce high quality pipes for a relatively low price but high service and soon became quite popular. By 1907 they used the name L & A Orlik, which apparently added Louis’s brother, Alfred to the company name. In the first quarter of 1900 they also established in Birmingham. This can be verified by silver hallmarks. In 1980 the company was acquired by Cadogan. Like many of London’s other pipe manufacturers they moved to a new built factory in Southend-on-Sea. As all current brands in the Cadogan group, Orlik was being produced in those factories.
Orlik used the slogan “Smoked by all shrewd judges” “(who are also loved by his hard judge)” with a portrait of a judge wearing a wig. The picture is still used in Denmark for manufacturing of Orlik cigarettes.” (Orlik – Pipedia)
Here, I also found a link to an old catalog, date undetermined, with a shape 9 matching the stamp on the pipe in hand.
(Orlik – Pipedia). Next I wanted to know what the B of the B9 Large Chubby Bent could stand for. There was a section which states the following:
Models & Grades: Pre-Cadogan era
Virgin (Series Letter:Without letters)
Old Bond Street (Series Letter:A)
Old Bond Street Sandblast (Series Letter:AX)
Supreme (Series Letter:T)
Supreme Sandblast (Series Letter:TX)
Meerschaum Lined(Series Letter:M)
Corona (Series Letter:C)
Old Root (Series Letter:R)
De Luxe (Series Letter:L)
De Luxe Sandblast (Series Letter:LX)
Double Bore (Series Letter:W)
Prince Regent (Series Letter:P)
Major Black (Series Letter:MB)
Captain Black (Series Letter:B)
Captain Black Sandblast (Series Letter:BX)
Clubman (Series Letter:6793)
Clubman Sandblast (Series Letter:6793X)
Black Prince (Series Letter:6791)
Black Sandblast (Series Letter:6791X)
3/4 oz De-Luxe (Series Letter:1990)
3/4 oz (Series Letter:1986)
3/4 oz Sandblast (Series Letter:1986X)
(Orlik – Pipedia the bold and blue was added by me). The only problem with this discovery was that it refers to Captain Black and the pipe is only stamped with CAPTAIN. I did give some insight to the B. It also indicated a pipe that was made prior to the 1980 purchase by Cadogan.
I went to pipephil.eu seeking clarification of the CAPTAIN vs. Captain Black. Iere I was rewarded with greater confusion. The fonts from the below screenshot all look like the Orlik in hand. The stem of this pipe does not have the iconic brass circle though. Perhaps it is indeed a replacement stem.
I returned to the pipedia.org entry to look for clarification. Michael Lankton authored an entry titled DATING ORLIK PIPES (Talk:Orlik – Pipedia). In this piece he discusses the pre-Cardogan, desirable, and the Cadogan “These are not the pipes you’re looking for, move along.” (Talk:Orlik – Pipedia). He states that the pre-Cadogan pipes are stamped as follows,
“The Orlik series proper will be stamped in all caps in a sans serif font on the port side of the shank one of two ways
“The following series are probably of little interest to Orlik collectors but I am including them for the sake of completion. In any event, if you picked up one of these pipes it would probably share the superior smoking qualities of their better lines, with obvious trade offs in the interest of producing a lower priced pipe.
We pick up where we left off above, again in descending order of quality with the series code in parentheses:
So, what do I make of all this? Well, I think this is an Orlik pipe made in England. Thank you Captain Obvious. Seriously, the stamps are indicative of a pre-Cadogan pipe but there is no mention of a CAPTAIN line without the “Black”. The pipe does have the “B” from the Captain Black line. Together this leaves me confused. The good news is that I can carry out a restoration while in a state of confusion. Perhaps a reader can add an explanation in the comments.
The restoration
The Captain settled onto the workbench with a clean denim piece.
I began with reaming or, I should say with gathering the reaming tools. The PipNet, Smoking pipes Low Country rReamer, General triangular scraper (with the tip ground round) and a wood dowel wrapped with 320 sandpaper.
The tobacco chamber had a light layer of cake and a little lava flowing onto the rim.
The PipNet made short work of the cake. With the other scrapers playing clean-up.
The interior of the chamber showed no signs of damage after being sanded. The rim on the other hand needed some light scraping.
Another photo of the chamber with more light.
The rim scraping was done with a sharp pocket knife and a bit of saliva.
The stummel was taken to the sink for a scrub with undiluted Murphy Oil Soap and a nylon scrub brush.
The soap was rinsed with warm water and the stummel dried with a cotton hand towel. Back at the workbench the stummel showed no signs of clear coat.
A quick wipe with 95% ethyl alcohol removed no stain indicating that this was a virgin finished pipe. The stain on the make-up pad was mainly from smoking residue around the mortise.
The stem was rubbed with 0000 steel wool to remove the outer hardened oxidation. A pipe cleaner was inserted into the stem to act as a hanger for the stem’s bath in Before and After Extra Strength Deoxidizer.
The stem went into the deoxidizer where it remained overnight.
The stummel had a few small dents. These were too deep to be removed by sanding without altering the shape of the pipe. I tried raising the dents with a hot iron and wet cloth.
The below 2 photos are pathetic attempts to show what I was seeing. There was an area that looked like it was from a drop onto concrete and two scratches.
Using your imagination and pretending that my photography is adequate is appreciated. The steaming did help raise the dents.
The next day the stem was removed from the deoxidizer and allowed to drip excess solution back into the jar for a few minutes.
I used a coarse shop rag to absorb the remaining solution and rub away some of the loosened oxidation.
Below you can see the oxidized rubber that was removed.
Back at the workbench the pipe was starting to look better but brown was very evident.
I used several make-up pads drizzled with Soft Scrub cleanser to remove more of the oxidized vulcanite. The shank was taped with masking tape for protection while the stummel gave me a handle for easier holding.
I then covered the stamps with painters tape for thor protection during sanding. The pipe was sanded with a series of sanding sponges. Between each sponge I wiped the stummel with an alcohol wetted make-up pad to remove sanding debris. The stem was rubbed with mineral oil and wiped with a dry paper towel.
Micro-meshing followed the sanding. The 4000-12000 micro-mesh pads were used with stummel and stem wiping as above except the stem received Obsidian Oil in place of mineral oil between each pad.
The pipe was then given a coating of Before and After Restoration Balm. This was allowed to sit for 20 minutes.
20 minutes later the balm was wiped from the pipe using an inside out athletic sock.
BAH! The stem still was showing brown under bright light. That oxidation had penetrated deeply into the vulcanite.
The solution? More time in deox was all I could think. I won’t bore you with the details of this second application of the previous protocols of deox, coarse rag wiping, Soft Scrubbing, micro-meshing and a trip to the buffer. I will show you the resulting stem top and bottom photos:
The pipe was taken to the buffer where it received several coats of carnauba wax. The final step was a hand buffing with a microfiber polishing cloth.
The Orlik Captain B9 is a true beauty. I decline to call it by the official Orlik name, “Large Chubby Bent” as I think that just sounds mean. I was finally happy with how the rim repair went. The oxalic acid treatment allowed me to remove nearly all signs of the charring without severely changing the shape of this wonderful old pipe. The briar grain of a Peterson De Luxe is on full display with this pipe. Beautiful bird’s eyes on both sides and lovely cross grain on the front and back. Though the cross grain is not quite centered it remains attractive. The stem was not severely oxidized leading me to believe this pipe was stored in a drawer and out of the light for a long time. The vulcanite polished up very well and the gloss black accentuates the briar grain. The dimensions of the Orlik Captain B9 are:
Length: 5.35 in./ 135.89 mm.
Weight: 1.76 oz./ 49.90 g.
Bowl Height: 1.72 in./ 43.69 mm.
Chamber Depth: 1.34 in./ 34.04 mm.
Chamber Diameter: 0.70 in./ 17.78 mm.
Outside Diameter: 1.68 in./ 42.67 mm.
I do hope that you have found something here useful to your own pipe care, maintenance or restorations. If you like this sort of thing, please click the like and subscribe buttons. Thank you for reading the ramblings of an old pipe lover.
Loading…
Below are some photos of the completed Orlik Captain B9.


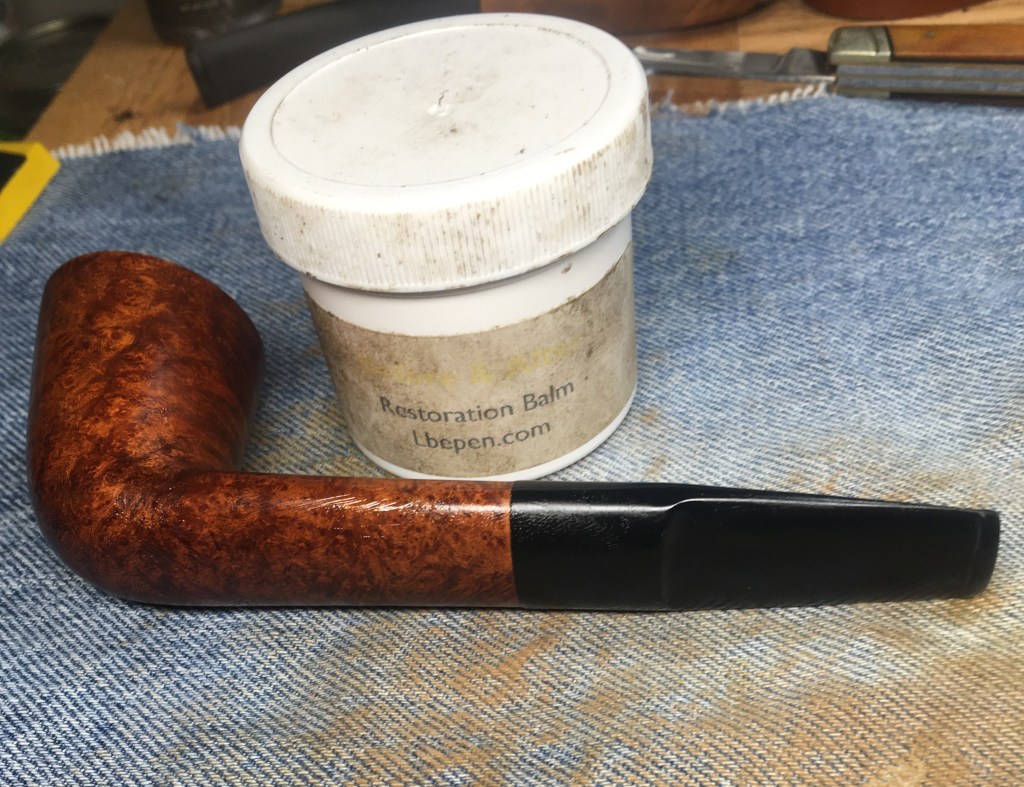


 (
(


 The “Donegal Rocky” (in quotation marks), released in 1945 or so, was Kapp & Peterson’s first rusticated line. Not that K&P hadn’t rusticated pipes previously, they just that they hadn’t devoted an entire line to rustication. And they were apparently proud of it, because they gave it a sterling mount along with a black finish and white-stamped P on the mouthpiece.
 It was part of K&P’s “Product Line,” what I call gateway pipes and others might call an entry-level pipe, as you can see in this shape chart from the 1945 catalog. Like the Shamrock (European version) and “K,” it was originally a fishtail line.

 It’s worth remarking concerning the removable stinger. This spike-ended aluminum tube is easily removed, leaving the P-Lip mouthpiece strictly a graduated-bore regulation affair.


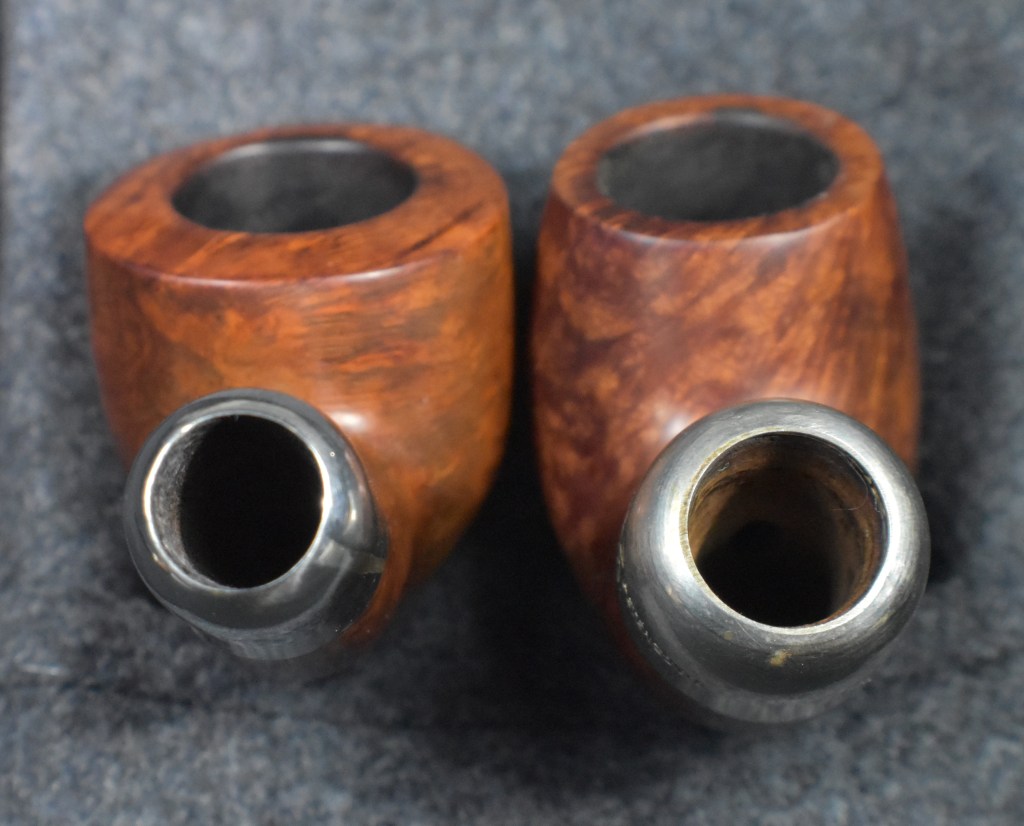


 well, it was not much to go on and it looked like a stretch but, follow it, I did. The link was to a French pipe maker LMB. The only text was the following and it appears roughly translated from French to English: “From Les Pipiers Français — Histoire et Tradition. Gilbert Guyot


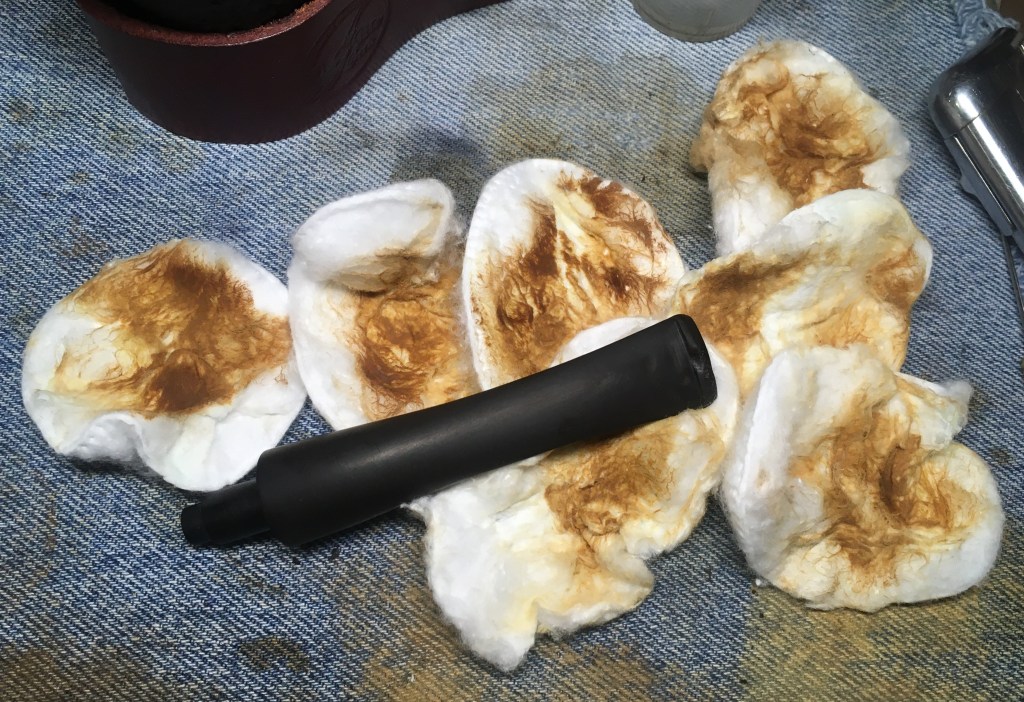


 (
(


Leave a comment