
Photographed and written by
John M. Young
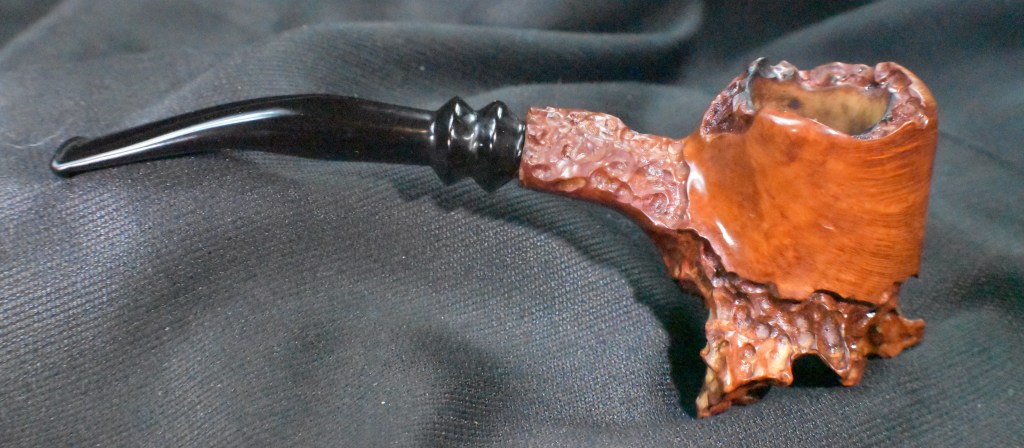
The best man in my wedding is an artist. The creativity that artists have is an innate ability to create beauty from nearly anything. I was always amazed by this superpower. When I first saw this Micoli pipe I thought, “that carver is an artist, how in the world did he come up with that?” I merely have the ability to repair the toll of time on things of beauty and a sense of practicality. Though this Micoli pipe is an incredible pipe to look at, the carvings do not meet my sense of practicality. Aesthetic beauty and useful practicality are often at odds and this pipe strikes me as an example of that conflict. For whatever reason; desire to work on a Micoli pipe, infatuation with a truly artistic creation or “dang, that’s cool”, I had to have this pipe when I saw it on eBay. After the winning of the auction the waiting for arrival began. Five days seemed to go more slowly than usual, perhaps I have discovered a remedy for aging? The relatively short trip from Saint Charles, Illinois to the wilds of southeast Nebraska was done and below is what the pipe looked like upon its arrival. The only stampings were a signature style “Micoli” over “Fre…” I could not make-out the last letters of the lower word.


I wasn’t and still am not sure if the stem is intended to be a reverse tenon push stem or a threaded tenon. Maybe the artist designed it to be either or. The pipe looked to be in better condition than the eBay photos indicated. Minimal oxidation of the stem, good news. A nice polish to the smooth sections, I do hope that is just a very thick carnauba wax… A slight cake in the bowl, more good news. This looked like an “easy button” restoration.
Background
Micoli has an active website: Micoli is a master carver of freehand pipes
According to the site,
“Micoli or “Mic” as he is called by family and friends, has aquired the reputation of being one of the best American pipe makers. He is appreciated by the most prominent of collectors. Educated in the arts, He started this adventure in 1968. His craftsmanship and artistry were dedicated to over twenty years of full time pipe making, with no two alike. In the last thirty years plus he has been partially retired and limits carving to a few pipes a month. He has continued sculpting animals and other subjects fom brair and other rare woods.
Micoli is now 79years” (About Micoli)
That woud make chronological sense, I was born in 1966 and if he started carving in/after college he’d be about 79. Yeah, math works. The site has photographs of a lot of Micoli carved pipes. These were fun to look through though I did not find one similar to the pipe in hand. That is not too surprising since no two pipes look alike and the various styles are a veritable kaleidoscope of shapes.
For further information I checked pipephil.eu. Here I found the following quote and images:

“Artisan: Robert Eugene (Mic) Burns carved pipes at least from the early 1970’s. Last news about him dates from November 2001. His son Ryan Burns stated in a forum his father is still (2009) very much alive and is in excellent health.
The deeply Dremmel carved pipes are typical of R. Burns’ work.
Micoli’s second: E. Oslo” (Mi-Mk — Pipes: Logos & Markings)
The final search was at pipedia.org, where the below was taken along with several photographs. Hmm, it sounds remarkably like his own website. Darn these lazy writers… Oh wait, I’m one of them.
“Micoli or “Mic” as he is called by family and friends, has acquired the reputation of being one of the best American pipe makers. He is appreciated by the most prominent of collectors. Educated in the arts, He started this adventure in 1968. His craftsmanship and artistry were dedicated to over twenty years of full time pipe making, with no two alike. In the last twenty years plus he has been partially retired and limits carving to a few pipes a month. He has continued sculpting animals and other subjects from brair and other rare woods. Micoli is now 72 years old.


The signature of Burns’ work is the specific way of rustication he worked out using a Dremel power tool. (The Dremel had been introduced to pipemaking by Teddy Knudsen.)
Burns / Micoli also made the E. Oslo pipes. These can be considered his entry-level pipes as he did not carve these from scratch but rather purchased run-of-the-mill standard shapes from Italian and English pipe makers, such as Savinelli and Comoy’s, and dremeled his signature magic on them. The pipe shown was very likely a Savinelli 111 KS.”
- Example and detail, courtesy Doug Valitchka


The Restoration
I took the pipe parts to the workbench and gave them a cleaned denim piece.

Looking over the pipe with a more critical eye, I again inspected the tobacco chamber. I hoped that the darkened rim was just a deposit of lava and that there was no charred wood beneath.

I heard Jed Clampitt saying, “What in tarnation?” in my mind. I grabbed a thin forceps and grabbed at the obstruction. A wadded up abraded piece of plastic came out. It looked as if someone had been trying to get it out for some time and had scratched and pushed the piece of plastic into the airway. “Odd”, I thought.

The air way was now open and had a normal draw.

The ream team was gathered.

The PipNet #3 and #4 blades got used but not much. The wide bowl of this pipe was cleaned out with a little help from both the Smokingpipes Low Country reamer and the General triangular scraper.

Below is the condition of the reamed tobacco chamber.

I sanded the interior of the chamber with 320 sandpaper wrapped around a wood dowel. The briar showed no signs of heat damage.


I ran an alcohol dipped pipe cleaning into the shank and it went straight in but not into the bowl. Hmm, that is odd. “What is this little depression in the tobacco chamber and why is it wet?”

And why are there two airways? Those two pipe cleaners were not going through the same hole.

Here you can see two pipe cleaners in the bowl. Well, one complete pipe cleaner and the emerging tip of the second.

The correct airway was a bit difficult to get a pipe cleaner into with the Delrin tenon screwed into place. I bent the tip of the pipe cleaner downward and it would go through.

Below you can see a slightly bent pipe cleaner going through the airway.

It is kind of hard to make out in the photo below but if you use your imagination you can see two airways.

I used a length of aluminum tube which was 0.13 inches in outside diameter to go through the drillings. This was done so I could envision what in the heck was going on inside this shank. It was weird, there were two airways. One was only accessible if the Delrin tenon was removed. This one angled down from the shank-end and to the bottom of the tobacco chamber. The other drilling was straight inline with the Delrin tenon if it was screwed in place.
The below three photos with overlaid diagrams are representations of what I think the airway was like and how I thought repairs might proceed.
The first diagram is how the carver drilled the stummel. The angle is not precise nor probably to scale but for visualization purposes it works.

This second diagram shows what was done to the stummel by a previous owner. The angle here would follow the straight line entrance of a pipe cleaner or drill bit inserted through the threaded reverse tenon if it were screwed into the shank.

This photo shows the stummel with the threaded Delrin reverse tenon fitting.

This last diagram attempts to show my idea of a repair. I thought that I could use a disposable pipette to deliver J-B Weld epoxy and fill the incorrectly drilled hole, shown in dark gray, into the existing upper drilling. This would fill the hole and seal off the incorrect airway. The epoxy is inert and heat resistant. I would sand any epoxy that extruded into the tobacco chamber. This seemed like a grand idea if I could get the thick viscous epoxy to flow enough to use a pipette to deliver it into the hole.

For this plan to work the epoxy would have to be drawn up into a disposable pipette. I had two types of pipettes on hand, one with a larger diameter tip and one that was smaller. I thought the larger would work. If it did not, I figured I could cut the tip back a little and make the opening wider.

I needed to be careful not to get any epoxy onto the threads or into the correct airway. I made a tool to clear the correct airway of any stray epoxy by plugging the end of a 0.14 inch, outside diameter brass tube with a cotton swab.

I snipped off the extra cotton and hardened it with a drop of thin cyanoacrylate (CA). Once hard I sanded the CA hardened cotton smooth.

I had a plan now to see if the pipette would be able to deliver the epoxy. I measured out the epoxy.

Then mixed the two parts for 30 seconds as per instructions.

The moment of truth, would the plan work or force a “Plan-B” into effect? Success. The epoxy did flow up into the pipette. Very slowly and probably only for about 5 minutes but it was working.

Using the bright workbench lights I was able to see into the mortise of the shank, insert the pipette into the hole and deliver some of the epoxy. This was repeated a few times before the epoxy became too thick to be drawn into the pipette. The below photo shows the wet epoxy filled hole at the 10:00-11:00 position.

I checked the correct airway with the “brass correct airway clearing tool” (I wonder if there is a market for these?). It came through clean and epoxy free.

Next I cleaned the threads of the epoxy which I had carefully and purposely spilled using acetone on a cotton swab. Okay, that isn’t true. I did not purposely spill anything.

I set the stummel in a pipe holder and let the epoxy set-up for about 20 minutes. This was done so the epoxy would not flow out of the hole. Gravity can, on occasion, be your friend.

Once the epoxy was set-up, I held the stummel up to the light so that I could see light coming through the correct airway. Again, success. I thought that I had better quit. This many successful outcomes usually indicates a major FAIL in the near future. The pipe was set aside for 12+ hours giving the epoxy time to cure completely.

The next day I sanded the spot where epoxy had come through the hole into the tobacco chamber. I thought that I might have to use a bowl coating to cover this slight imperfection.

I also disassembled the “brass correct airway clearing tool” by dipping the tip in acetone and pulling the cotton swab with a pliers. Weird how my marketing team has not gotten back to me about the prospects of a nationwide campaign for “brass correct airway clearing tools”. O, yeah, I forgot, I don’t have a marketing team.

It was time to get this restoration back on track. The whole “easy button” theme had been severely violated. The stem was cleaned with ethyl alcohol dipped pipe cleaners and cotton swabs. All one each of them. You can tell I am not used to clean pipes.

The stummel was taken to the sink for a scrubbing with undiluted Murphy Oil Soap and a nylon brush. The soap was rinsed with warm water and the stummel dried with a cotton hand towel.

Back at the workbench the stummel was wiped with a cotton ball dipped in 99% ethyl alcohol. Very little color came off on the cotton indicating that the stummel was free of any finish or wax.

I was very happy to see that the rim had not been charred much by use and that the lava coating the surface was mostly removed.

The stummel was sanded with a series of sanding sponges from 400-3500 grit. Between each sponge the briar was wiped with an alcohol dampened cotton ball to remove sanding debris.

The stem was also sanded with a series of sanding sponges. Between sponges the stem was rubbed with mineral oil and wiped with a paper towel.

The stem and stummel were worked with micro-mesh pads 4000-12000. I don’t know why there was no photograph documenting the micro-meshing of the stummel. Perhaps the photography team is off cavorting with the marketing team.

The stummel was then given a coating of Before and After Restoration Balm while the stem was coated with Before and After Hard Rubber Balm. Both the stem and stummel were then abandoned because the fishing team needed a guide.

Okay, there isn’t really a fishing team but there was fishing. The next day I wiped the remaining Before and After balms from the pipe with an inside out athletic sock.

I wanted to give the smooth parts of this pipe a nice coating of carnauba wax but I did not want the wax to gum-up the carvings. My solution was to mask off the carvings with masking tape.

The smooth shiny parts received their carnauba coatings and they looked marvelous.

The last steps were to remove the masking tape and to hand buff the pipe with a microfiber polishing cloth. That made the shinies even shinier.
This Micoli was a treat to work on. Sure, the whole repair of a second airway was a pain but I learned that epoxy can be applied via a disposable pipette. Besides, I think the repair was a fun challenge and keeps my old brain working on problems that need solving. The grain on this Micoli is nearly flawless. Perhaps he carved away flaws but I do not think that was why he carved like he did. I think the artist was just being an artist and I got to share in that process. The stem polished-up beautifully. There is one tiny metal inclusion in the vulcanite that is reminiscent of the recycled rubber from wartime pipes. Overall the pipe is a whimsical adventure of flowing lines. I am not sure if this piece will enter my personal collection or if it will go on to another owner. I’ll just have to see if someone reaches out to me about purchasing it. Pipes like politicians are nearly all for sale. The dimensions of this Micoli are:
Length: 6.08 in./ 154.43 mm.
Weight: 1.43 oz./ 40.54 g.
Bowl Height: 1.87 in./ 47.50 mm.
Chamber Depth: 1.43 in./ 36.32 mm.
Chamber Diameter: 0.88 in./ 22.35 mm.
Outside Diameter: 1.54 in./ 39.12 mm.
I do hope that you have found something here useful to your own pipe care, maintenance or restorations. If you like this sort of thing, please click the like and subscribe buttons. Thank you for reading the ramblings of an old pipe lover.
Below are some photos of the finished Israeli Bent Billiard.


Yeah, I still don’t know what that second word is. I did email The carver via his website but have not heard back.


