
Photographed and written by
John M. Young
This is a bit different from my typical restoration. I was chatting with a fellow Vacebook group member, Cash Gillespie, the other day about how Vermont Freehand’s Forveer Stems a are beautiful but the were just a bit too thick in the button zone. I said something like. “I frequently take a file to them and thin them a bit.” We continued chatting and I thought maybe folks would like a bit of a tutorial on working a stem. I’ll be doing this with a Forever Stem I picked up a while back for a Missouri Meerschaum Mark Twain.
Let me start with the selection. This can be overwhelming at first. Vermont Freehand is a great crew to work with. Now, I feel the need to warn you that the do take a week off for the Las Vegas Pipe Show so don’t expect a rapid response in October. Other than that they are “get ‘er done” guys and quickly post orders. Their Forever Stems page will give you the below options:

(https://vermontfreehand.com/forever-stems/)
Carefully select the stem for the pipe you want to customize. From there you can select the style of stem you are interested in.

(https://vermontfreehand.com/product/forever-stem-filtered/)
Then comes the toughest choice, color.

(https://vermontfreehand.com/product/forever-stem-filtered/)

(https://vermontfreehand.com/product/forever-stem-filtered/)
The choices will make you second guess yourself and want to buy more than one. I am sure this is fine with the Vermont crew but at $18 each this retired pensioner has to think long and hard.
The color I chose for th e MM Mark Twain was the Red Ambeer Tortoise. A few days later the stems arrived. Yeah, I said stems. I couldn’t choose between colors and I have a lot of cobs so I figured what the heck. Don’t judge. Anyway, the stem arrived and the Mark Twain never looked better. I heard the theme song to the Jeffersons playing in my head, “Movin on up”. Placing the pipe in my mouth kind of shattered my euphoria. It wasn’t nearly as comfortable as I’d hoped. The thinner bit of a standard M cob wasn’t there. The bit was wider, which I liked but it was a touch too thick. Off with the tinfoild hat and on with the pondering cap. I thought for a minute and decided that a custom stem might need a customization to really make it live up to the name, “custom”.
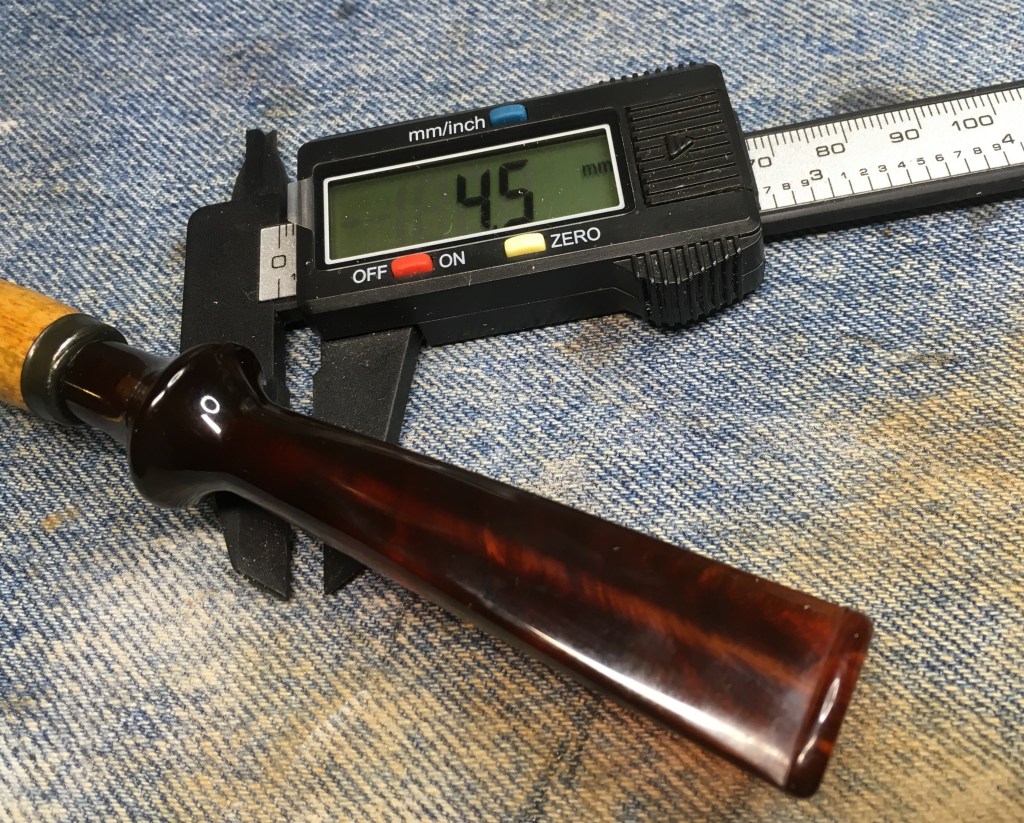
I examined the stem then measured it with a caliper. It was 5.1 mm thick. I recalled reading once that Dunhil stems were regarded by many to be the most comfortable stems and that they were close to 4 mm thick. That would mean that I needed to take 0.5 mm from the top and 0.5 mm from the bottom of this new stem. Hmm, do I dare file this beauty and risk marring the gorgeous finish. Oh yes, I dare.
I figured that filing slowly while checking the thickness with the caliper would be the best way to proceed. I do not have a belt sander, this tool would be a great option if available but I’d imagine that you would want to use grit like 320 or finer and take your time.
My Forever stem felt a bit thick at 5.1 mm.

I used a pair of files to thin it down. The most important part is the side of the file that hits agains the button. Both of my files have a cuttign edge and a smooth non-cutting edge. I kept the non-cutting edge against the button as I didnt want to file that potion.


I used the below wooden block to raise the stem up off the benchtop and allow me to file with curved strokes and rotated the stem while filing. I frequently used the calliper to check the thickness. My goal was to remove about 0.25 mm from the top then flip the pipe and remove 0.25 mm from the bottom. If that felt good, great. If not, then additional filing would be done.


I moved through the series of sanding sponges working with finer and finer grit. Between each sponge I wiped was any sanding debris with a paper towel.

All the sanding reduced the thickness slightly more.

Next came the micro-mesh pads. I worked the stem with these from the 3600 grit through the 12000 grit. Between pads I would wipe the stem with a paper towel or soft cloth rag to remove debris.
The final polishing was done with Before and After Fine followed by the Extra Fine Polish. These were applied with a soft cotton cloth, AKA t-shirt rag and hand buffed.

There you have it, how I had a Forever Sten feel better for my clench. The whole process was done without the use of any power tools. Now, if you have access to those, things would undoubtedly go faster but for me this is a hobby of leaisure and not something I am in a hurry to complete. Yeah, if you think that sounds like a cover for saying that I am too cheap to buy and equip the shop of my dreams you are not far from wrong. Oh, I almost forgot, if you are interested where I got my sanding sponges and micro-mesh pads there are the links: Sanding sponges:


Micro-mesh pads:


I do hope that you have found something here useful to your own pipe care, maintenance, restorations or customizations. If you like this sort of thing, please click the like and subscribe buttons. Thank you for reading the ramblings of an old pipe lover.
Below are some photos of the finished Forever Stem and it’s MM Mark Twian.


