

Photographed and written by
John M. Young
My love affair with Marxman pipes sometimes gets the best of me or worst of me. This pipe started out as just a typical listing on eBay for two pipes. The E. Wilke is the one that caught my eye and the Marxman was a deal sweetener.

I made an offer that was accepted. The seller messaged me saying that he broke the Marxman while putting the stem back on and that he was going to substitute a Dr Grabow pipe. I replied by saying that I bought the two pipes from the listing and did not want a Dr Grabow. We messaged back and forth, him saying the pipe was thrown away, me saying I’ll still take it but I wanted a discount of the original price. He eventually sent me the broken Marxman, though without the chipped piece from the shank and the Wilke. Below are some photos of the Marxman prior to work being done.


The glaring repair was the large chip from the shank. I thought the best way to fix this would be to cut a piece of briar from a donor pipe and carve it to fit. The whole piece would then be covered with a band. The replacement briar would provide the strength and fill the void. Other than that this looked like a typical restoration.
Background
I have restored numerous Marxman pipes and blogged about several. I will not go into great detail fawning over the amazing Robert Marx and his marketing genius. I will include a link to one blog where I detailed the history of the; company, myth, legend and the man that was Robert Marx. If you’d like a nice brief history, pipedia.org has a nice Marxman primer HERE.
The Restoration
The poor broken Marxman made its way to the workbench and a clean denim piece.

The first task was to find a donor pipe that was close in size. I found an old Bruyere Guarente with nearly the same diameter. I felt a little bit sad for the poor donor then looked upon the large number of fills in the old French billiard and thought that would live on in this Marxman.

I measured the approximate chip dimensions and marked them on the donor.

The ream team was gathered and included the PipNet, Smokingpipes Low Country Reamer and the General triangular scraper.

The PipNet #1 blades were used for most of the work. The #2 blades were just a bit too large for the tobacco chamber so the other two reamers were used to finish the scraping.

The tobacco chamber was then sanded with 220 sandpaper wrapped around a wood dowel. No heat damage was observed in the chamber.

Airway cleaning was next. The initial alcohol soaked cotton swabs and pipe cleaners came back black with smoking residue. The best part about the chipped shank was that I could get a little bit deeper into the shank with the dental scraper. The scraping produced a great deal of tar and yuck.

The cleaning continued with more alcohol, cotton swabs and bristle pipe cleaners. There was also more scraping and scrubbing with a nylon shank brush.

The stem was cleaned with 95% ethyl alcohol and bristle pipe cleaners. The tooth dents were filed with a small flat file.

The filing also addressed the reshaping of the button.

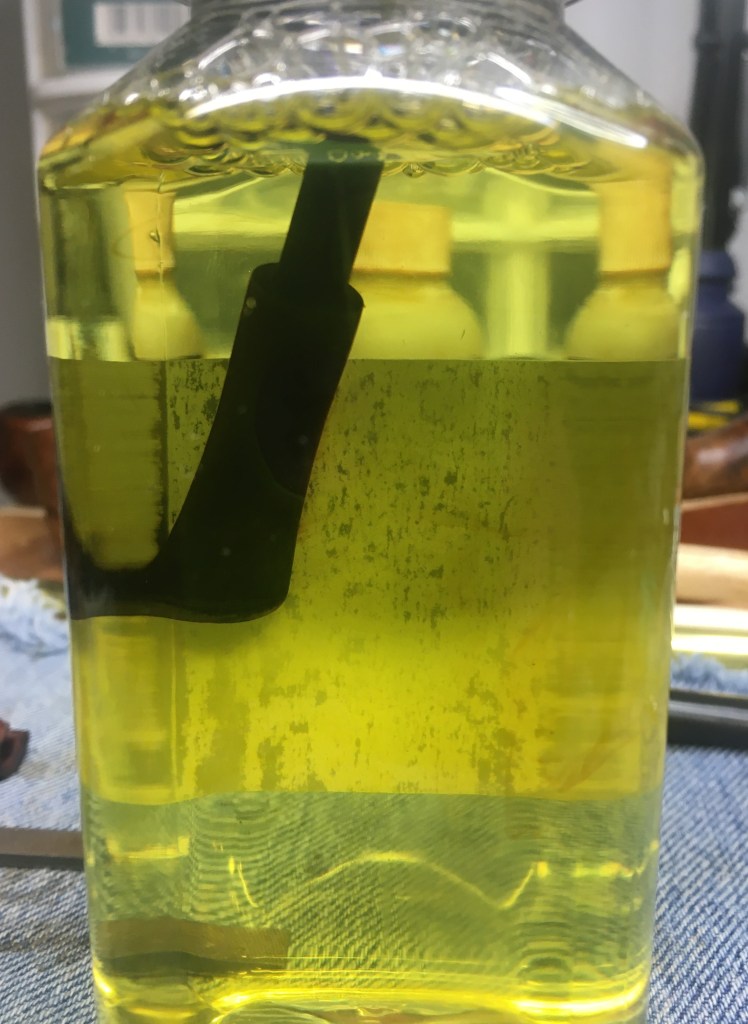
A couple of weeks ago Richard Messineo (BRIARVILLE TOBACCO PIPE REPAIR & RESTORATION) asked for my address. He said that he’d like to send me some of Briarville’s Stem Oxidation Remover to try. Apparently he had read the blog and still thought that Briarville should be associated with this blog. Weird, eh? Heck, I don’t even know if I want to be associated with some of the ramblings found here… Anyway, the Briarville Stem Oxidation Remover (Briarville deox) arrived and I was anxious to give it a try. The label said to leave the stem in the solution for between 2-24 hours. The solution was a lovely bright yellow and was far more liquid than the Before and After Extra Strength Deoxidizer (deox) that I have been using for the past several years. The Briarville deox also has a much less offensive aroma than my old deox. The stem received a pipe cleaner to act as a hanger to suspend the stem in the solution.
As I was cleaning the shank and stem I was thinking about the best way to cut the donor shank and remove the patch. I opted to use the Dremel rotary tool with a cutoff bit.

The large diameter would create a larger cut on the donor but the thin nature of the cutoff bit was a plus.

The cutting went without issue and provided me with a pretty good match to the chipped portion of the Marxamn. Some minor shaping was done to improve the fit with the flat surface of the cutoff bit.

Below you can see a rough fitting of the patch.

Here is the opposite side.

The stummel was taken to the sink for a scrubbing with undiluted Murphy Oil Soap and a nylon brush. The soap was rinsed with warm water and the stummel dried with a cotton hand towel.

I looked over at the Briarville deox. The stem had been in the solution for about an hour. I noticed there was a brown swirl at the bottom of the jar. Cool, it works.

Back at the workbench, the stummel looked better. The scrubbing revealed a couple of old fills that were quite soft, one on the left of the bowl and another on the right at the junction of the shank and bowl. I picked the old fill out of the pits with a fly tying bodkin.

I wiped the surface of the stummel with a make-up pad dipped in 95% ethyl alcohol.

Below is the pit picked of the old fill.

And the second pit.

The pits were filled with brown cyanoacrylate (CA, super glue) applied with a fly tying bodkin.

I then pressed briar dust into the pit. The new fill was then filed smooth and sanded with a 400 grit sanding sponge.

And the second fill.

The next day I returned to the stem. It had spent about 12 hours in the Briarville deox.

The stem was removed and placed on a coarse shop rag.

I vigorously rubbed the stem with the shop rag. Some oxidized vulcanite was removed by the rag.

Back at the workbench I examined the stem and compared the results between the two solutions. There was a light brown residue on the stem. The residue was also present in the stamping of the stem logo.

I wanted to treat the stem like I would if I were using the Before and After product so I scrubbed the stem with Soft Scrub on a make-up pad. The Soft Scrub removed more oxidized vulcanite. The light brown residue was removed with this scrubbing.

After the scrubbing I applied Before and After Hard Rubber Balm.

I gathered the stuff that I needed for the gluing of the patch into the chipped area. I wanted to use epoxy due to the more forgiving nature and longer setting time.

I wanted to glue the patch in place with the assistance of the tenon to keep this aligned. To keep the epoxy from adhering to the tenon, I applied a coating of petroleum jelly to the tenon.

Below, you can see the well greased tenon.

The epoxy was placed on all of the surfaces and clamped. The next three photos show various views of the clamp. This epoxy is said to set-up in 15 minutes. I let it sit for 30 before removing the clamp and stem.


While the epoxy was setting-up I measured the width of the brass band. I thought that a band that completely covered the patch looked too large for the size of this pipe. I chose to make the band a bit smaller and looked more appropriate.

After 30 minutes the clamp and stem were removed. The patch looked good. I thought that it provided good contact with the existing shank and the tenon. The band would provide the reinforcement strengthening the whole shank end.

I began filing the patch making the patch fit the contours of the shank.

There were small seams which I filled with brown CA and briar dust, as with a normal fill.

The above fills were smoothed with a file and sanding sponges. In preparations for the sanding, the shank stamps were taped on both the left and right sides.


The stummel was sanded with a series of sanding sponges from 320-3500. Between each sponge the briar was wiped with a make-up sponge moistened with alcohol.

The stummel was then worked with micro-mesh pads 4000-12000. Again, between each pad the stummel was wiped with a make-up pad wetted with alcohol.

To keep the joint from being rounded by sanding I wanted to sand it attached to the shank. I was not worried about rounding the shank end since it would be under the band but I still did not want to remove briar from the shank so, I wrapped it in masking tape.

The stem logo was taped over with masking tape for its protection. The stem was sanded with a series of sanding sponges from 320-3500 grit. Between sponges the stem was rubbed with mineral oil and wiped with a paper towel to remove sanding debris.

The stem was worked with micro-mesh pads from 4000-12000. Between pads I rubbed the stem with Obsidian Oil and wiped it with a paper towel.

The brass band was temporarily fitted. I could see that the filing and sanding of the shank end had made it lighter color than the rest of the shank. I thought that I could match the color better with a Furniture Touch-up marker. Oak was the color of choice.

Below you can see the stained shank end.

To glue the band in place I used brown CA applied to the shank and pressed the band in place against the workbench.

I thought the stem logo would look good in a color that accentuated the brass band so gold leaf Rub’nBuff was used. I first cleaned the logo stamping with alcohol on a cotton swab.

The Rub’nBuff was applied with a fly tying bodkin and worked into the stamping.

The Rub’nBuff was buffed off holding the stem and rubbing it on the denim work surface.

The stem was then re-oiled with Obsidian Oil.

The stummel received a coating of Before and After Restoration Balm and was allowed to sit for 20 minutes.

After the Restoration Balm worked its magic the excess balm was wiped with an inside out athletic sock.

The pipe was taken to the buffer to polish the brass band with white buffing compound.

After the metal polishing the pipe was wiped thoroughly and waxed with several coats of carnauba wax with the buffer.

The final step was a hand buffing with a microfiber polishing cloth further deepening the shine.
I think this Marxman turned out very well. I am still having internal debates as to the band width. I think it looks great with this band but I wonder if a band that concealed the whole scar would have been okay. The repair is solid and the stem fit is very good. I have no worries about the repair failing. The band looks like it is original and adds a flourish which improves the look of the pipe. The Briarville Stem Deoxidizer was a very nice product to work with. I cannot say at this point whether I prefer it or not over the Before and After Extra Strength Deoxidizer. More testing will be done on future restorations. I can say that it works well and is less messy to use. The stem looks great with no signs of oxidation but it was not a heavily oxidized stem to begin with. These dimensions of the Marxman lovat are:
Length: 5.20 in./ 132.08 mm.
Weight: 0.74 oz./ 20.98 g.
Bowl Height: 1.56 in./ 39.62 mm.
Chamber Depth: 1.37 in./ 34.80 mm.
Chamber Diameter: 0.67 in./ 17.02 mm.
Outside Diameter: 1.20 in./ 30.48 mm.
I do hope that you have found something here useful to your own pipe care, maintenance or restorations. If you like this sort of thing, please click the like and subscribe buttons. Thank you for reading the ramblings of an old pipe lover.
Below are some photos of the finished Marxman lovat.


