
Photographed and written by
John M. Young
I am stepping a bit away from a restoration with this blog. These are brand new Missouri Meerschaums that I saw on sale from The Pipe Nook a while back. I was not terribly impressed with the color scheme but I thought that they would look lovely if dyed with black. The gold (brass) collar and the white stem looked amazing in my vivid mental image. Well, I ordered three of them and completely forgot about them until the day they arrived. Below are a couple of photos of the pipes upon arrival.


Background
The three pipes in my vivid mental image reminded me of the Three Amigos movie. Perhaps due to the color scheme of because I found both to be funny.

Corn cob pipes by their very nature make me think of down home utilitarian goodness. Nebraska, my home state, is known as the home of the University of Nebraska Lincoln (UNL) Cornhuskers. Immediately to our southeast is the state of Missouri, home of the Missouri Meerschaum Pipe Company. According to pipedia.org,
“Washington, Missouri has long been known as the “Corn Cob Pipe Capital of the World.” It was the Missouri Meerschaum Company, still the world’s oldest and largest manufacturer of the cool, sweet-smelling corn cob pipes, that began the tradition for which Washington became famous.
In 1869 Henry Tibbe, a Dutch immigrant woodworker, first began production of the corn cob pipe. Legend has it that a local farmer whittled a pipe out of corn cob and liked it so much he asked Henry Tibbe to try turning some on his lathe. The farmer was well-pleased with his pipes so Henry made a few more and put them for sale in his shop. They proved to be such a fast selling item that soon Tibbe spent more time making pipes for his customers than working with wood. Soon Tibbe went into full time production of corn cob pipes. In 1907, the H. Tibbe & Son Co. became the Missouri Meerschaum Company
The word Meerschaum is taken from a German word that means “sea foam”. It is a Turkish clay used in high grade pipes. Tibbe likened his light, porous pipes and their cool smoke to that of the more expensive meerschaum pipes and coined the name “Missouri Meerschaum” for his pipes. Tibbe and a chemist friend devised an innovative system of applying a plaster-based substance to the outside of the corn cob bowls. In 1878, Tibbe patented this process.
A nationwide distribution system was established for the sale of his pipes. Other pipe firms also developed; by 1925 there were as many as a dozen corn cob pipe companies in Franklin County, most of them in Washington. Today, Missouri Meerschaum stands alone as the first and only surviving piece of the living history. These gentle pipes are smoked and loved all over the world as well as being used as souvenirs, often imprinted with the name of the city, business or event.” (Missouri Meerschaum – Pipedia)
These three lovelies are brand new products of Missouri Meerschaum.
The Customization
The three amigos made their way to the workbench and nestled in with a clean denim piece.

I thought the natural rim of these pipes would look interesting if I kept it in it’s natural state. TO do this I planned on applying a coating of Vallejo Liquid Mask to the rim. This product is a liquid latex which dries quickly and will seal off the surface. It is used by model painters to keep paint off surfaces where paint is unwanted. Once dry it can be easily peeled off. I planned on pouring a small amount onto a try and dipping the rim into the Liquid Mask.

Well, the plan came to a quick detour. The liquid was thicker than I remembered it being so a fly tying bodkin was used to stir it and apply a layer to the rim.

As the mask dries it loses the pastel color and becomes more clear.

Below you can see the mask clearing. I sanded the stummel and shank with a 320 sanding sponge and followed that with a 400 grit sponge. The bare wood/cob was wiped with a make-up pad moistened with alcohol to remove sanding debris.

The dye of choice was Fiebing’s Leather Dye in black. I wanted to heat the surfaces to be dyed with a heat gun prior to the dyeing to help the dye penetrate.

The dye was applied with a folded pipe cleaner. I applied two coats and tried to flame the wet dye but most of the alcohol had evaporated. Instead I used the heat gun to apply heat to the stummel.

A third coat of dye was applied. This time it did flame but not much so the heat gun was used again.

Back at the workbench the stummel was allowed to dry for over an hour.

I was happy with how the cob and wood had taken the dye.

I peeled the Liquid Mask from the rim.

The mask worked brilliantly but I Was not sure if I liked the natural rim or not.

Tha base and the logo looked okay.

For pipe number two, I sanded as with number 1.

This time I applied the Vallejo Liquid Mask to the logo on the bottom of the pipe.

Below is the dye kit used for the second pipe.

Number two was dyed black.

A second coat of black on number two.

A third coat of black on number 2.

Both pipe 1 and 2 were set aside for an hour to completely dry. As I looked at the two side by side, I decided that I did not like the natural rim. I used a cotton swab to carefully apply Fiebing’s Leather Dye to the rim of pipe number 1.

I liked that better. Some dye made it past the cork plug and into the tobacco chamber with both pipes. I do not think this will be noticeable when smoked or if it is I’m sure it will be very temporary.

As the first two were dying st started on the third pipe. As I was twisting the stem loseI noticed it was cracking. As I continued it broke completely leaving the broken tenon in the mortise.

I used a drywall screw to remove the broken tenon piece. Hmm, not happy but this will be an excuse to buy a Forever Stem from Vermont Freehand. I think one of the light bone sems would look amazing. Stay tuned for that blog.

The natural and the black backgrounds for the logos both looked good to me so, I left it weil enough.

The next day I applied a coating of Nordicare Danish Oil to the black dyed surfaces. This was allowed to dry for an hour.

A second coating was added and allowed to dry for several hours.

I wrapped the shanks of both pipes with masking tape to protect them while I buffed the collars.

White buffing compound was used on the dedicated white wheel. This did put some smudges on the white stems but wiped clean with a cotton cloth.

The pipes were then lightly waxed using carnauba wax on the buffer.

The final step was a hand buffing with a microfiber polishing cloth.
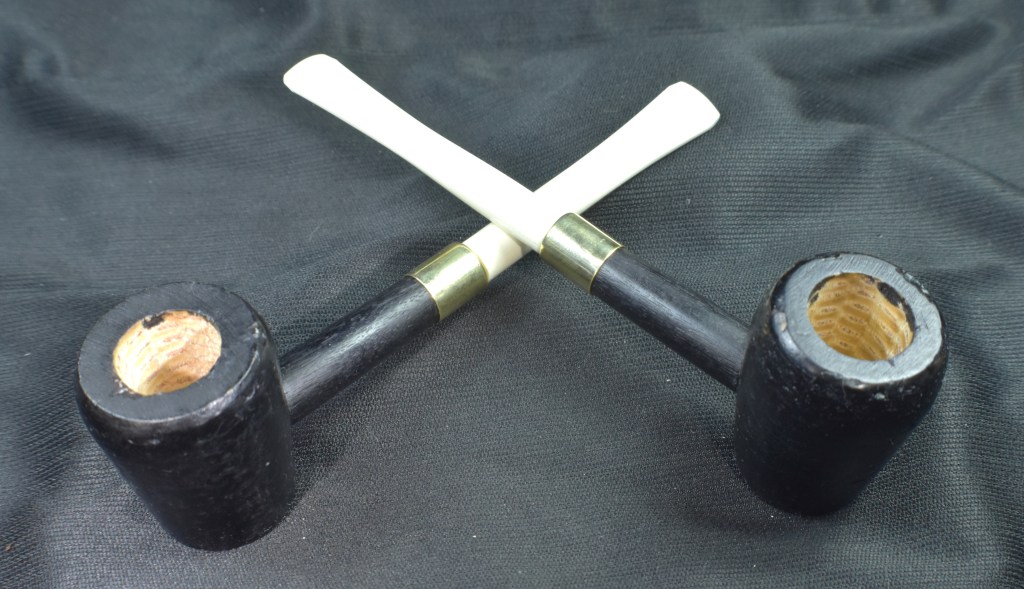
I think these two corn cob pipes turned out very nicely. They match the vivid mental image I formed in my imagination when I first saw them. The whole process went pretty much as planned. I think the slightly matte finish goes with the whole cob character as does the slightly rough finish of the shank. The white stems are a beautiful contrast to the black dyed stummels and those polished brass collars add a touch of class few expect from a corn cob pipe. These pipes are ready for a classy night at the opera or at least Grand Ole Opry.
These dimensions of these two Missouri Meerschaums should be very similar, being lazy, I only measured one:
Length: 6.30 in./ 160.02 mm.
Weight: 1.31 oz./ 37.13 g.
Bowl Height: 1.80 in./ 45.72 mm.
Chamber Depth: 1.67 in./ 42.42 mm.
Chamber Diameter: 0.69 in./ 17.53 mm.
Outside Diameter: 1.48 in./ 37.59mm.
I do hope that you have found something here useful to your own pipe care, maintenance or restorations. If you like this sort of thing, please click the like and subscribe buttons. Thank you for reading the ramblings of an old pipe lover.
Below are some photos of the finished Missouri Meerschaum Riverboat Gamblers.


Below is pipe #1

Below is pipe #2

Below is the rim of pipe #2

Below is the rim of pipe #1


One response to “A Missouri Meerschaum Riverboat Gambler Customization”
Dunno If i like it! It’s just black and White….but i do like the Arbeitsplattenöl!😁😁😁
That mask is interessting
LikeLike