
Photographed and written by
John M. Young
You could call this little pipe a Custom-Bilt knock off. This pipe is stamped SHORT over SNORTER on the left shank. It has that very Custom-Bilt look to it but it is diminutive. It reminds me of Dr. Evil and Mini-Me from the Austin Powers movies.

(https://www.pinterest.com/pin/208713763967237818/)
The term “short snorter” according to Google Is less comic,
“Origin:
The tradition began before World War II, with bush pilots in Alaska signing bills as a sign of good luck and a way to remember their travels.
- Meaning and Purpose:
- “Snort” was slang for a shot of liquor, and “short” meant a smaller amount, so a “short snorter” was a way to remember a small drink or a flight”.
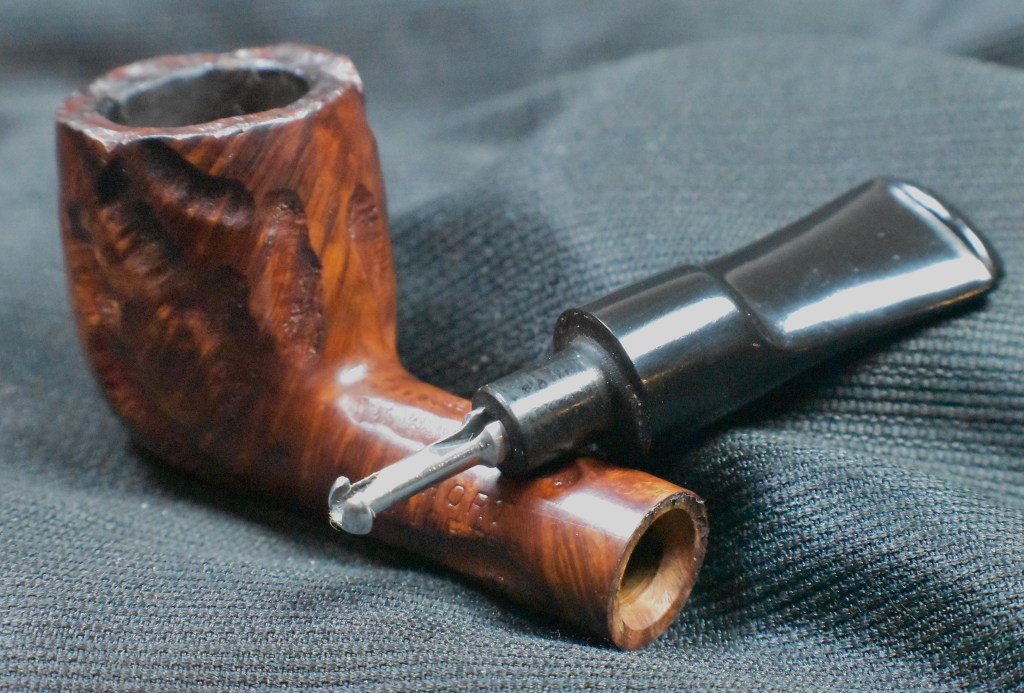
This pipe would certainly be that, a short smoke allowed by a small pipe. Below are some photos taken before I did anything but remove the stinger.


The pipe looks to be in good condition. There were still tobacco remnants in the tobacco chamber. The cake and the lava on the rim suggested the pipe had seen use. The stinger was quite stuck in the stem before I took the above photos. I had to soak the tenon for about 30 minutes and did quite a bit of wiggling of the stinger as I held it between the fold in a piece of leather and pliers. There were a couple of spots which needed to be filled and of course the usual cleaning.
Background
I really have no idea who made this pipe. Searches for “Short Snorter” yielded nothing on both pipedia.org and pipephil.eu. The big Custom-Bilt book, “Individual as a Thumbprint” The Custon-Bilt Pipe Story by William E. Unger also makes no mention of the Short Snorter though it does discuss a marketing scheme where a person could pick up a miniature pipe and a gift certificate for a person. The person could then keep the miniature pipe and exchange the certificate for the pipe that they wanted from the retailer.
I searched Short Snorter in the blog posts of Steve Laug (it’s a rare day when I restore a pipe brand that Steve has not worked with) there I came across a restoration by Dal Stanton, “Short Snorter Imported Briar” (https://rebornpipes.com/tag/short-snorter-pipe/). Dal’s search for information on the Short Snorter was more productive but not by much,
“In the little I found on the internet about the Short Snorter, it is described as a nose burner or as a pocket pipe, but most often with other shapes than the horn. Steve looked up the Short Snorter in the book, Who Made That Pipe, and it indicates that it was made by Weber or Wally Frank. With that information, I looked at old Wally Frank catalogues, but did not see the Short Snorter. I suppose the name is apropos, but I think a lady pipe smoker would give this pipe a look see.” (https://rebornpipes.com/tag/short-snorter-pipe/)
In conclusion the Short Snorter appears to have been made by Weber of Wally Frank after World War Two. I say after WWII because of the IMPORTED BRIAR stamping which was something added to reassure customers that briar was once again used in the pipe.
The Restoration
The restoration began with the stinger taking a dip in a medicine cup of 95% ethyl alcohol and the pipe proper, getting a cleaned piece of denim.

The stem was dirty and constricted. I used several alcohol dipped bristle pipe cleaners and the Vermont Freehand Slot Funnelling Tool (https://vermontfreehand.com/product/slot-funneling-tools/) to clear things out.

Ithen wiped a bristle pipe cleaner with toothpaste and clamped one end in the vice. I pushed the other end through the stem and buffed the airway with the toothpaste enriched pipe cleaner.

The tooth chatter was filed with a small flat file to remove the dents.

I turned my attention to the stummel. The dental scraper got quite a workout here removing the crunchy caked tar and smoking residues. Alcohol dipped pipe cleaners and cotton swabs were also used.

The reaming was surprisingly productive for such a small pipe.

Once reamed, the interior of the tobacco chamber looked good and showed no signs of heat damage.

Next came the scrubbing of the stummel’s exterior. This was done with undiluted Murphy Oil Soap and a nylon brush. The soap was rinsed with warm water and the stummel dried with a cotton hand towel.

Back at the workbench the stummel was wiped with a make-up pad dipped in 95% ethyl alcohol.

I used the make-up pad to scrub a little bit more on the rim to get rid of the remaining lava.

There were two areas which I thought needed to be filled. One small sand pit where the shank met the bowl. The pit was small and I thought that it would fill with brown cyanoacrylate (CA, super glue).

The other area was on the rin and right side. This area required CA and briar dust to fill the gap on the rim and CA alone on the side.


I allowed the CA to cure and filed the shank fill with a half-round file.

The rim and right side needed to be retextured to match the existing rustication or carvings. I did this with a rotary tool and a small carving bit.

Below you can see where the fills look like a crack. This was only superficial and did not penetrate through the side wall of the bowl.

The re-rusticated carvings looked good as I attempted to match the contours of the original carving.

The rim recarvings were nearly unnoticeable.

The shank was taped with masking tape to protect it from the stem sanding. I wanted the stem and stummel intact for the sanding to avoid any rounding of the joint between the two.

A series of sanding sponges from 40-3500 were used in sequence. Between each sponge I rubbed mineral oil onto the stem and wiped it with a dry paper towel to remove sanding debris.

The stem was then worked with micro-mesh pads 4000-12000 grit. Between each of these pads I applied a small drop of Mark Hoover’s new Hard Rubber Balm, rubbed this onto the stem and wiped the stem with a paper towel.

The stummel then received a coating of Before and After Restoration Balm and was set aside to what I thought would be 15-20 minutes. It turned out to be the next morning.

The next morning I hand buffed the remaining Restoration Balm from the stummel with an inside out athletic sock.

The pipe was then taken to the buffer where it received several coats of carnauba wax on the stem and smooth surfaces of the stummel.

The final step was a hand buffing with a microfiber polishing cloth.
This little pipe was a fun project. I am enjoying practicing with the Dremel tool and improving my carving techniques. The blending of repairs to original rustications is a challenge which I find very enjoyable. This demure darling turned out very nicely. I have a Custom-Bilt with a near identical shape and seeing them side by side is quite amusing. The fills and re-carvings turned out beautifully and are only noticeable under serious scrutiny. The stem polished up very well with the glossy black complimenting the rustic carved rich brown of the stummel. The dimensions of the Short Snorter are:
Length: 3.92 in./ 99.57 mm.
Weight: 0.66 oz./ 18.71 g.
Bowl Height: 1.50 in./ 38.10 mm.
Chamber Depth: 1.09 in./ 27.69 mm.
Chamber Diameter: 0.63 in./ 16.00 mm.
Outside Diameter: 1.12 in./ 28.45 mm.
I do hope that you have found something here useful to your own pipe care, maintenance or restorations. If you like this sort of thing, please click the like and subscribe buttons. Thank you for reading the ramblings of an old pipe lover.
Below are some photos of the finished Short Snorter.


