
Photographed and written by
John M. Young
Dr Grabow, a name that introduced many a young pipemen or pipewomen to the hobby of pipe smoking. The accessibility of Dr Grabow pipes, found in every drugstore and in my case, a 7-Eleven, made for easy and affordable acquisition of a first pipe. This would have been in the early 1980s. Throughout the 1970-1980s period I fondly remember many of the older neighbors sporting pipes as they went about their suburban outdoor rituals. When this Dr Grabow Omega came to me as part of an estate pipe lot I was immediately reminded of those memories. My record keeping is poor but I think this was one of 12 pipes which came to me in September of 2024. The poor Omega had been patiently waiting for some workbench time. The pipe was stamped OMEGA over DR GRABOW on the left shank and IMPORTED BRIAR on the right. Below are some photographs of the pipe prior to work done.


This was obviously a seldom smoked pipe. I doubted that more than a couple of bowls of tobacco had burned through this specimen. The rim looked nearly pristine. There was one unsightly fill on the shank which just touched the “DR” stamp. “That might be troublesome to replace”, I thought. The finish was not of the clear coat variety, which made me happy though the oxidation of the vulcanite stem would have to be dealt with. I have restored a couple of Omegas and have found that not all of them used vulcanite as stem material. I wondered if that could be used as an indicator of age. The Omega also had a brand new paper filter in the stem.
Background
Dr Grabow pipes did not all start out as Dr Grabows. Prior to that name they were Linkman’s which was preceded by ML&C (Mary Linkman & Company). I will let the following sites tell the story for those interested in pursuing the history of this venerable pipe maker.
One site that I like to use for Dr Grabow research is a timeline written by Tiki Vegas. If that is a real name, kudos to their parents. The timeline runs from 1953 to 2006. I assume that the 2006 date is when the timeline was published. The timeline is partially interactive and gives a nice graphical representation of various Dr Grabow lines and models. Below is a sample of what the timeline looks like:

(https://www.timetoast.com/timelines/dr-grabow)
According to Tiki Vegas,

(https://www.timetoast.com/timelines/dr-grabow)
In booking for Dr Grabow Omega pipes today, I found them on Amazon so it appears that they remain in production at present. The well pipe description is most likely a kind way to note that the pipe is designed copying the renowned Peterson System. To its credit, the well of the Omega is drilled to approximately ¼ inch or 6 mm. below the draft hole, which would allow for water to condense out of the smoke and accumulate in the well. The stem of the Omega even sports a rounded P-lip style button but with the draft hole proceeding straight through the stem rather than being directed up as a true P-lip should do.
The Restoration
The Omega was placed on a cleaned denim piece to protect the work surface.

I wanted to get the stem into the Before and After Deoxidizer (lovingly referred to as deox from here on) solution quickly as I wanted to finish this project in one night. The stem was lightly sanded with a 400 grit sanding sponge.

A pipe cleaner was inserted into the button to act as a hanger suspending the stem in the deox.

With the stem in deox, I turned my attention to reaming the tobacco chamber. Fortunately I didn’t need very much attention because the chamber was nearly new.

I did use the PipNet #1 blade.

It barely had anything to remove. I was surprised by the fact that the chamber on the Omega was this small. It feels like a much more substantial pipe. It does have very nice thick walls though.

I did a bit of scraping with the General triangular scraper I had ground the tip of this tool round on a grinder. The factory tip was frighteningly sharp.

The tobacco chamber was reamed and looked pretty much like it did before I started.

Sanding it with the 220 sandpaper wrapped around a wood dowel made it look like new. You could even see the chuck marks on the interior from turning the bowl at the factory.

Next came the scrubbing. This was done at the sink with undiluted Murphy Oil Soap and a nylon scrub brush. The soap was rinsed with warm water and the stummel dried with a cotton hand towel.

Back at the workbench, I wiped the exterior and interior with a make-up pad dipped in 95% ethyl alcohol. On the photo below you can see the pinkish hue from the little bit of stain the pad picked up while the brown is from inside the tobacco chamber.

I started picking at the fill on the left shank. It was hard and secure but I didn’t like the look of it.

Soaking it with a cotton swab dipped in acetone softened it up very quickly.

The fly tying bodkin was able to pick the chemically softened old fill out much more easily.

Now for the harder part, replacing the old fill. I used the fly tying bodkin to carefully lay a bead of brown cyanoacrylate (CA, super glue) into the depression.

I then scooped up briar dust on a dental scraper and pressed it into the wet CA and brushed off the excess.

The dry briar dust was then topped with another bead of brown CA. This was allowed to cure for 10 minutes or so until hard. I then filed the new fill smooth with a small flat file and sanded it with a 400 grit sanding sponge.

I topped the fill a third time with thin CA. I applied this by putting a small drop on the bodkin and used it to transfer the CA to the fill.

This was then smoothed with the flat file and sanding sponge again.

I carefully sanded around the stampings trying to blend the sanded area to the stamped area.

This sanding was done on both sides of the shank.

The smooth surfaces were then sanded with a series of sanding sponges from 400-2000 grit. Between each sponge I wiped the stummel with a make-up pad wetted with alcohol.

The smooth areas were then micro-meshed from 4000-12000 with alcohol wiping between the pads.

The stummel then received a coating of Before and After Restoration Balm applied with a baby toothbrush and was allowed to sit for 15 minutes.

The Restoration Balm was wiped from the stummel using an inside out athletic sock to remove excess balm.

Buffing the aluminum collar was nex on the list. I taped off the shank to protect it from buffing with masking tape.

I used the white buffing compound on the dedicated white wheel which is far from white.

The stummel looked very nice. Time to retrieve the stem.

The stem was removed from deox and allowed to drip excess solution back into the jar.

I like to use a coarse shop rag to vigorously rub the remaining deox from the stem. The rough material absorbs the solution and removes more of the oxidized vulcanite.

Below you can see the oxidized vulcanite that comes off with rubbing.

Back at the workbench I used Soft Scrub cleanser on make-up pads to remove more of the oxidized vulcanite. The stem was cleaned out using cotton swabs and pipe cleaners.

After the Soft Scrub I got lazy and tried to just buff the remaining oxidation from the stem. Just like always, it didn’t work. The next three photos show a nice shiny stem with traces of oxidation.


So, back to the sanding sponges… Oh wait, I do have something new to try and tell you about. Mark Hoover, the brains behind the Before and After products, sent me a bottle of Before and After Hard Rubber Balm. I told him that I would try it so, try it I shall. The stem was sanded with sanding sponges 400-3500. Between each pad I rubbed the Hard Rubber Balm onto the stem using my fingertips. I then wiped the excess off with a paper towel. In the past I used mineral oil for this step. The Hard Rubber Balm is more viscous, thicker, than mineral oil. Being a heavier oil, I think that it would vaporize/evaporate more slowly making it preferable to mineral oil for sealing vulcanite away from the oxygen in air. I do not know if there are any antioxidants added to the formulation as there are no ingredients listed on the bottle.

After the sanding I returned the stem to the buffer. I will master using a buffer to remove oxidation if it kills me. I used the white compound and the “white” wheel for the buffing. When finished I wiped the stem with a soft cotton cloth to remove any buffing compound and oiled the stem with the Hard Rubber Balm. It looked much better without the brown haze of oxidized vulcanite.

The pipe was waxed with several coats of carnauba wax at the buffer. I did not buff the carved surfaces as I feared they would trap wax and lead to a buildup of dirt and grime.

The final step was a hand buffing with a microfiber polishing cloth.
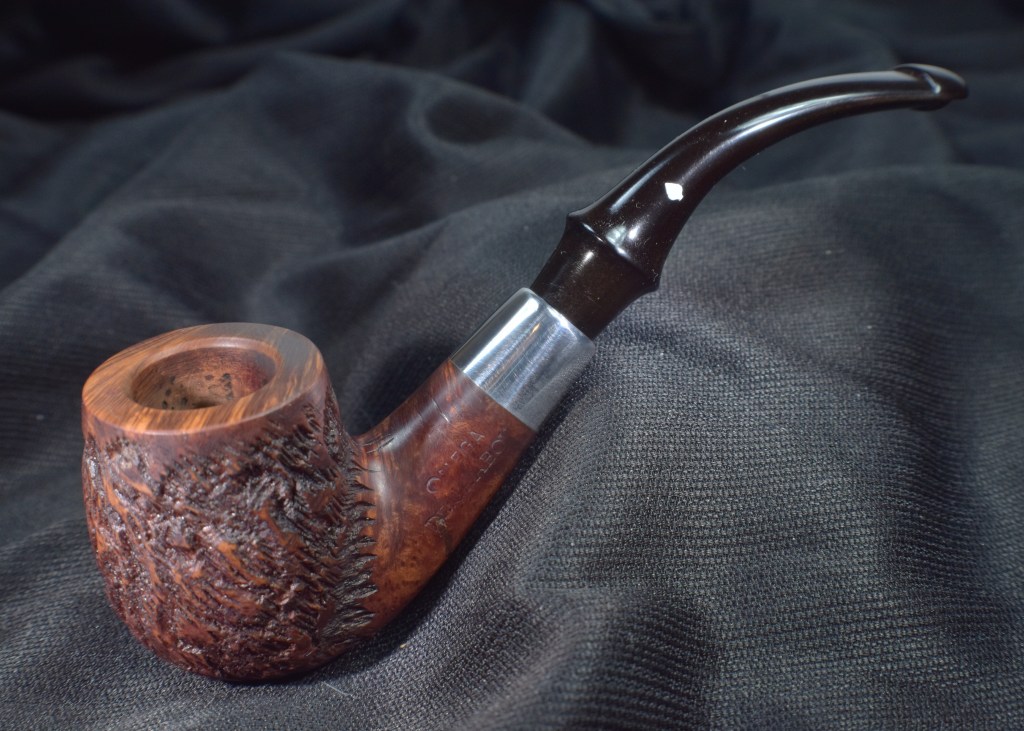
I always enjoy working on Dr Grabow pipes. Perhaps it is the history of the brand. This pipe did not disappoint. Yes, it is a factory made pipe but the quality of the drillings and the fit of the parts is excellent. The rustication works well with this shape and the carvings fall in line with the pipe’s curves. The one large flaw in the briar was reworked and turned out as well as could be expected. The vulcanite stem polished up pretty well and contrasts the rustication quite nicely. The dimensions of the Dr Grabow Rusticated Omega are follows:
Length: 5.06 in./ 128.52 mm.
Weight: 1.27 oz./ 36.00 g.
Bowl Height: 1.17 in./ 29.72 mm. (bowl only) 1.70 in. / 43.18mm (with tube)
Chamber Depth: 0.82 in./ 20.83 mm.
Chamber Diameter: 0.85 in./ 21.59 mm.
Outside Diameter: 1.49 in./ 37.85 mm.
I do hope that you have found something here useful to your own pipe care, maintenance or restorations. If you like this sort of thing, please click the like and subscribe buttons. Thank you for reading the ramblings of an old pipe lover.
Below are some photos of the finished Dr Grabow Rusticated Omega.


