
Photographed and written by
John M. Young
The white whale of the Marxman world resurfaced the other day on eBay. The elusive The Four Hundred. This sighting was of an abused stummel. Some bugger had raided the poor pipe for both it’s stem and 14K gold band. I had vivid mental images of a young man disassembling grand dad’s old pipe to abscond with the band and use it as an engagement ring for a high school sweetheart. I can only hope that it worked and that he and the 20 mm fingered bride-to-be are still together. Yeah, an imagination can be a terrible thing.
Of course, I bid on the stummel and actually won it for less than $40 with shipping. I guess there is a fool born every minute. The stummel travelled from Waynesville, Georgia to the frigid wilds of southeast Nebraska. Upon arrival the stummel appeared as the photos below indicate.


She looked a bit rough, far worse off than the first Four Hundred appeared. Here is a link to that restoration if you are interested. The first Four Hundred was also missing the original stem and band. Coincidence or global conspiracy? Hmm, I do love a good conspiracy theory. Unfortunately, my imagination is all tired out from the previous vivid mental image. This stummel would need a new band and stem. It had numerous areas where the old fills were showing through in a less than attractive fashion. There was an ugly dark stain on the heel, right on the stamp. That would also have to go. Dents and dings from use were also scattered about the briar. The good news was that the stummel appeared to be very structurally sound. The damage was all cosmetic.
Background
Being a proud member of Generation X, also known as a Slacker, I will reuse the background section from the first Marksman The Four Hundred restoration below. Heck, I’ll even give myself credit for the quote.
“According to pipedia.org: “The Four Hundred was Marxman’s best series, characterized by very large pipes. Similarly famous was the Marxman Heirloom Pipes series, with around 80 pieces produced by well-known North American sculptors, such as Jo Davidson, Cecil Howard, Charles Kopp, and RD Lewis, contracted by Bob in 1947. Today these pipes are genuine collector’s items. The series included animal and human figures, selling at extremely high prices for the time.” (https://pipedia.org/wiki/Marxman)
I have restored and blogged about several Marxman pipes over the past year. I will include a few of them here if you are interested in more of the history of the brand.
- Camel figural https://wordpress.com/post/scimansays1787.com/7445
- Jumbo C https://wordpress.com/post/scimansays1787.com/7197
- Jumbo Dublin https://wordpress.com/post/scimansays1787.com/3071
- Mel~O pear https://wordpress.com/post/scimansays1787.com/6995” (https://scimansays1787.com/2024/11/12/a-marxman-four-hundred-restoration/).
I do have to add a little bit more information about Robert Marx. While sharing the previously mentioned restoration blog with another Marxman aficionado, they (pipesmagazine.com forum member: telescopes) brought a little known fact to my attention. The legendary Robert Marx created the first slow smoking competition. According to the Club History of the International Association of Pipe Smokers’ Clubs,
“The International Association of Pipe Smokers’ Clubs, Inc. was founded in October of 1949 and incorporated in the State of New York, City of Schenectady, County of Schenectady, on July 15, 1952.
Mr. Robert Marx, founder of the famous Marxman Pipe, was the first man to put on a Pipe Smoking Contest. He owns the world’s most famous pipe, sculpted by Joe Davidson, that is insured for $7,500.” (https://www.iapsc.net/history.html).
Just when I thought that Robert Marx’s marketing genius couldn’t be improved, I learned something new about the guy.
The Restoration
In breaking with tradition I did not first place a denim piece on the workbench. I admit to being rather excited to start this project so much so that I began it before I had even received the gold band from the Vermont Freehand boys (https://vermontfreehand.com/). My first task was to look through the stock of stems to see if I had something that would be a good fit, preferably for as little work as possible. Yeah, I’m honest and lazy. I had an acrylic stem that was a very good fit for the diameter and length. As a bonus the tenon was too large. I felt blessed or lucky and didn’t care which. The stem was also an acrylic. I know the original Marxman stems were vulcanite but as I get older I am really learning the benefits of acrylic stems. They do not have the issues with oxidation and do not require the constant oxidation removal. Yeah, my laziness appears to be increasing.

I used the tenon cutting tool from Vermont Freehand (https://vermontfreehand.com/product/adjustable-tenon-turning-tool/) on a practice stem. I adjusted until I got a good fit with the practice stem into the stummel then used the tool to cut the replacement stem.

The fit was nice. There was some misalignment and a very slight gap but I would take care of that by heating the stem, pressing the stem into place and allowing it to cool stating the exact tenon fit as the acrylic cooled.

The slot of this stem needed some work. It was an unused replacement stem but it only had a draft hole bored through and a basic slot cut into the button. I used a Dremel and a circular cutting bit to cut the slot and angle the draft hole more smoothly.


This improved slot was further opened and filed into a “Y” with small files.

With the stem drawing nicely, I turned my attention to the stummel. The reaming tools were gathered.

The tobacco chamber of the Four Hundred was very large and fit the #4 blades of the PipNet easily. I had to press into the sides to get the PipNet to contact them.
There was minimal cake accumulated and what was present was quickly removed.

The tobacco chamber was sanded with 220 sandpaper wrapped around a wood dowel and a piece of sandpaper.

The chamber showed no signs of any heat damage or charring.


The next several photographs show the old fill material used by Marxman at the factory. The fill material is the light colored bits.


The removal of the old fills was a tedious process of softening the fill with acetone and picking it out with a dental scraper and the fly tying bodkin.

There dark stain on the bottom of the stummel was also a feature which I did not want.

I tried soaking the stain with a solution of saturated oxalic acid solution. The solution was applied with a cotton swab.
I allowed the oxalic acid to dry and sit for 30 minutes before rinsing it with copious amounts of water and a light scrubbing.

Once dried the stain had disappeared completely.

The shank cleaning was the next task. This was done with several cotton swabs and bristle pipe cleaners dipped in 95% ethyl alcohol.
see
The acrylic stem was in good shape but I was eager to see how it would look with the cleaned stummel. I used white buffing compound on the buffer with the appropriate white compound wheel.

The shank of the pipe was taped with masking tape to protect it from the buffing.

The acrylic polished up very nicely.

Back at the bench the replacing of the old fills was about to commence. I planned on using brown cyanoacrylate (CA, super glue) and briar dust to fill the gaps in the briar. The CA would be applied with a fly tying bodkin and the briar dust would be pressed into the wet CA. This combination cured almost immediately and could be shaped with a file or sandpaper with subsequent layers building up the depressions.

Below you can see the wet CA applied to a gap.

There were plenty of gaps in this old pipe to be filled. The briar dust was then pressed into the wet CA. This produces the equivalent of a chunky scra on the surface of the briar. I use a brass brush to brush the surface removing the dry briar dust that doesn’t come into contact with the wet CA.

Once all the flaws were filled the texture of the carvings needed to be reestablished. I used a Dremel rotary tool with a small carving bit to re-carve the surface.

I prefer to keep the bit more stationary and move the stummel into the rotating bit. I propped the Dremel up on a piece of 2×4 .

The recarving process is slow and requires eyes that are capable of fine focus, something that my old eyes have trouble with. Below you can see the carving of the texture as it progresses.

Eventually the CAA is reshaped to be similar to the original.

Noticing the great success of the oxalic acid on the old stain, I thought that perhaps the entire stummel would benefit from a light bleaching. I used oxalic acid on the entire stummel.

The wet stummel looked very nice with a coating of oxalic acid. The acid was allowed to dry and sit on the briar for 30 minutes.

Below are a couple of photos of the bleached briar prior to rinsing and scrubbing the oxalic acid from the stummel.


The rinsing was done with copious amounts of water and a Scotch Bright pad that I applied Castile soap to. I figured that the basic nature of the soap would also neutralize any remaining acid during the rinsing. Upon drying the stummel received a coating of Befoer and After Restoration Balm. I was impatient and wanted to see the color of the briar. In insight I should have sanded and micromeshed the briar prior to the balm but impatience got the best of me.

After allowing the Restoration Balm to work its magic for 20 minutes I hand buffed the stummel with an inside out athletic sock to reveal a lovely dark briar.

I couldn’t help myself and had to take the pipe upstairs and into the sunlight for a couple of photographs.


It took 2 weeks for the gold band and a new drill bit to arrive from the Vermont Freehand boys. It was not their fault as the winter weather in the east has been tough this year. Still, it was an excruciating wait.

The band was far too wide for this pipe but it was the only one available in a 20 mm diameter. I seated the band to show how much material I would have to remove. Yes I could have used the entire 20 mm but that would have covered up an unacceptable amount of the Marxman stamp on the left shank.

The band glueing kit was gathered. The plan here was to use acetone to clean the band and shank end of any oils that may be present, slightly rough up the band interiors and shank with sandpaper, and apply a thin coat of J.B. Weld 2 part epoxy to the interior of the band and the shank end and fit the band.

The surfaces were cleaned with acetone and the epoxy thoroughly mixed.

The band was fitted and adjusted. The reason I used epoxy and not CA was to allow me additional time to adjust the fit of the band. CA would have given me seconds to adjust and I wanted to take my time. With everything in place the 24 hour wait began. Sure, the package says that the .B. Weld cures in 15 minutes but that is a soft cure. I wanted everything to be solid. In discussing this project with fellow pipe restorer Donald Cole, he suggested that I used sandpaper to remove the excess band width. His recommendations were the following, “Sandpaper on a flat surface. Like glass.
It’s thin and won’t take long with low grit. Use a figure 8 motion and it’ll keep it even.” (Cole, Donald, Personal communication). That sounded like a very good idea.

When the time came, I started sanding as Donal had suggested. It was working but oh, so slow. My impatience attacked again. I returned to the workbench and selected a flat file. I filed the excess band material caterfull to about 2 mm above the shank. Frequently rotating the stummel to keep the filing reduction even. The below photo shows my filing.

After I filed to about 2 mm I returned to the Donald Cole technique of sanding with the figure 8. I am sure patience is a virtue but I also like my steaks on the rare side of medium rare. Perhaps my impatience is a flaw that extends beyond just pipe restoration. Below is a photo of the sanded band and shank end.

There is is, the trimmed band on the Four Hundred.

And a close up showing the fit.

The smooth surfaces of the stummel were sanded using a series of sanding sponges from 400-250. I neglected to photograph and on that, apologies. The next step was a light coating of Danish oil applied to the stummel. This was rubbed in with a gun cleaning patch as they tend to be lint free.

The stummel was set into my mini bench vice to dry.

After several hours of dry time I worked the stummel with micro-mesh pads in grits from 4000-12000. Between each pad I wiped the stummel with a make-up pad wetted with 95% ethyl alcohol to remove mehsing debris.

The last major step was to apply several coats of carnauba wax. Since the rustications were shallow and general wide I opted to carefully work the wax into the carvings with the buffing wheel. It took quite a while to get into all of the nooks and crannies but I think the result was worth it. The smooth panels took the wax easily as did the stem.
ha
The final step was a hand buffing with a microfiber polishing cloth.
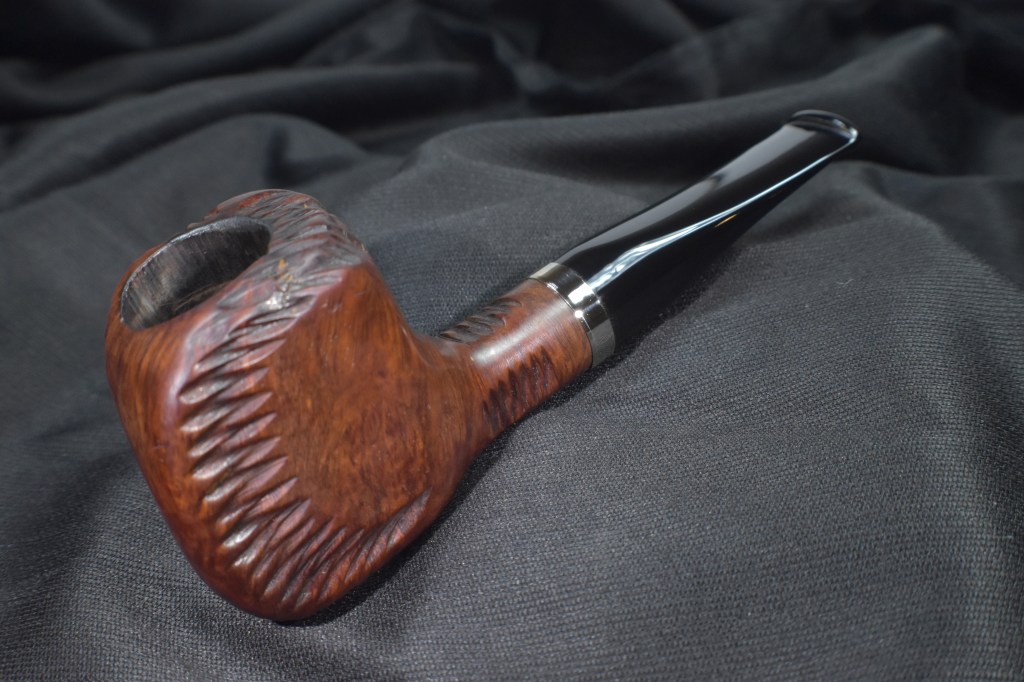
There is it,The Four Hundred by Marxman, number two. I sure would love to see an original that had been taken care of rather than the dilapidated darlings that I have come across. Not that I am complaining. I have thoroughly enjoyed spending time with the two that I’ve acquired. They are both large handfuls. Another interesting thing about the two I have is that one is quite comfortably held in the right hand while the other feels more like it belongs in the right. This Marxman is a beautiful example of a large FourHundred and though it now sports a replacement gold plated band and a replacement acrylic stem it retains all the charm of a Four Hundred. The impressive dimensions of The Four Hundred are:
Length: 5.97 in. / 151.64 mm.
Weight: 3.31 oz./ 93.84 g.
Bowl Height: 2.30 in./ 58.42 mm.
Chamber Depth: 1.84 in./ 46.74 mm.
Chamber Diameter: 0.92 in./ 23.3 mm.
Outside Diameter: 2.39 in./ 60.71 mm. (At it’s widest)
I do hope that you have found something here useful to your own pipe care, maintenance or restorations. If you like this sort of thing, please click the like and subscribe buttons. Thank you for reading the ramblings of an old pipe lover.
Below are some photos of the finished Marxman The Four Hundred.


