
Photographed and writing by
John M. Young
Here is a pipe which I had my doubts about ever possessing. I first saw the eBay auction in the spring of 2023, I think. The price was more than I was willing to spend but I was intrigued by the shape. The pipe was never sold and was relisted. This went on for numerous cycles. I eventually started making offers to the seller which met with no reply nor counter offer from the seller. I thought that I must be just offering too little to warrant a response. Well, long story shortened, after over a year of this the seller agreed to my offer and I received the pipe in July of 2024. I guess this proves that something is only worth what someone is willing to pay.
When the pipe arrived I was amazed at the detail which the photos failed to show. The stem had a matching bell shape and crack. The front of the pipe had the 1776 and 1976 pressed into the meerschaum as well as the crack. The bottom of the pipe had a stylized clapper or the “hanging ringer thingy”. Unfortunately there was no maker’s mark indicating who carved this piece of American history. Below are some photos before I began work on the pipe.


The most notable issues were the lava on the rim and the tooth dents on the top and bottom of the stem. The photos don’t show the dents well but they were there and annoying.
Background
1976 was a time, which I remember as nostalgic and optimistic. There were continuous celebrations of the 200 year birth of the nation. Lots of fireworks displays, parades and advertising all in support of the bicentennial year of our founding. From Saturday morning cartoons (yeah, that was about the only time we got them) to the minting of bicentennial coins, nationalism and patriotism were on full display. Apparently this also made its way to meerschaum pipes. I was able to find a couple of examples of Liberty Bell meerschaum pipes but none matched the shape or style of this piece.

(https://www.worthpoint.com/worthopedia/liberty-bell-meerschaum-pipe-480964941)

(https://www.worthpoint.com/worthopedia/liberty-bell-block-meerschaum-tobacco-4653030132)
With nothing to really work with I reached out to the meerschaum experts in a Facebook group I am part of. I posted photos of the Liberty Bell and said that I thought it to be from 1976 and asked if anyone could provide any additional information. Unfortunately, I did not get a response by anyone to further clarify the potential origin of this pipe.
The Restoration
I am preparing myself for some new workbench protective pieces of cloth. As this summer closes out I will be retiring a couple of pairs of cargo shorts thus I’ll be entering a new phase of workbench protection. Until then I’ll just have to deal with these rather stained denim pieces.

The below photo shows the rim of the Liberty Bell and it’s slightly lava encrustation.

Cotton swaps dipped in 95% ethyl alcohol were used to clear away this lava. I didn’t want to wear away the rustications of the carvings so a light touch was employed.

My unfamiliarity with meerschaum led me to not cleaning as thoroughly as I probably could have. My fear was that I’d overdo the cleaning and smooth the surface of the meerschaum.

The stem was cleaned with bristle pipe cleaners dipped in ethyl alcohol.

I scrubbed the stummel with warm water and a medium stiff toothbrush. The stummel was dried with a cotton hand towel and looked better than it did prior to the cleaning.

I found myself washing my hands constantly during work on the meerschaum. I did not want to have my grubby finger leaving marks on the pipe.

The two photos below show the tooth indentations better than the initial photos.


These dents needed to be filled with thin clear cyanoacrylate (CA, super glue) applied with a fly tying bodkin. If you are wondering, the CA bottle is glued to the card to make spilling less likely.

I started with the bottom side of the stem. The thin CA flows very readily and fills the surface imperfections well.

I spritzed the wet CA with a CA drying accelerator. This makes the CA cure almost instantly and gives it a rough surface texture.

The rough CA was filed with a small flat file to smooth the fill and blend it with the surrounding acrylic stem.

The fill was then sanded with a 400 grit sanding sponge.

The process was repeated for the top of the stem. Below shows the application of the CA to the dents.

Again the wet CA was spritzed with drying accelerator.

Filing and sanding of the fills was done and they were far less noticeable than before.

The stem was then sanded with a series of sanding sponges from 400-3500 grit. Between each sponge I wiped the stem with a water dampened paper towel to remove sanding debris.

After the sanding I used micro-mesh pads in grits 4000-12000 for further polishing the stem. Between these pads I applied a small drip of Obsidian Oil and wiped it with a paper towel. The fills were nearly invisible.

Top view of the micro-meshed stem.

Bottom view of the stem.

I used a double boiler type set-up to melt the beeswax. The wax sat in a small glass jar placed in a pan of boiling water. The tin to the left of the pan was used to catch the drips of wax during application and as the meerschum is heated with the heat gun.

I prepared the meerschaum for waxing by heating it with a heat gun.

The meerschaum was then covered with hot liquid wax via a paintbrush.

The meerschaum was then heated with the heat gun again and the remelted wax allowed it to drip from the pipe into the tin. The photo of this step was so blurred by me moving too much to be useful. The final step was using a paper towel to absorb any excess wax from the still hot stummel. I put on a kevlar glove here not for protection from being cut but because that was the only glove at hand. This sink and counter are used for cleaning fish on occasion, thus the kevlar glove.

The pipe was taken to the buffer where the stem received several coats of carnauba wax. The stummel did not receive any carnauba as it just got fresh beeswax.
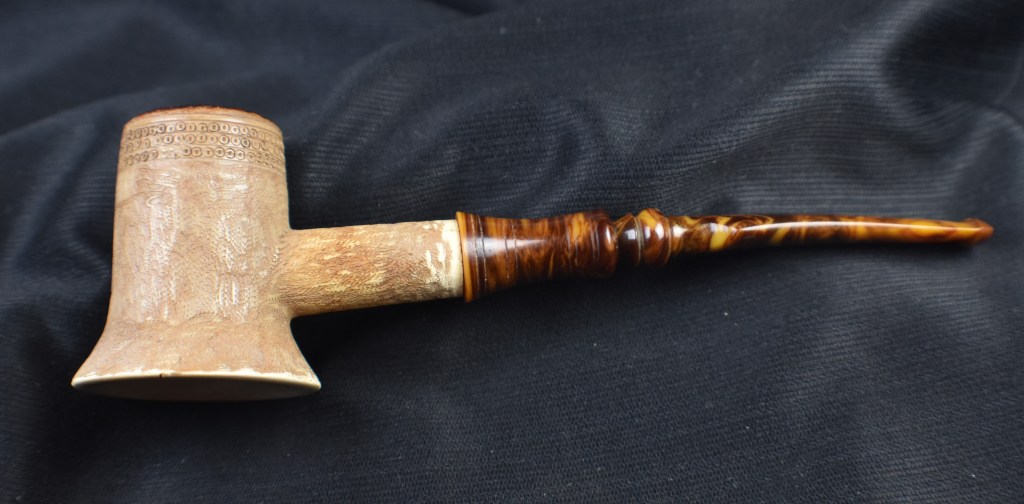
The fresh beeswax darkened the meerschaum slightly and gave it a richer color. I am very pleased with how well the fills on the stem came out. The cyanoacrylate blended in with the swirling amble to make nearly perfect fixes. I do wonder if I should have used the brown CA instead then I wonder if I’m just being too critical. The rim also bothers me slightly with the darkening of the rustications with a touch of old lava. The original Liberty Bell did not have a rusticated dome so maybe I should have smoothed this one and completely eliminated the crevasses and their blackened grooves. Oh well, none of these petty grievances detract much from this old pipe and I can attest to it being a grand smoker. The dimensions of this Liberty Bell meerschaum are:
- Length: 7.16 in./ 181.86 mm.
- Weight: 1.79 oz./ 51.00 g.
- Bowl Height: 2.15 in./ 54.61 mm.
- Chamber Depth: 1.57 in./ 39.88 mm.
- Chamber Diameter: 0.81 in./ 20.57 mm.
- Outside Diameter: 1.33 in./ 33.78 mm. (at the shank)
1.86 in./ 47.24 mm. (at the flared bottom)
I do hope that you have found something here useful to your own pipe care, maintenance or restorations. If you like this sort of thing, please click the like and subscribe buttons. Thank you for reading the ramblings of an old pipe lover.
Below are some photos of the finished Liberty Bell meerschaum pipe.


