
Photographed and written by
John M. Young
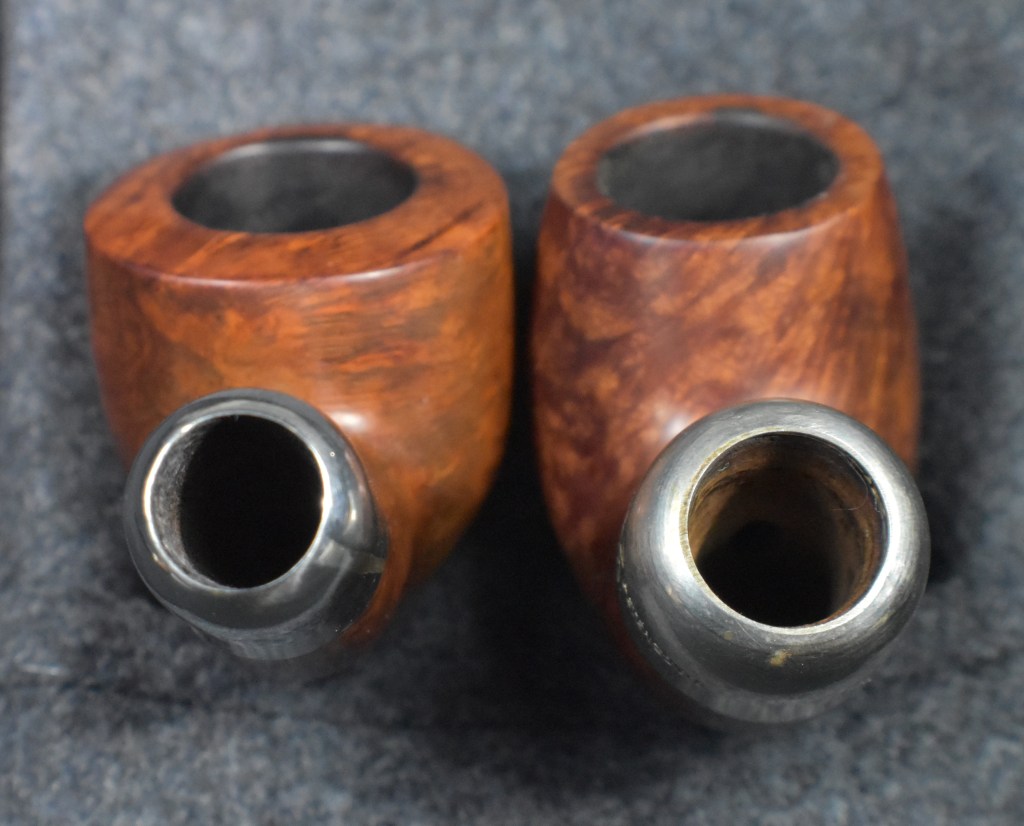
This is one of those pipes that I had always wanted to lay my hands on and restore. The novelty of these pipes are whimsical and a bit dark at the same time. I mean, who really wants to put the barrel of a pistol in their mouth? While at the same time they are fun looking and sure to draw comments from folks who observe them. A Facebook friend, Stacy Reddig, posted that he had picked up a pair of pistol pipes at a local antique shop and included photos. Once again, I was immediately jealous as I have only found two pipes at my local antique shops that were slightly interesting. Anyway, I commented that I’d always wanted to do a restoration on one of those. A couple of weeks later a package arrived. Inside was one of the two pistol pipes. Oh, this was a surprise and the highlight of my day. The pipe had only one identifying stamp, Italy. Below are some photos of the pipe prior to any work done.


I was not sure what material the pipe was made from. I had read of gutta-percha and Bakelite and knew both materials had histories in pipe making. The moldings of the pipe were of impressive intricate detail and appeared to be in great condition. There was some discoloration towards brown from what I assumed was an original black. The briar was of lesser quality judging from the number of pits and fills. The drillings were a bit irregular and out of round. The stem/button area had a few tooth marks from having been clenched. The pipe also showed typical signs of age and accumulated dirt and grime from its assumed 100’ish years on this planet. Alltold, this was going to be fun.
Background
Surprisingly little information could be found on the Italian Revolver pipe. Oh, there were plenty of revolver type marijuana or “weed” pipes as evidenced in the photo below.

(Six Shooter Pipe | Novelty Pipes | Premium Grinders)
I also found historic evidence of a revolver pipe similar to the pipe in hand on pipedia.org. This example was French made by the Colossus Pipe Factory. The information on Colossus is included below in its entirety:
“There is not much known about the Colossus Pipe Factory. By the mid 1890’s it was owned by Kaufmann Bros. & Bondy. Bill Feuerbach has an old invoice from KB&B dated 1898 that has “C.P.F.” in the upper corner, with Trademark underneath. So they owned the brand by then. It could have been a company that was acquired by KB&B or possibly even founded by them.
Bill is a VP at S. M. Frank & Co. (Kaywoodie) and has also provided the evidence to the name Colossus below.
I have always been under the impression that the intials C.P.F. stood for Consolidated Pipe Factory. Many pipe collectors that I know believe the same thing. However only this week I had that cleared up. A pipe collector friend in Seattle emailed a scan of a page from a trade magazine called “The Jeweler’s Circular”, dated August 23, 1899. A reader wrote in the following question, “Please inform us who manufactures briar pipes with trademark, C.P.F.?” The answer was, “These letters stand for Colossus Pipe Factory, the business being conducted by Kaufmann Bros. & Bondy, 129 Grand Street, New York.”
I have seen pipes with both the C.P.F. logo and KB&B logo on them that date to pre-1900. This may have been a way to let the public now that the companies were affiliated. As far as I can tell, the C.P.F. brand was discontinued sometime in the 1910-1920 range.
— Don Gifford 16:50, 18 August 2009 (UTC)” (Colossus Pipe Factory – Pipedia)
The piedia.org entry did have two photographs of their version of the Revolver Pipe.

(Colossus Pipe Factory – Pipedia)

(Colossus Pipe Factory – Pipedia)
It has been said that imitation is the sincerest form of flattery. The thing that many people do not realize is that that saying is incomplete. The entire quote is often attributed to Oscar Wilde and should read, “Imitation is the sincerest form of flattery that mediocrity can pay to greatness”. There is quite a bit of discussion about the origins of this quote and that it is not due to Oscar Wilde. If you would like to read about that, I included the link to a blog by Terence Eden, here. Whomever first said it, matters little to me. The point I’ll emphasize is the mediocrity of the imitation solely, based on the quality of the briar. Now this could also be the case where the Italian maker was indeed the first and CPF merely imitated their original. Without any documentation proving otherwise I’ll have to consider CPF as the originator and the poor little Italian Revolver as the imitator. As for the date of production, I would hazard a guess to the later 1920s-1940s.
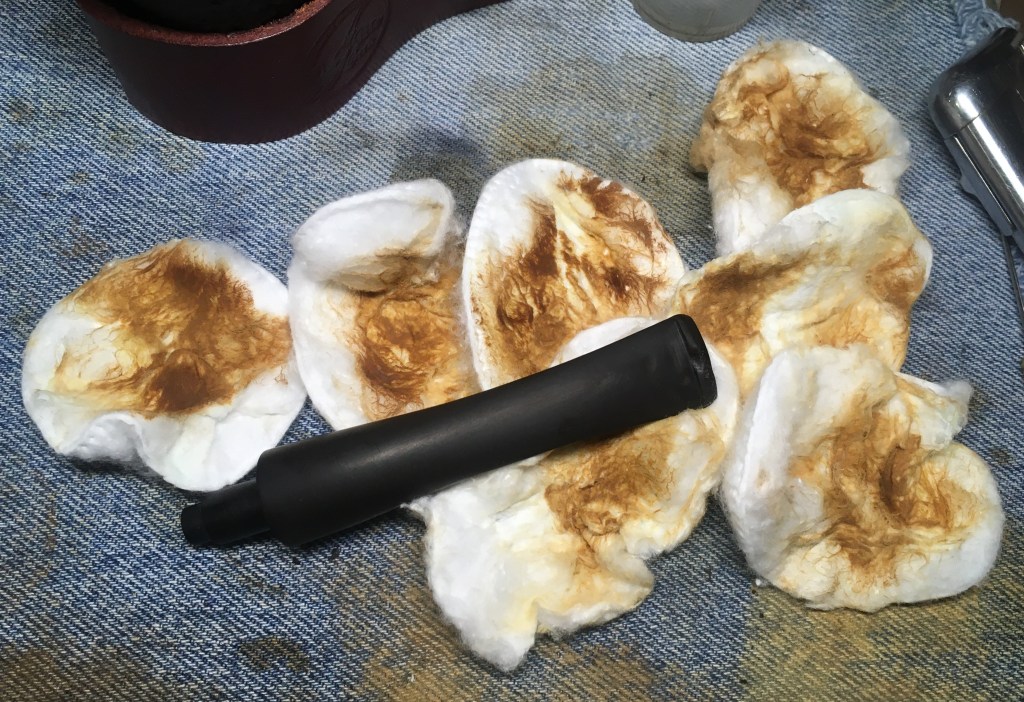
The final question I had was,”what is the body of the pipe made of?” Materials of the era would have most likely been gutta-percha or Bakelite. Gutta-percha was an older latex derived early plastic which was used from the 1840s-early 1900s (gutta-percha history). According to wikipedia, “Bakelite was one of the first plastic-like materials to be introduced into the modern world and was popular because it could be moulded and then hardened into any shape.” (https://en.wikipedia.org/wiki/Bakelite). An easy test to see if a plastic is Bakelite is to slightly moisten a cotton swab with water and touch it to baking soda, rubbing this on the surface of Bakelite will produce a yellow or brownish-yellow smudge on the cotton swab. I tried this and the cotton was indeed yellow-brown. Positive test? Yes. Positive identification of Bakelite? No, but quite probable.
The Restoration
As usual I started with a cleaned denim piece to protect the work surface.

Reaming the tobacco chamber was the first job undertaken. The PipNet blades #1 and #2 did the job nicely.

The interior of the chamber was sanded with 220 sandpaper wrapped around a wood dowel. There was no indication of any damage to the chamber.

Unscrewing the bowl from the body of the pipe revealed a piece of fabric. Under this fabric were several pieces of what looked like charcoal.

The fabric and charcoal were removed.

The airway was cleaned with bristle pipe cleaners dipped in 95% ethyl alcohol.

The pipe was then taken to the sink for a scrubbing with a nylon brush and undiluted Murphy Oil Soap. The soap was rinsed with warm water and the pipe dried with a cotton hand towel.

Back at the workbench the pipe looked clean but now had a dry, oxidized appearance to the Bakelite.

I tried to clean the surface of the pipe with a cotton swab wetted with ethyl alcohol.

To get in the smaller crevasses I also used a bristle pipe cleaner.

The molding seams or ridges were filed with a small rat tail file to make them less noticeable. These were sanded with a 400 grit sanding sponge to further smooth the surfaces.

The old fills were soft and very light colored. I picked the old fill material out with a fly tying bodkin.

New fills would be done with brown cyanoacrylate (CA, super glue) and briar dust.

The fly tying bodkin was used to apply a small drop of CA to the pit. Briar dust was then piled onto the wet CA and pressed into the pit.

The cured CA/briar dust fill was then filed with a small flat file and sanded with a 400 grit sanding sponge. For deeper fills I used a second application of CA and briar dust.

The new fills were hard and secure but do stand out as dark spots on the stummel.

The bowl was then sanded with a series of sanding sponges from 600-3500 grits. Between each sponge I wiped the bowl with a make-up pad wetted with alcohol.

The button and mouthpiece area were sanded with a series of sanding sponges from 600-3500 grits, to remove the tooth chatter and to smooth the stem. I did not want to sand the other surfaces of the Bakelite in fear of rounding the edges.

The bowl and mouthpiece area were worked with micro-mesh pads 4000-12000. Between pads I wiped the bowl with an alcohol wetted make-up pad. The Bakelite was wiped with a paper towel between pads to remove debris. I did use the micro-mesh pads on the flat surface of the barrel and the top of the pistol.

I used Before and After Fine Polish, which is a fine abrasive buffing polish on a cotton swab to polish the surfaces of the Bakelite. I could have sworn that I photographed this but could find no photos as I transferred the photos to the computer. Darn old people or gremlins…
The entire pipe was given a coating of Before and After Restoration Balm and allowed to sit for an hour.

The remaining Restoration Balm was hand buffed from the pipe with an inside out athletic sock. The pipe was then taken to the buffer where several coats of carnauba wax were applied to the bowl. The pipe was hand buffed with a microfiber polishing cloth as a final step.
Overall I am happy with how this pipe cleaned-up. The bowl looks much better. I cannot say that I am pleased with the brownish looking pistol parts of the pipe. I am uncertain how to clean and polish Bakelite without damaging the detail of the piece. I thought about using a buffing wheel with a buffing compound on the Dremel rotary tool but again feared that I would inadvertently remove detail from the molding. If this were my own pipe, I might have taken more risks with the material. It was a fun little project and another pipe which I can remove from the list of “pipes I want to restore”. The dimensions of the Italian Revolver pipe are:
Length: 5.09 in./ 140.46 mm.
- Weight: 1.57 oz./ 44.51 g.
- Bowl Height: 1.58 in./ 40.13 mm. (bowl only) 2.75 in./ 69.85 mm (connected)
- Chamber Depth: 1.08 in./ 27.43 mm.
- Chamber Diameter: 0.74 in./ 18.80 mm. (Conically bored diameter is at the top)
- Outside Diameter: 1.22 in./ 30.99 mm.
I do hope that you have found something here useful to your own pipe care, maintenance or restorations. If you like this sort of thing, please click the like and subscribe buttons. Thank you for reading the ramblings of an old pipe lover.
Below are some photos of the completed Italian Revolver pipe.


 well, it was not much to go on and it looked like a stretch but, follow it, I did. The link was to a French pipe maker LMB. The only text was the following and it appears roughly translated from French to English: “From Les Pipiers Français — Histoire et Tradition. Gilbert Guyot


 (
(


Leave a comment