Have you ever wondered how to use the terms Dutch, Holland or the Netherlands? Well, this pipe may help. The pipe was made in Holland, two of twelve provinces of the country known as the Netherlands. Yeah, there are two Hollands, a north and a south. The makers of the pipe were Dutch, referring to the culture and language of the region. Okay, I have shown off my undergraduate geography major for four years quite enough for one day.
This pipe caught my eye on eBay recently. I was taken by both the shape and the price. I immediately sent Sascha Mertens a private message via Facebook, asking if it was a good deal. He replied quickly, as usual, saying that it was indeed a good deal for a relatively rare and desirable shape. He had me at “good deal”. I can’t say I place too much emphasis on popular things, I know what I like. While we are talking about Sascha, he keeps me laughing with his complaints of purchasing pipes that are very clean. Yeah, he complains when a pipe is too clean and does not provide him with the opportunity or challenge of cleaning them up himself. This pipe is a wonderful example of that. I think it had only been smoked once. I now completely understand Sascha’s disappointment. Below are some photos of the Big Ben 702 before I did any work, if you can call it that, on it.
The pipe was nearly brand new. There was some unsmoked tobacco remnants in the bowl and a very minimal residue on the rim. I cannot even call it lava. The stem was slightly oxidized due to age with maybe a few light tooth marks. The only other thing to complain about was a slight wax build-up in the beading. This was going to be an “easy button” restoration.
The next search was on pipedia.org. Here too, the entry was lacking specificity for the Classic Line. Well actually it was lacking pretty much everything stating only, “The brand name Big Ben was originally owned by a small trade company in Amsterdam which was already well established in several countries selling pipes among other goods. The firm was bought by Elbert Gubbels & Zonen B.V. – see Gubbels – who were in search for a suitable brand name to further expansion on international markets.
I did follow the link from pipedia.org to the Gubbbels’ website: Want to buy a Big Ben pipe? The best tobacco pipes since 1870 – bigben. This site was a nice shopping and informational site. I found the most impressive thing was that they opened the workshop up to the public every Friday from 10:00am-4:00pm. Here in the US, that would likely meet with stern warnings from Occupational Safety and Health Administration (OSHA).
“Our store is open every Friday! We cordially invite you to take a look at our production workshop. In our store you will find a wide range of Big Ben pipes in all shapes and colors. If your ideal pipe is not listed, we may be able to manufacture a pipe especially for you! Light maintenance of your beloved old pipe can usually be done on site.
Making a pipe requires craftsmanship, a lot of fingerspitzengefühl and experience in working with the unpredictable and capricious material: the root of the Erica Arborea, better known as briar wood. Formed by the rocky bottom of the Mediterranean region, this noble and beautifully textured wood contributes its 50 to 80 years of growth to the value of the pipe. We are proud to be able to tell you the whole story – from carrot to tobacco pipe!
We are open every Friday from 10:00 am to 4:00 pm. On all other days you can visit us by appointment.
There was also a very nice history of the company and a look into their future. It is quite detailed so I will not include it here but this link will take you there if you are interested in a very interesting history.
The Restoration
The restoration began with a clean denim piece which I felt certain would remain clean upon finishing.
I lexamined the tobacco chamber more closely under the bright lights of the workbench. Only smoked once or twice, was my conclusion.
The look down the mortise reaffirmed my thinking.
The reaming of this tobacco chamber only required a brass bore brush, from a 20 guage shotgun and a light scrape from the Smokingpipes Low Country reamer.
I swabbed out the chamber with an alcohol dipped cotton swab. Below you can see that the reaming only produced a tiny bit of carbon and a few flakes of tobacco.
The shank was cleaned out using 99% ethyl alcohol on cotton swabs. These too, came back with little grime.
The stem was cleaned with alcohol and a bristle pipe cleaner.
I used a dental scraper to clear the majority of the wax that was built-up in the bead around the bowl.
The light residue on the rim was removed with saliva and a cotton make-up pad.
I took the stummel to the sink for what was probably an unnecessary scrubbing with undiluted Murphy Oil Soap and a nylon brush. Some habits are hard to break. The soap was rinsed with warm water and the stummel dried with a cotton hand towel.
Back at the workbench, the stem had a slight residue, likely from the airway cleaning.
I rubbed the stem with alcohol on a make-up pad and did get some oxidized vulcanite from the surface.
The stem was taken to the buffer where it was buffed with a blue buffing compound. This removed any additional oxidation along with the slight tooth chatter. It also dulled the bright silver of the stem logo.
To replace the silver, I used Silver Leaf Rub’nBuff. Before applying the fresh silver, I cleaned the logo with a cotton swab dipped in alcohol.
The silver leaf was applied and hand-buffed with a soft cotton cloth.
The resulting fresh silver was back to its original bright finish.
The pipe was given several coats of carnauba wax with the buffer.
The final step was another hand buff with the microfiber polishing cloth.
This beautiful Big Ben Classic Line 702 did not need very much work. I love the shape and the balance of this pipe. It fits my hand well and clenches like a dream. The contrast dye was well done at the factory and really accentuates the briar. THe bright nickel accent on the stem goes very nicely with the silver stem logo. This is just a classy comfortable pipe that I am glad to add to my personal collection. The dimensions of the Big Ben Classic Line 702 are:
Length: 4.74 in./ 120.40 mm.
Weight: 1.48 oz./ 41.96 g.
Bowl Height: 1.97 in./ 50.04 mm.
Chamber Depth: 1.57 in./ 39.88 mm.
Chamber Diameter: 0.68 in./ 17.27 mm.
Outside Diameter: 1.63 in./ 41.40 mm.
I do hope that you have found something here useful to your own pipe care, maintenance or restorations. If you like this sort of thing, please click the like and subscribe buttons. Thank you for reading the ramblings of an old pipe lover.
Loading…
Below are some photos of the finished Big Ben Classic Line 702.
Well here I go again on another Custom-Bilt crusade. I’m not sure why the Custom-Bilt pipes have such a following. They are good smoking pipes and are uniquely carved but there has to be more to it than just that. There were numerous pipes made during and after World War Two which are arguably better made with better quality materials. Perhaps it is in part due to the writing of William E. Unger, Jr., Ph.D. His well written book, “Individual as a Thumbprint” The Custom Built Pipe Story is very well researched and provides a great deal of information about the maker, Tracy Mincer and the company Custom-Bilt. Perhaps it is this personal history which draws collectors to the pipes setting them apart from other impersonal brands of factory made pipes. For whatever reason, I was drawn to this Listing. The fact that I won the auction for less than $12 had nothing to
do with it… Okay, that is a load of bologna sausage (BS), I’m admittedly a tightwad. I had purchased from this seller previously and was quite happy with this purchase. The pipe made its way from Kentville, Nova Scotia to the wilds of southeast Nebraska and into my hot little hands. Below are some photos of the pipe before any work was done.
The stummel looked to be in good condition. The stem was the issue and was probably what caused the bidding to be favorable to my bidding. It was severely oxidized and had a large hole in the button. I remained hopeful that I could repair the stem or fit a suitable replacement. Either way this old pipe was not destined for the dustbin, it would live for another generation of pipe tobacco lovers.
Background
Being a proud member of Generation X and prone to the slackard description that accompanies my generation, I will include the background from a previous Custom-Bilt restoration. You can find that one here.
“The standard starting point for researching a pipe typically includes pipedia.org. The query of Tracy Mincer, originator of Custom-Bilt, will take you to this brief entry:
“Tracy Mincer started the original Custom-Bilt pipe company in 1934. In 1946, the name was changed to Custombilt after Mincer began an association with Eugene J. Rich, Inc. There were some big changes in advertising and distribution. The slogan “AS INDIVIDUAL AS A THUMBPRINT” began at this time as well.
In the early 1950’s, Tracy Mincer developed severe financial problems that caused him to stop making the Custombilt, and he lost the name. n 1952, Mincer began a new pipe, The Doodler, that due to the holes in the bowl had to made primarily in a billiard type shape in three sizes. In the early 1950s, National Briar was turning the bowls for Mincer. Based upon the documentation, it appears that Mincer made the pipe until the mid 1960s, when National Briar Pipe Co., Inc. began making and selling the Doodler.
Mincer died in 1964. Based upon the information provided, Mincer seemed to always have money, production, distribution and other problems. Mincer was probably a terrific craftsman but a very poor businessman and administrator. To me, Mincer sounds like your typical small business entrepreneur who always knew what was right and if you disagreed¼problems. Mincer always seemed to be on the brink of going out of business, not meeting payroll and so on.
Claude Stuart purchased the Tracy Mincer Pipe Company and began making pipes using the Tracy Mincer stamp. Stuart finished nearly all the pipes produced, mostly carved and textured bowls and the occasional straight grain. Claude made the Tracy Mincer Pipe Company a moderate success. Stuart became ill and in 1990 The Tracey Mincer Pipe Company went out of business. Currently, Jim Tedesco owns the Tracy Mincer name.
These interesting examples bellow are pipes made with the Tracy Mincer stamp. If you any additional information about these pipes, or can otherwise add to the history of this interesting pipe man, please add it here, or send it to sethile.pipes@gmail.com, and we can add it for you.” (Mincer – Pipedia).
There is a book written by William E. Unger, Jr.,Ph.D titled “As Individual As A Thumbprint”: The Custom-Bilt Pipe Story. This book appears to be self published by Dr. Unger at The Graphic Touch, of Columbus, Ohio. Printed in 2001 and bound with a black plastic spiral, the book states that the entire contents are “All rights reserved…without permission in writing from the author”. Dr. Unger passed away January 1, 2013 (obituary: https://www.legacy.com/us/obituaries/dispatch/name/william-unger-obituary?id=12197453) and the book is no longer in print. This unfortunately means that I will not be including any quotes from the book. We’ll see how I get around that, I guess. I got lucky and purchased a copy from eBay for under $30 (with shipping) earlier this year, after watching several copies sell for what I considered astronomical prices. The book is a remarkable piece of work and is the definitive history of the Custom-Bilt pipe. The research that Dr. Unger put into getting the story correct is amazing. Fortunately there were several past employees, friends and relatives associated with Tracy Miller and the company that were able to give interviews and explanations to the inner workings of the company.
In regards to the stamps on the pipe in hand, I will speak to what I have found in Unger’s book, without quoting any of it. The first thing that needs clarification is the Custom-Bilt vs. Custombilt name. I’ll paraphrase William Unger here, the first stamps used by Tracy Mincer were “Custom-Bilt”. These were used from 1938-1946 definitively and less definitively prior to 1938. You could, perhaps, find reference to this in the book on page 91. There, I think that should give me legitimacy and keep any lawyers at bay. Next we examine the IMPORTED BRIAR stamp on the bottom of the pipe. Unger states that he has inspected a large number of Custom-bilt pipes and that about ½ of them do not have this stamp. He declares that he is at a loss to explain either their absence or presence This lack of explanation might be seen towards the bottom of page 114. The final stamp on this Custom-Bilt is the geometric circle stamped on the shank. Certainly these stamps have some utilitarian meaning. Nope. Unger declares that he is not able to explain any system where shapes such as circles, triangles, stars, rectangles, half moons or even trapezoids have any systematic meaning. This may or may not be seen on the top of page 114.
Pipephil.eu does allow quotations with proper referencing and shows nice examples of the above-mentioned geometric stamps.
Regarding the specific pipe of this restoration, I believe it to be one of the Custom-Bilts made between 1938-46 due to the “Custom-Bilt” stamping. I cannot discern any IMPORTED BRIAR stamp nor any geometric shape.
The Restoration
As usual the pipe went from the photo table to the workbench and received a clean denim piece.
The stem was the place where I decided to start. Mainly because it was the part that would need the most work. The stem was cleaned with bristle pipe cleaners dipped in 95% ethyl alcohol.
The stem was lightly sanded with a 320 grit sanding sponge.
Next, the stem was submerged inBriarville’s Pipe Stem Oxidation Remover. This would be a real test for the relatively new-to-me solution.
I placed a pipe cleaner in the tenon for easy removal.
I left the stem in the Briarville oxidation remover overnight. The next day the stem was removed.
A vigorous rubbing with a coarse shop rag removed some of the oxidized vulcanite and can be seen on the rag below.
Back at the workbench the stem looked far better.
I wanted the stem and stummel intact during sanding to keep the joint where the two pieces met nice and unrounded. To do this I wrapped the shank with painters tape.
In the photo below you can see where I wiped the sanding debris from the sponge onto the denim. Notice the color difference. The lighter colored debris was from the stem before the Briarville solution whereas the darker debris on the sponge is from after the solution.
I sanded the button zone with the 320 grit sponge. This was to roughen the stem for better adhesion of the epoxy and cyanoacrylate (CA) that I planned to use to rebuild the button.
Below is a photo of my idea: I wanted to use the slot cutting bit with a Dremel rotary tool to cut a slot into the button. I would then cut a piece of 2 mm brass rod/pin to span the broken piece of the stem. This pin would be held in place by black epoxy resin. The epoxy would also be used to fill in the void.
Below is a slightly different view of the dremel bit.
Below is how I imagined the placement of the pin in regards to the button.
I used the Dremel to cut a groove in the button.
The same cut from the side.
The pin was cut with pliers and the ends of the pin were filed to a taper. This pin was set into the groove.
Below a view of the button from the front with the pin in place. Sorry about the poor focus.
JB Weld was the black epoxy that I used because that was the product I had on hand.
To keep the epoxy only in the areas where I wanted it, I used a “dam”.. This dam was a piece of plastic lid cut to fit the stem. The dam was coated with petroleum jelly to keep the epoxy from adhering to it. I laid a bead of epoxy in the groove and placed the pin into the epoxy. Additional epoxy was added to the top of the pin and to the hole. The dam provided a floor for the epoxy to rest on. The JB Weld sets up within 15 minutes so I was able to allow it to firm up and then add additional epoxy before the whole mix became unworkable.
Below you can see the rebuild button on new epoxy, the filled hole and the incorporated pin.
After about 30 minutes I removed the dam.
The pin was completely encased in epoxy. My idea was that this would provide the rigidity needed to withstand a significant bite while retaining the correct shape.
The epoxy had solidified enough to hold its shape yet was soft enough to allow me to cut the excess off with a sharp knife.
I allowed the epoxy to sit and harden for 24 hours. I know the packaging says an hour but I wanted it hard enough to sand and work with a file.
The top and bottom were filed. I applied black CA to the top of the epoxy patch in an attempt to blend the repair better to the original stem and to build-up the button. Once cured this was again filed and sanded smooth.
Below you can see the scar from the repair during the sanding.
The stem was sanded with a series of sanding sponges from grits 320-3500. Between each sponge I rubbed Obsidian Oil onto the stem and wiped it with a paper towel.
Once sanded I took the stem to the buffer and worked it with rouge compound on the rouge wheel.
I repeated the buffing using white buffing compound on the dedicated white wheel.
The stem looked good in the sunlight.
This was now two days into the restoration. Far more than usual and I still had not started work on the stummel. I gathered the reaming kit.
The tobacco chamber was surprisingly well kept. The PipNet’s #2 and #3 blades removed the majority of the cake only requiring a little bit of clean-up scraping with the General triangular scraper.
The airway on the shank was far less well kept. I swear the camera didn’t even want to witness the tar deposits. Okay, I did a crappy job photographing it but you can see the amount of scraping and the yuck that was removed.
The shank was nowhere near finished and I decided to switch gears and maybe soften things up with warm water. The Exterior of the stummel was about as dirty as the airway. I scrubbed the stummel with undiluted Murphy Oil Soap and a brash brush.
The soap was rinsed with warm water and the stummel dried with a cotton hand towel. The stummel still looked dirty, especially in the grooves. I repeated the Murphy Oil Soap scrub 2 more times with a nylon brush.
Back at the workbench I scrubbed the stummel again using the nylon brush and 95% ethyl alcohol then wiped the stummel with a make-up pad and more alcohol.
Okay, back to the airway. I wanted to see if a cotton-alcohol treatment would help dissolve some of the tar in the airway. The bowl and shank were packed with cotton.
About 10 ml of 95% ethyl alcohol was added to the cotton with a disposable pipette. The cotton was saturated with alcohol. The plan was to let this sit overnight.
Time to go fishing.
After fishing the cotton and alcohol had done a little bit of tar removal but things were still damp.
I decided to apply a coating of Before and After Restoration Balm and let that sit overnight as well.
The next morning the cotton alcohol treatment looked like the below two photos.
The Before and After Restoration Balm was hand buffed with an inside out athletic sock.
With the excess balm removed I next removed the cotton from the stummel.
The cotton and alcohol had done a good job at softening and removing the tars. I repeated some of the scraping, to little avail, and continued scrubbing with cotton swabs and a shank brush both dipped in alcohol.
The pipe was reassembled and taken to the buffer for several coats of carnauba wax. Because the carvings were not deep nor too jagged I thought that carnauba would not build up too badly in the grooves.
The final step was a hand buffing with a microfiber polishing cloth further deepening the shine.
Another Lovely thick walled Custom-Bilt is ready for many more years of use. The rusticated briar cleaned up well and really looked good after the Before and After Restoration Balm worked its magic. The stem repair worked quite nicely and left a hardly noticeable scar. The oxidation removal was not perfect leaving some areas of brown smudgeness. This can only be seen under very bright light. I was glad that the stem was salvaged and made strong again with the brass pin incorporation. The stamping did remain legible though here a bright light is an asset, at least for my old eyes. The old cigarette burn on the shank was left alone as I did not want to sand and alter the carvings on the shank. This will be a battle scar or a symbol of character. The dimensions of the Custom-Bilt Taper Stem are:
Length: 5.99 in./ 152.15 mm.
Weight: 1.73 oz./ 49.05 g.
Bowl Height: 1.97 in./ 50.04 mm.
Chamber Depth: 1.59 in./ 40.39 mm.
Chamber Diameter: 0.79 in./ 20.07 mm.
Outside Diameter: 1.64 in./ 41.66 mm.
I do hope that you have found something here useful to your own pipe care, maintenance or restorations. If you like this sort of thing, please click the like and subscribe buttons. Thank you for reading the ramblings of an old pipe lover.
Loading…
Below are some photos of the finished Custom-Bilt Taper Stem.
I love it when an attractive pipe comes across the bench that is stamped with a rather obscure maker. In this case S. Johnson and SFJ on the stem as well. Pride in workmanship and putting one’s name on a pipe is something that I find interesting. I’d never heard of S. Johnson and I have to say that this pipe was not the focus of purchasing the estate lot which it was featured in. The entire lot looked interesting and I couldn’t believe that I was the only bidder. Below is the original eBay listing photo.
The lot came to me from Ipswich, Massecheutets (dang, I can’t believe I spelled that right the first time) in mid-January of 2025. I guess not everyone gets excited about oxidized broken pipes with one missing a stem. The S. Johnson pipe had a broken acrylic stem and a reverse tenon. The stampings on the pipe were: S. JOHNSON over XXQ offset 8 on the left shank, HANDMADE over U S A on the right shank and SFJ stamped on the stem with a gold paint filling the impressed stamping. Below are some photos of the S. Johnson pipe prior to work. I was trying a white background for the initial photography of this restoration. I am unsure but generally not liking the white. Please feel free to comment.
The issues with this pipe seemed to increase upon close examination. The obvious ones were the chipped mortise and tooth marks on the stem. The plug on the bowl would require some serious investigation regarding the condition of the tobacco chamber but it looked as if it were professionally done. The reason why it was done is the thing which worried me. The exterior of the stummel looked great. I guess I need to focus on the positives and be glad I don’t have to worry about oxidized vulcanite.
Background
I was glad to see that there was information on S. Johnson on both of my “go to” pipe researching sites. I first found him mentioned on pipephil.eu. There I discovered the S. stood for Steve. Below is the pipephil.eu information.
Research stop number two was pipedia.org. Here I found a short entry and have included it in its entirety:
“Steven Johnson made his first pipe at the age of 9, as a friend had accidently dropped his pipe in a stream while fishing. This is according to an article in the Boca Raton News on May 16, 1982. It says further that by the age of 20 he had become a master pipe maker. He worked as the manager of the E. Wilke pipe shop, since 1977 was located in a large department store called John Wanamakers in Philadelphia. For his own pipes he’s reported to have produced 3 pipes a day, 6 days a week. His pipes are rare to find and are marked S. JOHNSON.
Richard Esserman, in an article entitled “Pipe Travels”, wrote of meeting Steve Johnson in 1978 at Wanamaker’s. At the time Johnson made pipes for Wilke’s in a small room right in the middle of the department store. The two became friends, and Esserman comments on one pipe going to the Wilke shop in New York City with an asking price of $500.00, a substantial sum in those days for any pipe.
In “Trial By Fire”, an article in Pipes and Tobaccos magazine by William Serad and Tad Gage, Mr. Serad speaks of Steve Johnson working as the manager of the satellite store in Philadelphia in the early 1970’s, and again offers great compliments to Mr. Johnson’s work.
Mr. Johnson is believed to have moved on from the Philadelphia Wilke’s shop to working for Zino Davidoff.
Markings: No. 1 BROAD STREET, (J.W), MADE IN ENGLAND (round stamping) made in the 1930’s-40’s timeframe reportedly by Comoy’s for the tobacco shop in the John Wanamaker department store in Philadelphia, located at No. 1 BROAD STREET. It’s stamped with the (J.W) logo and the early 1930’s-40’s circular MADE IN ENGLAND country of manufacture stamping. Here’s some info on the stamping from Trademark history: J.W. On Tuesday, April 18, 1933, a U.S. federal trademark registration was filed for NO. 1 BROAD STREET by JOHN WANAMAKER PHILADELPHIA, PHILADELPHIA. The USPTO has given the NO. 1 BROAD STREET trademark serial number of 71336921. Made for them by Comoy’s. The NO. 1 BROAD STREET trademark is filed in the category of Rubber Products . The description provided to the USPTO for NO. 1 BROAD STREET is SMOKING TOBACCO.” (Steven Johnson – Pipedia)
The last paragraph there was pretty much discussing the building that the pipe shops were in. I did not include the images as this blog is already a long one. So, Steven Johnson must have been a pipe making progeny and he got to live the dream of making pipes and working in pipe shops throughout the 1970s. If any of you would like to make this S. Johnson yours for $500, PLEASE say something in the comments. In all seriousness I’ll sell it for far less than $500.
The Restoration
The first step was to poorly focus on the S Johnson while it sat on a cleaned denim piece.
Next came the evaluation of stem banding material. I checked available spent cartridges for the correct size, thinking that one might look cool and the more traditional brass tubing. The diameter needed was .50 inches which coincided nicely with a 300 Winchester Short Magnum that I picked up somewhere.
The rifle case was tarnished but would polish up nicely. The question was, how to bore out the interior to fit the stem. Hmm, good thing I don’t have a lathe (said with extra sarcasm). I do know a great machinist though. I will call him Christian, because that is his name. I have employed the use of Christian’s unique skill set on other restorations here and here, if you are interested. More on Christian in a bit.
The stem had a large chip removed due to a previous break. My thought was to add a “band” to the stem, thus concealing the chipped portion and also filling it with epoxy within the band.
While considering the stem repairs I proceeded on to reaming the tobacco chamber. The tools needed were the PipNet, Smokingpipes Low Country Reamer and the General triangular scraper.
The pipNet with the #2 and #3 blades worked well for the deep chamber but (dramatic pause)
there was a good deal of extra scraping that required the General.
Eventually the chamber looked pretty well reamed. There was charring damage observed within the tobacco chamber. It was not severe but it was an issue which would require attention.
Next, the lava on the rim was addressed.
This was softened with saliva and scraped with a sharp pocket knife.
The stummel was taken to the sink for a scrubbing with undiluted Murphy Oil Soap and a nylon brush. The soap was rinsed with warm water and the stummel dried with a cotton hand towel.
Back at the workbench the stummel was wiped with 95% ethyl alcohol on a make-up pad.
The shank was cleaned out using numerous bristle pipe cleaners dipped in the ethyl alcohol and a nylon shank brush.
I had reached out to Christian to ask when he would be available to assist with this project. The date was February 4. The project was put on hold until February 25 when I could make it to Christian’s new machine shop. Once there I showed him what my thoughts were regarding the band. He immediately thought that the cartridge would make a cooler looking band than the brass tubing or, maybe he relished the greater challenge of the cartridge.
The cartridge was measured and cut using a lathe. The edge was then slightly beveled.
I neglected to photograph the next steps, I know, loser move. I will try to explain them. A boring bar was used on the lathe to bore out the interior of the cartridge giving it an equal inside diameter with a flat bottom. This bottom would be the resting place for the end of the acrylic stem. The outside diameter of the tenon was measured and an appropriate drill bit was selected. The primer pocket was enlarged to .25 inch. The brass was then polished on Christian’s buffer.
Back at home I assembled the stem and fit it to the stemmel. Everything looked like it was coming together nicely.
Below are a couple of photos of the parts at this juncture.
I needed to build up epoxy to replace the chip on the stem. I found a surrogate stem which fit the mortise of the real stem nicely. This was greased with petroleum jelly to avoid the epoxy from sticking.
The surrogate was inserted into the stem. This would prevent the epoxy from getting in the hole meant for the tenon insert. The two part epoxy was mixed and added to the chipped area. I had to continuously rotate the stem for about 15 minutes while the epoxy was setting up.
Once the epoxy had set I removed the surrogate.
It would take the epoxy a full 24 hours to completely harden but the chip had been filled. While the epoxy was still soft I used an exacto knife to trim the edge flush with the original edge.
I could work on the tooth chatter while the epoxy was curing. I cleaned the top and bottom of the bite zone with acetone.
Once cleaned, I used Thin clean cyanoacrylate (CA, super glue) to build up the tooth dents.
This was repeated on the opposite side of the stem.
The CA was allowed to cure then was filed with a small flat file and smoothed with a 400 grit sanding sponge.
Additional applications of This CA were used until the depressions were completely filled.
The airway of the stem was then cleaned using pipe cleaners dipped in 95% ethyl alcohol.
With the epoxy on the stem needing time to completely harden, I returned to working on the stummel. The rim had some charring that I wanted to remove. This was done by lightly topping the pipe.
A piece of 220 sandpaper was laid flat on the counter and the rim sanded using a figure 8 motion. I rotated the stummel in my hand and repeated the sanding a few times.
The topped rim looked much improved.
The next day I couldn’t help but think I was mistaken about the reverse tenon of this stem. I gripped the tenon insert with a jaw-taped pliers and gave it a twist. The tenon insert came out. I felt kind of dumb for not realizing that the tenon of this pipe was completely normal and that the tenon insert was not reverse but that the broken stem had merely released the gluck holding the tenon insert in the stem. DOH!
I used the two drill bits in the above photo to clear and clean the hole in the stem. The brass was roughened up with a piece of 80 grit emery cloth to allow epoxy to better adhere.
The tenon insert was test fitted to the stem. The airway looked very nice and clear.
The tenon insert was roughened up with the emery cloth again to allow better contact with epoxy.
The brass was thoroughly cleaned with acetone. The epoxy was mixed and applied to the tenon insert and to the brass.
The tenon insert was seated into place.
A pipe cleaner was run through the airway from the button out through the tenon insert to clear any epoxy which may have intruded.
The excess epoxy was removed using a cotton swab then was wiped clean with a soft cotton cloth wetted with acetone.
Next came the sanding of the briar. The stamps were both masked with painters tape for their protection.
The tape was cut in slightly irregular shapes to better conceal the lack of sanding immediately around the stamps.
The inner rim was beveled by sanding it with a small wood ball wrapped in 220 sandpaper to mask the slight rim charing.
The exterior of the stummel was sanded with a series of sanding sponges from grits 400-3500. Between each sponge the stummel was wiped with a make-up pad moistened with ethyl alcohol.
The stummel was then worked with micro-mesh pads from 4000-12000 grit. Between each pad the stummel was wiped with an alcohol wetted make-up pad.
The stummel received a coating of Before and After Restoration Balm and was set aside for 15 minutes to allow the balm to work its magic.
The excess balm was wiped away with an inside out athletic sock.
The brass and stem were buffed using white compound on the buffer.
I wanted to revitalize the gold which the stem logo had. I used Run’nBuff Gold Leaf for this. The metallic wax was applied with a fly tying bodkin and buffed with a soft cloth.
The surrounding area was then cleaned of any gold using a cotton swab dipped in acetone.
The pipe then received several coats of carnauba wax with the buffer.
To address the charring of the tobacco chamber, I decided to give the pipe a bowl coating. I applied a light coating of 100% pure maple syrup to the interior with my finger tip. I ran a pipe cleaner up to the inner edge of the chamber via the mortise. This would act as a plug to keep the charcoal dust out of the airway.
A capsule of activated charcoal powder was then dumped into the chamber and placed a piece of painters tape over the rim.
The stummel was shaken for over a minute. The shaking was interrupted by me tapping the stummel on the denim covered workbench from several different sides. The goal was to evenly disperse the carbon powder. The tape was removed and the excess charcoal was dumped in the trash. I then blew air through the shank and avoided the black cloud of dust.
The final step was to hand buff the pipe with a microfiber polishing cloth.
This was a long restoration with several interesting twists. The whole misidentification of the reverse tenon made me feel foolish. I am not sure why the bowl was plugged. The interior of the tobacco chamber showed some light charing but did not show signs of excessive scraping. The plug looks very professionally done with a minimal footprint. The finish on the pipe with the checkering is interesting and something I think of with rifle stocks and not pipes. It does make the 300 Winchester Short Magnum brass more appropriate though.The color of the acrylic stem blends in well with the brass. Overall it turned out as a very large beautiful billiard which will hopefully give someone many more years of enjoyment. The dimensions of the S. Johnson 8 are follows:
Length: 8.76 in./ 222.50 mm.
Weight: 2.27 oz./ 64.36 g.
Bowl Height: 2.74 in./ 69.60 mm. (bowl only) 1.70 in. / 43.18mm (with tube)
Chamber Depth: 2.58 in./ 65.53 mm.
Chamber Diameter: 0.84 in./ 21.34 mm.
Outside Diameter: 1.47 in./ 37.39 mm.
I do hope that you have found something here useful to your own pipe care, maintenance or restorations. If you like this sort of thing, please click the like and subscribe buttons. Thank you for reading the ramblings of an old pipe lover. Oh, I almost forgot. I do not like the white background. Perhaps it’s my lighting but, I find the black better for me and my photography.
Loading…
Below are some photos of the finished S. Johnson 8.
I cannot say that I have had a lot of experience with Bari pipes. I can say that they have a look all their own and this one adds a Danish flare to what I’d call a bent billiard shape. I am sure there is a pretty pipe under the years of accumulated dust and grime and the stem most likely is not supposed to be that unique two tone pea green on top. This Bari came all the way from Eschweiler, Germany with an estate lot. I was hoping for some pipesthat were a bit less common to the States and was not disappointed. The Bari had a stamped and painted BARI on the stem but I couldn’t be certain of the paint color. On the underside of the shank there was a smooth area stamped with BARI over DE LUXE next to that is MADE IN over DENMARK and offset to the right a 710 (assumed to be a shape number). Below are some photos of the Bari prior to work.
Hmm, I do not think that this two tone stem is part of the original design. The oxidation of the stem appears to be the greatest area in need of restoration with the rest of the pipe just needing a good cleaning and a bit of refinishing.
Background
Not being well versed in the history of Bari pipes, I turned first to pipedia.
“Bari Piber was founded by Viggo Nielsen in Kolding around the turn of 1950/51. Viggo’s sons Kai Nielsen and Jørgen Nielsen both grew into their father’s business from a very young age and worked there till 1975.
Bari had very successfully adapted the new Danish Design that had been started mainly by Stanwell for it’s own models. When Viggo Nielsen sold Bari in 1978 to Joh. Wilh. von Eicken GmbH in Hamburg Bari counted 33 employees.
From 1978 to 1993 Åge Bogelund and Helmer Thomsen headed Bari’s pipeproduction. Thomson bought the company in 1993 re-naming it to Bari Piber Helmer Thomsen. The workshop moved to more convenient buildings in Vejen. Bogelund, who created very respectable freehands of his own during the time at Bari got lost somehow after 1993.
Bari’s basic conception fundamentally stayed the same for decades: series pipes pre-worked by machines and carefully finished by hand. Thus no spectacular highgrades but solid, reliable every day’s companions.
The most famous series are the smooth “Classic Diamond” and the blasted “Wiking”.” (Bari – Pipedia)
The entry in pipedia.org looked like a pretty good Google translate entry with some non-standard English wordsmithing. It did give me an idea as to the age of the pipe though.
Next I searched pipephil.eu for Bari logos. Here I screen captured the below image:
The Bari made it onto a freshly laundered piece of denim on the workbench. Upon removing the stem I saw a brand new 3mm filter emerging from the stem. “Huh, never tried one of those”, I thought.
I began this project with the stem since that was the part which seemed to be in the greatest need of attention. It was cleaned out with bristle pipe cleaners dipped in 95% ethyl alcohol. The surface was lightly sanded with 400 grit sandpaper and a pipe cleaner was inserted into the tenon to act as a hanger.
The stem was suspended in Before and After Extra Strength Deoxidizer overnight. I refer to this as deox, kind of like detox for alcoholics or drug users (it makes me smile).
Before I gave the stummel a scrub I wanted to see if there was some kind of a clear coat finish applied. I thought the smooth underside of the shank looked too glossy for no finish. I wiped the stummel with 95% ethyl alcohol on a make-up pad. The pad immediately picked up stain. Yay, no finish to remove just a very nicely sanded and stained piece of briar.
The stummel was taken to the sink for its scrubbing. This was done with undiluted Murphy Oil Soap and a nylon brush. The soap was rinsed with warm water and the stummel dried with a cotton hand towel.
Back at the workbench I wiped the stummel with alcohol wetted make-up pads. I was amazed at how much stain came off.
The team was gathered.
The #1 and #2 blades of the PipNet did most of the work but the Kleen-Reem was used to ream the bottom of the tobacco chamber as it was bored with a more tapered bit than the PipNet blades.
The final scraping was done with the General triangular scraper. I had ground the sharpened factory tip off the General and it was perfect for getting the bottom of the chambers done.
The interior of the chamber was sanded with 220 sandpaper wrapped around a wood dowel. The chamber showed no evidence of any heat damage or charring.
The next day, I removed the stem from deox and allowed the excess solution to drip back into the jar.
I laid the stem onto a coarse shop rag. I like the coarse rag for vigorously rubbing the stem after deox to remove the remaining solution and some of the oxidized rubber that was loosened by the deox.
Below you can see a good deal of removed oxidized material on the rag.
Back at the workbench the stem looked much better, well more black, though the surface now showed light pitting from the removal of the oxidized vulcanite.
I used make-up pads drizzled with Soft Scrub cleanser to rub the stem surface. This removed more of the oxidized rubber.
I tried hand buffing the stem with Before and After Fine Polish. In a conversation I had with the inventor of the Before and After products, Mark Hoover, he mentioned that this was his preferred technique.
The Fine Polish did improve the condition of the stem but I think I am too impatient for Mark’s technique. I masked off the logo, mounted the stem to the shank and masked off the shank. I was going to use the buffer and see if I could get rid of the remaining oxidation.
At the buffer I used the dedicated rouge wheel and compound.
The buffing worked wonders but there remained brown areas which I was not happy with. The worst was immediately below the button. I tried sanding with 320 and 400 grit sanding sponges.
The brown persisted. I then brought out the big gun – a small flat file. The area below the button was filed on both top and bottom.
This was then resanded with the 320 and 400 sanding sponges then rebuffed. Finally I was happy with the appearance of the stem.
The shank was cleaned with 95% ethyl alcohol, cotton swabs and bristle pipe cleaners.
Once the deoxidation process was completed I could see that the BARI logo was a gold looking paint. I decided to use Rub’nBuff Gold Leaf on it.
The Run’nBuff was applied with a fly tying bodkin and worked into the impressions.
The slightly dried gold leaf was then rubbed and buffed by hand. A little bit of the metallic gold was still present but I knew that the imminent Fine and Extra Fine Polish would remove that.
The stem was then hand buffed with Before and After Fine Polish on a soft cotton cloth.
The stem received a similar hand polishing with Before and After Extra Fine Polish.
I opted to use Renaissance Micro-Crystalline Wax rather than carnauba since some of the rustications from the sandblast were deep enough that I thought the carnauba would just accumulate too much in the pores. The Renaissance was applied with a baby toothbrush, allowed to dry for 10 minutes then buffed with a clean buffing wheel on the buffer. While at the buffer I applied several coats of carnauba wax to the stem and the smooth surface on the underside of the shank.
The final step was a hand buffing with a microfiber polishing cloth.
This Bari De Luxe 710 turned out beautifully. The stem, which I had my doubts about, restored very nicely and now has a glorious high gloss black finish returned to it. The sandblast of the briar is just lovely and delicate, fitting perfectly to the delicate curves of the stem and shank. Normally I like a slightly more robust pipe but the dimensions of this Bari fit well in hand and clenching it is easy and comfortable. The texture also feels very good. What more can you ask for from a pipe that looks as good as it feels? The dimensions of the Bari De Luxe 710 are:
Length: 5.75 in./ 146.05 mm.
Weight: 1.35 oz./ 38.27 g.
Bowl Height: 1.88 in./ 47.75 mm.
Chamber Depth: 1.58 in./ 40.13 mm.
Chamber Diameter: 0.72 in./ 13.17 mm.
Outside Diameter: 1.39 in./ 35.31 mm.
I do hope that you have found something here useful to your own pipe care, maintenance or restorations. If you like this sort of thing, please click the like and subscribe buttons. Thank you for reading the ramblings of an old pipe lover.
Loading…
Below are some photos of the finished Bari De Luxe 710.
When naming this restoration I nearly called it a “A No Name Rusticated Pot Pipe”. I did not want to be considered a drug paraphernalia marketeer thus, the word “Pot” was eliminated from the title. The complete lack of any stampings makes me question the origins of this pipe. More on that in the “Background” section to the . The pipe has a very nice shape and size to it and though I prefer a tapered stem this saddle fishtail is a nice touch. Below are some photographs taken of the pipe before I started work on it.
Background
I know this is not a Custom-Built pipe but it has the characteristics of a Custom-built and is most likely a copied version of one Now Custom-Belts were first made in the mid 1930 by Tracy mMincer. They gained renown and popularity and this popularity most likely created a market for imitators.When I was a kid most knock-offs, as we called them, came from Taiwan and Japan Over the years those two countries greatly improved their quality control and craftsmanship and today are known to produce high quality products. After World War Two (WWII) There was a flood of cheaper made pipes entering the United States. The Tariff Act of 1930 had made an attempt to force countries to mark or stamp the country of origin on the products but this was not always as successful or regulated but usually it was. Enforcement after the early 1950s was much better and in 1963 new regulations specifically addressed pipes. (https://www.usitc.gov/publications/tariff_affairs/pub103s.pdf, p.533) Thus we see ENGLAND, FRANCE or ITALY stamped on lower quality or “basket pipes”. If a pipe has no Country of Manufacture (COM) stamp, that is an indicator that it was made in the USA.
During WWII the supply of briar wood was greatly limited. Various alternatives like Mountain Laurel, mainly from North Carolina, and Mission Briar, from California, were used. Neither wood was successfully adopted by pipe smokers. After the war the supply of briar was again accessible and most makers stamped their pipes stressing that they were indeed made from genuine briar. Thus we see stamps like IMPORTED BRIAR, REAL BRIAR, GENUINE BRIAR etc… What does this have to do with the pipe in hand? Since there is no COM I assume it was made in the US. Due to the lack of stamping about the origin of the wood, I questioned whether it is made of briar. Jumping ahead, after the restoration I was able to get a good look at the wood along the smooth surfaces and it is definitely briar. No other wood has the grain and bird’s eyes like briar. The heavily carved surface of this pipe and the large areas of fills, that you can see in the photos during the restoration, led me to hypothesize that this was a pipe made after Mincer’s Custom-Bolts had become popular. The briar is of lower quality requiring the heavy use of rusticated carving and fill/putty, again indicating war years. Could this have been a second of Custom-Bilt? Possible but I could not find any examples of a real Custom-Bilt pipe with a pronounced fish tail stem in William E. Unger’s book, Individual as a Thumbprint The Custom-Bilt Story. I also couldn’t recall any mention of “seconds” from the book.
The Restoration
I normally photograph a pipe on a cleaned denim patch at the beginning of a restoration. I did that this time also but completely failed to get a decent focus. Well, I can’t go back so here is another in the long list of documented mistakes.
This pipe did not need a reaming as the tobacco chamber had been recently done. It did need a date with a scrub brush and some Murphy Oil Soap. The soap was rinsed with warm water and the stummel dried with a cotton hand towel.
The pipe kind of looked cleaner but there were strange dark patches present all over the stummel. I used make-up pads wetted with 95% ethyl alcohol to wipe the exterior of the stummel. The pads were quickly stained with stain.
This got rid of some of the dark patches but not all. The below two photos show the patches. They appeared to be made of a fill material applied after the carvings then stained. The stain seemed to have penetrated easily and produced the dark patches.
At the front of the pipe the patch had a hole in it. This looked like the patch here was shoddily applied to cover a larger hole or pit in the briar.
I dipped a brass brush into the alcohol and worked the patch area in an attempt to get rid of the fills. The patches were again wiped with an alcohol wetted make-up pad.
This helped but did not remove the filler completely. I figured a longer soaking in ethyl alcohol may be required to soften the old filler.
The tobacco chamber looked good. I lightly sanded the interior with 220 sandpaper and inspected the chamber for any heat damage.
Everything in the chamber looked fine with no sign of damage.
No damage here either.
I checked the cleanliness of the shank.It was far from the level of clean that the tobacco chamber was. I ran the Kleen-Reem shank drill through the draft hole, did some scraping and swabbed the airway with cotton swabs. It was quite tar filled.
The shank would also benefit from an extended soaking in ethyl alcohol.
The jar of 95% ethyl alcohol was topped off with fresh alcohol and the pipe started it’s bath.
The stummel was in the bath overnight. Whe it emerged the fills were much softer.
I worked them again with a brass brush and they just disappeared leaving slight depressions.
These depressions were nothing that I felt obligated to refill.
Well, the obligation to fill did arrive when I looked at the front hole. This one would need to be refilled.
The airway of the shank was far easier to clean after the alcohol bath as well.
The hole in the front of the stummel was filled with brown cyanoacrylate (CA, super glue) applied with a fly tying bodkin. While the CA was wet briar dust was pressed into the wet CA. This was allowed to cure Then was roughed up with 220 sandpaper.
The stem was lightly sanded with 320 and 400 sanding sponges to remove the worst of the oxidation.
The stem was then vigorously rubbed with Soft Scrub cleanser on a make-up pad. This was done mainly to assess the level of oxidation.
The stem was severely oxidized enough that I thought a bath in Before and After Extra Strength Deoxidizer (deox) was in order. A pipe cleaner was inserted into the tenon to act as a hanger. The stem was in deox for 4 hours.
Upon removal from deox, I let the stem drip excess solution back into the jar for a few minutes.
I used a coarse shop rag to energetically rub the remaining solution and some of the oxidized rubber from the stem.
Below you can see some of the oxidation which came off on the shop rag.
I wanted to sand the stem in place on the stummel to avoid rounding the joint where the two pieces meet. The stem was sanded with a series of sanding sponges frome 320-3500 grit. The smooth sections of the stummel were simultaneously sanded. The stummel was wiped with a make-up pad moistened with alcohol between sponges while the stem was rubbed with mineral oil and wiped with a dry paper towel between sponges.
Normally I would have switched over to micro-mesh pads for the fine sanding but I wanted to try buffing the stem and stummel with rouge compound on the buffing wheel. That worked well and the finnish seemed adequate. The buffing compound was wiped from the pipe with make-up pads dipped in ethyl alcohol. The stummel then received a coating of Before and After Restoration Balm. The balm was allowed to sit and do it’s magic for 20 minutes.
The remaining Restoration Balm was wiped from the stummel using an inside out athletic sock.
I decided to use Renaissance Micro-Crystalline Wax as the finish for the stummel. I applied this with a baby toothbrush working it into the carvings. The product was allowed to dry for an hour then was buffed with a clean buffing wheel. The stem received several coats of carnauba wax also at the buffer.
The final step was a hand buffing with a microfiber polishing cloth.
I am quite pleased with how this No Name Rusticated Pot turned out. The briar is very lightweight and the shape feels amazingly good in hand. The stem polished up nicely with little indication of the previous oxidation. Saddle stems are not my favorite stem shape to restore as they are difficult to sand and polish. The area where the old fills were spread on so thick are noticeable under scrutiny but with a casual glance they appear to be just part of the rustication. I know they were there to cover for poor quality briar but the issues with quality are cosmetic, the structural integrity of the pipe is quite sound and I am sure this pipe will continue to serve me for many years. This gives me a “Custon-Bilt” like pipe for a fraction of the current market price of such a pipe. The Dimensions of the No Name Rusticated Pot are:
Length: 6.08 in./ 154.32 mm.
Weight: 1.67 oz./ 437.35 g.
Bowl Height: 1.69 in./ 4.93 mm.
Chamber Depth: 1.36 in./ 34.54 mm.
Chamber Diameter: 0.85 in./ 21.59 mm. (Conically bored diameter is at the top)
Outside Diameter: 1.75 in./ 44.45 mm.
I do hope that you have found something here useful to your own pipe care, maintenance or restorations. If you like this sort of thing, please click the like and subscribe buttons. Thank you for reading the ramblings of an old pipe lover.
Loading…
Below are some photos of the completed No Name Rusticated Pot.
I picked up a pipe rack for churchwardens the other day and upon placing pipes in it I realized I was short one churchwarden. Well, my Obsessive Compulsive Disorder (OCD) could not stand for that. Actually I think it should be CDO (compulsive disorder of obsessions) that way it is in alphabetical order. Anyway, I did happen to have a little churchwarden in need of restoration. I had apparently led a life of sunlight exposure and wore the oxidation scars to prove it. The little Czech appeared as below prior to any work done.
Yeah, she looked rough. The glaring issues were the chipped faded clear coat, the charred rim and the heavily oxidized stem. The good news was that the briar was nice, thick and looked structurally sound, there were no deep bite marks on the stem and the mortise to tenon fit was tight. This restoration would be some work but it looked promising.
Background
I did not have much to go on researching this pipe. The only stamp was CZECH on the left shank. Both pipephil.eu and pipedia.org came up empty for that stamp. Surprisingly, pipephile.eu only has 6 makers listed from the Czech Republic and they all appear to be artisan carvers. This pipe does not strike me as artisanal. Pipedia.org lists significantly more than 6 with nearly all of them also artisan pipe makers. The one factory pipe maker mentioned was BPK. The BPK name in the country index listed had the following:
Upon following the link to BPK this short entry is all the information to be found,
“A long tradition of producing pipes. BPK company exports pipes to more than 40 countries. The production of pipes has been traditionally connected with small town Prosec u Skutce since 1842. Prosec is situated in the heart of Czech Republic, approximately 150 km (93 miles) far from Prague. Since the change of political situation in 1989 the company BPK, Ltd has been continueing in the traditional production.” (BPK – Pipedia).
BPK
Located in the town of Proseč, Czech Republic, the BPK workshop makes pipes since 1842. The firm succeeded at a time when pipe market was growing. At first, BPK pipes were actually not made with briar, but with other types of wood: alder, maple or pear tree. M. Zabor Bernard Kopperle (officer of the company) will only begin to use briar in 1910 for his pipes. The result is stunning because of the briar properties, particularly for tobaccos combustion: more heatproof and better for smokers when it comes to the taste. The BPK pipes success was immediate, and pipes were therefore exported in numerous neighbor countries. In the late 30s, more than 600 craftspeople worked for the production of BPK pipes! Nowadays, these pipes are still liked by smokers thanks to their classical design. Their silhouettes are simple and without any flourishes. Last criterion, and an important one: BPK pipes are proposed at an affordable price!
I think I need to get some larger and fresher denim for workbench working surfaces.
The reaming tools were gathered.
The #1 blades of the PipNet did the majority of the work with the Smokingpipes Low Country Reamer and the General Triangular scraper just finishing up the process.
The interior of the tobacco chamber was sanded with 320 sandpaper wrapped around a wood dowel. No signs of any damage were observed in the bare briar.
The rim was scraped with a sharp pocket knife to remove the lava. The stummel was topped using a piece of 320 sandpaper laid flat on a counter. This was followed by topping the stummel with 400 grit sandpaper. I then tried a technique described to me by Sascha Mertens, a pipe restorer from Germany, where petroleum jelly is rubbed onto the charred briar and then gently scraped with a sharp knife. This application of petroleum jelly and scraping was repeated several times.
The stummel was then taken to the sink for a scrubbing with Undiluted Murphy Oil Soap and a nylon scrub brush. The soap was rinsed with warm water and the stummel dried with a cotton hand towel.
Back at the workbench the now clean finish could be seen more clearly.
I tried dissolving the clear coat with an acetone dipped make-up pad. The finish did surrender to the acetone but the process was slow. The remaining finish was thickly applied and soaking the stummel seemed to be a more effective approach.
The stummel was submerged in a jar of acetone for 30 minutes.
Upon removing the stummel from the acetone, I could see the finish had softened and bubbled up from the briar. This was rubbed off with a couple of make-up pads dipped in acetone.
In places the remaining finish was scraped with my thumbnail while it was still soft. As the acetone evaporated the finish rehardened but was far easier to remove with additional rubbing with the make-up pads.
While the airway was still moist with aceti=one I quickly worked with folded bristle pipe cleaners to remove the softened tar. Additional cotton swabs dipped in 95% ethyl alcohol were used to clean the shank along with more pipe cleaners.
The rim looked far better than it did originally however there remained a darker area where the charring was the worst. This can be seen in the below image even with the poor focus.
I decided to try to lighten the briar by bleaching it with a saturated oxalic acid solution.
Rather than just treating the darkened areas I treated the entire stummel. An empty 20 gauge shotgun shell was used as a handle as it fit tightly into the tobacco chamber. The oxalic acid solution was painted using a cotton swab. As the solution soaked into the briar and/or dried additional oxalic acid was applied.
The stummel was allowed to dry and to let the oxalic acid work. 30 minutes later the dry stummel appeared as below.
The stummel was taken to the sink where it was rinsed with warm water and scrubbed with a dish detergent. My thinking was that the basic nature of the dish soap would neutralize any acid remaining. Back at the workbench the stummel was wiped with a95% ethyl alcohol on a make-up pad. No significant color came off the stummel with the alcohol.
The pits and old fills were picked with a fly tying bodkin to remove the old fill material. New fills were done using brown cyanoacrylate (CA, super glue) and briar dust. The CA was placed into the pit with a fly tying bodkin then briar dust was pressed into the wet CA. The subsequent fills were filed with a small flat file then sanded with a 400 grit sanding sponge. This was repeated for larger pits.
To further conceal the slightly darkened rim and the new fills as well as accentuate the briar grain, I decided to give the stummel a contrast dye with black Fiebing’s Leather Dye. The counter was covered with a folded paper towel. The 20 gauge shell was wrapped with a layer of masking tape to tighten the seal to the tobacco chamber and limit dye from entering. A folded pipe cleaner acted as the applicator for the dye.
The black dye was applied with the pipe cleaner then flamed with the lighter. This allows the solvents in the dye to burn off and fix the dye to the briar. The process was then repeated.
The dye was allowed to dry for about 30 minutes. The stummel was then sanded with a 320 sanding sponge to remove the outermost layer of black dyed briar. The dye penetrates more deeply in the softer grained wood. By lightly sanding the surface and removing only the outermost layer the briar grain can be differentially dyed. The stummel was then sanded with a series of sanding sponges from 400-3500 grits. In between each sponge the stummel was wiped with a make-up pad moistened with alcohol to remove sanding debris.
The stummel was then worked with 4000-120000 micro-mesh pads. Between each pad the stummel was again alcohol wiped.
The stummel was given a liberal coating of Before and After Restoration Balm and allowed to sit for 20 minutes while the balm worked its magic on the briar.
The balm was then wiped from the stummel using an inside out athletic sock.
This heavily oxidized stem was so long that I couldn’t manage a container which could hold Before and After Extra Strength Deoxidizer. Removing that from my restoration arsenal, I had to rely on sanding alone. I knew that this would probably result with a finished product that retained some brown rather than the desired black. The brown oxidized vulcanite would probably be near the shank end where extra sanding would remove so much material that the fit to the shank would be negatively affected. Oh well, I figured that I would cross that bridge when I got there. I started the sanding with a light touch and the 320 grit sponge. The oxidation removed better than I had hoped. I proceeded through the series of sponges 400-3500, though the photo below only shows 400-1500. Between each sponge I rubbed mineral oil onto the stem and wiped it with a paper towel to remove sanding debris.
I cleaned the airway with bristle and soft pipe cleaners dipped in 95% ethyl alcohol. I had to approach the stem from both ends for the cleaning due to the length.
The stem was then worked with micro-mesh pads 4000-12000. Between these pads I rubbed the stem with Obsidian Oil and wiped it with a paper towel.
The final polishing was done with Before and After Fine Polish hand rubbed with a soft cotton cloth. This was repeated several times with fresh Fine Polish. I eventually ended with the Before and After Extra Fine Polish and the soft cotton cloth. The stem looked good but did show slight oxidation at the shank end. I hate it when I’m right about these things.
The pipe was taken to the buffer where it received several coats of carnauba wax. The final step was a hand buffing of the pipe with a microfiber polishing cloth.
All told, this lovely Czech churchwarden turned out very nicely. The best part is that it completely fills the 6th slot of my churchwarden pipe rack enabling me to sleep OCD free at night. The contrast dye worked at accentuating the briar grain while concealing the previously charred rim and numerous fills. The stem polished up better than I had anticipated. And looks very good in normal room lighting. Bright lights do allow the oxidized vulcanite to be seen at the shank end. The dimensions of the Czech Churchwarden are:
Length: 10.75 in./ 273.05 mm.
Weight: 1.35 oz./ 38.27 g.
Bowl Height: 1.59 in./ 40.39 mm.
Chamber Depth: 1.19 in./ 30.23 mm.
Chamber Diameter: 0.63 in./ 16.00 mm.
Outside Diameter: 1.38 in./ 35.05 mm.
I do hope that you have found something here useful to your own pipe care, maintenance or restorations. If you like this sort of thing, please click the like and subscribe buttons. Thank you for reading the ramblings of an old pipe lover.
Loading…
Below are some photos of the completed Czech Churchwarden.
The story and mystique of Custom-Bilt or Custombilt pipes and their inventor, Tracy Mincer, are things of pipe legend. I have to admit to having only restored one Custombilt pipe and it was a pipe actually made after the death of Tracy Mincer in 1964. My only Custombilt was a Wally Frank ere pipe probably made in the 1970s (that restoration can be found here: https://wordpress.com/post/scimansays1787.com/3262). Although, I also did restore a Doodler. Declaring that pipe an actual Tracy Mincer piece would be fraught with uncertainty (https://wordpress.com/post/scimansays1787.com/369) This pipe was older and wore the following stamps Custom-Bilt on the left shank, IMPORTED BRIAR on the bottom and a circle on the lower right shank. Below are some photographs taken prior to working on the pipe.
As you can see it was a rusticated pipe typical of Mincer Custom-Bilts. The size was smaller, what I would call medium sized. The most glaring issue was the chipped mouthpiece which would require some creative repairs. The tobacco chamber had a significant cake build-up indicative of a well used pipe. This was also evident in the lava flowing onto the rim. There was also the expected dirt and grime ground into the rustications. This was going to be fun.
Background
The standard starting point for researching a pipe typically includes pipedia.org. The query of Tracy Mincer, originator of Custom-Bilt, will take you to this brief entry:
“Tracy Mincer started the original Custom-Bilt pipe company in 1934. In 1946, the name was changed to Custombilt after Mincer began an association with Eugene J. Rich, Inc. There were some big changes in advertising and distribution. The slogan “AS INDIVIDUAL AS A THUMBPRINT” began at this time as well.
In the early 1950’s, Tracy Mincer developed severe financial problems that caused him to stop making the Custombilt, and he lost the name. n 1952, Mincer began a new pipe, The Doodler, that due to the holes in the bowl had to made primarily in a billiard type shape in three sizes. In the early 1950s, National Briar was turning the bowls for Mincer. Based upon the documentation, it appears that Mincer made the pipe until the mid 1960s, when National Briar Pipe Co., Inc. began making and selling the Doodler.
Mincer died in 1964. Based upon the information provided, Mincer seemed to always have money, production, distribution and other problems. Mincer was probably a terrific craftsman but a very poor businessman and administrator. To me, Mincer sounds like your typical small business entrepreneur who always knew what was right and if you disagreed¼problems. Mincer always seemed to be on the brink of going out of business, not meeting payroll and so on.
Claude Stuart purchased the Tracy Mincer Pipe Company and began making pipes using the Tracy Mincer stamp. Stuart finished nearly all the pipes produced, mostly carved and textured bowls and the occasional straight grain. Claude made the Tracy Mincer Pipe Company a moderate success. Stuart became ill and in 1990 The Tracey Mincer Pipe Company went out of business. Currently, Jim Tedesco owns the Tracy Mincer name.
These interesting examples bellow are pipes made with the Tracy Mincer stamp. If you any additional information about these pipes, or can otherwise add to the history of this interesting pipe man, please add it here, or send it to sethile.pipes@gmail.com, and we can add it for you.” (Mincer – Pipedia).
There is a book written by William E. Unger, Jr.,Ph.D titled “As Individual As A Thumbprint”: The Custom-Bilt Pipe Story. This book appears to be self published by Dr. Unger at The Graphic Touch, of Columbus, Ohio. Printed in 2001 and bound with a black plastic spiral, the book states that the entire contents are “All rights reserved…without permission in writing from the author”. Dr. Unger passed away January 1, 2013 (obituary: https://www.legacy.com/us/obituaries/dispatch/name/william-unger-obituary?id=12197453) and the book is no longer in print. This unfortunately means that I will not be including any quotes from the book. We’ll see how I get around that, I guess. I got lucky and purchased a copy from eBay for under $30 (with shipping) earlier this year, after watching several copies sell for what I considered astronomical prices. The book is a remarkable piece of work and is the definitive history of the Custom-Bilt pipe. The research that Dr. Unger put into getting the story correct is amazing. Fortunately there were several past employees, friends and relatives associated with Tracy Miller and the company that were able to give interviews and explanations to the inner workings of the company.
In regards to the stamps on the pipe in hand, I will speak to what I have found in Unger’s book, without quoting any of it. The first thing that needs clarification is the Custom-Bilt vs. Custombilt name. I’ll paraphrase William Unger here, the first stamps used by Tracy Mincer were “Custom-Bilt”. These were used from 1938-1946 definitively and less definitively prior to 1938. You could, perhaps, find reference to this in the book on page 91. There, I think that should give me legitimacy and keep any lawyers at bay. Next we examine the IMPORTED BRIAR stamp on the bottom of the pipe. Unger states that he has inspected a large number of Custom-bilt pipes and that about ½ of them do not have this stamp. He declares that he is at a loss to explain either their absence or presence This lack of explanation might be seen towards the bottom of page 114. The final stamp on this Custom-Bilt is the geometric circle stamped on the shank. Certainly these stamps have some utilitarian meaning. Nope. Unger declares that he is not able to explain any system where shapes such as circles, triangles, stars, rectangles, half moons or even trapezoids have any systematic meaning. This may or may not be seen on the top of page 114.
Pipephil.eu does allow quotations with proper referencing and shows nice examples of the above-mentioned geometric stamps.
The photos don’t show it very well but I didn’t feel too bad about the stains on the denim in comparison to the dirtiness of this pipe.
The first step was to gather the remaining tools: The PipNet, Smokingpipes Low Country Reamer, General triangular scraper and 320 sandpaper wrapped wood dowel.
The #2 and #3 blades of the PipNet did their work beautifully with little need for the other scrapers.
The tobacco chamber was sanded to bare briar and showed no signs of any damage.
The shank was cleaned out by running the Kleen-Reem drill through the airway. The drill had to be cleaned out several times as the tars from the airway filled the grooves. 95% ethyl alcohol was used with the nylon shank brush, bristle pipe cleaners and cotton swabs to clean out the yuck.
The stummel was taken to the sink for a scrub with undiluted Murphy Oil Soap and a nylon scrub brush. The soap was rinsed with warm water and the stummel dried with a cotton hand towel.
There remained some ground in dirt and grime in the rustications and the rim did not clean-up as well as I like so a second scrubbing with the Murphy’s was done. This time with a brass brush. That worked a bit more aggressively to remove the external yuck.
Again, the stummel was rinsed with warm water and dried.
Back at the workbench the stummel was wiped with a makeup pad dipped in 95% ethyl alcohol. The wiping removed a bit more of the accumulated grime but the briar looked much better.
The stem was quite dirty and required a good number of bristle pipe cleaners dipped in 95% ethyl alcohol to clean out the airway.
The stummel was given a coating of Before and After Restoration Balm and allowed to sit for over an hour.
After the break I returned to the stummel and wiped the remaining balm from it with an inside out athletic sock.
Also during the break I came up with a plan for repairing the chipped section of the button. I planned on using the Dremel tool and the bit I use for cutting a new slot in a mouthpiece. The below photo shows the bit.
The next photo is the bit in reference to a piece of 2 mm brass rod.
The goal was to use the Dremel to cut a channel for the brass rod to fit into spanning the missing section. Below you can see the brass rod cut to fit into these grooves. The piece of green plastic is a piece of a lid that I cut to act as a dam, preventing glue from seeping into the airway.
I used cyanoacrylate (CA, super glue) to fix the brass rod into position.
To make sure the brass rod did not emerge through the new button material I ground the brass down using the same Demel bit. The photo below shows the tapered brass after grinding.
With the brass rod in place and held at its opposite ends with CA, I planned on building up the missing material with black two part epoxy. To prevent the epoxy from adhering to the dam, I coated it with petroleum jelly and reinserted it into the airway.
The epoxy was mixed on a piece of plastic. I accidentally got more of one part than I intended, thus the usable part of the mix in the half below the fly tying bodkin in the below photo.
The epoxy was applied to the stem thickly enough as to rebuild the missing button.
The shank of the pipe was wrapped in masking tape to protect it from any sanding of the stem. Since the area to be replaced was the underside or bottom of the button, I let gravity pull the curing epoxy earthward. This allowed the “drip” to thicken the button where I wanted more material.
After 2 hours I removed the dam. The button looked rough but the epoxy had provided enough material to be reshaped into a new button.
After curing for about 2 hours the epoxy had assumed its shape and was no longer flowing. It did remain soft though. Soft enough for me to cut a nice straight edge with an Exacto knife.
The epoxy was allowed to cure for an additional 4 hours. After this time it was hard enough to allow me to file and sand the button to an appropriate shape.
The below photo shows the slight color difference of the black epoxy prior to it being finish sanded, micro-meshed and polished.
The stem was sanded with a series of sanding sponges from 400-3500 grit. Between each sponge I rubbed the stem with mineral oil and wiped it with a paper towel.
The stem was then worked with micro-mesh pads 4000-12000. Between each pad the stem was rubbed with Obsidian Oil and wiped with a dry paper towel.
With a surface as rusticated as this I opted to apply Renaissance Micro-Crystalline Wax instead of carnauba. The wax was applied with a baby toothbrush and allowed to dry for a few minutes. I then took it to the buffer and buffed it with a clean flannel wheel.
The stem received several coats of carnauba wax from the buffer. The entire pipe was then hand buffed with a microfiber polishing cloth.
Overall, this circle stamped Custom-Bilt turned out beautifully. I have a new appreciation for Tracy Mincer’s work. The pipe is smaller than I expected a Custom-Bilt to be but it has thatTracy Mincer look with its deep rustications and hefty wall thickness. It is lightweight and feels great in hand. I am happy with the stem rebuilding but not with the quality of the vulcanite. There seem to be tiny inclusions in the rubber. These are readily available under very bright light yet not noticeable with normal room light. I think they are due to the recycling of tires for rubber during the war years of World War Two. I can certainly understand why the pipes have attracted a following, even 80 years after they were made and 60 years after Tracy Mincer’s passing.
The dimensions of the Custom-Bilt are:
Length: 4.89 in./ 124.21 mm.
Weight: 1.28 oz./ 36.29 g.
Bowl Height: 1.70 in./ 43.18 mm.
Chamber Depth: 1.36 in./ 34.54 mm.
Chamber Diameter: 0.79 in./ 20.07 mm.
Outside Diameter: 1.49 in./ 37.85 mm.
I do hope that you have found something here useful to your own pipe care, maintenance or restorations. If you like this sort of thing, please click the like and subscribe buttons. Thank you for reading the ramblings of an old pipe lover.
Loading…
Below are some photos of the completed Custom-Bilt Circle Stamped pipe.
My first reaction to this pipe was a near uncontrollable desire to name it Stumpy. It looked like a gnarled old tree stump. As I held it I came to appreciate the way the grooves fit my hand and saw/felt the practicality of the carvings. This pipe was a great tactile experience. Examining it more closely I saw how the maker had created the grooves. It reminded me of a Tracy Mincer Doodler in that each of the four sides were likely drilled from top to bottom with two holes. These holes were then exposed by further briar removal to create 8 grooves. The overall shape is a highly carved four square panel that I could not classify as anything other than a freehand. I had to know more about this pipe’s maker. I looked at the stampings and read the following: MADE over IN CANADA then Trypis (in a flowing script) over 4. Below are some photographs of the pipe prior to any work done.
There was dirt and grime in the carvings which would clean out easily. The rim had some lava deposits suggesting that the pipe had been smoked quite a bit yet the tobacco chamber was not heavily caked. This indicated a previous owner who used but cared for this pipe. The stem was very oxidized indicating the pipe had been stored or displayed in the light. I could certainly understand displaying such a unique pipe. In general this looked to be a fun restoration.
Background
I was really looking forward to researching this pipe. I was unfamiliar with the brand. I asked Steve Laug about them in a message on Facebook and he said that he had worked on several. I immediately went to his site, https://rebornpipes.com/ and searched “Trypis”. I was rewarded with three blogs to read. While reading, I found that one of the posts was by Charles Lemon and dealt with a shank repair on a short Trypis Dublin (https://dadspipes.com/2019/05/31/quick-shank-repair-for-a-trypis-canted-dublin/). The stamping on all three pipes were very similar to “Stumpy”.
A quick search on pipephil.eu came up with the below screenshot.
Next I searched on pipedia.org. Here I found a short article of the carver, Philip Trypis.
“Phillip Trypis has been a pipe maker in Canada for well over 40 years. Originally from Greece, his experience ranges from cutting burls in a briar mill to making literally thousands of pipes out of his home in the hamlet of Oakwood, Ontario. Brigham pipes benefitted from Phillip’s skills where he worked for a number of years. There he directed the pipe production of the company when it was producing over 50,000 a year. Even though he left to start his own pipe shop, he still imported briar and turned tens of thousands of bowls for Brigham not to mention produce a large number of his own branded pipes.
Many of the styles are traditional in form although Phillip has a number of freehand styles that are both familiar and off the beaten path. The vast majority of the higher priced pipes are very large pieces to be sure. Except where the pipe was of unusual shape or size, the frame sizes are 7.15″ x 3″ so you can get an idea of the scale.” (Trypis – Pipedia). The three examples I had read about from the restorations of Laug and Lemon were of more traditional shapes. I would classify Stumpy as one of Trypis’ “freehand styles…off the beaten path.” (Trypis – Pipedia).
My curiosity was still not quenched. I was intrigued by this maker and needed more information. A general search for “Phillip Trypis pipes” on Google led me to a forum post by a member going by the name “User 3604”. I was unable to contact them directly and hope that including his wonderful recollection below will not offend.
A recollection of the maker, Phillip Trypis:
“When I got into pipe smoking and bought my first pipe, (at least my first as an adult that I didn’t try to hide from my parents), I got it from Phillip Trypis whose name is known to most here I expect as a former carver for Brigham pipes back in their heyday. At this time Phillip’s health was in decline, he was in the early stages of dementia and his situation and our three meetings caused me to write about my second visit. Here is is. I hope you enjoy reading it as much as I enjoy remembering it.
Meeting Phillip Trypis for the First Time – Again
August 2007
I arrived in the little hamlet of Oakwood, just,north of Lindsay, Ontario a little after 12:00 noon. The drive was relaxing and it brought back memories of my days in college there in the late 70’s. My canine buddy Casey was along for the ride. I was making the 2 plus hour trip from Fergus to Oakwood to see Phillip Trypis; in his heyday a former master carver for Brigham pipes whom, in retirement started his own line. I was there to pick up a pipe I’d bought for my friend Don about 10 months ago as a going away gift when he moved to western Canada. Unfortunately, he’d broken the stem off while knocking it on something to get the dottle out after a smoke. I was also buying a few more for Don and hopefully another for myself.
I pulled up in front of the Trypis’s home and saw Phillip and his wife sitting in their screened in front porch. A sign on the front lawn advertised “Auction Sale Saturday”. I was somewhat relieved to see them. I had spoken to Phillip this morning on the phone, (about 3 hours ago now) and he had said to come between 12:00 and 2:00 pm but knowing his short term memory had all but disappeared since he fell and struck his head the previous winter, I wondered if he’d forget and go out. I walked up the steps and realizing that he would probably not remember my face from 11 months ago, I reintroduced myself.
“Hi Mr Trypis, I’m Marlowe Sharp.” The intro was returned with a blank stare. Did he not hear me? “HI MR TRYPIS, I’M MARLOWE SHARP” I said a fair bit louder. Blank look again. I SPOKE WITH YOU THIS MORNING AND TOLD YOU I WAS GOING TO COME AND PICK UP DON’s PIPE?” I saw in his eyes recognition of that name but he still wasn’t putting it all together. Mercifully Mrs Trypis stepped in. “Oh hello.” she said, “You’re Don’s friend.” Then turning to her husband, “Phillip, this is Don Janzen’s friend…Don from Alberta.” I saw the light go on!
“How are you Mr Trypis?” I said much more confidently.
“ I’m peesed off!” he replied glumly in his thick Greek accent. Not a good start.
“Why are you pissed off?”
“This move…I don’t want to move. It’s too much.”
I suddenly felt sad for him. He was being forced, almost to leave a place he loved – a place where he could go to the basement and peeter around his shop and do what ever he liked. The stairs were too much now and Mrs. Trypis had recently been diagnosed with macular degeneration and had her driver’s license taken away. It was time to move into town where she could get around and where Phillip didn’t have to manage stairs. He was losing his independence a brain cell at a time along with all his “stuff” that kept him in a familiar world – sold off to strangers willing to pay the highest bid.
“Can we go into your shop Mr Trypis? I want to buy some pipes.”
At that his face brightened. Familiar territory! Yes let’s go there! At the same time, Mrs Trypis who had disappeared arrived back with Don’s pipe. It had been repaired, (apparently) and was in the box with Don’s original letter wrapped up in a bubble wrap envelope, all ready to go in the mail as he had promised last Sunday…and every other Sunday since October last year. I ran and put it in my van immediately. I didn’t want to take the chance of getting wrapped up in the new pipes and arrive home having left it on the Trypis kitchen table.
We went down to the shop and I pulled the pamphlet of Trypis Pipes from my pocket and told Phillip which ones Don wanted. First the 1/4 bent billiard. I put one aside. Then the 1/4 bent apple. I spent a while over that one because there were a couple of beauties. While I sorted through and put aside some favorites, I asked Phillip what the difference was between a $70.00 pipe and $150.00 pipe. With that question, all the remaining fogginess fell away. He was in his element now, firing on all cylinders as he explained to me about the grain of the wood and spoke about briar, design and workmanship. He pulled out a gorgeous $150.00 bent apple. The grain was lovely and on the stem he had added a piece of yellow lucite. He shoved it in my hand and said, “Here this one is good. Your friend will like this. ”I started to quickly add up the amounts in my head…this could get dangerous. I think Don had said he wanted $300.00 worth of pipes. I was at that price now and hadn’t yet got the Scandinavian pear that I had been eyeing for myself. I was also starting to have difficulty wondering if I might keep that bent apple for me…it was nice!
The next box broke my resolve to only get one pipe for myself. Out of the bottom of a box of $150.00 pipes I pulled a beautifully carved Bent Sitter. It had a tobacco leaf carved into each side. “Uhh…do you have two of these?” I said hopefully. “I don’t think so.” said Phillip.” I think one only was made. Maybe another but it could be anywhere in here.”, he said as he swept his hand toward 30 boxes containing about a thousand pipes. In my head I apologized to Don; maybe I won’t tell him about this one. One day years down the road he’ll oogle it on my mantle. “Oh ya, I picked that up from Trypis some time ago.” I’ll say casually.
Finally we got to the Scandinavian pear box. I selected one and looked it over but Phillip took it from me. Actually, he had done this with all the pipes I selected. He would pull the mouth piece out and reseat it several times before giving it back. I was wondering if he did this to make sure it would come out easily so Don wouldn’t break another one. Phillip didn’t give this one back though. He looked at it, thought a bit and said, “I need a pencil.”
“Why?”
“I show you. Come!”
The next 10 minutes was spent looking for a pencil. What was he doing? We went back into his workshop to continue the search. As we entered the small back room I looked around at one of the messiest shops I had ever seen. Tools were everywhere, not to mention hundreds of partially finished pipe bowls of every shape and size. Everything was covered in wood shaving and dust. I picked up an unfinished bowl and immediately recognized the design as Brigham’s 100 anniversary pipe, a large Bent Square Panel with a maple leaf design carved on either side. They came out about 2 years ago. I looked at Phillip. He smiled and said, “My design. I don’t know if it sold well”.”
For the next 10 minutes we again looked for the elusive pencil finally finding a package of new, un-sharpened carpenter’s pencils hanging on the wall. Next Phillip removed the buffing wheel from his lathe and replaced it with a sanding wheel. I was stumped. Was he going to personalize this pipe some how? Transform it to a one of a kind pipe just for me? Another 10 minutes went by as we traced an octopus of extension cords though the shop to figure out why the lathe had no power. Finally everything was in order, the power was on and the lathe screamed to life.
“WHAT ARE YOU GOING TO DO MR TRYPIS?” I yelled over the noisy machine. This pipe was a really nice piece and I was wondering whether the old master carver still had the skills in him to do what ever he was about to do. He looked at me and smiled again, “You watch”. He was loving this!
Phillip seated himself on his stool, took apart the pipe and looked at it. Then he looked at his lathe and seemed to think about something. I was getting excited. I was about to witness the master at work. He picked up his brand new carpenter’s pencil, steadied himself and….. sharpened it. He turned off the lathe, rubbed some graphite on the tenon of the stem, tried it a couple of times in the shank of the pipe and handed me the pipe saying, “There, it doesn’t stick any more.” That was it!! 30 minutes to sharpen a pencil. I couldn’t help but laugh. Old Phillip thought I was just as proud of his effort as he was…and I was.
After struggling back up the stairs and giving me a whopping 50% discount on the pipes I sat at his table looking at over $500.00 worth of pipes that he had just sold to me for $255.00. He was exhausted. The fall he had a year ago had taken it’s toll and although he was looking and talking better than when I saw him 11 months ago. He had little strength and I think with the pending move from his home, little spirit.
We talked about my family and work as a police officer and then I took a few photos of Phillip holding my sitter. I shook his hand and wished him luck, which I regretted saying because I don’t believe in luck.
“I’ll need it.” he said. “Thank you, It was very nice seeing you too.”
I left with a tinge of sadness but was hopeful that I could visit Phillip once he gets to his new digs, buy another pipe or three, and meet Mr Trypis again…for the first time.
January 2018
P.S: I later realized that Don’s pipe had not been repaired well and that Phillip had been beyond doing any quality work for a number of years. He hadn’t been making pipes for probably 5 years and all the ones I had seen or bought were from before that time.
I did see Phillip once again around 2011 after he had moved in to his son’s home in Scarborough near Toronto. I took a friend there and between us we purchased about 7 or 8 pipes, again all at a highly discounted price. He didn’t remember who I was that time either.
I spoke with Phillip’s son in 2015 I think, and by that time Phillip was in a long term care facility with full blown dementia. I think that all his remaining pipes have been bought up by a couple of vendors. I still see them around occasionally. Get one if you can. They are lovely pipes.”
That recollection satisfied my quest for information about mr. Trypis. I think the photo added the last piece. I am grateful that User 3604 shared this remembrance with all of us.
The Restoration
I began by giving Stumpy a clean denim piece to sit upon during this restoration.
I knew that this stem would require some extra time in the Before and After Extra Strength Deoxidizer so, I started with it. The stem was cleaned out with a couple of bristle pipe cleaners dipped in 95% ethyl alcohol. Earlier I had remarked that the previous owner appeared to have cared for this pipe. This was again made evident with the relatively clean airway of the stem.
The reaming tools were gathered.
The PipNet made quick work of the reaming only requiring light scraping with the other tools. The interior of the tobacco chamber was sanded with the wood dowel wrapped in 320 sandpaper. This sanding was taken to bare briar and revealed no damage to the interior of the bowl.
The lava on the rim was moistened with saliva and scraped with a sharp pocket knife.
The airway of the shank was moistened with alcohol wetted cotton swabs and scraped with a dental scraper then scrubbed with several cotton swabs dipped in 95% ethyl alcohol.
The stummel was taken to the sink where it was scrubbed with undiluted Murphy Oil Soap and a nylon scrub brush. The soap was rinsed with warm water and the stummel dried with a cotton hand towel.
The minimal tooth chatter was sanded with 320 and 400 grit sanding sponges.
The stem received a pipe cleaner inserted into the tenon to act as a hanger for its bath in Before and After Extra Strength Deoxidizer or, as I like to call it, deox.
The deox bath lasted overnight and the next day the stem was removed from the deox and allowed to drip excess solution back into the jar.
I rubbed the remaining excess solution from the stem with a coarse shop rag.
This rag absorbs the deox and abrades the softened oxidized rubber leaving wonderful patterns on the rag, creating a lovely Rorschach lick pattern on the rag.
Back at the workbench I wrapped the shank with painters tape and used Soft Scrub cleanser on make-up pads to further scrub the oxidized vulcanite from the stem. This stem was severely oxidized.
Next the stem was sanded with a series of sanding sponges from 320-3500 grit. Between each sponge I rubbed the stem with mineral oil and wiped it with a paper towel.
There was still lingering oxidation on/in the vulcanite. I had to use the bright lights of the photo station so show it below.
Bah.
I took the stem to the buffer and used the rogue compound on a flannel wheel. Several applications of rogue to the wheel and wheel to the stem later, I could barely make out any oxidized vulcanite. I continued on to the micro-mesh pads. Here I used pads 4000-12000. Between each pad I applied Obsidian Oil rubbed on and wiped off with a paper towel.
I polished the stem with both Before and After Fine and Extra Fine Polish. Each polish was hand buffed using a soft cotton cloth.
The stummel was given a coating of Before and After Restoration Balm applied with a baby toothbrush. I failed to photograph this step and the final waxing of the stummel. The Restoration Balm was allowed to work its magic for 20 minutes before being wiped from the stummel. The stummel was then waxed with Renaissance Micro-crystalline Wax, again applied with a baby toothbrush.
The wax was buffed with a clean flannel wheel on the buffer. The stem received several coats of carnauba wax also applied with the buffer. This final step was hand buffing with a microfiber polishing cloth.
Trypis Freehand is a delightfully carved original one-of-a-kind work. As mentioned earlier the pipe feels amazing in hand. The carvings add character with the smooth rim and side contrasting beautifully. The stem polished up fairly well. In normal room light it looks great, under very bright light residual oxidation can be seen in places. I think that the thickness and the extreme texturing of the briar will make a very cool smoking pipe for the next steward of this wonderful beauty. The dimensions of the Trypis Freehand are:
Length: 5.83 in./ 148.08 mm.
Weight: 1.94 oz./ 54.99 g.
Bowl Height: 1.98 in./ 50.29 mm.
Chamber Depth: 1.59 in./ 40.39 mm.
Chamber Diameter: 0.74 in./ 18.80 mm.
Outside Diameter: 1.58 in./ 40.13 mm.
I do hope that you have found something here useful to your own pipe care, maintenance or restorations. If you like this sort of thing, please click the like and subscribe buttons. Thank you for reading the ramblings of an old pipe lover.
Loading…
Below are some photos of the completed Trypis Freehand.
I really like the apple shape. It is one of those things that I can’t explain, kind of like the inexplicable pull to pat a dog on the head even though they haven’t done anything pat worthy. Now this pipe, through no fault of its own, has remained unrestored for quite a while due to a previous owner smoking marijuauna or some cannabis with it. I dread working on pipes used for pot. The resins and tars from cannabis are a pain to remove from a pipe. Those pot-heads who say. “But, smoking weed is “natural” and way healthier than tobacco” have apparently never compared the smoking residues of the two. Not only does the cannabis smell terrible, when exposed to ethanol it kind of dissolves then as the alcohol evaporates the remaining resins become more like a soft plastic and resist further applications of ethanol. Okay, I am sounding whiny, so I will leave it at this:
Cannabis users, please just eat your cannabis – edibles do not seem to leave any residue in a pipe. I think even Jeff Spicoli would agree with that statement.
I began researching this pipe by visiting the pipephil.eu site. Here I found the following:
(Go-Gq — Pipes: Logos & Markings). John Redman, eh. As a kid I grew up on Redman avenue. I am going to assume that the street was named in honor of the pipemaker though in reality I know this not to be true. Stupid reality. This John Redman produced several very nice looking pipes in his London factory.
Now I wanted to know more about this factory and the history of my childhood street namesake. I turned to pipedia.org. There the entry was what I call lacking. Though there was a nice photograph of the factory.
“John Redman Ltd. and British Empire Pipe Co.
Other lines include Aristocrat, Buckingham, Buckingham Palace, Canberra, Captain Fortune, Dr John, Golden Square, Redonian, Richmond (not Sasieni), Twin Bore
My thirst for knowledge remained unfulfilled. I tried searching the internet without a guide and found a wonderful article by an anonymous author on the vkpipes.com site.
“This famous picture above is perhaps the only broad known illustration to materials about John Redman LTD & British Empire Pipe Co. And the majority of sources doesn’t move usually far beyond a couple of sentenses: this company did really exist, it was located at this address and there is their former building. However…
However, this Edwardian building on Westland Place was only an annex and no actual manufacturing was located there. The principle place of business and offices were located in Whitecross Street 123/5/7, within 15 minutes of slow walking from Westland Place. Therefore, one of their series was named Whitecross – you may find it in the catalogue below. The building on Whitecross St. still stands there and you may see it on the picture below. The crossing street is the Fortune St., so we have got an explanation of another Redman’s brand name – Captain Fortune.
Indeed, many Redman’s brands bear such toponomical signs: the “Golden Square” series comes from the Golden Square located between the Lower John and Upper John streets, “Dr. John” is the most probably related to the abovementioned John streets. There are also Canberra road and Canberra House in London (which might inspire stamping of the famous Canberra pipes) as well as Canterbury House (Canterbury series). Burlington pipes named after the Burlington Arcade (see also H. Simmons). The majority of them are located quite close to the John Redman’s main office. No wide explanations are needed for the series Westminster and Kensington. And of course, some British imperial charm was added with names Aristocrat, Redman’s Royal, King’s Ransom.
John Redman (as it happened later to Eric Nording) was both a carver and an owner of a business of the same name. The first pipes were born in 1934, but personal efforts appeared soon to be insufficient, what inevitably led to emerging of the name John Redman LTD. Unfortunately, we don’t have artifacts, which could be unambiguously carried to the “pre-war” period. In the WWII years the company could hardly got to the list of lucky manufacturers, who received scarce briar from the state.
But by the end of 1950s John Redman’s firm offered a well balanced portfolio – from popular and practical “Captain Fortune”, “Dr John”, “Golden Square” to top graded Redman’s Royal made of best briar and almost without any stains (comparable to GBD Virgin, but the “Royals” were usually much larger and carved in their own unique style). And of course, we shouldn’t forget about qualitative and still affordable Redonians, Aristocrats and Canberras – a very strong middle (and upper middle) segment. More details, list of offered brands as well as presentation and gift sets can be seen in the catalogue.
It is known that in late sixties and later a part of the production was ordered from subcontractors, for example Blakemar Briars, and since 1992 trademarks of John Redman were taken over by Gerald Grudgings of Loughborough; this company wasn’t a top manufacturer, but many sources attribute the invention of the lovat shape to it.
As the conclusion we are proud to express our sincere and warmest thanks to Robert Deering, who worked for John Redman in 1960s and gave us a number of very important directions.
I did start with a clean denim piece but only photographed the stem. I’m not sure why. I guess I wanted to get rid of that nasty marijuana smell so bad that I wasn’t thinking straight. I used a channel lock with the jaws wrapped in masking tape to remove the stinger from the stem.
The stinger was placed into a medicine cup where it was submerged in 95% ethyl alcohol.
The stem cleaning went better than I thought it would, only requiring a couple of bristle pipe cleaners dipped in 95% ethyl alcohol.
Next came the ream team and the reaming of the tobacco chamber.
This too went quickly with the PipNet doing most of the work.
The Tobacco chamber was sanded with 220 sandpaper wrapped around a wood dowel. After the sanding I scrubbed the bowl with alcohol dipped cotton swabs, hoping to get rid of the smell. The interior showed no signs of heat damage.
The rim was not in too bad shape requiring only a little bit of scraping with a sharp pocket knife.
The resulting surface looked better but there were two areas of charring, fore and aft as well as the deep rim dents.
I decided to lightly top the rim to better analyze the best way to proceed with restoring the rim. I used 320 sand paper laid flat on a countertop and circular sanding.
The rim was sanded wit 400 grit paper in the same fashion as with the 320.
The front rim looked pretty good but the rear would require some filling with cyanoacrylate (CA< super glue) and briar dust.
Next, the stummel was taken to the sink where it received a scrubbing with undiluted Murphy Oil Soap and a nylon scrub brush. The soap was rinsed with warm water and the stummel dried with a cotton hand towel.
There was the shine of a clear coat present after the scrubbing. Alcohol had no effect on it soI tried acetone on a make-up pad. This worked but was very slow acting.
I recently refilled my acetone jar by topping it off with fresh acetone. I submerged the stummel in the acetone and set the timer for 30 minutes.
30 minutes later I removed the stummel and decided to scrub the airway of the shank while the tars and smoking residue were still softened by the acetone. The shank was filthy and reeked of non-tobacco. Scraping with a dental scraper and numerous cotton swabs and bristle pipe cleaners seemed to do little but anger the residues.
I continued the assault.
That unpleasant task finished, I turned to addressing the rim damage. I beveled the inner rim with 320 sandpaper and a wood sphere. The outer rim, I tried to bevel it with a flat file.
Though better, those dents had to go. I picked out the old fills with a fly tying bodkin figuring that I may as well do all the filling at the same time.
Since there would be a significant amount of sanding with the new fills, I finished removing all traces of the clear coat with acetone dripped make-up pads.
I placed a small drop of brown CA onto/into each of the pits. While it was still wet, I pressed a small scoop of briar dust into the pit. The briar dust causes the CA to set-up and cure nearly immediately. I used a brass brush to clear the loose dust from the area. The photo below shows what the new fills look like at this stage.
These new fills were filed with a small flat file to remove the excess new fill. The light color of the fill indicates that it needs an additional application of CA and perhaps briar dust. A completed fill appears dark.
An additional application of CA and more briar dust was done.
This created another round of light briar new fills to be filed.
Eventually the new fills were smoothed with a 400 grit sanding sponge.
At this point, I was thinking to myself, “Hey self, the name of the pipe is Golden Square. Let’s try to lighten the briar to a more golden color.” Self replied, “Brilliant, I’ll get the oxalic acid.” Oxalic acid can be used as a treatment to bleach darkened or stained wood. I had mixed this saturated solution several months ago and had used it successfully a few times.
I applied the solution with a cotton swab. The effects occurred quickly. Below is the stummel still wet with the solution.
The solution was rinsed thoroughly then scrubbed with dish soap. The basic nature of the soap helped neutralize any remaining acid. The stummel was towel dried and allowed to air dry for several minutes. The below photos show the lightened color of the briar.
I got the stem prepped for a dip into the deox tank, that is my term for the Skippy peanut butter jar filled with Before and After Extra Strength Deoxidizer. The stem would be spending overnight in the solution.
While the stem was soaking I apparently thought it best to completely not photograph the sanding of the stummel with sanding sponges 400-3500 and also not to photograph the micro-meshing of the stummel with micro-mesh pads 4000-12000. I also failed to photograph me wiping the stummel with an alcohol moistened make-up pad between each sponge and pad to remove sanding debris. For the life of me, I cannot understand why I chose not to do any of the above. Darn old people…
I did however photograph the application of Before and After Restoration Balm after all the sanding and micro-meshing was completed.
After the balm had worked it’s magic for 30 minutes the remaining elixir was wiped from the stummel using an inside out athletic sock revealing the glorious briar of this Golden Square.
The next day, I removed the stem from deox and allowed the excess solution to drip back into the jar.
The stem was hand rubbed with a coarse shop rag to remove the excess solution and some of the loosened oxidized vulcanite.
Below you can see the oxidized rubber that was removed.
I cut a small piece of Scotch tape to cover the stem logo protecting it from the sanding barrage that was coming next.
I wanted the stem in place with the stummel for the sanding to avoid rounding the joint where the two pieces meet. I remembered that the stinger had been soaking in alcohol since the previous day. The medicine cup was retrieved
and the stinger cleaned.
The stem was reassembled and reinserted into the shank. Next, I wrapped the shank with painters tape to protect it from the stem sanding. The sanding progressed from sanding sponge 400-3500. Between sponges I rubbed the stem with mineral oil and wiped it with a paper towel. Oh, and photographed it.
The stem was worked with micro-mesh pads 4000-12000. Between each pad I rubbed the stem with a light coat of Obsidian Oil and wiped it with a paper towel. Oh, and photographed it.
The stem was looking very good but it needed to have the gold reapplied to earn it’s title Golden Square. I cleaned the logo area with an alcohol dipped cotton swaband fetched the Gold Leaf Rub’nBuff.
The gold was applied to the logo with a fly tying bodkin, pressing it into the stamped logo.
The Rub’nBuff was then rubbed and buffed to remove the gold from the high points of the logo.
I then used Before and After Fine Polish followed by the Extra Fine Polish. Both compounds were hand buffed with a soft cotton cloth.
The pipe, now cleaned, still had the lingering aroma of non-tobacco – yeah pot smoke. I decided to give it an alcohol and cotton ball overnight treatment. I stuffed cotton into the bowl and shank of the stummel then added 95% ethyl alcohol with a disposable pipette until the cotton was saturated. This sat overnight. In the morning, I found the following:
The cotton was removed and the bowl and shank were again scrubbed with alcohol dipped cotton swabs. The Ghost of Mary Jane was gone.
The pipe was reassembled and taken to the buffer where it received several coats of carnauba wax.
The final step was to hand buff the pipe with a microfiber polishing cloth.
Overall this Golden Square Apple turned out very nicely. I love the traditional well proportioned shape. The pipe retained some of the contrast stain, enough that I did not think additional dying was needed. The oxalic acid treatment did a nice job at lightening the briar without diminishing the original stain too much. I could have continued with additional bleaching but I liked where I stopped. The vulcanite of the stem polished up nicely and accents the briar well. The dimensions of the Golden Square Apple are:
Length: 5.58 in./ 141.73 mm.
Weight: 1.51 oz./ 42.81 g.
Bowl Height: 1.68 in./ 42.67 mm.
Chamber Depth: 1.43 in./ 36.32 mm.
Chamber Diameter: 0.72 in./ 18.29 mm.
Outside Diameter: 1.53 in./ 38.86 mm.
I do hope that you have found something here useful to your own pipe care, maintenance or restorations. If you like this sort of thing, please click the like and subscribe buttons. Thank you for reading the ramblings of an old pipe lover.
Loading…
Below are some photos of the finished Golden Square Apple.
“Another Kiko Caveman?”, you ask. I reply. “YES!” These pipes are so interesting, not just to look at but to hold. The feel in the hand is remarkable. The first thing that strikes me is how lightweight they are especially for a hunk of rock. Second, is the sheer idea of the age of the mineral itself. One source dates this Amboseli sepiolite (meerschaum) to the Late Pleistocene to Holocene age so, approximately 12,000-10,000 years ago (https://www.sciencedirect.com/science/article/abs/pii/S007045710870027X). This is interesting since several pipes advertise “century old” briar. How many can claim to be 100 centuries old? Anyway, this Kiko came from an eBay auction and has a much less interesting acquisition story than the first Kiko Caveman. Meerschaum is a hydrophilic mineral, meaning water loving. A few weeks ago I was chatting with Sascha Mertens, a pipeman from Germany, he was explaining how to tell a block meer from a pressed meerschaum. You need only to place your tongue on the meerschaum. It will stick to a block meerschaum and not with a pressed. This reminded me of testing minerals as a geologist. The same thing would occur with anhydrous hydrophilic minerals. Well, my tongue stuck most uncomfortably to the Kiko. It was in need of a fresh coat of beeswax.
The stem is the only part of the pipe that is stamped with any identifiers. Here we can see the elephant logo on the left side of the shank and TANGANYIKA on the bottom surface.
The Meerschaum was in good shape and the tobacco chamber was mostly clean, no cake to speak of. It looked like this restoration would be mostly stem work and of course a fresh beeswaxing.
Background
I did a restoration of another Kiko Caveman a couple of weeks ago. I will include a link here to that restoration. I will also use the background of the previous restoration here as both pipes are similar.
The first step that I took in researching this pipe was to look up the logo at pipephil.eu. There I found the following:
Turning to pipedi.org for some history of Kiko led to the following entry:
“Kiko, meaning “pipe” in Swahili-Kiswahili to English translation, is probably the best known of the various brands listed below. In East Africa Meerschaum is found in Tanganyika, once known as German East Africa, and since 1964 part of the United Republic of Tanzania. The main deposit comes from the Amboseli basin surrounding the Lake Amboseli. Tanganyika Meerschaum is normally stained in shades of brown, black and yellow, and is considered to be inferior to Meerschaum from Turkey. Eventhough, the raw material is mined by the Tanganyika Meerschaum Corporation and to a large extent used for pipemaking. Uncounted pipemakers throughout the world were supplied with Amboseli Meerschaum, preferentially used for Meerschaum lined briars or leather-clad pipes. In Tanganyika the Kilimanjaro Pipe Company Ltd.” (Kiko – Pipedia)
And, more specifically the Caveman line of Kiko pipes.
“Caveman Fashioned from a piece of natural meerschaum.Every pipe is unique and – is in fact a geological specimen over a million years old.Attractively boxed.” (Kiko – Pipedia)
A second entry at pipedia.org discusses the Tanganyika Meerschaum Corporation in greater detail.
“From Pipes, Artisans and Trademarks, by José Manuel Lopes
Tanganyika Meerschaum Corporation is a company that formed in 1955 by Kenyan businessmen from Nairobi after the discovery of a meerschaum mine relatively close to the surface on Kilimanjaro. The meerschaum is tougher, less porous, and cheaper than the Turkish variety. Another mine was soon discovered in Sinya, in the famous Amboseli Game Park.
To give more depth to the meerschaum story here is a quick lesson in geography.
Lake Amboseli is a rainy season body of water along the shared border of Kenya and Tanzania, northwest of Mount Kilimanjaro. The straight white line on the image below is that border. Sinya refers to the Sinya Mine (https://www.mindat.org/loc-266724.html).
Zooming in on the south western shore of the temporary Lake Amboseli you can actually make out the excavations of the old mining activities. On the below image from google maps; pits, tailing piles, roads etc… can be discerned.
It appears that little to no mining is done at the site today. Several sources say that the meerschaum deposit were close to the surface, not very large and were played out
With all of that information in mind and assuming that the TANGANYIKA stamp on the stem is referring to the country of manufacture (COM) this pipe was made not after 1962.
The Restoration
After getting a clean denim piece this pipe needed to have the stem freed from the tenon. It was firmly attached firmly, as if someone appeared to have glued the stem in place.
I wrapped the stem with several wraps of masking tape to protect the stem from the channellock pliers. A twist and turn later the stem was freed.
The tenon appeared to be aluminum as it was not attracted to a magnet and glued in place in the meerschaum. When inserted completely the stem was loose but if backed out about 2 mm it was a perfect fit. I decided that a cork washer would be the easiest fix for this situation.
The photo below shows the light cake deposits in the bowl were removed with 220 sandpaper wrapped around a wood dowel.
The stem was cleaned with bristle pipe cleaners dipped in 95% ethyl alcohol. The stem was then placed into a jar with Before and After Extra Strength Deoxidizer. The jar needed to be propped at an angle due to the length of the stem.
The stummel was cleaned with warm tap water and a nylon scrub brush.
Fresh beeswax was melted in a small glass canning jar placed in a pan of boiling water. The surrounding water keeps the wax molten for longer enabling me to have more time with the molten wax.
The heat gun was set up in proximity.
I did not have a cork of suitable size to plug the tobacco chamber so through the power of adaptation I discovered a 20 gauge shotgun shell was the perfect diameter. The shotgun shell was my plug and handle for the heating of the meerschaum with the heat gun.
The molten beeswax was brushed onto the stummel and the meerschaum was heated with the heat gun. The aluminum lid acted as a wax drop catch pan. Several coats of beeswax were brushed onto the meerschaum.
Below you can see the meerschaum was set aside to cool.
After four hours the stem was removed from the Before and After Extra Strength Deoxidizer and it was allowed to drip excess solution back into the jar.
The stem was hand rubbed/buffed with a coarse shop rag to absorb the remaining solution and abrade the softened oxidized vulcanite.
The below photo is blurry but does show the oxidized rubber left behind on the rag.
The stem was rubbed with mineral oil to prevent new oxidation.
My masking tape protective layer was not quite adequate to protect the stem during the freeing from the stummel. Doh! That would need to be repaired with an application of black cyanoacrylate (CA, super glue). Well, now you know that I make mistakes. A lot of them… The stem stamping and logo were covered with painters tape to protect them during the sanding.
The dent was filled with black CA and allowed to dry/cure on its own.
Once cured the repair was filed with a small flat file. The stem was then sanded with a series of sanding sponges from 600-3500 grit. Between sponges the stem was rubbed with mineral oil and wiped with a paper towel.
The elephant logo area was cleaned with a cotton swab and ethyl alcohol to remove sanding debris and mineral oil in preparation of a new paint job. White acrylic modeling paint was used.
The paint was applied using a bamboo skewer.
When dried the paint outside of the depressed logo was removed during the micro-meshing. This was done with 4000-12000 micro-mesh pads. Between each pad the stem was rubbed with Obsidian Oil and wiped with a paper towel.
The stem was taken to the buffer where it was polished with Blue Diamond compound . The stem then received several coats of carnauba wax. The stummel, having just received fresh beeswax, did not have any carnauba wax applied.
I am very pleased with how well this Kiko Caveman turned out. I could not find any information concerning the shapes that the makers tried to carve for. This pipe was very different in regards to the tobacco chamber drilling than the previously restored Kiko Caveman. This pipe has a narrow 16.26 mm bore while the other Kiko has an 18.29 mm bore. I tried the narrow bore with Carolina Red Flake virginia blend and it smoked very nicely. The stem of this pipe polished nicely and the glossy black vulcanite accents the lighter meerschaum well. The long stem does not make for a very comfortable clenching pipe but the “hand feel” makes up for that. Besides, the flat bottom of this pipe provides a perfect and stable sitting base. The dimensions of the Kiko Caveman Chimney are:
Length: 6.85 in./ 173.99 mm.
Weight: 1.92 oz./ 54.43 g.
Bowl Height: 3.02 in./ 76.71 mm.
Chamber Depth: 1.69 in./ 42.93 mm.
Chamber Diameter: 0.64 in./ 16.26 mm.
Outside Diameter: 1.92 in./ 39.88 mm. In line with the stem
1.47 in./ 37.34 mm. Perpendicular to the stem
I do hope that you have found something here useful to your own pipe care, maintenance or restorations. If you like this sort of thing, please click the like and subscribe buttons. Thank you for reading the ramblings of an old pipe lover.
Loading…
Below are some photos of the finished Kiko Caveman Chimney.


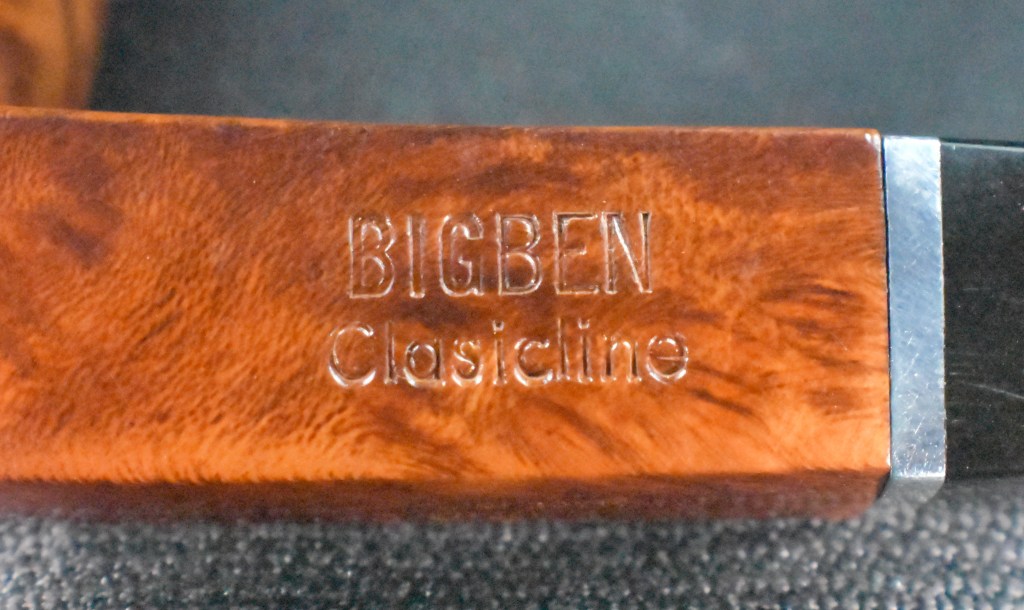


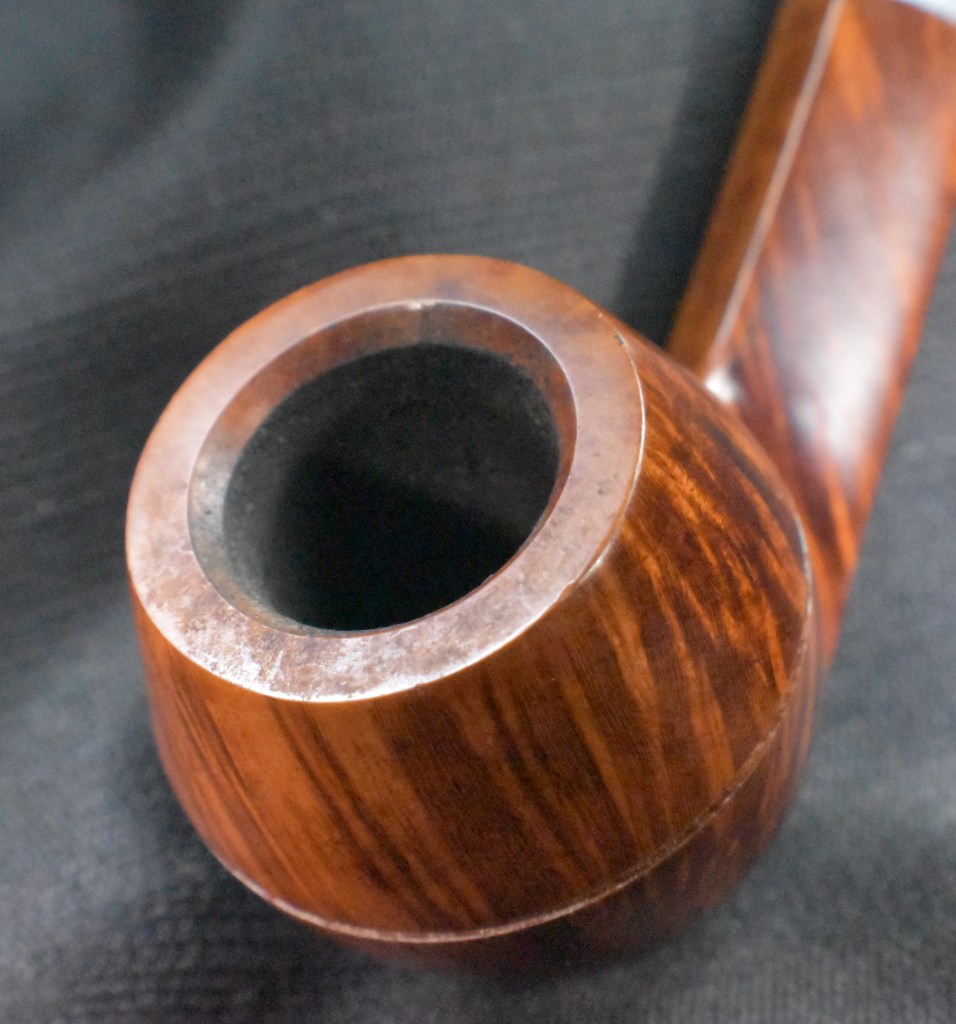
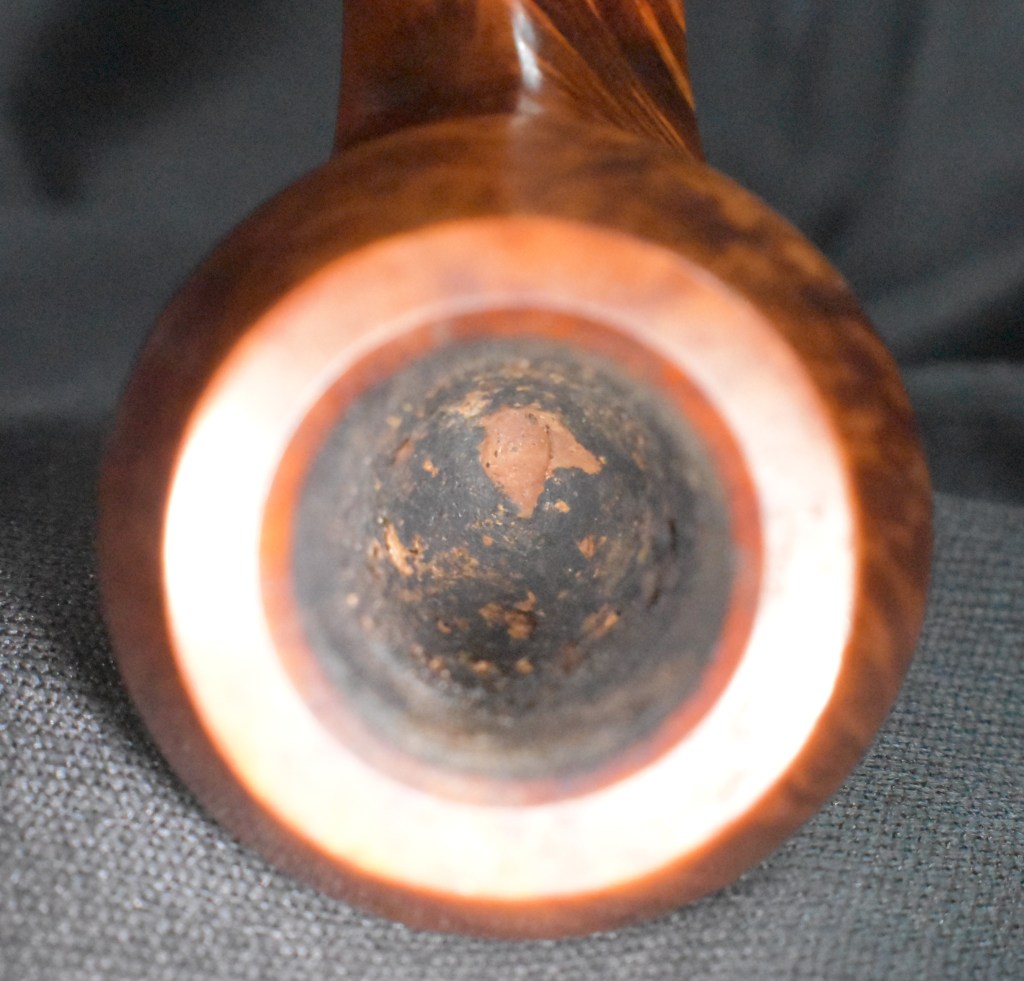
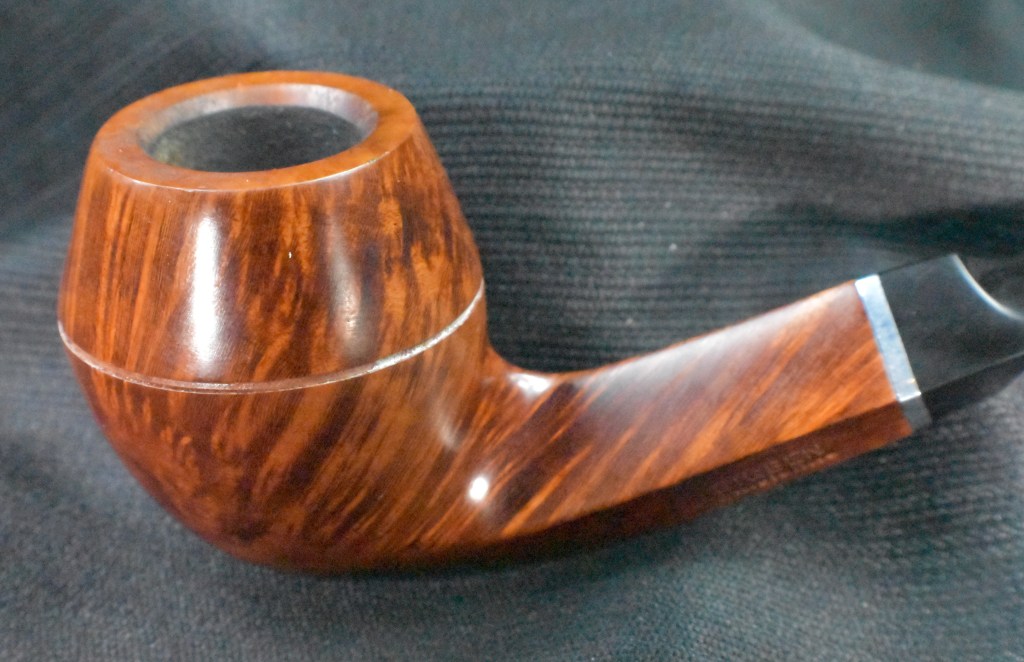
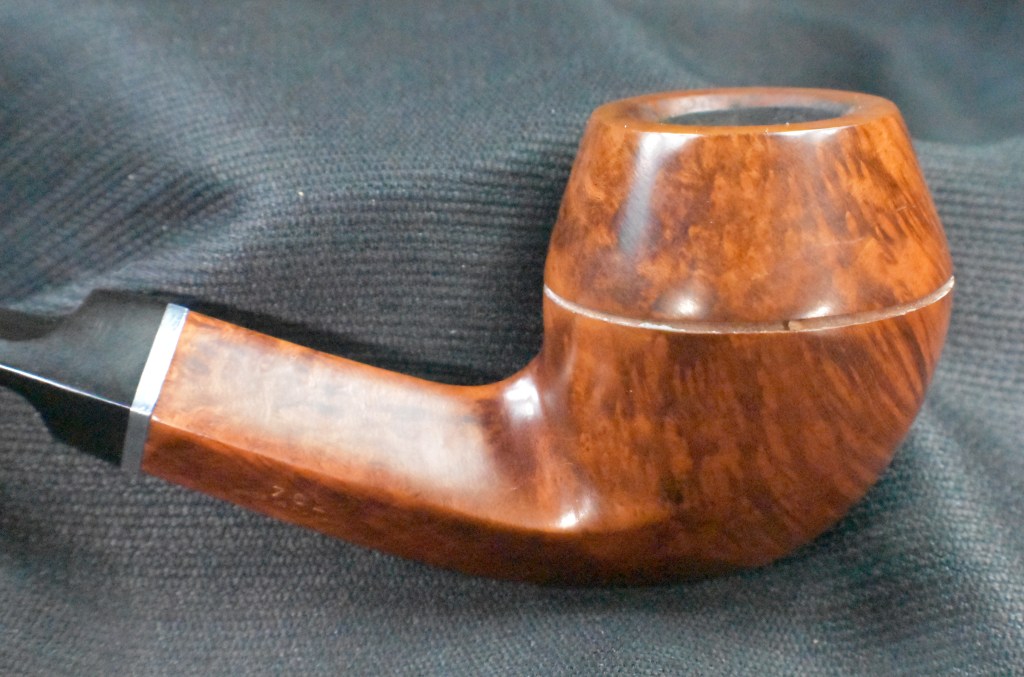

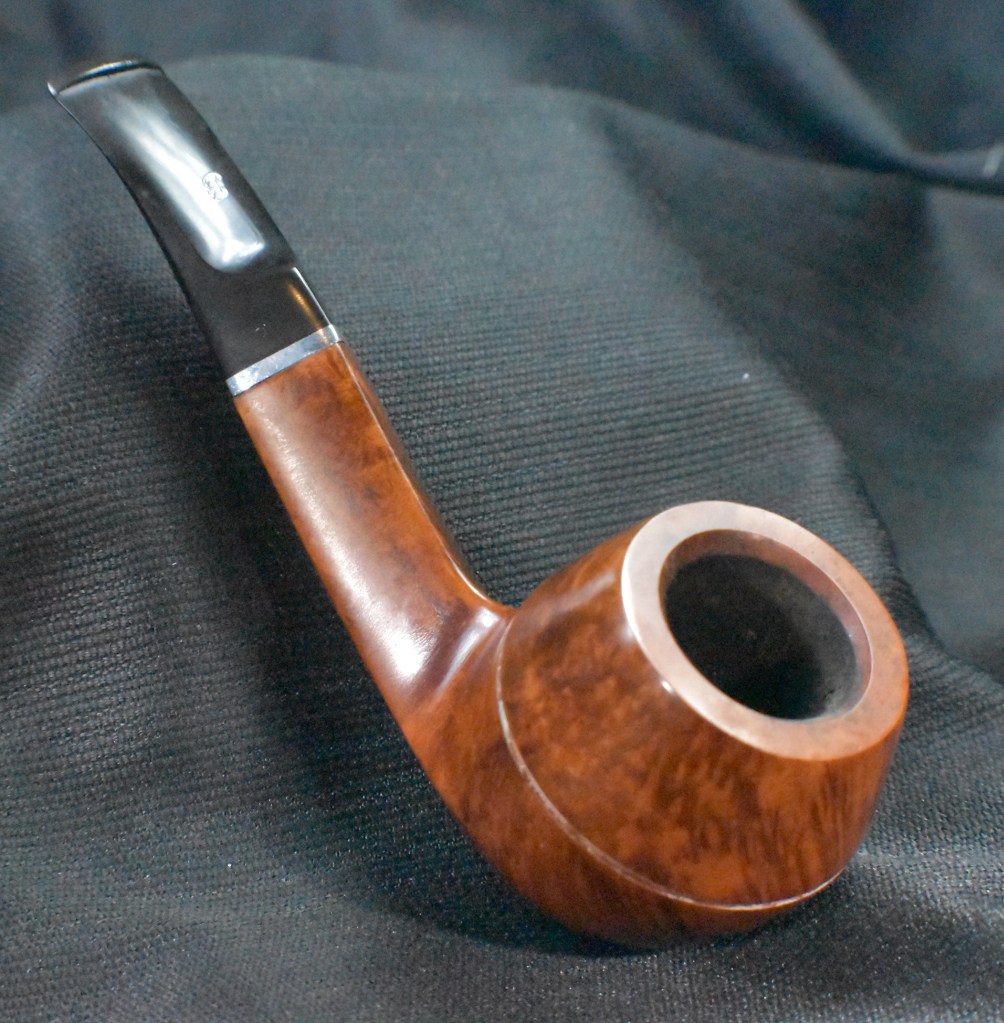


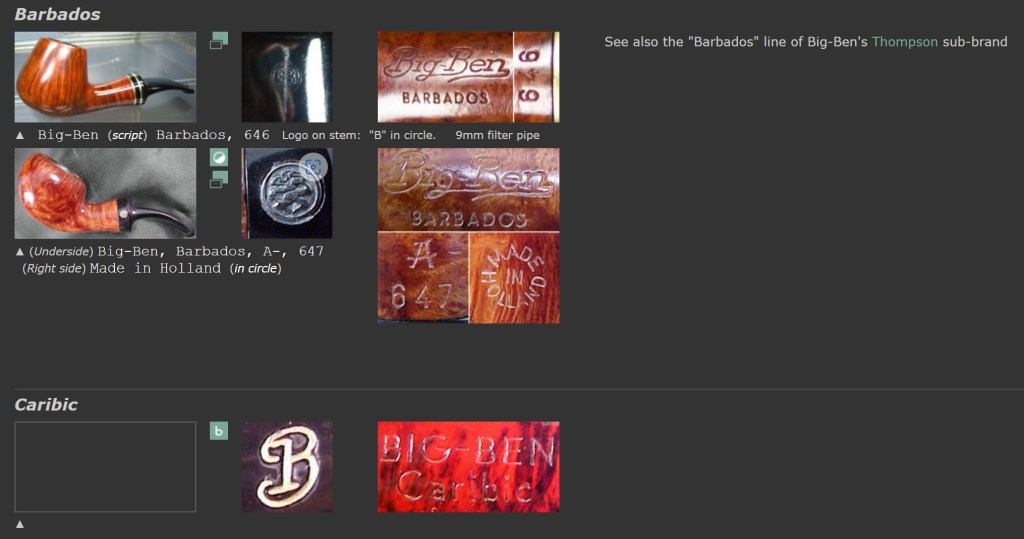

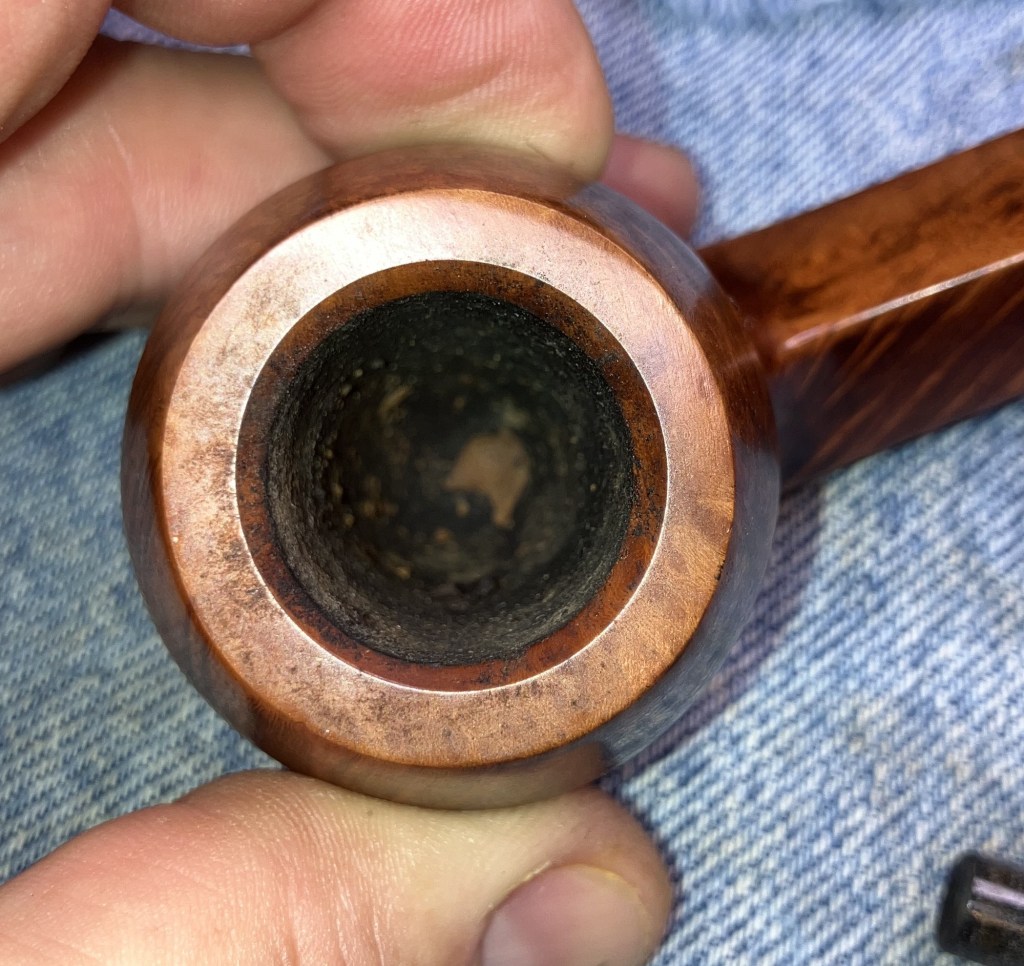

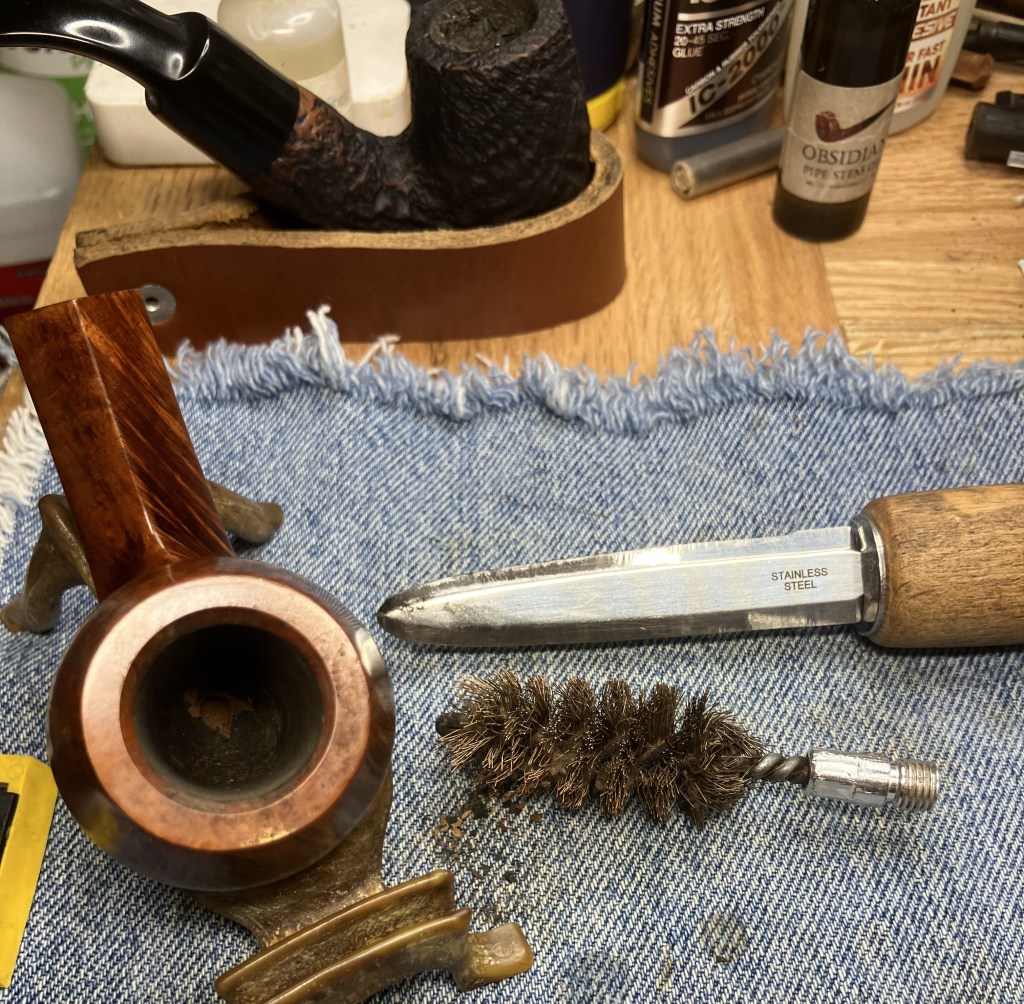
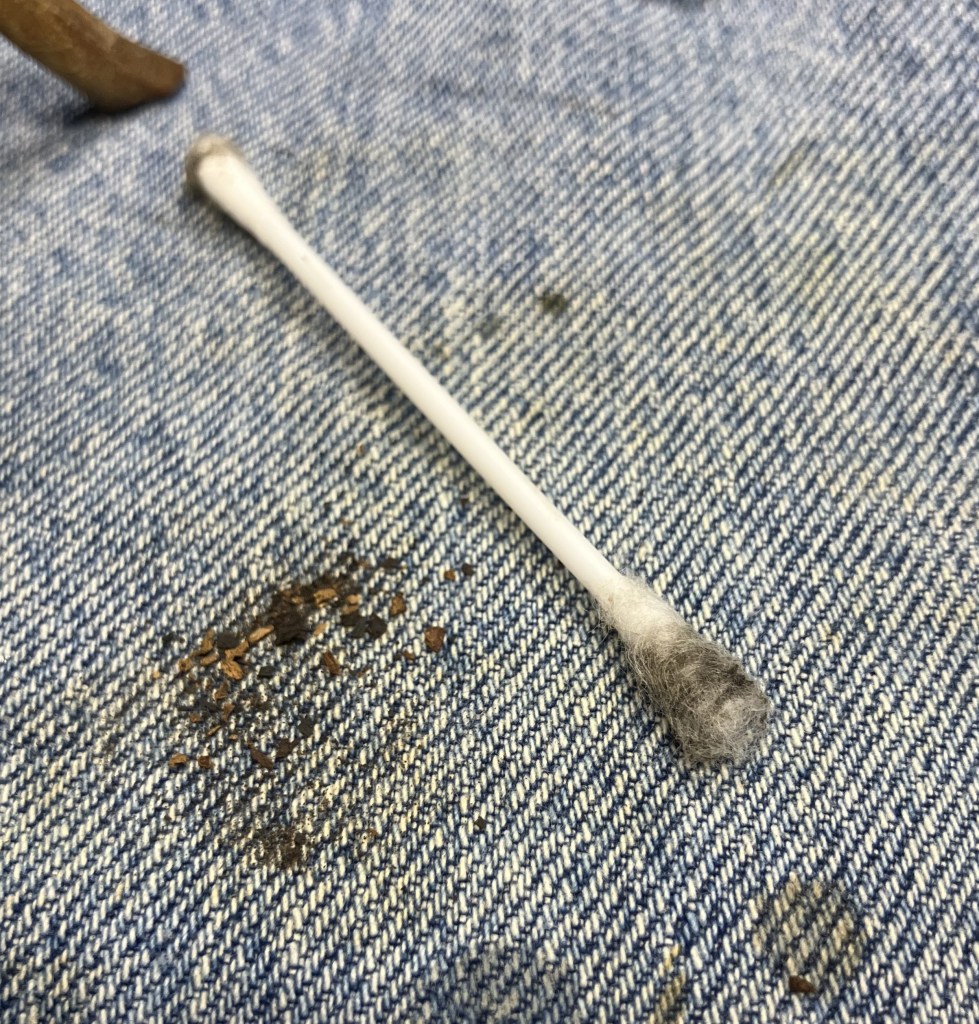


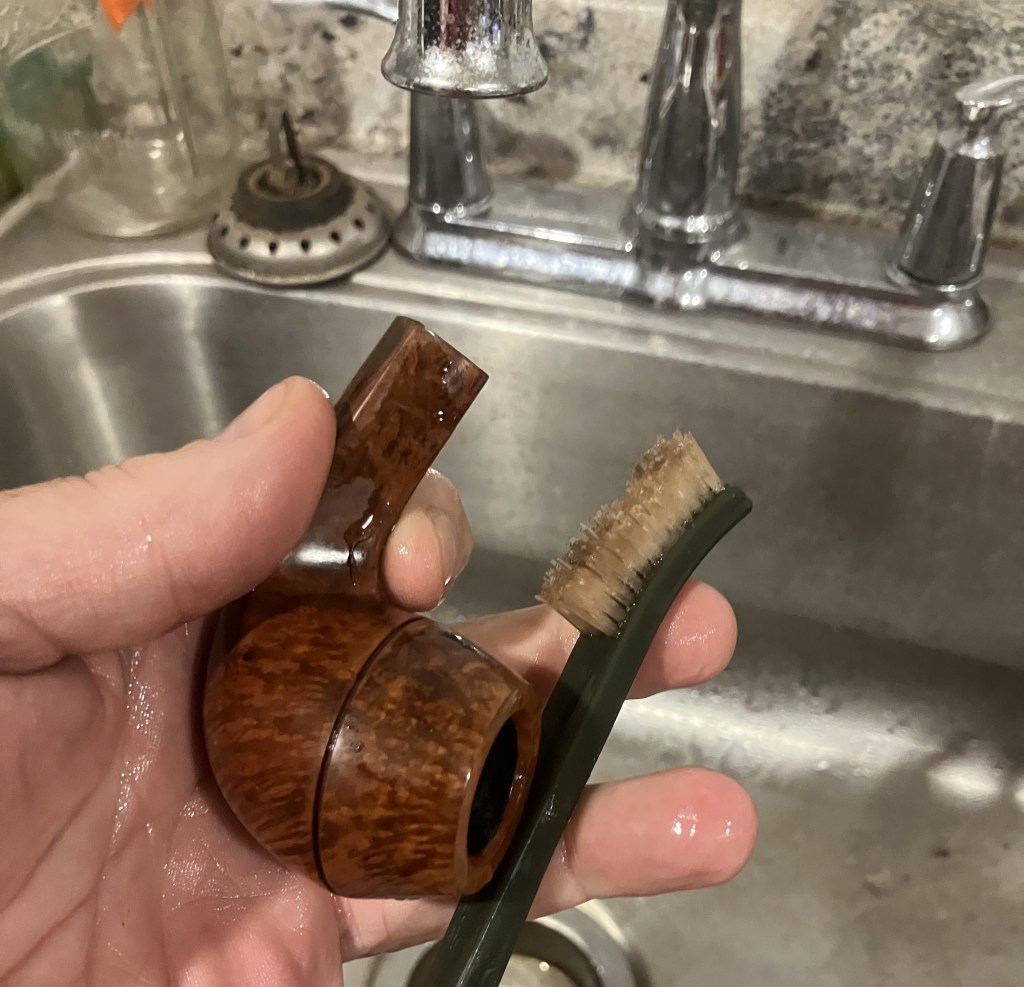
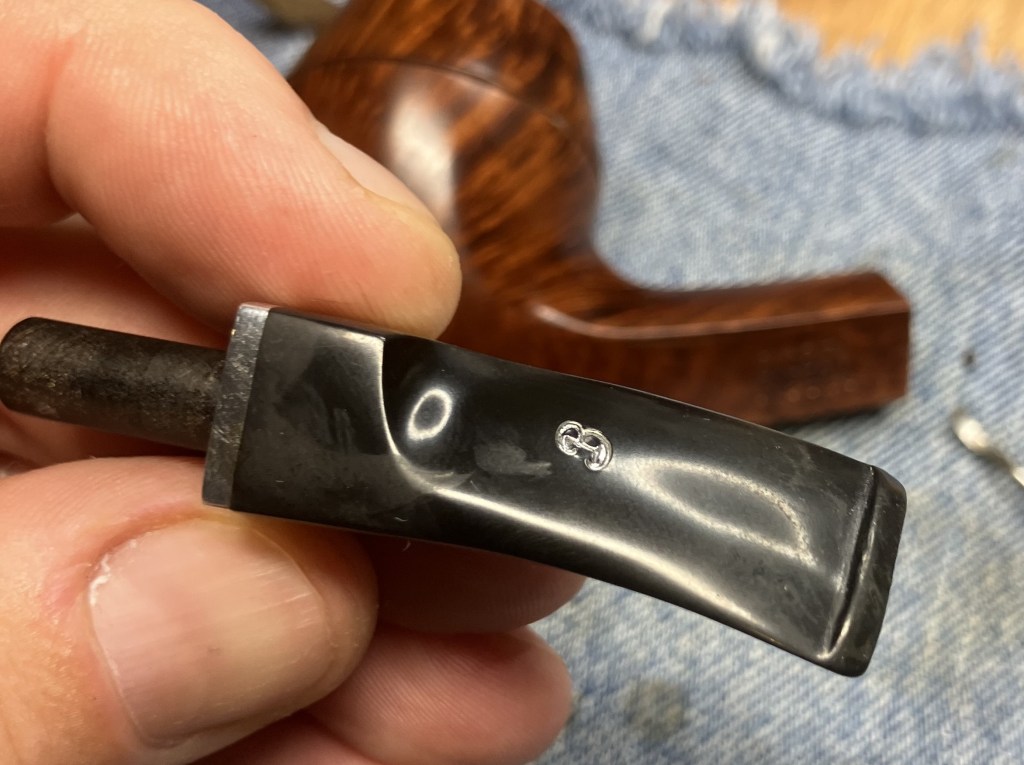
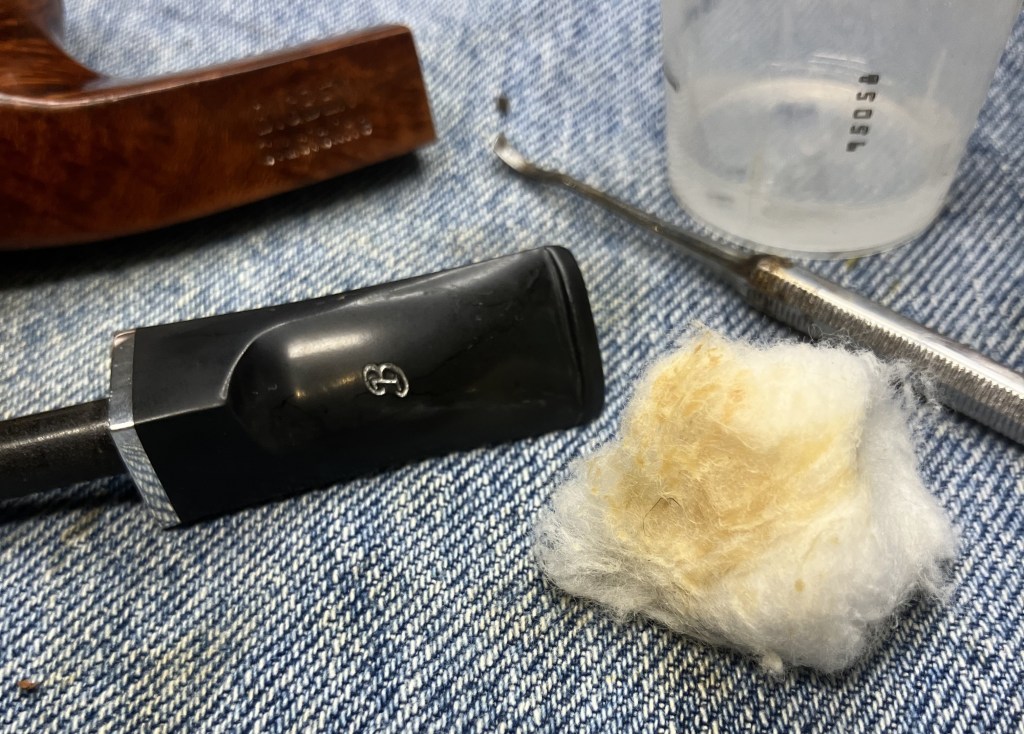
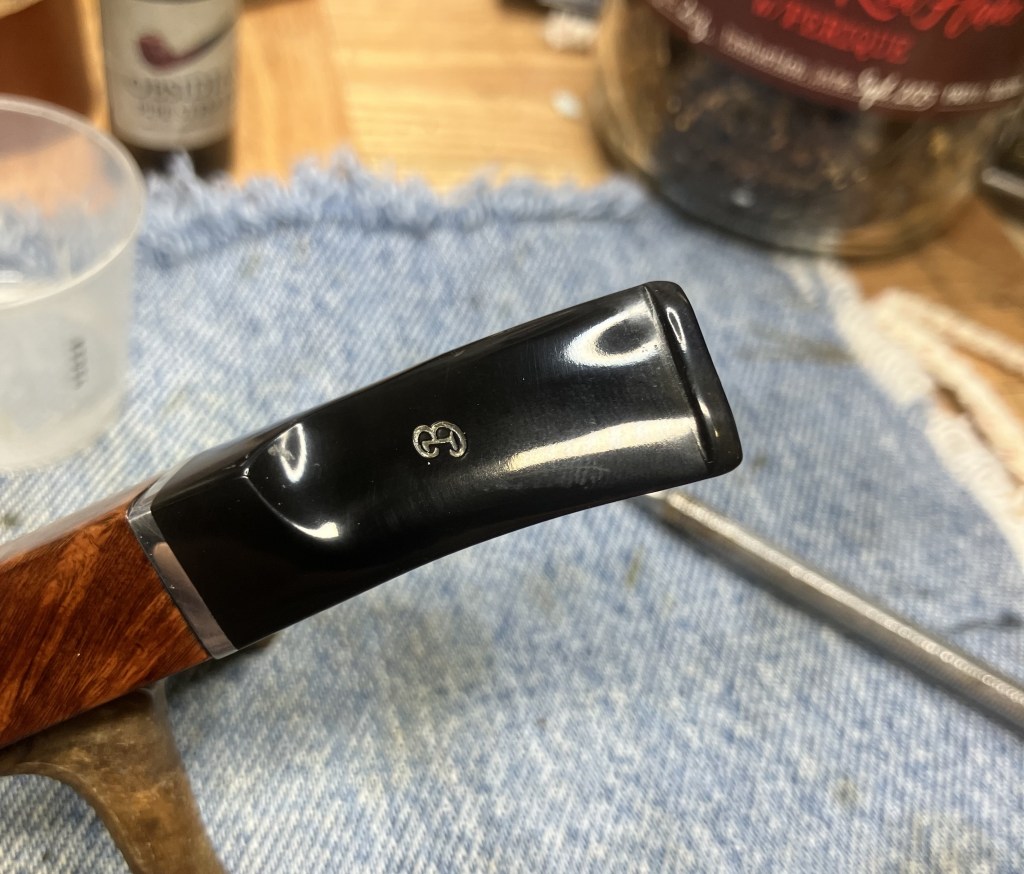

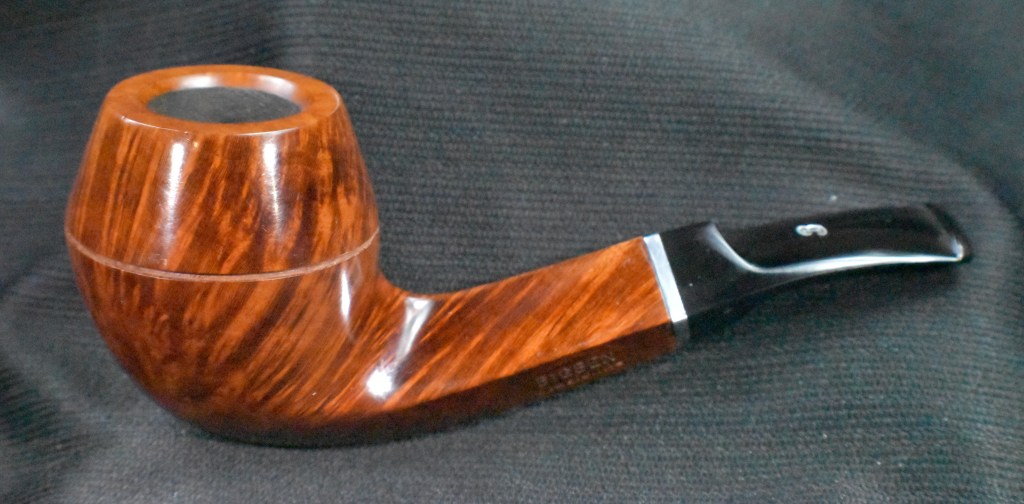


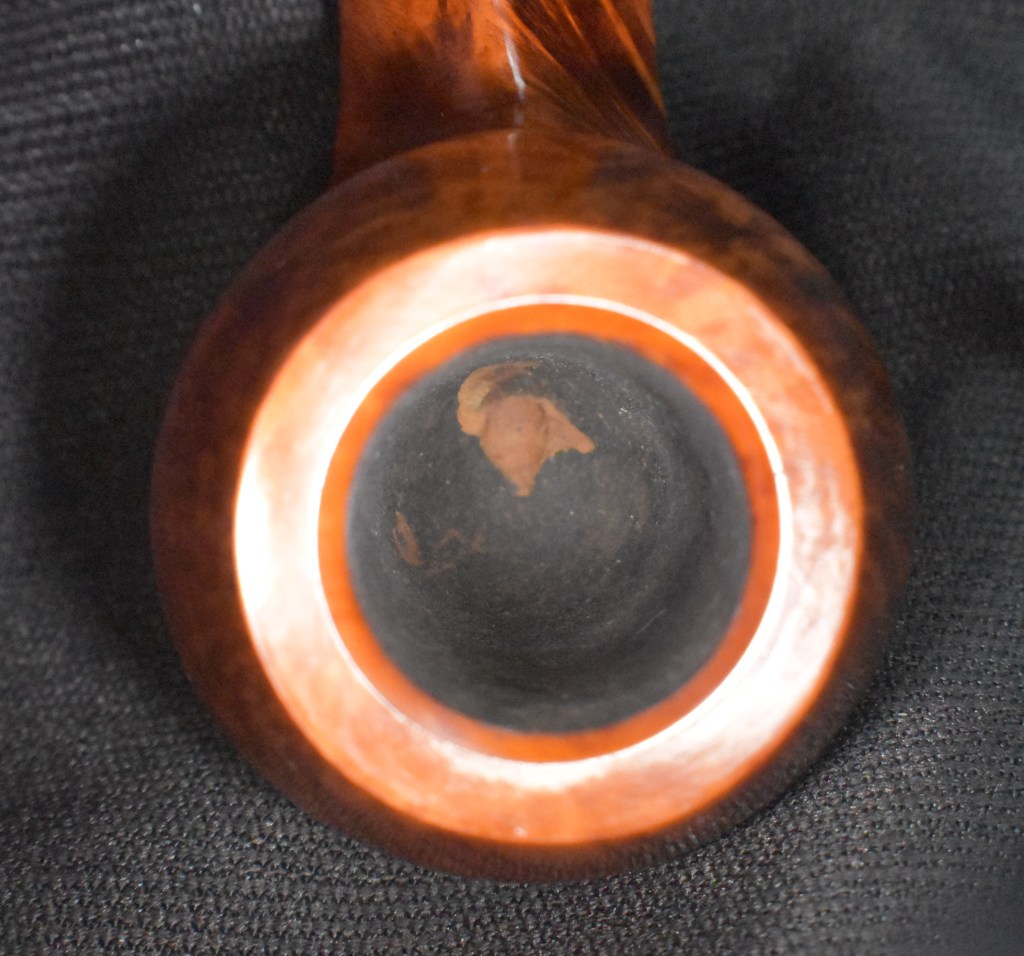
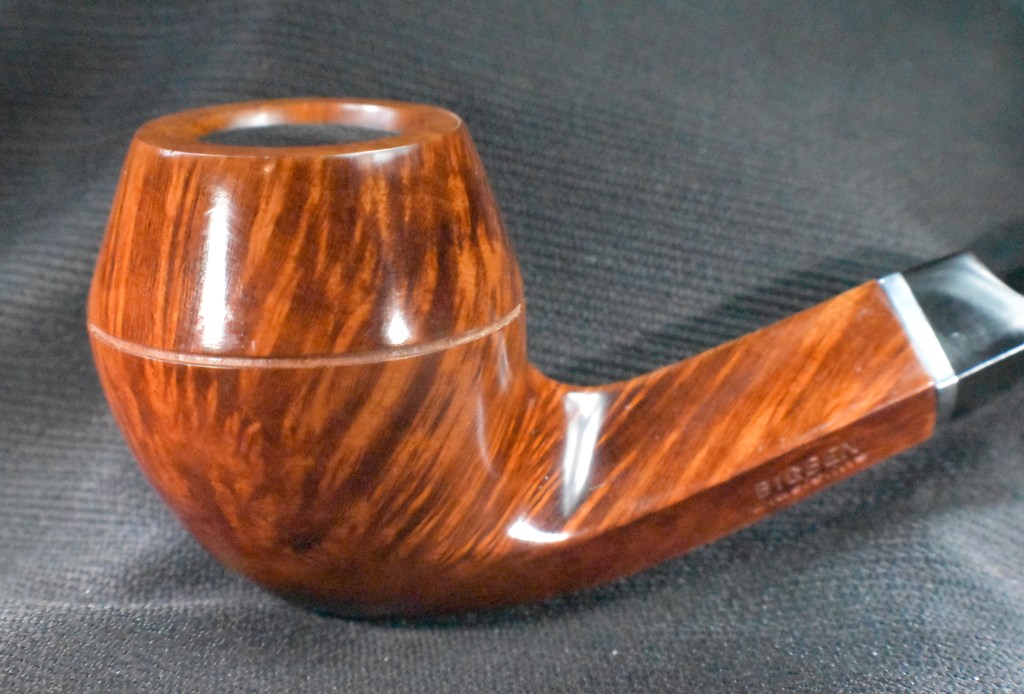
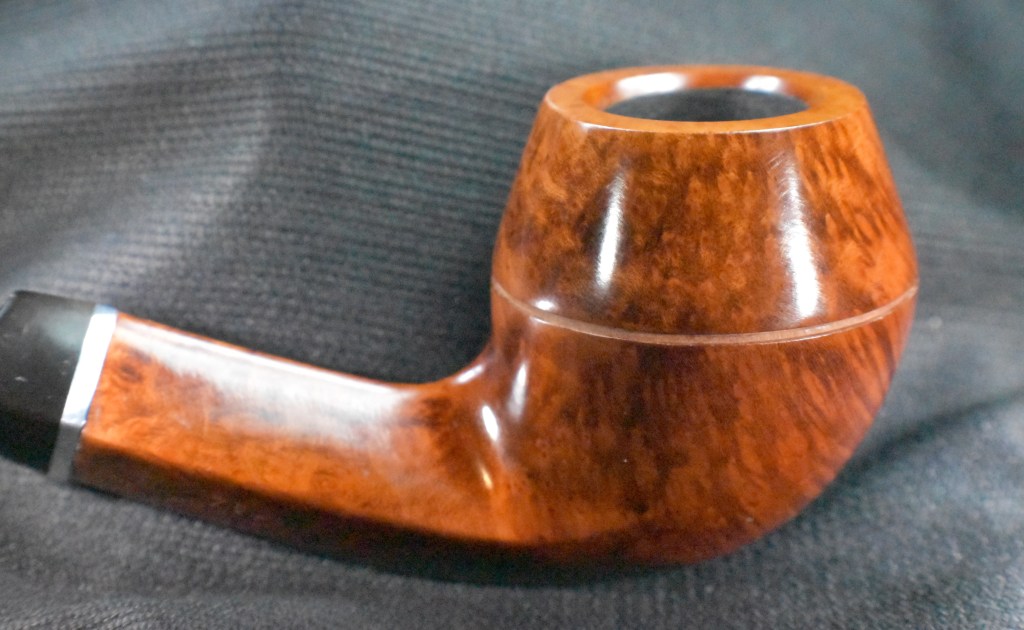

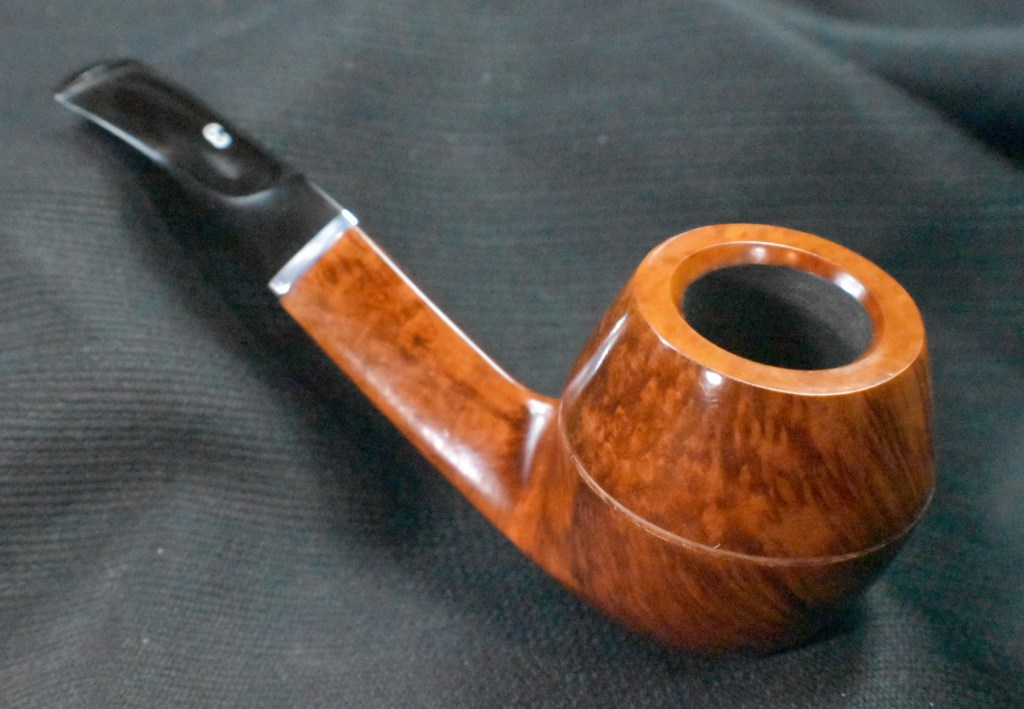

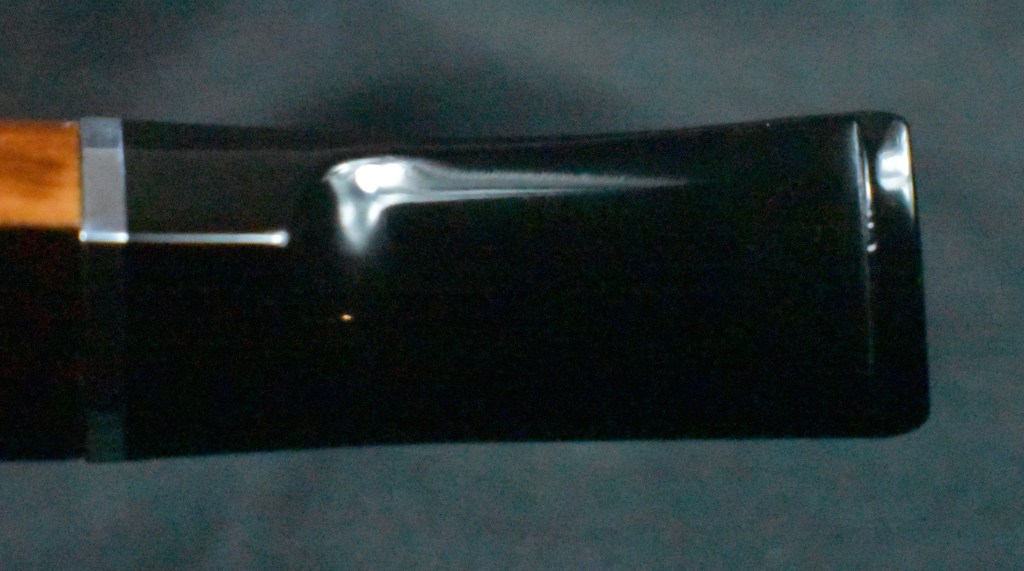


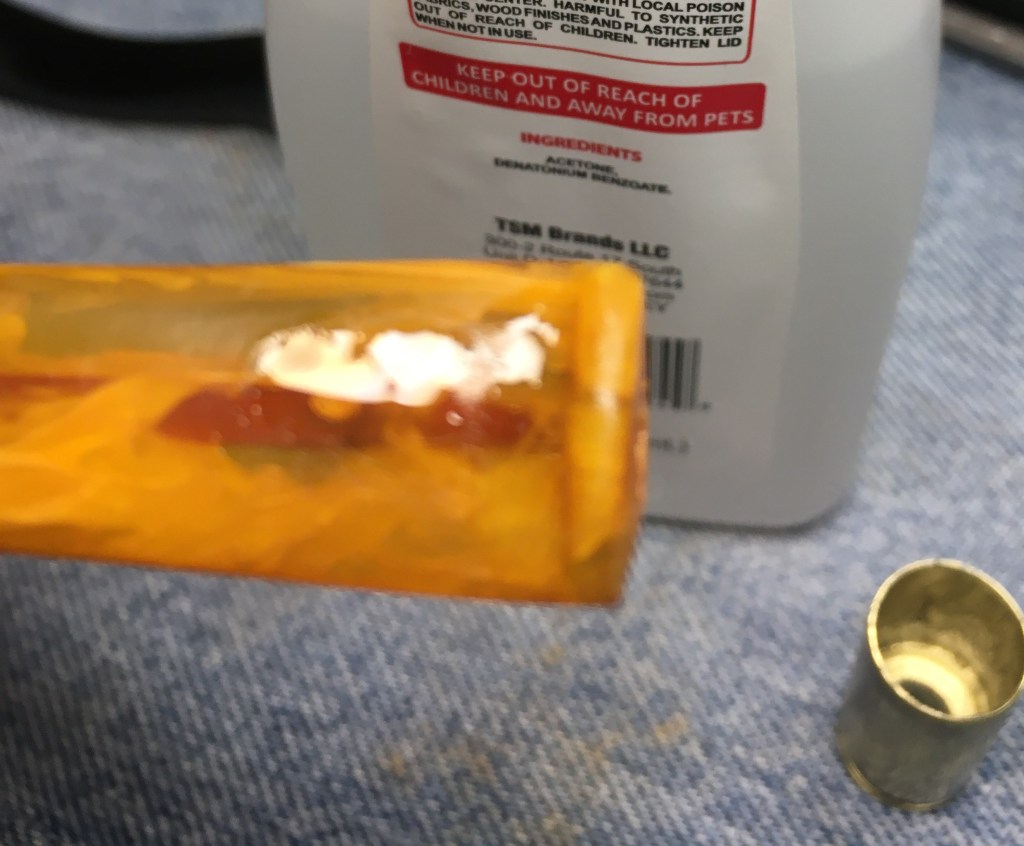


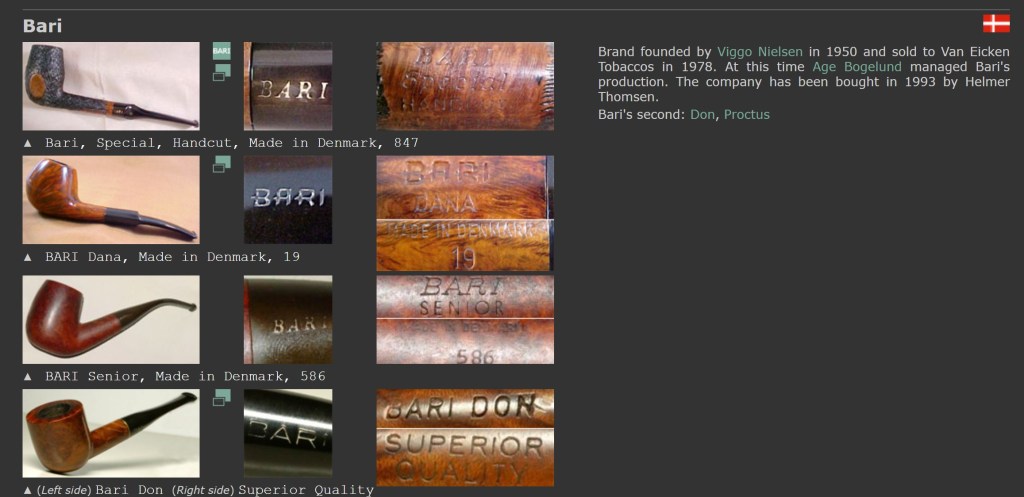


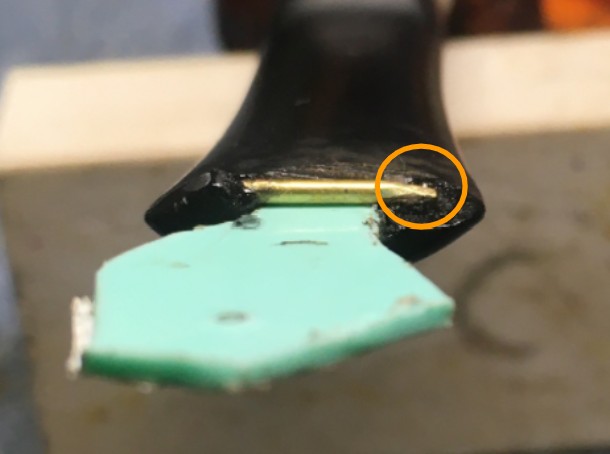


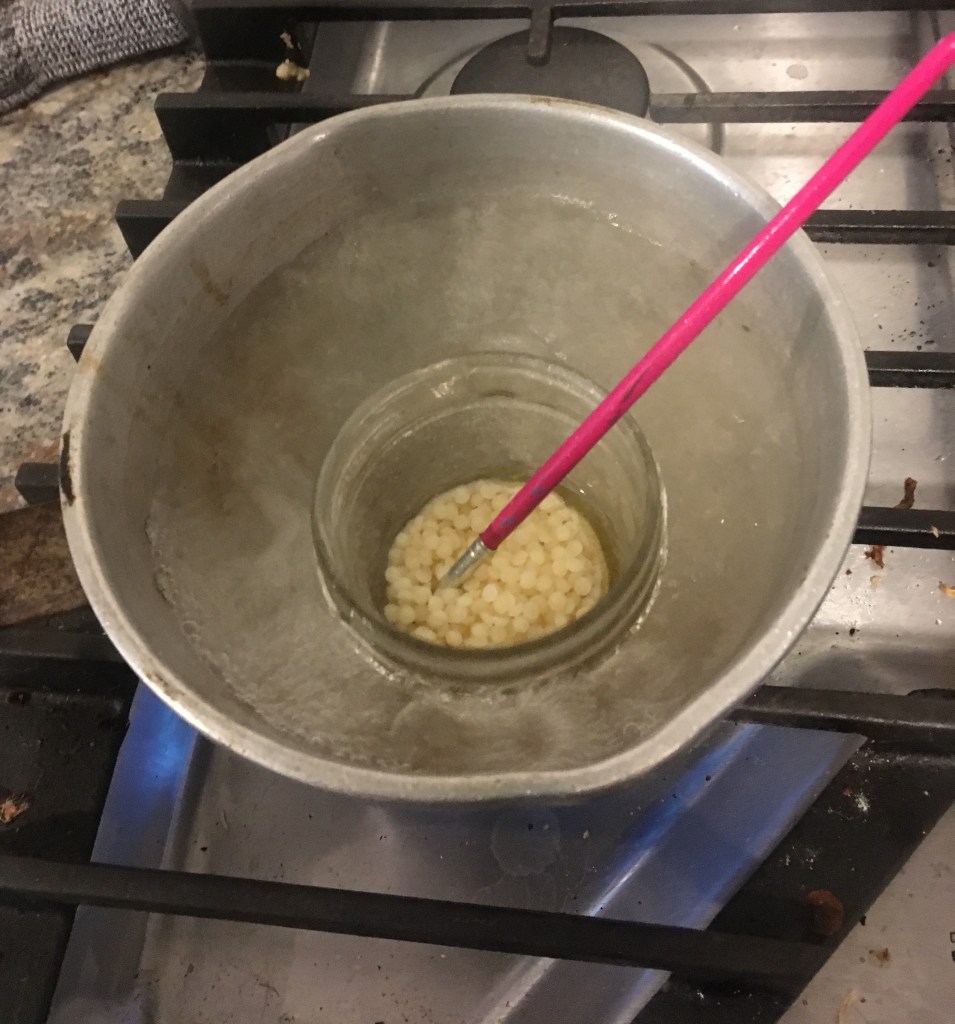


