
Photographed and written by
John M. Young
I cannot say that I have had a lot of experience with Bari pipes. I can say that they have a look all their own and this one adds a Danish flare to what I’d call a bent billiard shape. I am sure there is a pretty pipe under the years of accumulated dust and grime and the stem most likely is not supposed to be that unique two tone pea green on top. This Bari came all the way from Eschweiler, Germany with an estate lot. I was hoping for some pipesthat were a bit less common to the States and was not disappointed. The Bari had a stamped and painted BARI on the stem but I couldn’t be certain of the paint color. On the underside of the shank there was a smooth area stamped with BARI over DE LUXE next to that is MADE IN over DENMARK and offset to the right a 710 (assumed to be a shape number). Below are some photos of the Bari prior to work.


Hmm, I do not think that this two tone stem is part of the original design. The oxidation of the stem appears to be the greatest area in need of restoration with the rest of the pipe just needing a good cleaning and a bit of refinishing.
Background
Not being well versed in the history of Bari pipes, I turned first to pipedia.
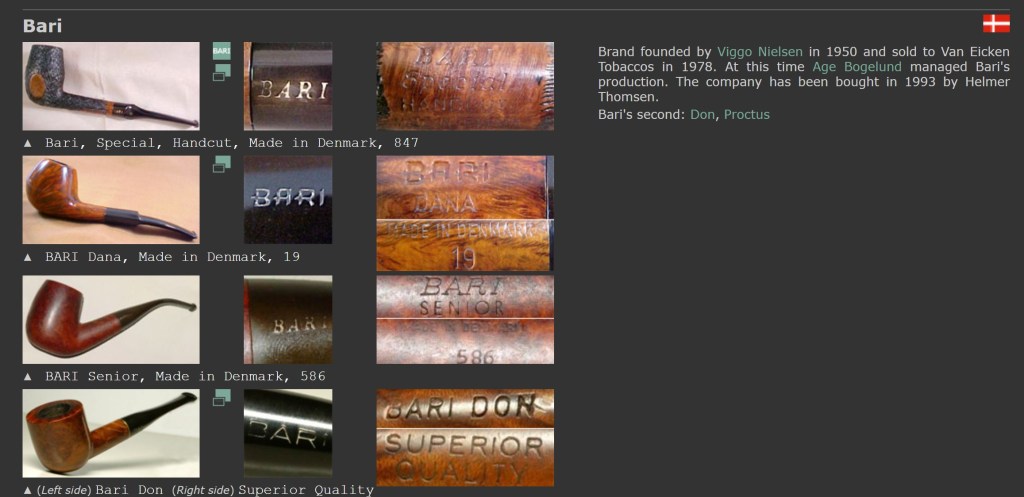
“Bari Piber was founded by Viggo Nielsen in Kolding around the turn of 1950/51. Viggo’s sons Kai Nielsen and Jørgen Nielsen both grew into their father’s business from a very young age and worked there till 1975.
Bari had very successfully adapted the new Danish Design that had been started mainly by Stanwell for it’s own models. When Viggo Nielsen sold Bari in 1978 to Joh. Wilh. von Eicken GmbH in Hamburg Bari counted 33 employees.
From 1978 to 1993 Åge Bogelund and Helmer Thomsen headed Bari’s pipeproduction. Thomson bought the company in 1993 re-naming it to Bari Piber Helmer Thomsen. The workshop moved to more convenient buildings in Vejen. Bogelund, who created very respectable freehands of his own during the time at Bari got lost somehow after 1993.
Bari’s basic conception fundamentally stayed the same for decades: series pipes pre-worked by machines and carefully finished by hand. Thus no spectacular highgrades but solid, reliable every day’s companions.
The most famous series are the smooth “Classic Diamond” and the blasted “Wiking”.” (Bari – Pipedia)
The entry in pipedia.org looked like a pretty good Google translate entry with some non-standard English wordsmithing. It did give me an idea as to the age of the pipe though.
Next I searched pipephil.eu for Bari logos. Here I screen captured the below image:
(B-Barn — Pipes : Logos & Markings)
The Restoration
The Bari made it onto a freshly laundered piece of denim on the workbench. Upon removing the stem I saw a brand new 3mm filter emerging from the stem. “Huh, never tried one of those”, I thought.

I began this project with the stem since that was the part which seemed to be in the greatest need of attention. It was cleaned out with bristle pipe cleaners dipped in 95% ethyl alcohol. The surface was lightly sanded with 400 grit sandpaper and a pipe cleaner was inserted into the tenon to act as a hanger.

The stem was suspended in Before and After Extra Strength Deoxidizer overnight. I refer to this as deox, kind of like detox for alcoholics or drug users (it makes me smile).

Before I gave the stummel a scrub I wanted to see if there was some kind of a clear coat finish applied. I thought the smooth underside of the shank looked too glossy for no finish. I wiped the stummel with 95% ethyl alcohol on a make-up pad. The pad immediately picked up stain. Yay, no finish to remove just a very nicely sanded and stained piece of briar.

The stummel was taken to the sink for its scrubbing. This was done with undiluted Murphy Oil Soap and a nylon brush. The soap was rinsed with warm water and the stummel dried with a cotton hand towel.

Back at the workbench I wiped the stummel with alcohol wetted make-up pads. I was amazed at how much stain came off.

The team was gathered.

The #1 and #2 blades of the PipNet did most of the work but the Kleen-Reem was used to ream the bottom of the tobacco chamber as it was bored with a more tapered bit than the PipNet blades.

The final scraping was done with the General triangular scraper. I had ground the sharpened factory tip off the General and it was perfect for getting the bottom of the chambers done.

The interior of the chamber was sanded with 220 sandpaper wrapped around a wood dowel. The chamber showed no evidence of any heat damage or charring.

The next day, I removed the stem from deox and allowed the excess solution to drip back into the jar.

I laid the stem onto a coarse shop rag. I like the coarse rag for vigorously rubbing the stem after deox to remove the remaining solution and some of the oxidized rubber that was loosened by the deox.

Below you can see a good deal of removed oxidized material on the rag.

Back at the workbench the stem looked much better, well more black, though the surface now showed light pitting from the removal of the oxidized vulcanite.

I used make-up pads drizzled with Soft Scrub cleanser to rub the stem surface. This removed more of the oxidized rubber.

I tried hand buffing the stem with Before and After Fine Polish. In a conversation I had with the inventor of the Before and After products, Mark Hoover, he mentioned that this was his preferred technique.

The Fine Polish did improve the condition of the stem but I think I am too impatient for Mark’s technique. I masked off the logo, mounted the stem to the shank and masked off the shank. I was going to use the buffer and see if I could get rid of the remaining oxidation.

At the buffer I used the dedicated rouge wheel and compound.

The buffing worked wonders but there remained brown areas which I was not happy with. The worst was immediately below the button. I tried sanding with 320 and 400 grit sanding sponges.

The brown persisted. I then brought out the big gun – a small flat file. The area below the button was filed on both top and bottom.

This was then resanded with the 320 and 400 sanding sponges then rebuffed. Finally I was happy with the appearance of the stem.

The shank was cleaned with 95% ethyl alcohol, cotton swabs and bristle pipe cleaners.

Once the deoxidation process was completed I could see that the BARI logo was a gold looking paint. I decided to use Rub’nBuff Gold Leaf on it.

The Run’nBuff was applied with a fly tying bodkin and worked into the impressions.

The slightly dried gold leaf was then rubbed and buffed by hand. A little bit of the metallic gold was still present but I knew that the imminent Fine and Extra Fine Polish would remove that.

The stem was then hand buffed with Before and After Fine Polish on a soft cotton cloth.

The stem received a similar hand polishing with Before and After Extra Fine Polish.

I opted to use Renaissance Micro-Crystalline Wax rather than carnauba since some of the rustications from the sandblast were deep enough that I thought the carnauba would just accumulate too much in the pores. The Renaissance was applied with a baby toothbrush, allowed to dry for 10 minutes then buffed with a clean buffing wheel on the buffer. While at the buffer I applied several coats of carnauba wax to the stem and the smooth surface on the underside of the shank.

The final step was a hand buffing with a microfiber polishing cloth.
This Bari De Luxe 710 turned out beautifully. The stem, which I had my doubts about, restored very nicely and now has a glorious high gloss black finish returned to it. The sandblast of the briar is just lovely and delicate, fitting perfectly to the delicate curves of the stem and shank. Normally I like a slightly more robust pipe but the dimensions of this Bari fit well in hand and clenching it is easy and comfortable. The texture also feels very good. What more can you ask for from a pipe that looks as good as it feels? The dimensions of the Bari De Luxe 710 are:
Length: 5.75 in./ 146.05 mm.
Weight: 1.35 oz./ 38.27 g.
Bowl Height: 1.88 in./ 47.75 mm.
Chamber Depth: 1.58 in./ 40.13 mm.
Chamber Diameter: 0.72 in./ 13.17 mm.
Outside Diameter: 1.39 in./ 35.31 mm.
I do hope that you have found something here useful to your own pipe care, maintenance or restorations. If you like this sort of thing, please click the like and subscribe buttons. Thank you for reading the ramblings of an old pipe lover.
Below are some photos of the finished Bari De Luxe 710.


