

Photographed and written by
John M. Young
This is the second pipe of the Real American Pipe Smokers Facebook (RAPS & FB) group set of pipes. The first pipe of this series was a porcelain apple (). All three pipes will be given away to RAPS members in the near future. This one is a real treat for me to work with. I love to play/work with pipes with what I call crazy gimmicks. I’m sure that the inventors would call them “creative innovations”, or some-such, rather than crazy gimmicks – tomayto, tomahto. Whatever you call them I find these creations fascinating. Going all the way back to Charles Peterson’s 1890 patent for the reservoir in Peterson pipes. Okay, that one is NOT a crazy gimmick but a heavenly inspired stroke of human genius.

(US519135A – Charles peterson – Google Patents)
Hey, I have the title Nebraska Pete Geek, Certified Pete Geek (CPG) for a reason. I think the heyday for these “innovations” was from the turn of the last century to the 1960s. This was a time of far more people smoking pipes and a period where new materials, like plastics, were coming to market. The age-old issues of heat, “impurities” and steam had a myriad of cures put forward by imaginative pipe inventors.
Now, this Rettke pipe reminds me of two other pipes I have restored; the Samharra and the Needham pipes. All three share a similar double drilled shank.

(A SAMHARA Pipe Restoration – NebraskaPeteGeek)

(A Needham Restoration – NebraskaPeteGeek)
The Rettke is the most recent patent with a 1962 stamping. OK, I’m getting ahead of myself again, let me get back on track. This pipe was sent to me by RAPS member Jonathan “Fuzzy” Polak, along with two others. The pipe was stamped with RETTKE over WASHINGTON MO. on the left bottom and PAT. JUNE 12 1962 on the right bottom.
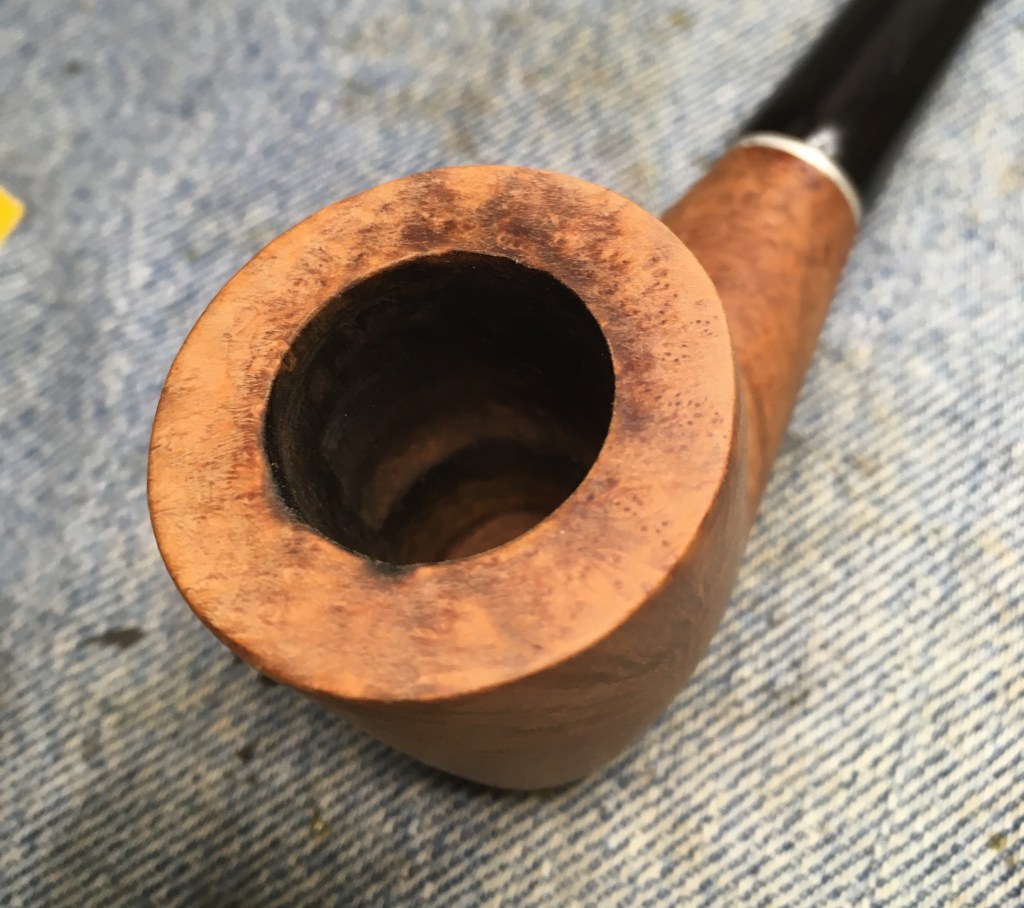
Below are some photos I took of the pipe prior to work beginning.


Overall the pipe looked to be in very good condition. The typical reaming and tobacco chamber sanding would be done. A thorough cleaning of the interior and exterior. Sanding of the stummel and a polishing of the stem. The exciting part, for me, would be the exploration of the drillings involved with making this pipe.
Background
I started my research on Rettke pipes with a pipedia.org search on “rettke”. Below is the short entry from that site.
“J. Rettke, Washington MO, PAT. June 12 1962. The silver colored thumbscrew below the stem unscrews and is a 2⅜” corkscrew like device. The company is now gone having been purchased by Missouri Meerschaum. This odd looking pipe is made of briar and has a lower chamber with a metal condenser and an upper chamber that contains a filter. The smoke leaves the bowl thru the lower chamber then into the upper and out the stem. It smokes dry and cool. It has a large bowl.”

(Rettke – Pipedia) I could not read the above newspaper article even by zooming in.
The next search was using Google patent and searching for “Rettke 1962”. This search turned up the original patent diagrams:

(1498404097506821639-D0194174)
My next search was for Steve Laug’s Rebornpipes.com. Steve Laug did a Rettke restoration back in 2017 and contained links to the State Historical Society of Missouri. I could not get this site to produce the same document or to even display the link Mr. Laug has in his blog post. I will link Steve Laug’s blog here: Restoring a J. Rettke Patent Pipe from Washington, Missouri | rebornpipes. It is a very well written and researched piece that does contain a transcript of the newspaper article as well as several photographs of Julius Rettke and the pipe making process.
My favorite quotes from the newspaper article are,
“The work is done in Mr. Rettke’s basement of his home at Third and Market streets. He doesn’t work at it every day only when he feels like it. He likes to fish and that comes before his pipes in the summer.”
I can completely understand the lack of enthusiasm for pipe work when fishing is taking a priority.
And this quote:
“Mr. Rettke received his patent on his pipe in 1962. What makes his pipe different from others on the market is the path the smoke takes from the bowl, and the passage of smoke through a twisted piece of aluminum, or a “whirler.” The smoke also travels through a standard filter in a standard hard-rubber stem. The “whirler” has a rubber tip that shows on the outside of the pipe under the stem. The “whirler” also can be used as a pipe cleaning tool. It pulls out easily for cleaning purposes.” Here the newspaper article talks about a rubber tipped “whirler”. That is how the whirler of my pipe is made. The other Rettke pipes I saw in photos all had a knurled aluminum tip. This little fact is mostly non-important, I just found it interesting.
Now for the fun part: How does this pipe work? In the news article transcript it said, “four holes are bored.” under the photo of J. Rettke at the drill press. I read that after I had done my exploration of the stummel and it was in near complete agreement of what I observed.


Using the above photo, I overlaid some image features to indicate the “four” drillings.

Not to be a smart ass, but I think Mr. Rettke would agree that there were actually 5 drillings. The final hole would be a hole at the bottom of the tobacco chamber connecting the airway to the lower chamber. I’ll blame the reporter for the oversight and not Mr. Rettke.
The Restoration
The Rettke made its way to the workbench and received its complimentary denim piece.

I started with cleaning the whirler, as Julius Rettke called it. There was a shellac like coating from smoking residue on the aluminum indicating that it did actually work.

The whirler was placed in a medicine cup with 99% ethyl alcohol and allowed to soak.

Using the same alcoholI started cleaning the two shank airways or, the upper and lower chambers if you are thinking about my amazing diagram from above.

This pipe had been used but not very heavily. The cleaning went quickly. Oh yeah, I also cleaned out the connecting airway with bristle pipe cleaners also dipped in ethyl alcohol.

I gathered the ream team.

The number 2 blades for the PipNet was the perfect size for most of the tobacco chamber, Julius Rettke may have had a custom drill bit for boring the tobacco chamber as it appeared to have a flat button and a slight taper at the bottom quarter of the chamber. According to the newspaper article he was a machinist for Missouri Meerschaum so who knows, maybe it was a custom built bit?

The photo below attempts to show the tobacco chamber’s shape after the reaming.

The below photo of the sanded tobacco chamber better shows the flat bottomed chamber. The chamber was sanded with 320 sandpaper wrapped around a wood dowel and with small pieces of sandpaper by hand.

The sten was placed into Briarville’s Pipe Stem Oxidation Remover and allowed to soak overnight.

The stummel was taken to the sink for a scrub with a nylon brush and undiluted Murphy Oil Soap. The soap was rinsed with warm water and the stummel dried with a cotton hand towel. The photo below shows how dirty the stummel actually was with the lather colored brown from dirt and maybe a bit of stain

Back at the workbench the stummel was wiped with a cotton ball dipped in 95% ethyl alcohol. A little bit more stain was removed but the wood grain looked very good. I also noticed that this pipe had no discernable fills. Thank you, Mr. Rettke for selecting quality briar.

I figured that I should give this pipe a full cotton/alcohol treatment due to the fact that there was additional length to the airway. I didn’t want any of the previous tobacco smoked to influence future smoking. I packed the tobacco chamber with cotton.

I then packed cotton into the lower, connecting and upper chambers. The cotton was then saturated with 99% ethyl alcohol and allowed to sit overnight.

The next day I returned to the workbench to find the alcohol had done its job of dissolving smoking residues then depositing those residues onto the cotton as it evaporated.

The cotton in both chambers looked as did the tobacco chamber.

Upon removing all of the cotton, I could see that the cotton/alcohol treatment was both needed and successful at removing more yuck from the airway.

I used alcohol dipped cotton swabs to clean the airways again.

The stem was removed from the Briarville solution and vigorously rubbed with a coarse shop rag.

I applied some Before and After Hard Rubber Balm to the stem to see how it would react with the vulcanite.

This is how the pipe sat for several days. I had a week-long trip to east Tennessee for family matters. When I returned I had all the post-vacation abandoned house/yard nonsense and some fishing to catch up with. I can say that the stem seemed to react positively to the time spent soaking up the Before and After Hard Rubber Balm. The restoration got back on track with a topping of the rim. 3200 and 400 grit sandpaper were used with the pieces laid flat on a countertop. I also used a wood sphere and 320 sandpaper to give the inner rim a slight bevel and conceal the two slightly charred spots.
The pipe stem was reattached to the stummel for the sanding. A series of sanding sponges in grits 320-3500 were used on both the stem and stummel. Between each sponge I wiped the stemmel with a cotton ball wetted with ethyl alcohol while the stem was rubbed with Obsidian Oil and wiped with a paper towel. These wipings were done to remove and sanding debris.

After the sanding the pipe was worked with micro-mesh pads 4000-12000. The same wiping between sponges was employed between pads.

The pipe was then coated with Before and After Restoration balm. This magic elixir was allowed to sit for 30 minutes. After the sit time excess balm was wiped away with an inside out athletic sock.

The pipe was then taken to the buffer for several coats of carnauba wax.

I placed a drop of Before and After Hard Rubber Balm on the rubber end of the whirler and rubbed it in. Yeah, this rubber is not “hard” but I figured that it would work well here too.

The whirler was reinserted and the entire pipe was hand buffed with a microfiber polishing cloth which raised the shine on this lovely pipe.
Of the many gimmick pipes I’ve had the pleasure of working on, I think this one would actually be an effective system for condensing steam. It just makes sense. That said, I did not try it out as it is intended to be a pipe given to a RAPS member. I did try the draw both with and without a new Medico filter and both were very nice. By the way, If you are interested in becoming a member give FB “The Real American Pipe Smokers” a look and join up with this interesting group of pipe smokers. This J. Rettke pipe has very pretty grain on the left and decent birdseye’s on the right. The Medico stem polished up well and can be used with or without a Medico filter. Looking closely at the stamp on the pipe’s bottom, I do think that the stamping should look like the other examples of Rettke pipes and read J. RETTKE. The J. is just too faint to be seen. Overall this is a very nice and interesting historical pipe. I would consider this an artisanal pipe from a time before artisanal was cool.
The dimensions of the J. Rettke are:
Length: 5.44 in./ 138.18 mm.
Weight: 1.49 oz./ 42.24 g.
Bowl Height: 1.93 in./ 49.02 mm.
Chamber Depth: 1.51 in./ 38.35 mm.
Chamber Diameter: 0.73 in./ 18.54 mm.
Outside Diameter: 1.36 in./ 34.54 mm.
I do hope that you have found something here useful to your own pipe care, maintenance or restorations. If you like this sort of thing, please click the like and subscribe buttons. Thank you for reading the ramblings of an old pipe lover.
Below are some photos of the finished J. Rettke pipe.


2 responses to “A Rettke Pipe Restoration for the Real American Pipe Smokers (RAPS) Facebook group”
[…] laid eyes and hands on a Rettke pipe in July of 2025. You can see that entire restoration here. I was taken by the rather nontraditional, double drilled shank, of the pipe. These pipes are […]
LikeLike
[…] the lower chamber. I’ll blame the reporter for the oversight and not Mr. Rettke.” (A Rettke Pipe Restoration for the Real American Pipe Smokers (RAPS) Facebook group – NebraskaPeteG…). It seems weird to quote myself but, I’m far too lazy to rewrite all that. Feel free […]
LikeLike